Cajun Rice to Feed a Horde.

Or At Least Everyone You Know And Love

I Don’t Care! Take Me To The Recipe!

We're making Cajun Rice this week! For anyone that knows Cajun food, you know it's a highly subjective food with recipes being very subjective. We've tried to make our recipe a bit more standardized, but you can still add or take away as you see fit. This week's recipe is for feeding a crowd. So grab your largest pot and get ready to make some food that will have everyone asking "hey, when are you going to make that again?" 

Ingredients:

2 Large Green Bell Peppers

2 Large Red Bell Peppers

1 Large Yellow or Orange Bell Pepper

1 Medium Yellow Onion

2 Stalks of Celery 

4 Roma Tomatoes

2 Tbsp Salted Butter 

2 cups Long Grain Rice *

4 Cups of Chicken Broth *

2 cups of black beans ( cooked, or canned and drained) 

2 Links of Smoked Sausage 

3 Large Chicken Breasts

1 lb of De-veined shrimp 


Spices: +

  • 1 teaspoon garlic powder

  • 1/2 teaspoon ground thyme

  • 1 teaspoon ground paprika

  • 1/4 teaspoon black pepper

  • 1 teaspoon kosher salt 

  • 1 bay leaf

  • *1/2 teaspoon of cayenne pepper

Tools: LARGE pot, cutting board, chef's knife, measuring bowls, large bowl for holding foods during prep, long handled spoon. 

*Since this recipe is (in theory) sized for feeding 4-5 people, if you want to buff it up, it's going to be the rice and the stock that are the easiest to add to. For every 1/2 cup of dry rice that you add, add a full cup of stock for the recipe. 

+ Spices, much like the recipe as a whole, are very subjective. So, if you want to add things in, go for it. Just remember to always go with a little bit at first before adding more. 

Recipe

Start by grabbing your cutting board, and laying your veggies out. You'll want to be careful about cleaning out the peppers as the seeds are horrible when cooked. Cut the tops of your peppers off, cut them into either quarters or thirds, depending on the number of bumps on the bottom of the pepper. Remove the pith and the seeds, and set them aside for your favorite gardener. Now cut them into strips, about a 1/4 wide, and cut each strip into chunks. Do this with all of your peppers and toss them into a bowl for the time being.  

Grab your yellow onion and dice that up into a consistent dice. Next up grab your celery and slice it up into consistent slices.  Add both of those into the bowl and give everything a quick toss. 

Chop up your tomatoes and set them aside in a separate bowl for the time being, we'll come back for those later. 

Now, grab your bowl of peppers and onions and head over to your stove. Turn on the heat to high and toss 2 tablespoons of butter in, letting that melt down. Once it's melted, add in your vegetables and grab your spoon to start turning. You want to sauté the veggies until the onion is transparent. 

Now, scoop out your veggies and set them to the side. Give your cutting board and knife a quick wash and grab your various meats.  If you haven't cooked your sausage and chicken already, grab a separate pan and do that now. Make sure to wash the pan after every round to ensure food safety. Check the bottom of the page for temperatures for both meats. 

 If you've already got your meats all cooked to the appropriate temperatures, it's time to chop them up. 

For your sausage, slice it into 1/4 slices, and then chop those in half. 

For your chicken, go ahead and slice the chicken breasts in half width wise, and then cut them into chunks about an inch in size.  (So, essentially, you'll butterfly your chicken at first.) 

Once that's taken care of, add your broth and spices to the pot and give everything a quick stir.  Turn the heat to high and wait until your pot begins to boil. At that point,  grab a spoon and give it a quick taste. Does it taste good? Do you need to adjust the spices? Do that now. 

Now, add in your rice give it another stir, and let the pot come back up to a boil. Once it's boiling again, turn the heat down to low, add in your sausage, chicken, beans, tomatoes and shrimp and put the lid on. Keep it on low for 25 minutes, giving it a stir every 5 minutes or so, or until all of the liquid has been absorbed into the rice. 

Once the time is up, push everything to the outer edges and see if you can find any additional broth on the bottom. If you can, then you need to keep cooking for 5 more minutes, making sure to keep the lid on. If not, tell everyone to come to the table, because the meal is ready. 

Let us know in the comments below or over on our Facebook if you decide to give this a try! We’d love to hear how it goes and anything you add to it. 


If you ended up here because you need help with your refrigerator, washer, dryer, stove, oven or any of your other major appliances, we can still help. In fact that’s kind of a real business. We just provide recipes for fun. So, if any of those major appliances have broken down recently, or are just acting funny, we can help get your them back into tip-top shape. Give us a call at ((214) 599-0055) or visit our appointment page.

True or False : 18 Things You Thought Could Go in The Dishwasher

How Good Are You At Knowing The Difference For What Can Go Into Your Dishwasher?

We've all had to check the internet for whether something could go into the dishwasher or not. It's late (or really early) and you just want to get the dishes done with so that you can go on with your day. Dishwashers are supposed to make things easy right? Just load it up and let it run. Unfortunately there are many things that just don't belong for a variety of reasons.  Test your prowess with our quiz below to see just how many you know. 

Let’s Get Started

+One - Insulated glasses, tumblers, and thermoses

False!

+Two - Bathroom accessories

True! Scrubbing your toothbrush clean can be gross. You've got toothpaste which feels so gross when it's wet, and just icky when you try to scratch it off. You've got soap residue which is slimy when wet and gross and sticky when dry. Then you have mold that can build up due to how warm and wet it gets in your bathroom. (Unless you're taking cold showers every day? Some people do.) Fortunately, your dishwasher is here to save the day. You can toss in all sorts of things from your bathroom, and they'll come out clean all without having to get things built up under your nails.

+Three - Acrylic dishes

False!

+Four - Plastic Hairbrushes

True! Have you ever looked at one of your hairbrushes after taking off the hair and noticed that it still had buildup on it? That's a mix of styling proucts and the natural oils from your scalp. Thankfully, you can get rid of that by putting it through the dishwasher. Ideally, you'd do this once a month. Just make sure not to do this with wooden hair brushes or ones with natural boar bristles. Both can be damaged by the soap and the hot water from the dishwasher.

+Five - Ashtrays

False! Ash trays are covered in, well, ash. Because of how fine that is, it can become clogged in your dishwasher's filter and lead to a dishwasher that just won't drain. We suggest using soap and an old toothbrush if you want to get your ashtrays looking good as new.

+ Six - Baseball caps

True! Oh no! Some jerk at your kid's football game got mustard on your baseball cap. It's cool, your dishwasher can clean it right up. Don't put soap on it, just rinse with cold water and put it on the top rack. We will say that you need to double check what the brim is made of first though. If it's a newer cap, you should be fine. But many older caps had cardboard brims and that can't go into the dishwasher.

+Seven - Wineglasses

False! While there are many glass makers that claim their wares can go through the dishwasher, this is only true on a technicality. While the glass can stand up to hundreds of cycles with harsh detergents without being damaged, they can't stand up to the dishwasher itself, or human error. Yup. Whether it's the glass being taller than the dishwasher itself or glasses being rattled around and shoved against the tiens and each other, it's very likley that your wine glasses will end up broken by putting them through the dishwasher.

+Eight - Ceramic knives

False! Not only will your ceramic knives likely catch on the coating of your rack, but they can also chip from being jostled around druing the wash cycle.

+Nine - Vacuum Cleaner Attachments

True! Since they're made of a heavy duty plastic, most are dishwasher safe. Make sure to double check your owners manual first, but if they give the all clear, you can run a load of just the different attachments and brushes and get them nice and clean.

+Ten - Lead Crystal

False! Crystal is heat sensitive, so it's very prone to cracking, and detergent can cause them to chip. Most importantly, lead can be leached out of your crystal, leaving them cloudy, and if it's not all washed away, potentially hazardous to your health.

+Eleven - Kitchen Tools - Metal and plastic only

True! Many of the things you use around your kitchen can be put through the dishwasher to be cleaned and sterilized themselves. Sponges, scrub brushes, drain plugs, sturdy plastic cutting boards or drainage trays, even plastic or metal shelving you have around the kitchen can go through the dishwasher provided you make room for it.

+Twelve - Flip-flops

True! Just getting back from the beach and you want to get your flops clean again? No worries. Your dishwasher has you covered. Rinse off any remaining dirt, mud, or sand either in your kitchen sink or and then loop the tongs around one of the tines on the top rack. Turn the dishwasher on like you normally would and you're good to go! Your flops will be looking lovely in a short run cycle.

+Thirteen - Wood -

Includes wooden spoons, bowls, chopping boards and wooden-handled knives. False! Wooden tools will absorb water and crack over time. It won't show at first, but the water will seep in and force the fibers of the wood apart slowly, until eventually the pieces split apart. So unless you're keen on splinters, we advse washing these lovely tools by hand.

+Fourteen - Refrigerator Components

True! Do you have any removeable bits in your refrigerator? The fruit and veggie drawers, that removeable butter tray, the shelves that you can move around for maximum storage capability? all of those can go into the dishwasher. Every three months or so is a great way to keep your dishwasher clean and sparkly. Now, if there are any metal shelves, you'll want to make sure that they're coated in rubber so that they don't chip the inside of your dishwasher. Make sure to dry them completely before with a microfiber cloth to keep them from growing mold.

+Fifteen - Gardening Tools

True! While you might usually give them a quick rinse outside in between uses, a more thorough cleaning is good before you put them away for winter. To that end, rinse off any leftover dirt, and make sure they're not aluminum before popping them in. Make sure to dry them by hand with a clean towel once they're out, and thoroughly to prevent rust.

+Sixteen - Pewter

False! Pewter is a very soft metal, with a melting point of just 400* Farenheit. It's all too easy for it to be warped by the heat of the dishwasher. On top of that the soaps you use or the foods you eat can cause pewter to become discolored.

+Seventeen - Graters and Sieves

False! The blades on the bottom of your grates have sharp edges that can either corrode or break off in the dishwasher. Seives on the other hand are more likely to rust.

+Eighteen - Metal Vent Covers

True! If your top rack is removeable you can send these through the dishwasher every six months, not only will they look nicer, but they'll also do better at keeping your house free from dust. Be sure to dry them completely before reinstalling them.


Points Total

1-6 - Dishwasher Beginner

7-12 - Kitchen Adept

13-18 - Ruler of the Dishes


So? How did you do? Let us know in the comments below or over on our Facebook page!
If on the other hand you ended up here because you ran one of these things through your dishwasher and now your dishwasher is spitting suds at you, we can help. Just give us a call at ((214) 599-0055) or go to our contact page to set up an appointment. At Appliance Rescue Service, we’re here to help. 


Additional Reading: 

Help I melted Plastic in my Dishwasher 


Banana Cake Bonanza

So You Need To Use Up The Bananas You Have

I Don’t Care! Take Me To The Recipe!

Ingredients

Cake:

2 cups all-purpose flour

1/2 teaspoon baking powder

3/4 teaspoon baking soda

1/2 teaspoon salt

1/4 cup buttermilk

1 cup mashed bananas

1/2 cup unsalted butter, softened

1 1/2 cups sugar

2 eggs, lightly beaten

1 teaspoon vanilla extract

Banana pudding:

3 cups milk

1 cup sugar

2 tablespoons cornstarch

1/4 teaspoon salt

6 egg yolks

2 teaspoons banana or vanilla extract


Banana frosting:

1 banana, smashed

1/2 cup whole milk

3 cups powdered sugar, sifted


Alternate Topping Option: 

Three bars of your favorite (plain) milk chocolate

2 cups of heavy whipping cream

Instructions:

Banana cake: 

Go ahead and preheat your oven to 300*F and gather up all of your ingredients. (Trust us, this makes it SO much easier, and you feel very TV-Star-Chef like. It's a good feeling.) 

Grab three separate bowls all of the same size.  In the first one, you're going to sift your flour with a fine sieve. This gets air into the flour as well as breaking up clumps, which is important for a cake like this. Once that's done, mix in your baking soda, baking powder and salt. 

Example of sifted flour for making banana cakes

Grab a second bowl and toss in approximately two large bananas. If you'd like to measure them precisely, we advise using another bowl to mash them and then measuring one scoop at a time. Give them a thorough smashing with a fork, and then add in the buttermilk. 

Using a stand mixer or a hand mixer, cream together your butter and sugar until it's pale, fluffy, and fully incorporated. You will want to start off on low so you aren't inhaling sugar and slowly work your way up. Once you've got it nice and fluffy, add in your eggs and vanilla and continue to mix. 

Next up is adding the dry ingredients and the banana a bit at a time. Alternate back and forth between them. until your dough is nice and thick, but it should also have a smooth consistency. 

Batter consistency for making banana cakes

This is what the consistency and smoothness of your batter should look like by the end of things, although, we will point out, your bowl should be much more full than this. We forgot to grab a photo prior to filling up the muffin tins.


Now, a quick discussion of forms for the cake. You can use muffin tins, or an eclair pan, or you could do something crazy and use that Star Wars tin that you got for Christmas from the company White Elephant. BUT whatever you do, there's two things you need to make sure of. 1) Your form needs to be only 1/2 full when you make these. The batter will rise and you will end up with what looks like cookies on top of your cake otherwise.  That turned out fine for us in our initial tests, but if you're wanting exactly what we offered, then you're going to need to make sure the tins are only 1/2 filled.  (ask us how we know that one!

Once you've filled your cake forms of choice, pop them in the oven for 25 minutes, rotating your pan (or pans) halfway through the cooking time. 

That /should/ be enough time BUT we advise checking with a fork or toothpick stuck in the center. If your testing implement comes out of the cake clean, great! You're done. If not, turn the pan, and leave it in there for another 2 minutes. Continue the process of testing and turning every 2 minutes until it /does/ out clean. 

Once they're done, allow them to cool completely, and we'll move on to making pudding! 

A preface for this section. Please, read all of the instructions carefully. Puddings are tricky beasts and they are just as easily destroyed as souffles. Our first attempt at making this ended up with cooked egg and grainy bits. Even after sieving the pudding could not be saved. You have been warned.

To start with, grab your six eggs and crack them into a pyrex bowl or measuring cup, preferably one that has room for more than just those six eggs. In a small saucepan, combine milk, sugar, cornstarch, and salt, mixing thoroughly. Cook over medium-high heat if you've got an electric stove, or medium low if you've got a gas stove.  Do this until it thickens and bubbles begin to form on the surface. Reduce the heat to low and cook it for two more minutes. Remove the pan from the heat, and grab your ladle. Carefully pour one scoop at a time of the milk mixture into the eggs, using a whisk or fork to mix thoroughly. Go slowly, and add about 1/3 of the milk mixture to the eggs.  MAKE SURE TO MIX THOROUGHLY and that you've brought the temperature of the eggs up to (roughly) the same temperature of the milk mixture. Once that's been reached, add the egg mixture into the pan and put that back on the heat, allowing it to come up to a gentle boil. Cook that for 2 minutes, stirring constantly. (and yes, we mean /constantly/. You don't have to whisk it so hard it flies out of the pot at you, but you do have to keep the mix turning constantly or else you'll end up with the bottom scorched. 

Making pudding for the first time for banana cakes

NO, this is NOT what your pudding should look like. We’re including this image for the horror factor. Don’t let your pudding end up like, and carefully follow the steps we’ve outlined, please.

Remove the pan from the heat and add in your extract of choice. (We chose vanilla when we made it, to give some balance to the banana cake.) Pour your pudding into a clean heat proof dish and allow the pudding to come down to room temperature. Then pop it into the refrigerator to continue cooling completely. 

For your frosting:  If you're going with the banana option: 

Grab a full banana, smash it up and then add it to a blender. Add in 1/2 cup of whole milk and blitz it until the mixture is fully liquid. Pour that mixture into your third bowl from earlier and whisk in the sugar one cup at a time. 

If you're going with the chocolate topping: Grab a clean, completely dry saucepan, and pour in 1 cup of cream, reserving the other half. Put the heat on low and allow the cream to come up to heat slowly while you chop up your chocolate. You're looking for small pieces, so if you get slivers while you're chopping, that's perfectly fine. 

Once you've got it all chopped up, add it to the cream, and bring your heat up to medium-low, stirring constantly. Just like before we don't want the cream to scorch. Once your chocolate has fully melted and you don't see anything solid any longer, that's when you need to make some choices. How thin you want your icing is going to decide how much of that second cup you need to add. If you want a ganache, keep it as is, don't bother adding any more. If you want to thin it out, add a little bit of the cream at a time, fully incorporating it until you are satisfied with how thick it is. Once the proper thickness has been reached, pull it from the heat and keep stirring until it's cooled down to room temperature. 


So, has everything rested/cooled/set? Yes? Then it's time to put it all together!! :D Grab a large piping tip, and set up a bag with your pudding inside it. Now, grab one of your muffins and inject the pudding in the center if you have a muffin, or in 3 places if you have an eclair shape. Put it onto a plate or cooling rack on a cookie sheet, and do the same to all of the other cakes. Once that's done, it's time for your frosting of choice.  Spoon that over the top of each cake and enjoy! 


We know there were a lot of warnings and choices that you had to make for this week's recipe. We just wanted to make sure that you were able to learn from our (many) mistakes and ended up with a delicious food. If you /did/ end up with a delicious treat, consider showing us over on Facebook? If you ended up with a horrific mess, well you can show us that too! 


If you're here because your stove threw a horrendous hissy fit during your attempt to make this (how /did/ you manage to get icing there?) that's ok!* You can give us a call at ((214) 599-0055) or set up an appointment with us on our contact page and we can help you fix it and get your home running smoothly again.


Additional Reading 

A SWEET-TART CAKE TO BEAT ALL THE PIES

MONKEY BREAD, MONKEY BRAINS, PULL-APART BREAD, IT ALL TASTES GOOD!

SPOOKY & HAUNTED HALLOWEEN DESSERTS

SLOW AND EASY SUNDAY STUFFED FRENCH TOAST


*Appliance Rescue Service does not accept any blame for things that may have gone wrong during the process of making this recipe. We are not liable if you opt to not follow the warnings we give, or forget to follow safety measures.

What You Want to Know About Heat Pump Dryers

Back when we were doing our Deep Dive on Dryers, we mentioned a type of dryer that many of our readers weren't familiar with, the Heat Pump Dryer. People had no idea what we were talking about, which isn't necessarily a bad thing, as it means we get to introduce you to something new.  This week we're taking a closer look at this interesting dryer type and seeing if they can fit into your home. 

What Is A Heat Pump Dryer?

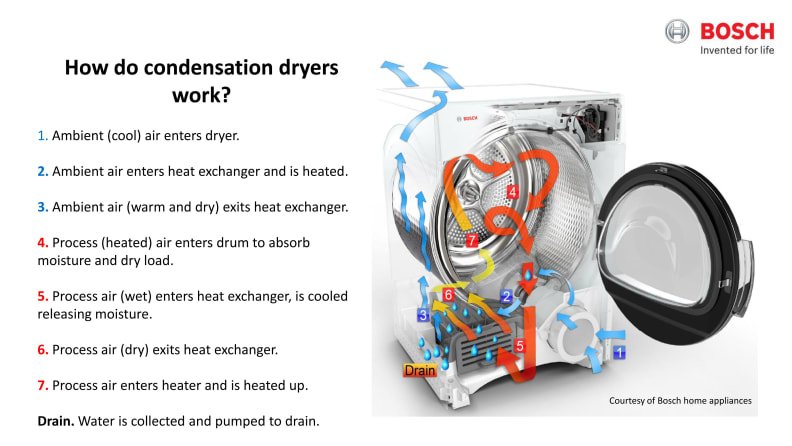
A heat pump dryer is a dryer that works on a closed loop. It draws air in, heats it for drying the clothes, and pushes that into the drum. 

Once the air has become full of moisture from the clothes, it's filtered for lint and pushed into an evaporator to cool and have the water drawn off. That evaporator system heats up on the outside though and that heat is reused to heat the now cool, dry air.  That air then goes back into the drum to start the process all over. 

The water that was drawn out of the air is pumped out through the same drain that your washer uses, which means that you don't have to worry about emptying a collection reservoir or anything. 

A diagram showing how a heat pump dryer works to draw in air, heat it, remove water from it using a condenser and then put the air back into the dryer

How is A Heat Pump Dryer Different?

The two biggest differences to your usual dryer are tied together, the vent or ducting and how the air is used. On a standard electric or gas dryer the air comes in, it gets heated by a coil or a flame and then is pumped into the drum. When the air becomes saturated with moisture that's pumped back out, into the vents and pushed outside of your home. This has led to all sorts of problems that we've talked about before for vents becoming clogged and full of lint. Because the heat pump dryer reuses the air over and over, that external vent isn't needed. There is some loss of air, but not enough that it needs a separate duct to go outside of your home.  

A heat pump dryer is also considerably more energy efficient than your standard dryer since the air is used over and over and the different steps serve multiple purposes at the same time. 

A heat pump dryer also works at a lower temperature, which means that it's easier on your clothes as it runs. 

What do I Need to Know Before Installing A Heat Pump Dryer? 

- They Do Cost More

As of right now a heat pump dryer does cost more. Because this design of dryer is relatively new by comparison to electric and gas dryers, they're still more expensive to purchase. However, since you end up saving on your electricity bill, that does weigh against the initial cost. 

-They Do Have A Smaller Capacity

Because of all the different pieces that go into making the dryer run, there's less space for the drum. So for the time being, most heat pump dryers are more 'compact' in terms of how much they can handle. So no, if you've got a large or active family, we wouldn't suggest getting this. 

- You Can Stack Them

Yup! If you're short on space, or you want to make it easier to get things in and out of your dryer, you can get a stacking kit for your heat pump dryer. 

-What About Wall Mounting A Heat Pump Dryer? 

Sadly, no. Because of how much a heat pump dryer weighs, you can't attach them to a wall. Even with brackets, they're too heavy to stay safely suspended. 

-What Are Some Brands That Make Heat Pump Dryers? 

Some of the brands that you can find a Heat Pump Dryer with are: LG, Miele, Whirlpool, Beko, Samsung and Bosch.

-Is There Anywhere I Can't Install A Heat Pump Dryer? 

Yes. As of right now, you cannot install one on the moon or in sitting pools of water. Jokes aside though, we would avoid areas that you know are cracked, uneven or prone to flooding. You'll also want to make sure that the electrical outlet is a high enough voltage that it can handle the power draw. Although as we've said the Heat Pump Dryers are very efficient, they are still going to draw more energy than what a standard outlet can provide. 


With all of that in mind, what's next? Do you think you'll end up getting a heat pump dryer for your home? Why or why not? We'd love to hear your thoughts on the matter in the comments below or over on our Facebook page. 


If you ended up here because you already have a heat pump dryer and it's on the fritz, no worries! We can still help. Just give us a call at ((214) 599-0055) or reach out to us over on our contact page to set up an appointment. No matter which of your appliances is acting up, we'll be happy to work with you to get your home running smoothly again. 


Additional Reading: 

Dryer Deep Dive

6 Things Your Should Never Put In Your Dryer

Why You Need To Clean Your Dryer Vent 

9 Things Your Dryer Hates

9 Electric Dryers At 3 Different Price Points

Our 9 Favorite Home Design Trends For 2022

Here Are The Trends We're Hoping Make It Big This Year 


Table of Contents

Closed Floor Plans

Parisian Inspired Interiors 

All Of The Texture

Colorful Tableware

Curved Furniture

Resourcefulness/Sustainability

Home Bars

Patterned Floors

Where  Did The Cabinets Go?

It's that time of year again when we're all trying to figure out who's doing what with their homes. Are open floor plans in or out? What about all-white kitchens? Are we still doing cottage chic or is it fairycore this year? When you're looking at your house at the beginning of the year, it's easy to be distracted and overwhelmed, trying to figure out what you want to do. Trends come and go and you have to figure out what you want your home to look like. What aspects of you that you want to show off. It's fun to just look through and see what you like vs what you don't. That's what this week's post is taking a look at our top 9 design trends that we think are going to go big this year.

Photo Credit: Redfin.com

Closed Floor Plans

We mentioned this one in our trends for 2021 and we weren't wrong! As our homes do more and more work, we're learning to partition them into different spaces to serve those needs. Being able to mentally partition them also means that we're less likely to get distracted as we work in those different spaces, or be as stressed from the overlapping segments of our lives.


Photo Credit: Hommes Studio

Parisian Inspired Interiors

Just because most of us haven't been able to make use of our passports, doesn't mean we can't dream. One of the rising trends right now is a modern take on Parisian interior designs. Think of an open room with lots of natural light. Bring in pastels and metallics to create the look, and hints of colored crystal and glass to make the room glow. If you want more ideas, check out this article we found over at Shelterness for how to pull off the look in your own space.

Layered rugs of a woved fiber and a soft faux fur

Photo Credit: The Fox & She

All Of The Texture

Whether you're looking at a calming sea of neutrals or a riot of colors, texture can make a room feel more inviting. We're going to see more and more of that this year, and not just in terms of throws and pillows. Everything from woven furniture and decor to layers of velvets and cottons brings a very welcoming atmosphere to a room.


Colorful Tableware

Have you ever realized how much time you spend at your dining table? Yes, everyone is different here, but a lot of us have started to spend more time at our dining tables again to just enjoy food and being with each other. Between that and the uptick in small at-home gatherings, people are realizing again that how you set your table says just as much about you as what you serve. You can express all sorts of things about your home just by how your decide to set your table, from colors to patterns, to materials. And companies have noticed that. More and more you're able to pick up mix and match flatware, tableware, glasses, napkins and more. The best thing? You don't have to finish a set all at once, or at all if you're not into it. If you want to just pick up a few pieces here and there, you can do that to grow your collection. If you want to grab the flatware from this set and the glasses from that one and salad plates from a third? Go for it. This is all about you. You can even start with small things like napkins, candlesticks and salad bowls if that's an easier place for you to start.

Curved Furniture 

This one was big in 2021 and we don't see it changing this year. We're still going hard on the idea of making our homes softer and more comfortable as we try to deal with the way the world is. So why shouldn't our furniture reflect that? We think we'll continue seeing this not only in how soft furniture is or how cushioned, but also in the overall shapes of different pieces. Backs, arms and even the overall shape of furniture will continue becoming more rounded, which all of our toes and shins should be thankful for.  Although it definitely makes it more difficult to plan in a square house, we're excited for where this trend is going.


reclaimed wood cabinet

Resourcefulness/Sustainability 

You've heard us talk about the microchip shortage before, and that's unfortunately still going on, as are supply chain issues. What's interesting is that this shortage of material is having a boom in terms of crafting, recycingl and reusing things we already have. So many people are remaking and updating many different things they already have into entirely new types of home goods. 

It's also meaning that people are taking a closer look at where the things they're purchasing are coming from. They want to see where materials are sourced from, and that they're designed with sustainability in mind from beginning to end. 


Photo Credit: House Beautiful

Home Bars

Whether you're going for a dry or wet bar, we see these becoming a very integral part of home decor and life again over not just the next year but the coming decade. Especially since companies are coming up with things like the at home bar system like the Barsys 2.0 Cocktail Machine.  At home bars are a great way to have a few close friends over to sit and relax without having to worry about pandemics or overly loud bars.


Photo Credit: Interior Design Trends

Patterned Floors

If you're looking at adding texture to a room, but you're not sure where to start, a great option is with your floors. Work from the ground up to transform a room, and you'll know that you're standing on solid ground. Ok, we're done with the puns. 

More seriously though, why restrict patterns to countertops, backsplashes and the walls? We've said before that your ceilings and floors add just as much to a room as those areas, so you might as well utilize them. Fortunately, there are plenty of ways that you can do just that. 

 You can bring in all sorts of influences in without having to bring in furniture, textiles or even paint.  Instead, grab some peel and stick reusable tiles for your floors. Whether it's your kitchen or your bathroom, your living room or parlor, there are so many different options available to you.  Or you could work with reclaimed materials to piece together a pattern entirely unique to your home.  Check out flea markets to grab some great reclaimed materials, that you can then give new life.


Photo Credit: Best Online Cabinets

Where Did The Cabinets Go? 

We will happily admit we didn't see this one coming when we were looking at trends last year. So many people talk about not having space for storage in their homes, and yet people are getting rid of their upper cabinets. It might be because people are wanting to simplify their homes and reduce the amount of clutter. Alternatively, it might be because then you have less space to clean if there aren't any cabinets. Whichever it might be, expect to see more of this trend throughout the year ahead as kitchens in new builds and magazines ditch the upper cabinets. 


That's it for us, our top ten trends of the year that we're looking forward to seeing more of. What about you? Were you surprised by any of these? Do you think we're wrong? Let us know over on our Facebook page or in the comments down below! We want to hear your take on the trends of 2022. 

If you're tired of talking trends though and just want something that works, we can still help. If you've got an oven that won't hold heat or a washer that leaks, we can help. Give us a call at ((214) 599-0055) or visit our contact page to set up an appointment. We'll work with you to diagnose and fix the problem so that your home can start running smoothly again.  We serve everywhere between Dallas and McKinney, from Coppel to Garland, and we're here to help you. 


Additional Reading 

Top 7 Kitchen Trends of 2021

2020 Design Trends: Big Or Bust?

2000s Kitchen Decorating Trends That Overstayed Their Welcome

So What If They Can’t Get Their Chips? 

5 Kitchen Tools From The Future