Leftovers

From Dessert to Breakfast Bliss: Lemon Cake French Toast Delight

Easy Steps to Turn Leftover Cake into Breakfast Bliss

Have you ever bought or made a cake for an event or even just because you could, expecting it to disappear... then realized later that basically all of the cake was still there? Maybe you didn't have the turnout you expected. Maybe your family just wasn't terribly interested in the cake. It doesn't much matter why, but somehow you have a whole cake sitting there that you aren't about to scarf on your own.


That's us this week. We got a lemon cake from the grocery store, cut it up, and that was about as far as it got. So now we have 97% of a lemon cake and we...  Well, we don't like lemon cake enough for that silliness. 


Time to get inventive! Thus, lemon cake French toast with blueberries.


Full disclosure: we used a two-day-old cake for this, not a fresh one, and it is assuredly store-bought. It's significantly sweeter and softer than the average homemade cake. It did not do the drying around the edges thing that a homemade loaf or bundt does when cut. If you work with homemade, the best way to get the same texture we did is to work with it fresh and not let it soak up too much of the custard.
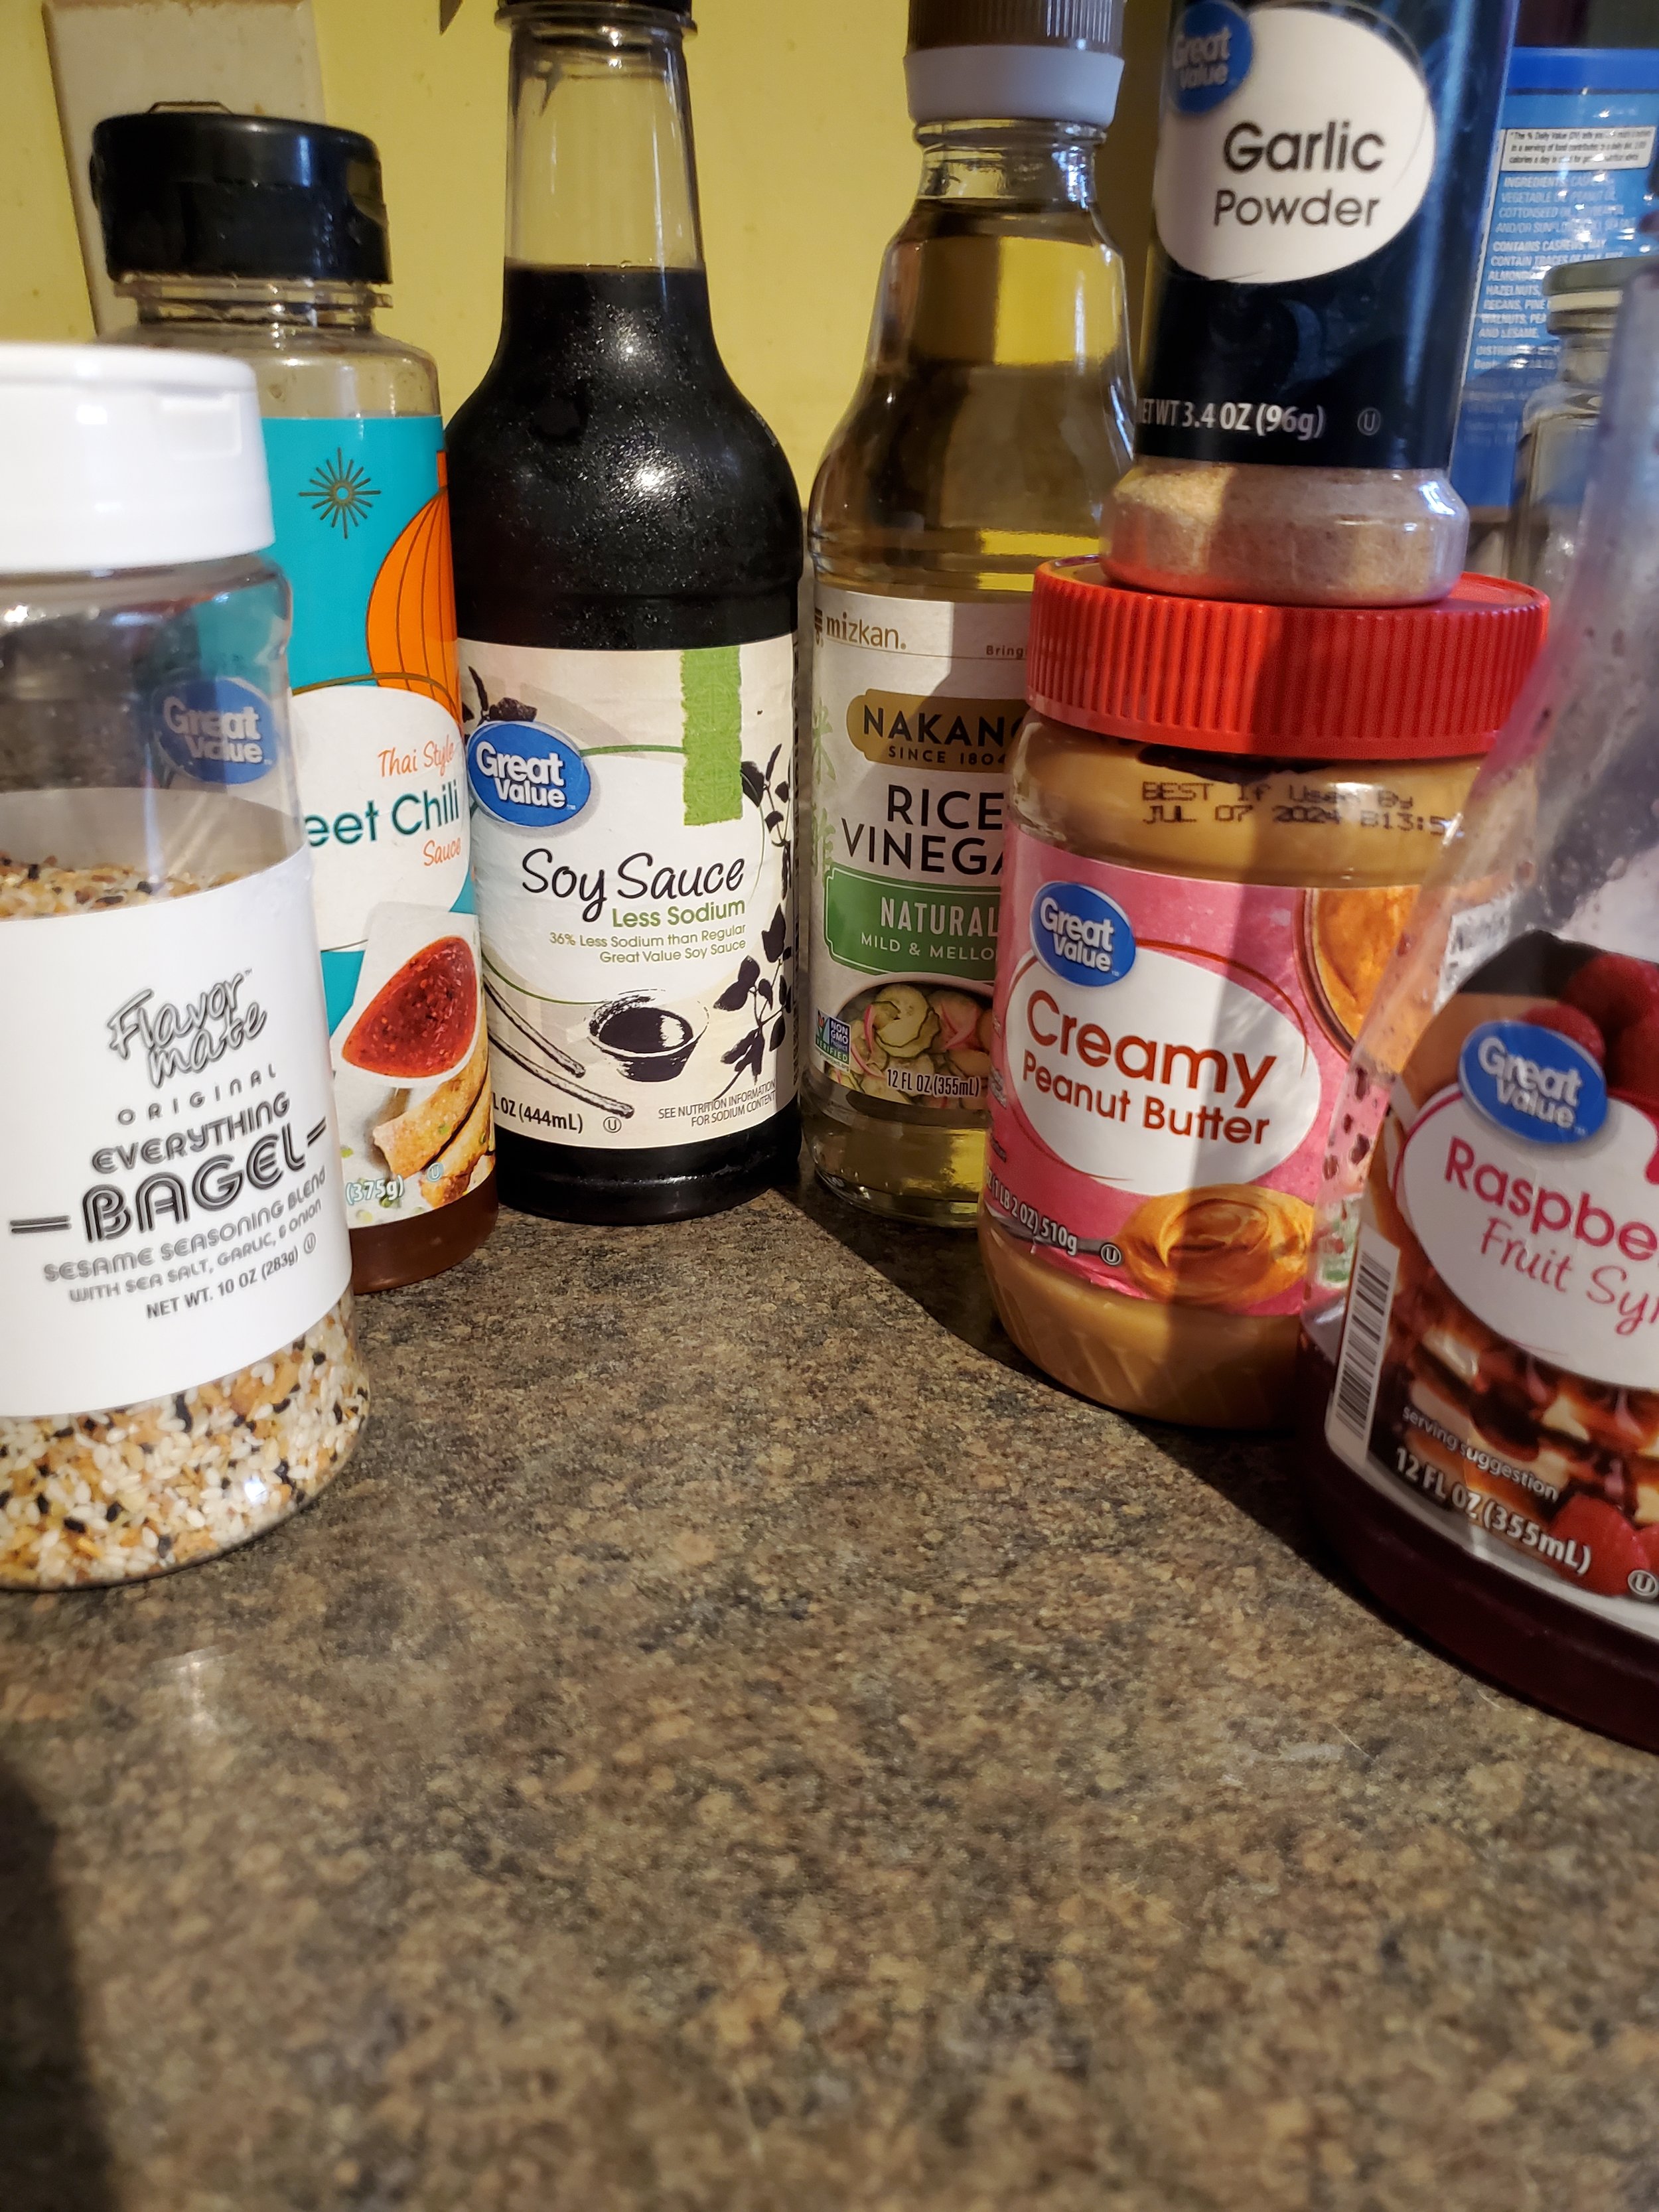

Ingredients:

3 eggs

1/4 cup milk

Pinch salt

Salted butter

Lemon cake


2 cups frozen blueberries 

1/4 cup water 

1 tablespoon lemon juice

1 teaspoon vanilla extract


Tools:

Mixing bowl

Spatula

Spoon, knife, fork

Measuring cups and spoons

Heavy bottomed skillet 

Saucepan with lid 


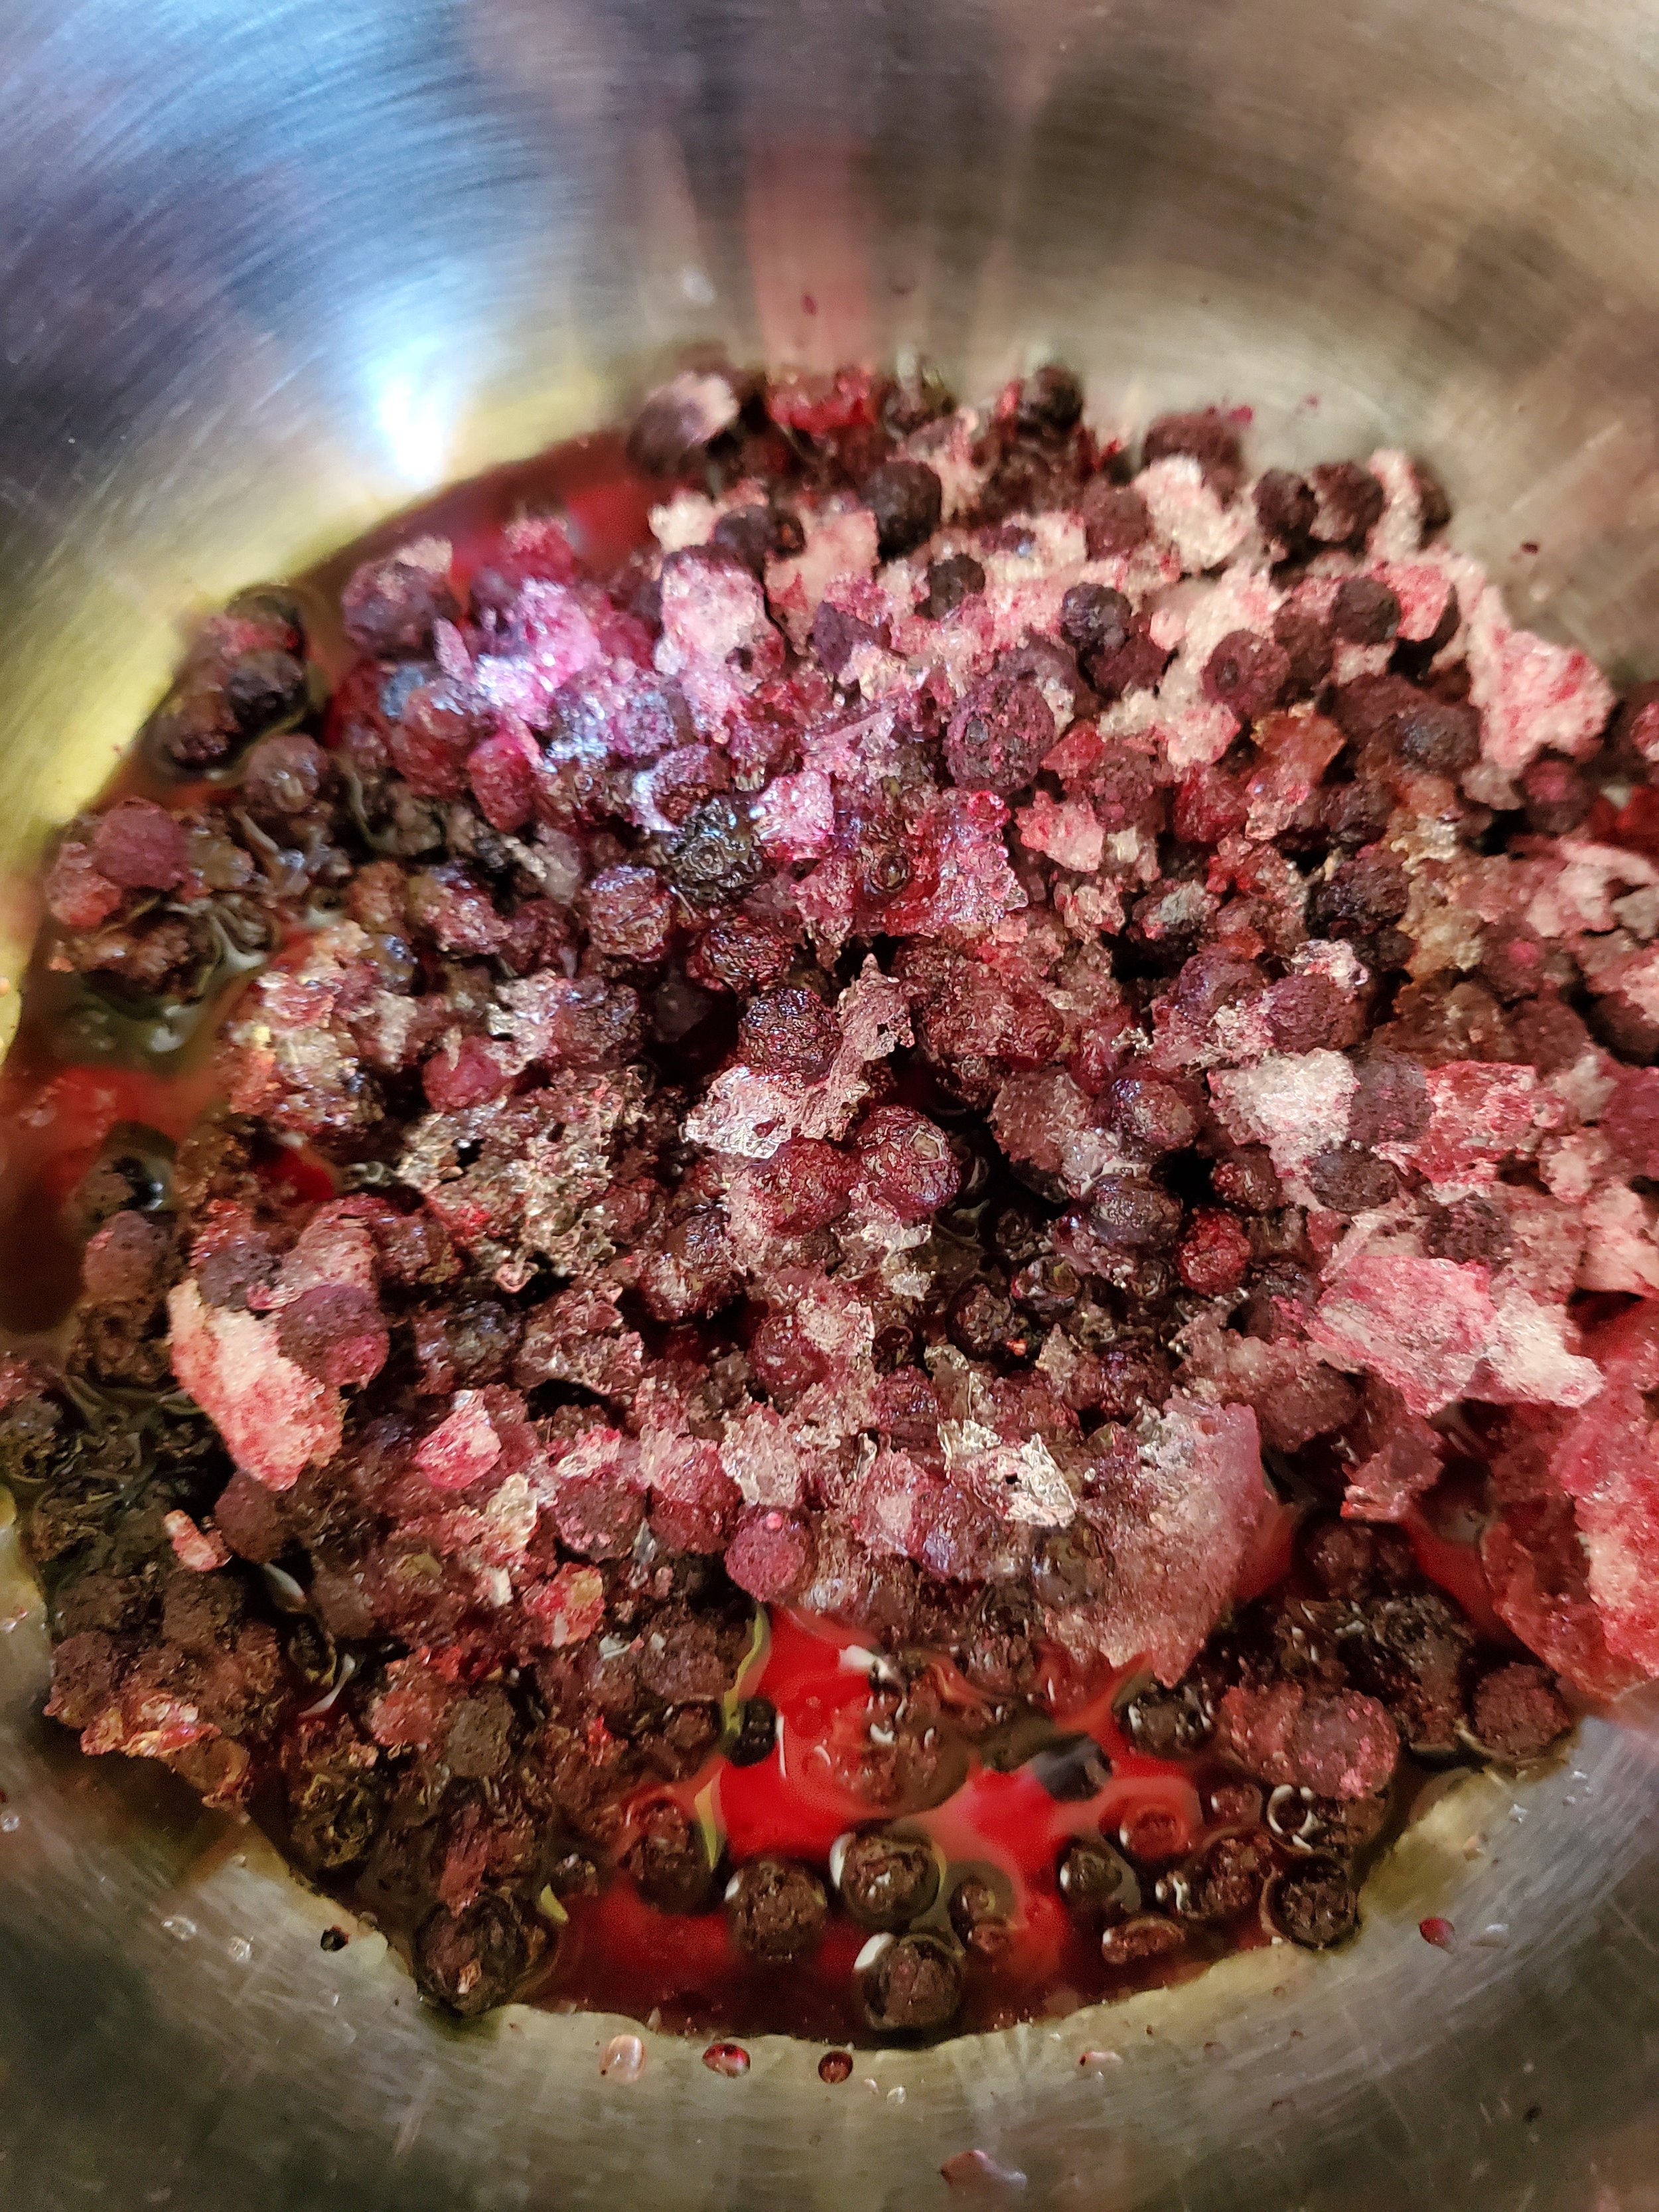
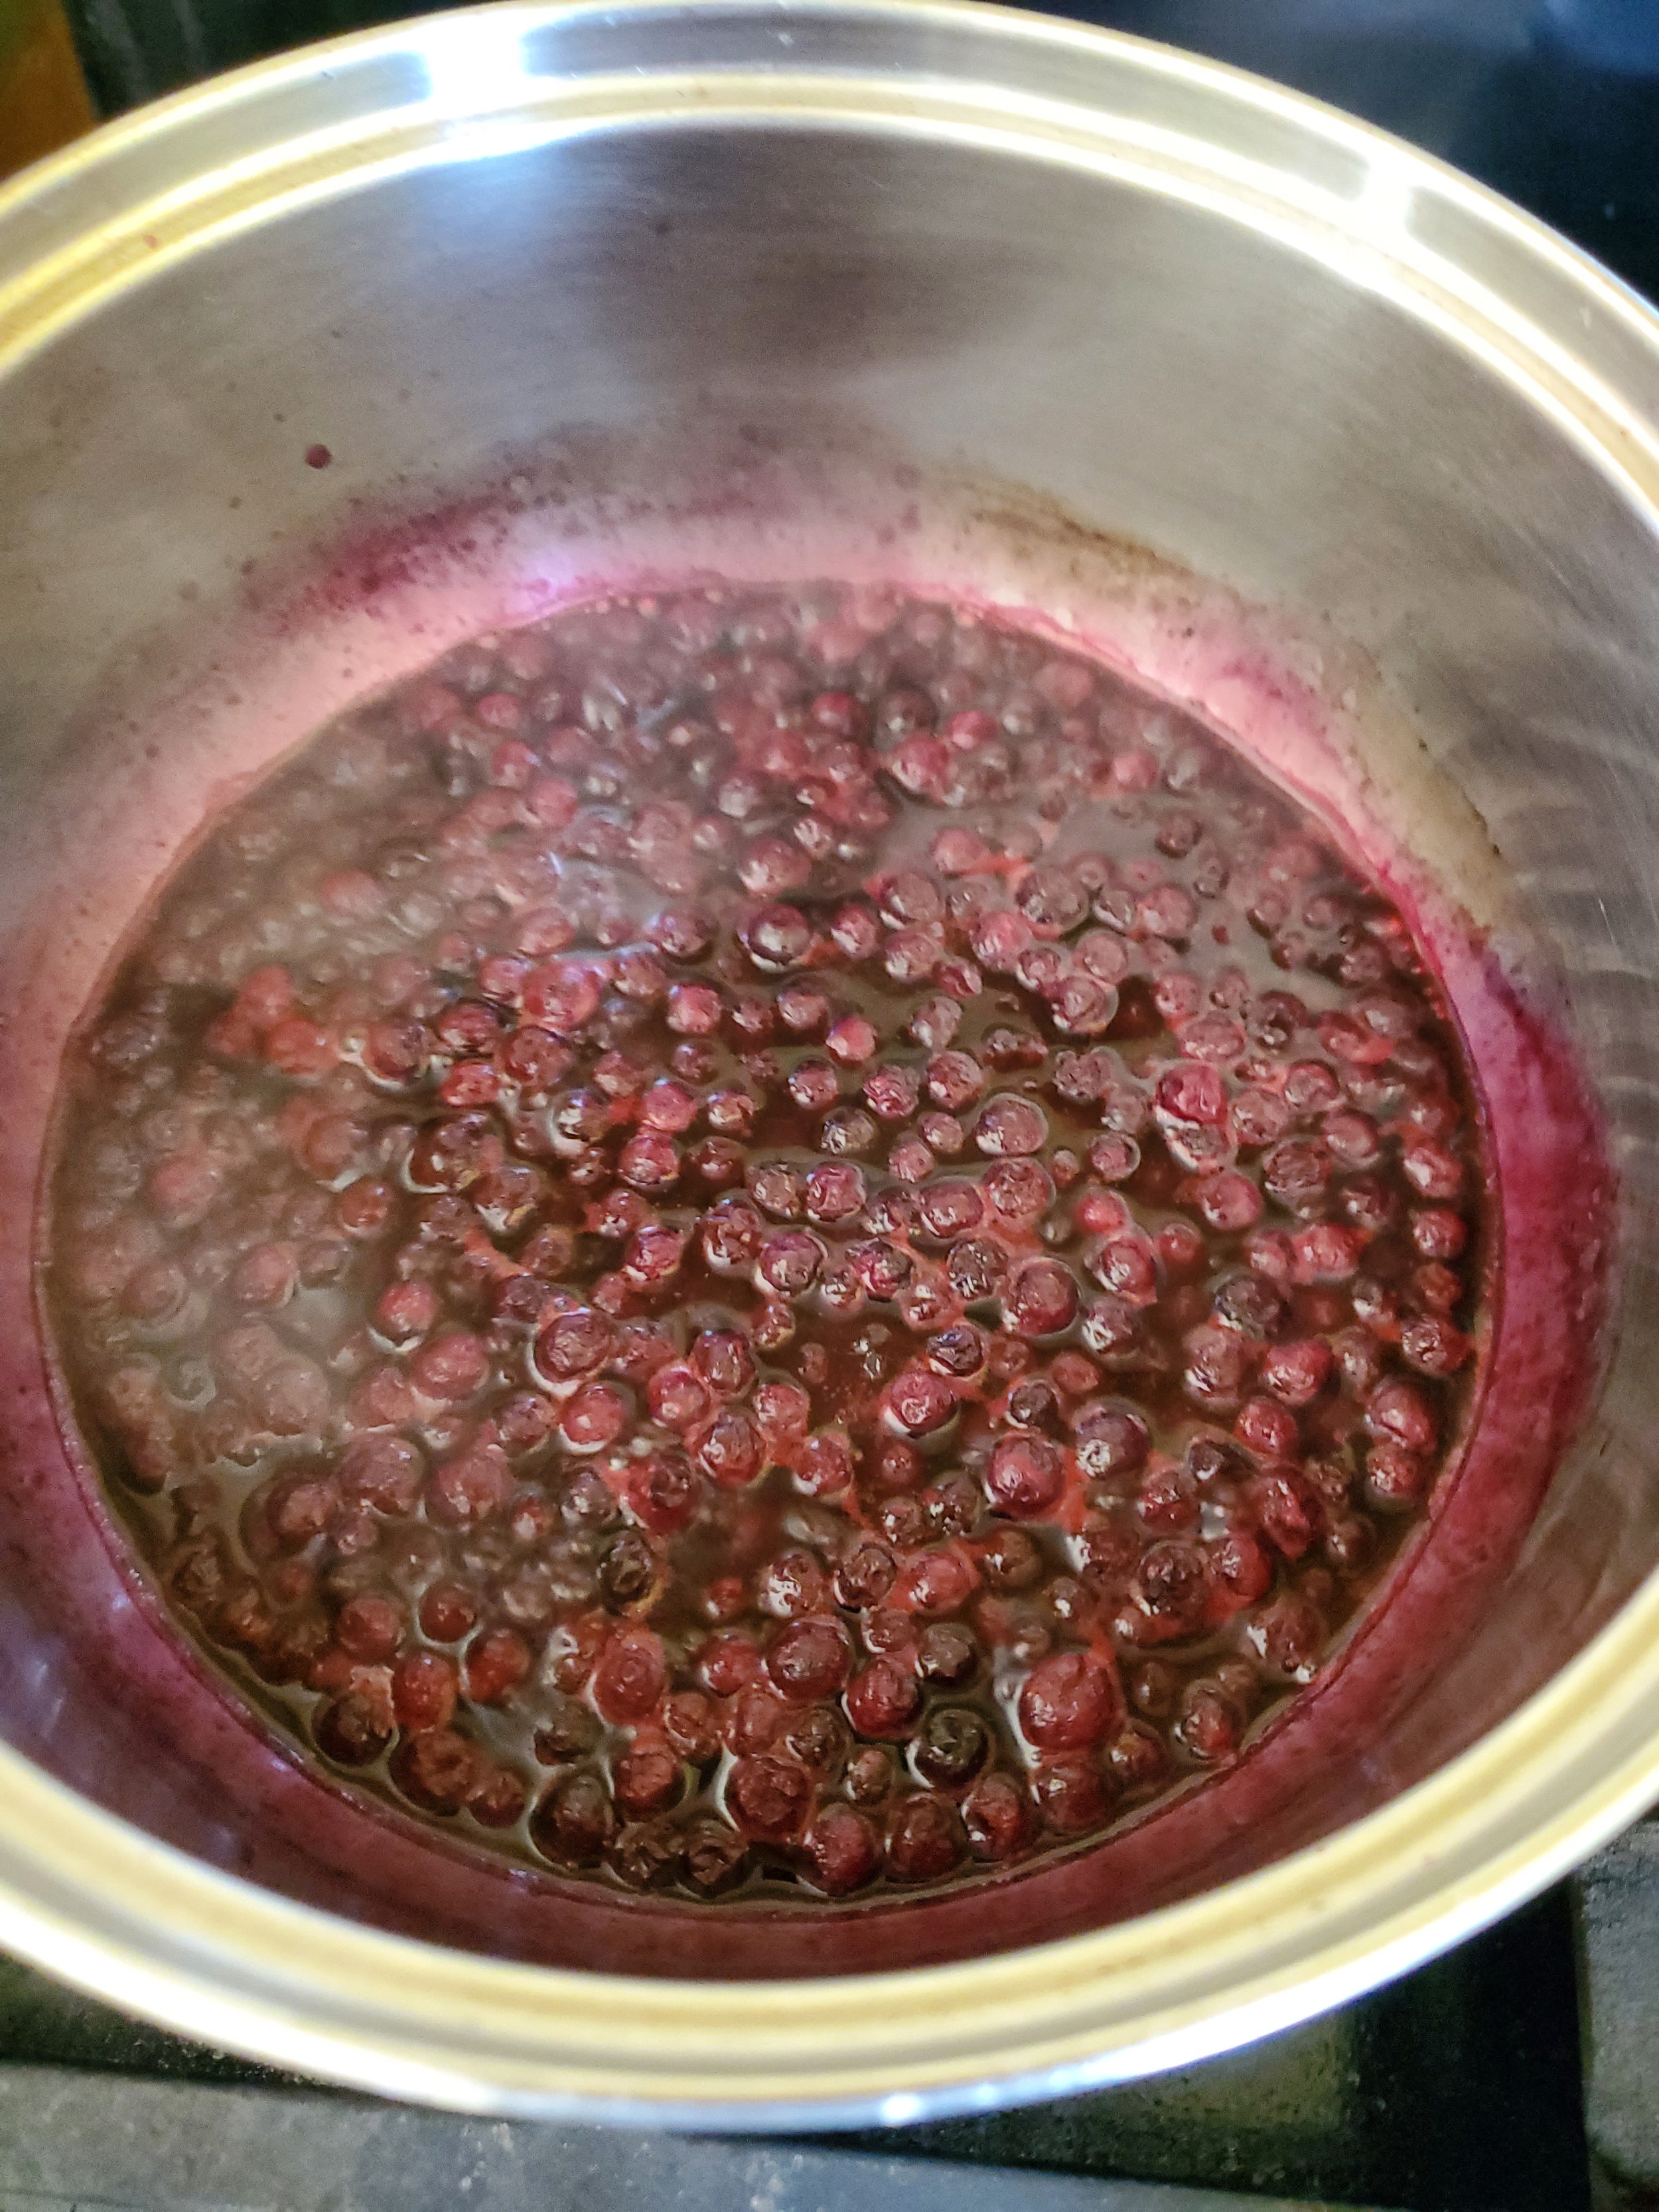
Because the blueberries take longer, we strongly recommend starting with them. Measure your blueberries into a saucepan, then add the tablespoon of lemon juice, teaspoon of vanilla extract and the water.


If you find blueberries to be a bit sour, you can add a little sugar, but we like them just as they are and omit the extra sweetener. Set the heat to medium-low, cover the pan, set a timer for 15 minutes and basically forget about it for a bit.


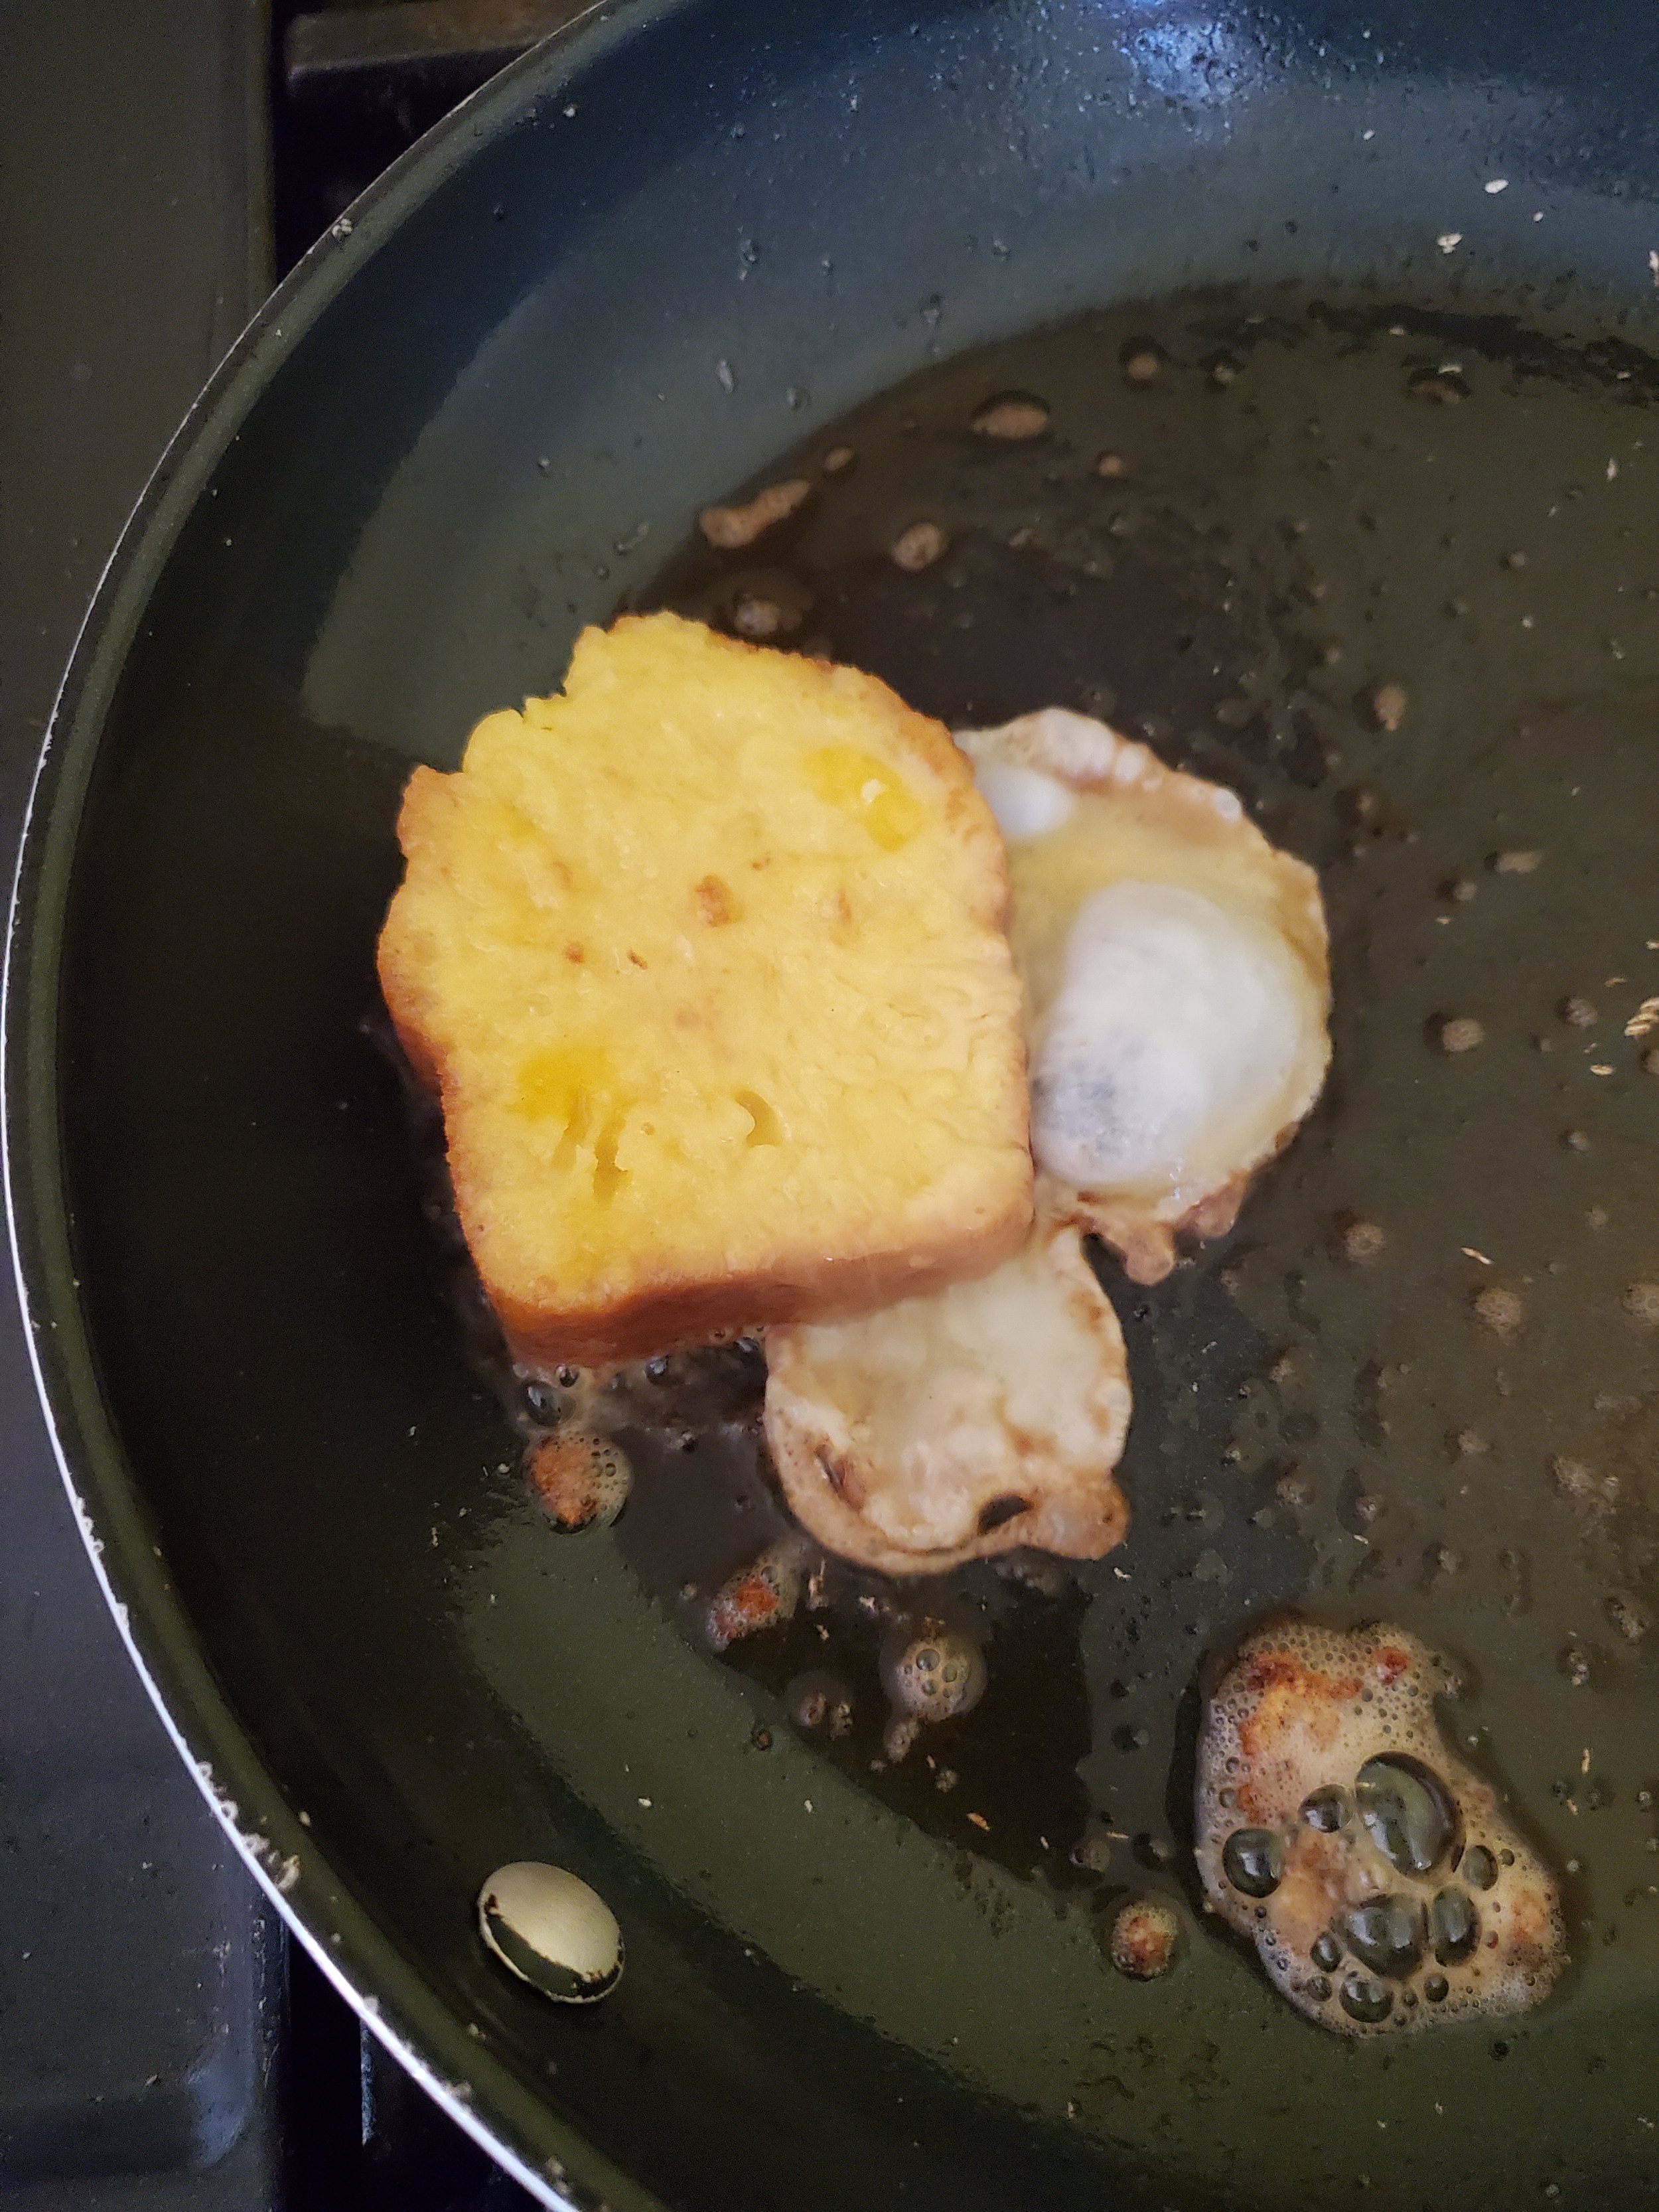
In a shallow mixing bowl, whisk together your eggs and milk and add a tiny little pinch of salt. You can add a little more milk or use a little less, depending on your preferences - everyone does French toast a little differently in our experience. We don't recommend sugar, cinnamon or vanilla be added here as is common in most French toast recipes. The cake is already super, super sweet.


Melt some salted butter in a skillet over low heat - definitely do not sub unsalted butter, as the result will be all sweet with very little to balance it.


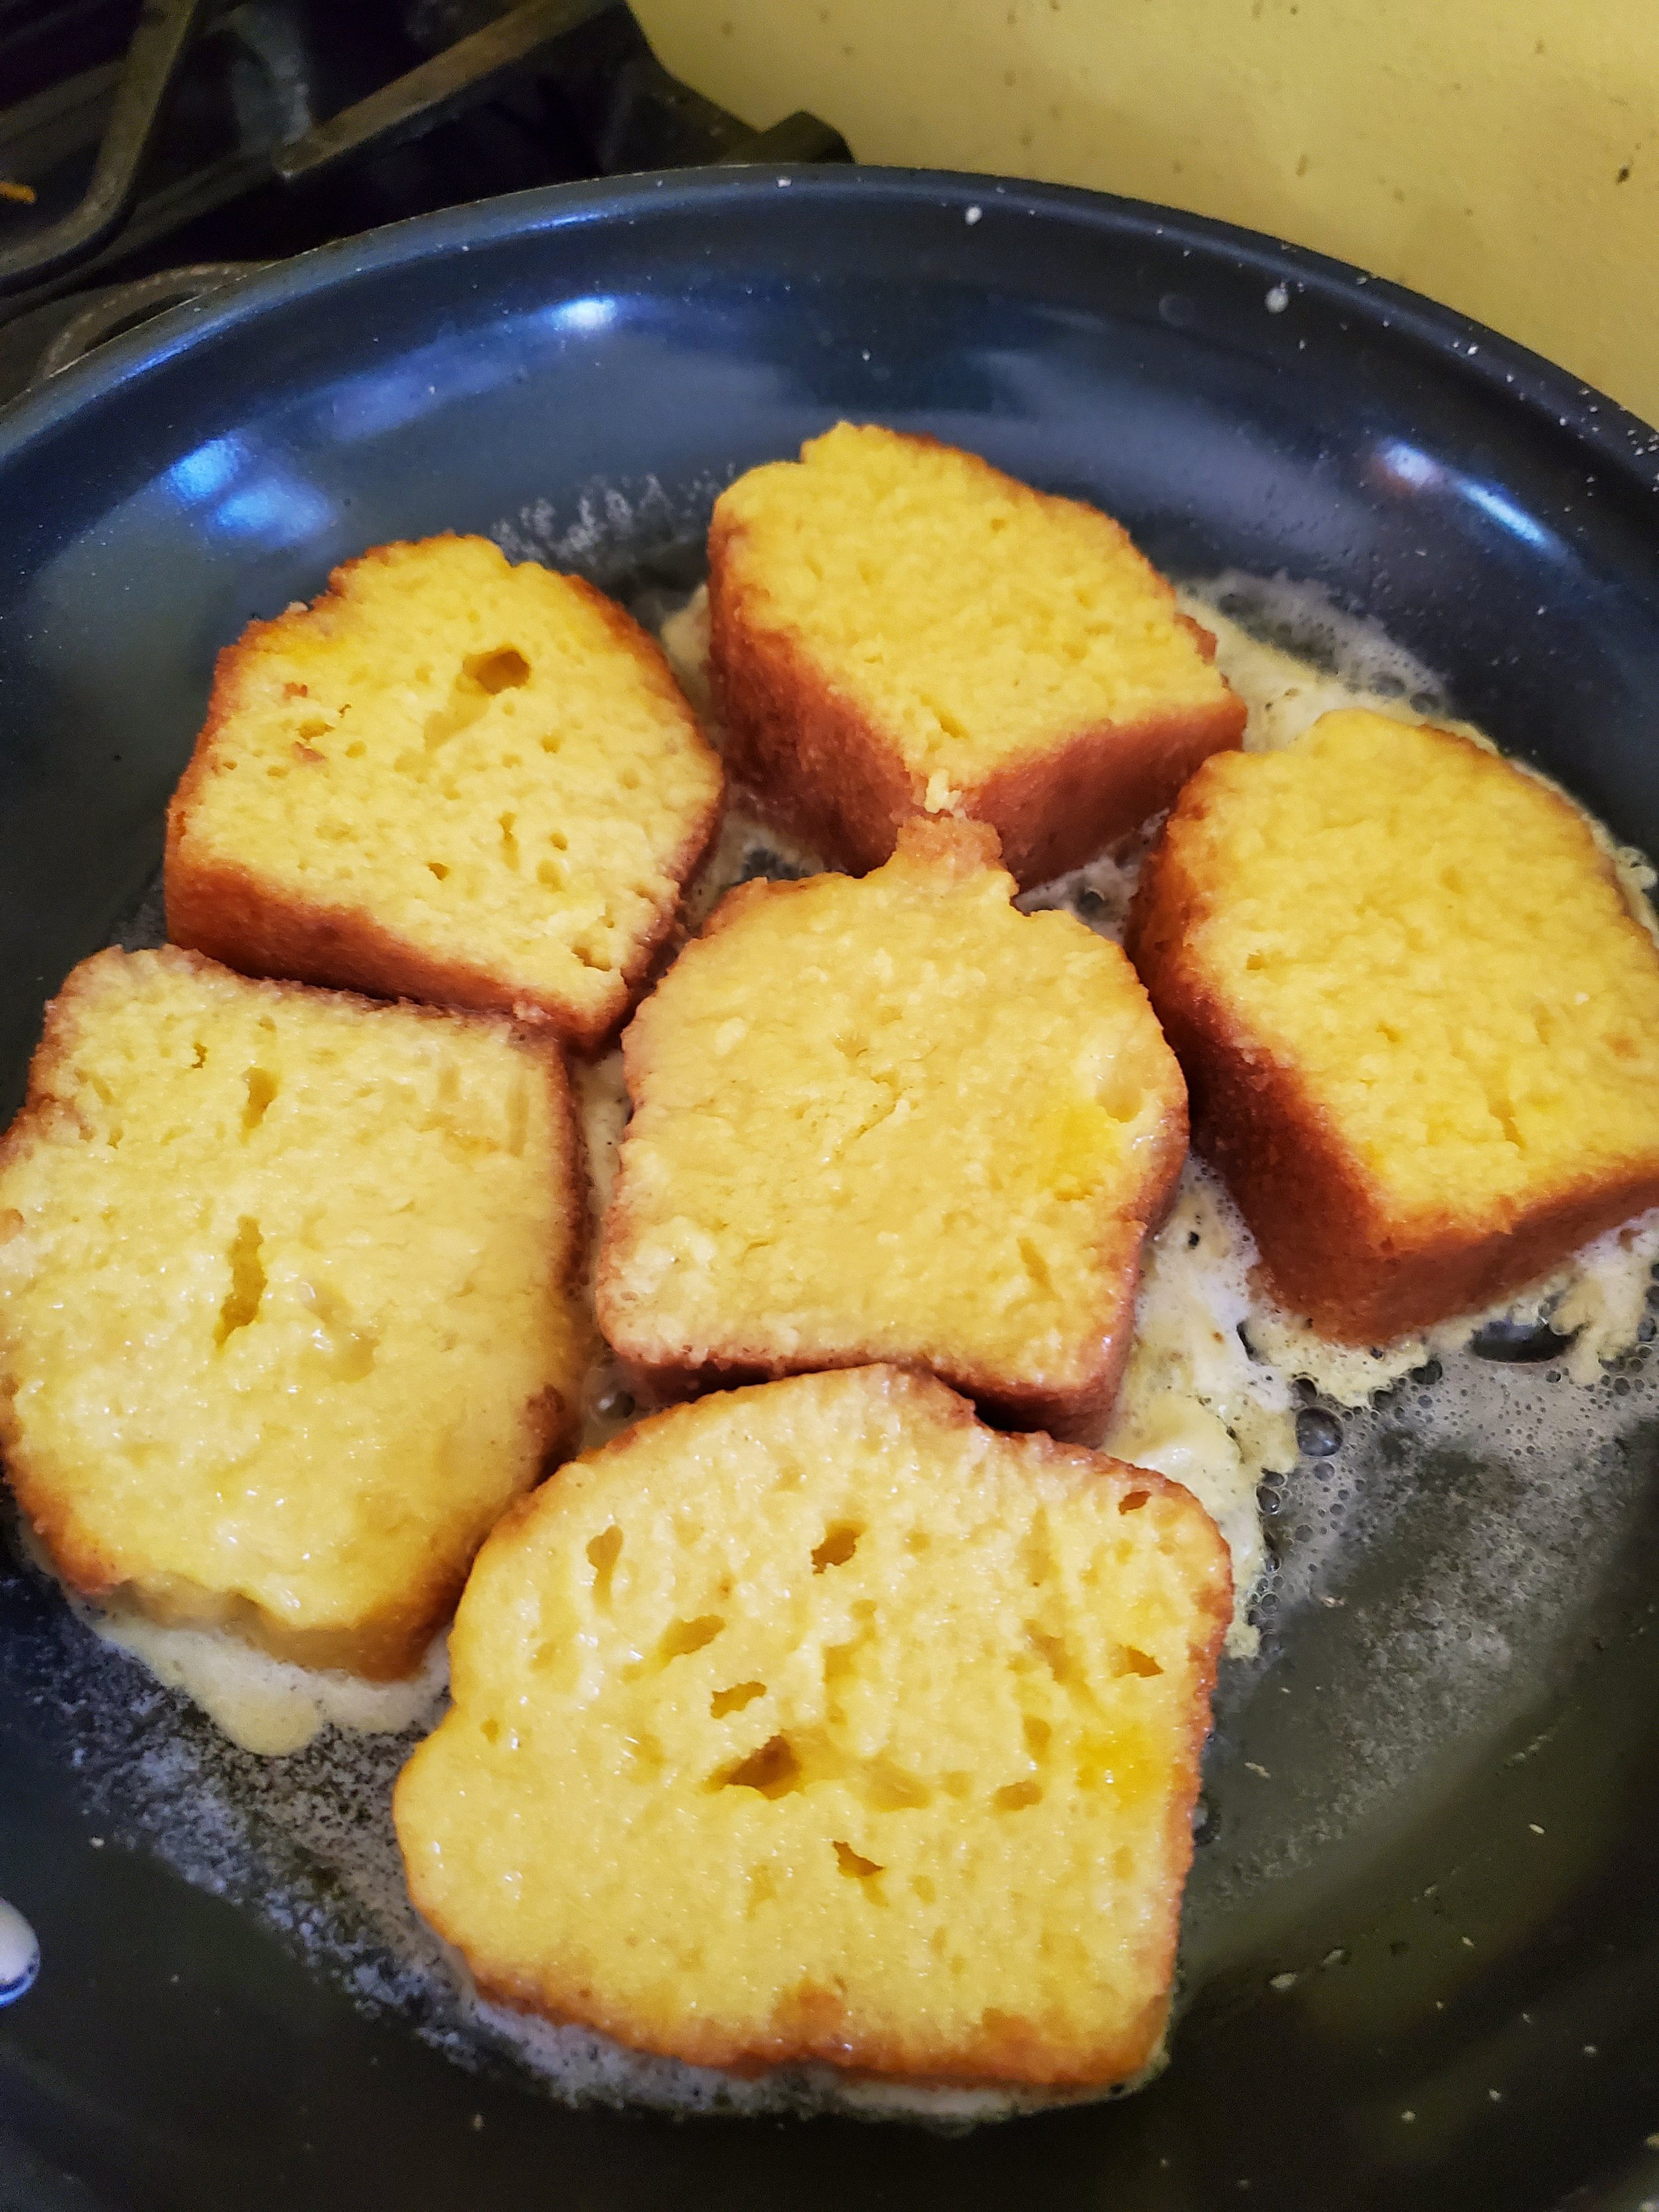
Dredge, flip, and dredge again the slices of cake through the custard, then add to the hot butter. Avoid allowing cake slices to sit in the custard, as they'll get soggy and fall apart.


Also try not to overcrowd the pan, as the slices will take longer to cook and be harder to flip. We fit five small slices into our skillet with enough room for flipping, but obviously your mileage may vary here. Maybe you have a giant cast iron skillet and can fit a whole cake in there. If you do, great - and also, where did you get it? We would like to have one too.


Cover the pan and let the cake cook for two to three minutes, then uncover, flip with a spatula (you may also need an assist from some tongs, depending on how soft your cake slices are), cover and repeat the "cook for two to three minutes" part. We like our French toast nice and toasty but not quite all the way to "scorched." Please adjust your cook time accordingly if you disagree.


Remove the finished slices from the pan and set them aside on a plate covered with another plate to keep some of the heat. If you have a crowd waiting, and said crowd is less interested in the blueberries that aren't done yet, you can just hand them off to hungry kiddos holding out plates as they leave the pan. Somehow, every variation of French toast seems to draw this crowd, so chances are pretty high you do have someone peeking around you trying to get the first piece.


Once the second wave of slices is in the skillet, grab a clean spoon so you can stir your blueberries. After giving them a quick stir, leave them uncovered for their remaining cook time. The goal is to have the liquid reduce some.


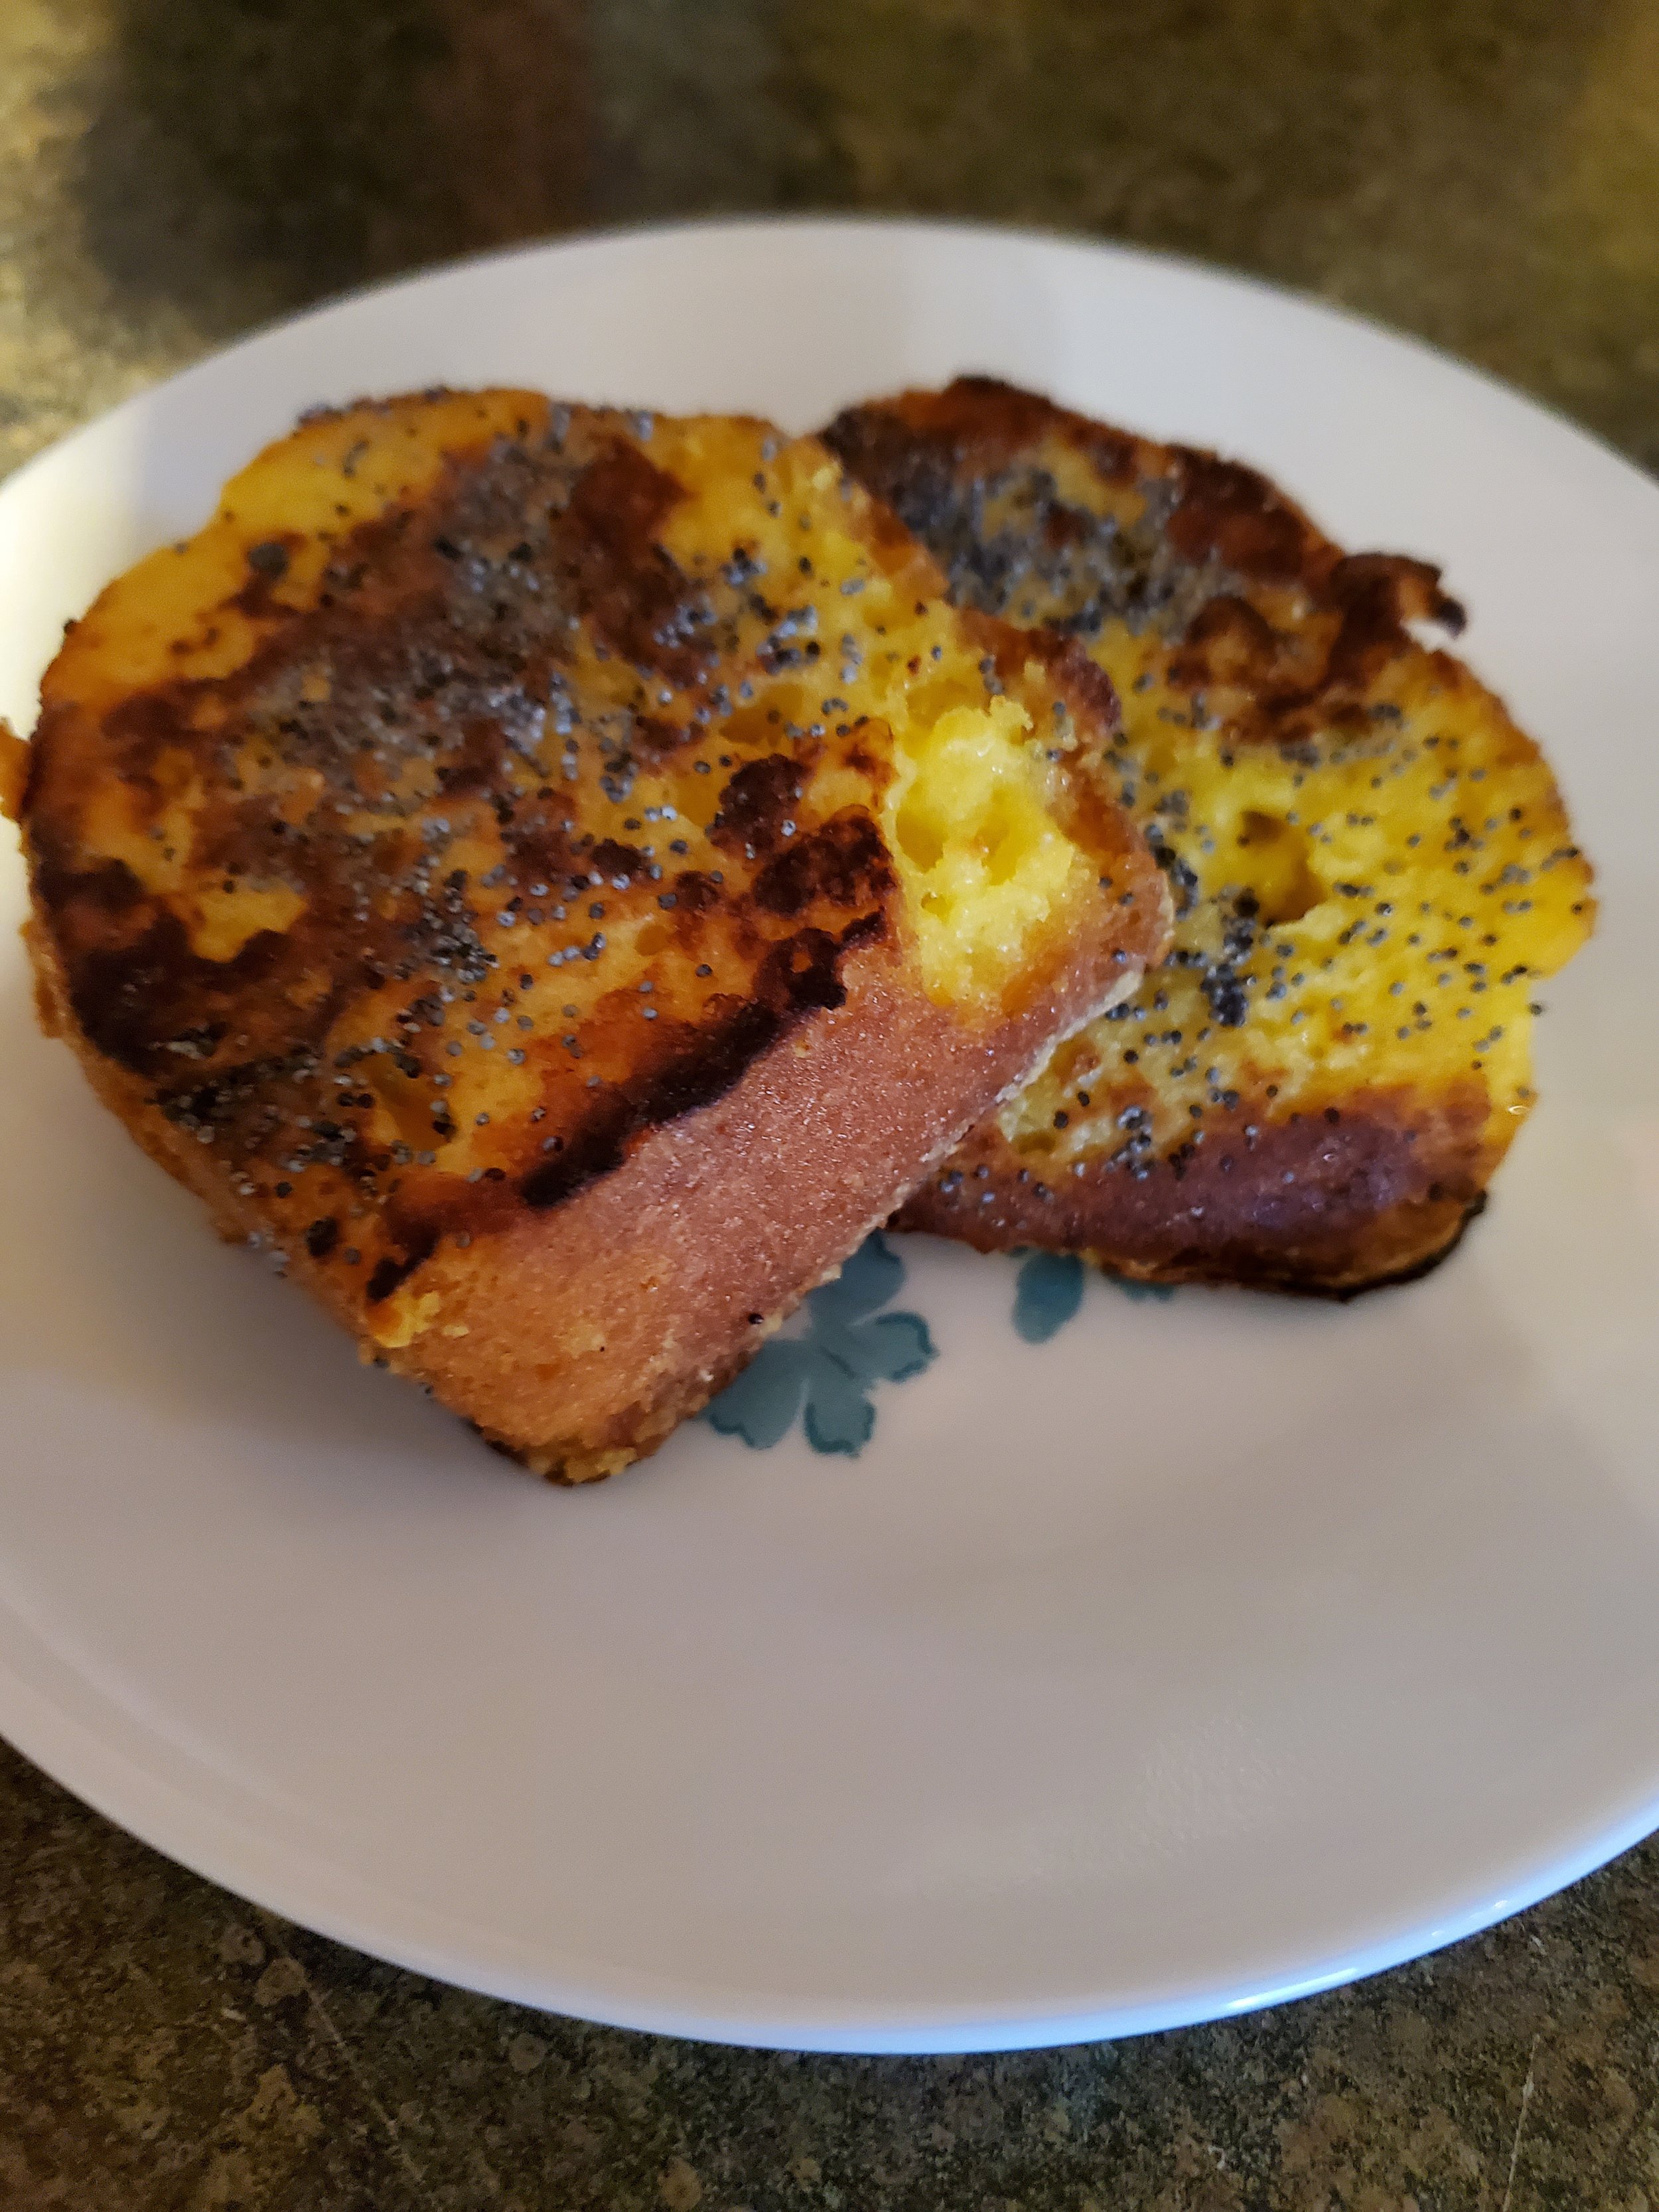
For the second wave of lemon cake French toast, we sprinkled some poppy seeds onto the slices as the first side cooked, then flipped and allowed the heat to sear them into place. This is totally optional, but hey, if you like lemon poppy seed muffins, why not give it a shot?


Once the blueberries are done, assuming there are still any slices of French toast left for the cook, make yourself a plate with a couple pieces and drown them in blueberry sauce.


Add some syrup if you're so inclined, but we'd definitely avoid any powdered sugar. Kids are thrilled; moms see the sugar content of this recipe and weep. Cake as a meal is kind of a rarity for a reason.


As you savor each sweet bite of this lemon cake French toast, you'll marvel at how a simple leftover can be transformed into a breakfast masterpiece. Whether you're enjoying it with family on a lazy Sunday morning or impressing guests at a brunch gathering, this recipe is sure to be a hit. So next time you find yourself with leftover cake, don't throw your hands up—embrace the opportunity to create something special. With a dash of creativity and a sprinkle of culinary magic, you can turn any ordinary day into a delicious adventure. 


If you’re struggling with any of your kitchen appliances while making this sweet treat, don’t wait on calling Appliance Rescue Service. We’ll work with you to get your home running smoothly again. 


Website

Call: (214) 599-0055


Get Your Protein with This Buddha Bowl

A Creative Way to Mix Up Left Overs 

Sometimes you want something that works with what you have left over from earlier in the week. Most times, you want something that’s going to fill you up and not leave you hangry a few hours later. This recipe fits both of those needs. Now, as with most recipes for Buddha bowls, you’re more than welcome to mix things up. Add in more veggies, add in less grain, sub out an entirely different sauce. This is one that we’ve been loving though, and have used multiple times since dreaming it up earlier this year. 

Sauce:

1/4 cup peanut butter

2 tablespoons low sodium soy sauce

2 teaspoons rice vinegar

1 teaspoon raspberry syrup

1/2 teaspoon sweet chili sauce

1 teaspoon garlic powder

2 tablespoons hot water


Bowl:

1 cup rice (cooked)

1 cup quinoa (cooked)

1/2 cup shredded carrots

1 package frozen sweet potato

1 can seasoned black beans

1 zucchini

1 teaspoon olive oil

1 teaspoon dried parsley

salt and pepper to taste


Tools:

cutting board

knife

measuring cups and spoons

serving spoon

sieve or colander

microwave-safe dishes

fork and spoon

frying pan


As always: wash your produce! This is our first step every time we're not utilizing washed/ready-to-eat veggies.


If you're not working with already-cooked rice and quinoa, go ahead and start them now. (This recipe was actually born out of there being too much rice in our fridge, left over from dinner the night before... which is why we sort of glossed over the cooking of the rice and quinoa steps.)


Put your steamable bag of frozen sweet potato chunks into the microwave and cook them according to package directions - in our case, roughly six minutes on high.


Dump the can of seasoned black beans into the colander or sieve to drain and give them a quick rinse before putting them into a microwave safe dish. You can set them aside for now, as they won't need to heat very long in the microwave, and the sweet potatoes will be hogging it for a while anyway. But when the sweet potatoes are finally done, swap them for the beans and zap them a minute or two, just long enough to heat them through.


Trim the ends and cut your zucchini into chunks - whatever shape or size you like is fine, but we do half inch quarter rounds because they cook quickly. Pour your olive oil into the frying pan, swish it around a little to coat, and add the zucchini. Sprinkle with parsley, salt and pepper, and saute for about 5 minutes over medium heat. You can substitute sesame oil for the olive oil if you have some, but it seems not a lot of people keep sesame oil in their pantries.


We chose to leave our shredded carrots raw, but if you'd prefer them cooked, feel free to toss them in with the zucchini about halfway through the cook time.


As your veggies heat/cook, grab a smaller microwave safe bowl and get started on the sauce. The first thing to go in should be the peanut butter. If you find peanut butter to be a little unwieldy (sticking to the spoon, landing in great blobs on the side of the dish instead of in the bottom, etc.) when you cook with it, feel free to employ the tactics of spraying your measuring cup with cooking oil before filling it and/or heating the peanut butter for 15-30 seconds in the microwave to soften it up.


After the peanut butter, use a fork to stir in the soy sauce, rice vinegar, sweet chili sauce, and syrup. These normally mix fairly easily. The troublesome one is usually the garlic powder. Once you have the other items mixed thoroughly, sprinkle the garlic powder on top and pour the hot water over it. Use the fork like a whisk and swish the hot water over the powder and into the peanut butter mixture a few times to combine.Switch to a spoon and stir it to death. Leave the spoon in the dish because you'll need it shortly.


Once your grains and veggies are all cooked or warmed through, begin layering things into your bowls. We started with rice, then quinoa, then scoops of zucchini, sweet potato, and beans, then a sprinkling of carrots and a drizzle of sauce. If you have some handy, a little everything-but-the-bagel seasoning is also a nice topping.

We hope that you enjoyed this recipe! Let us know if you decide to make it over on our Facebook page. As always, we love to hear from you. 

If you’re wondering what to do with leftovers because your fridge just ran out, we can help with that too! You can reach out to us via our contact page or by giving us a call at ((214) 599-0055). We’ll work with you to set up a  time and date that works with your schedule. At Appliance Rescue Service, our goal is to get your home running smoothly again. 


Cajun Rice to Feed a Horde.

Or At Least Everyone You Know And Love

I Don’t Care! Take Me To The Recipe!

We're making Cajun Rice this week! For anyone that knows Cajun food, you know it's a highly subjective food with recipes being very subjective. We've tried to make our recipe a bit more standardized, but you can still add or take away as you see fit. This week's recipe is for feeding a crowd. So grab your largest pot and get ready to make some food that will have everyone asking "hey, when are you going to make that again?" 

Ingredients:

2 Large Green Bell Peppers

2 Large Red Bell Peppers

1 Large Yellow or Orange Bell Pepper

1 Medium Yellow Onion

2 Stalks of Celery 

4 Roma Tomatoes

2 Tbsp Salted Butter 

2 cups Long Grain Rice *

4 Cups of Chicken Broth *

2 cups of black beans ( cooked, or canned and drained) 

2 Links of Smoked Sausage 

3 Large Chicken Breasts

1 lb of De-veined shrimp 


Spices: +

  • 1 teaspoon garlic powder

  • 1/2 teaspoon ground thyme

  • 1 teaspoon ground paprika

  • 1/4 teaspoon black pepper

  • 1 teaspoon kosher salt 

  • 1 bay leaf

  • *1/2 teaspoon of cayenne pepper

Tools: LARGE pot, cutting board, chef's knife, measuring bowls, large bowl for holding foods during prep, long handled spoon. 

*Since this recipe is (in theory) sized for feeding 4-5 people, if you want to buff it up, it's going to be the rice and the stock that are the easiest to add to. For every 1/2 cup of dry rice that you add, add a full cup of stock for the recipe. 

+ Spices, much like the recipe as a whole, are very subjective. So, if you want to add things in, go for it. Just remember to always go with a little bit at first before adding more. 

Recipe

Start by grabbing your cutting board, and laying your veggies out. You'll want to be careful about cleaning out the peppers as the seeds are horrible when cooked. Cut the tops of your peppers off, cut them into either quarters or thirds, depending on the number of bumps on the bottom of the pepper. Remove the pith and the seeds, and set them aside for your favorite gardener. Now cut them into strips, about a 1/4 wide, and cut each strip into chunks. Do this with all of your peppers and toss them into a bowl for the time being.  

Grab your yellow onion and dice that up into a consistent dice. Next up grab your celery and slice it up into consistent slices.  Add both of those into the bowl and give everything a quick toss. 

Chop up your tomatoes and set them aside in a separate bowl for the time being, we'll come back for those later. 

Now, grab your bowl of peppers and onions and head over to your stove. Turn on the heat to high and toss 2 tablespoons of butter in, letting that melt down. Once it's melted, add in your vegetables and grab your spoon to start turning. You want to sauté the veggies until the onion is transparent. 

Now, scoop out your veggies and set them to the side. Give your cutting board and knife a quick wash and grab your various meats.  If you haven't cooked your sausage and chicken already, grab a separate pan and do that now. Make sure to wash the pan after every round to ensure food safety. Check the bottom of the page for temperatures for both meats. 

 If you've already got your meats all cooked to the appropriate temperatures, it's time to chop them up. 

For your sausage, slice it into 1/4 slices, and then chop those in half. 

For your chicken, go ahead and slice the chicken breasts in half width wise, and then cut them into chunks about an inch in size.  (So, essentially, you'll butterfly your chicken at first.) 

Once that's taken care of, add your broth and spices to the pot and give everything a quick stir.  Turn the heat to high and wait until your pot begins to boil. At that point,  grab a spoon and give it a quick taste. Does it taste good? Do you need to adjust the spices? Do that now. 

Now, add in your rice give it another stir, and let the pot come back up to a boil. Once it's boiling again, turn the heat down to low, add in your sausage, chicken, beans, tomatoes and shrimp and put the lid on. Keep it on low for 25 minutes, giving it a stir every 5 minutes or so, or until all of the liquid has been absorbed into the rice. 

Once the time is up, push everything to the outer edges and see if you can find any additional broth on the bottom. If you can, then you need to keep cooking for 5 more minutes, making sure to keep the lid on. If not, tell everyone to come to the table, because the meal is ready. 

Let us know in the comments below or over on our Facebook if you decide to give this a try! We’d love to hear how it goes and anything you add to it. 


If you ended up here because you need help with your refrigerator, washer, dryer, stove, oven or any of your other major appliances, we can still help. In fact that’s kind of a real business. We just provide recipes for fun. So, if any of those major appliances have broken down recently, or are just acting funny, we can help get your them back into tip-top shape. Give us a call at ((214) 599-0055) or visit our appointment page.

Double Chocolate Guinness Cupcakes

The Second Best Use for Guinness


So Saint Patrick's Day is over. You're probably pretty tired of corned beef, cabbage, potatoes, and soda bread - and you're likely also tired of seeing recipes containing them.


But you know, there's one Saint Patrick's Day staple no one ever seems to get tired of. Guinness. And if you've already had your fill of Guinness for a while, but still have a couple bottles left in the fridge, there's only one thing left to do with them.


Bake.


That's probably not what you were thinking, but that's okay. We've got you covered.

Double Chocolate Guinness Cupcakes, anyone?

Double Chocolate Guinness Cupcakes in a red liner on a white plate

Ingredients:


1 ~15 ounce box chocolate cake mix (every brand is a little different; just try to stay in the 15 ounce ballpark)

1 4 ounce package chocolate pudding mix

1 11.25 ounce bottle Guinness Stout

3 large eggs

1/2 cup vegetable oil or melted unsalted butter

1 teaspoon vanilla extract

Tools:

Mixing bowl, mixer or whisk, measuring cups, sauce pan, spoon, cupcake pan, cupcake liners


Instructions:


Grab a bottle opener and crack open that bottle Guinness. Take a taste. No, seriously, you really should taste it. You do not want to ruin an entire batch of chocolate cupcakes with skunked beer. That's just disappointing.

Pour your Guinness into a sauce pan. We know, it seems like a bunch of extra work and an extra pan to clean. But the result is worth it. Turn the burner on medium-low and let the Guinness simmer. It will smell strongly like a brewery in the kitchen; you might consider opening a window to keep the family from complaining. It will also foam and threaten to make a great big mess, but this is normal. Give it a gentle stir to break up the foam and keep it from boiling over. Allow it to simmer for 20 minutes or so - your goal here is to reduce the Guinness down to about 1 cup. You started with not quite 12 ounces, so you have only a little ways to go here. Don't worry too much about the measurement until you can see a visible difference from your starting point in the pan.


Once you can see a difference between the amount of beer you started with and the amount of (reduced) beer you now have, remove it from the heat and allow it to come back to something around room temperature. Please do not immediately pour boiling hot beer into a measuring cup - it may crack or shatter the cup, and it will likely waste the Guinness. Both of these are terrible things.

While you're waiting for your Guinness to cool back down, start the oven preheating to 350 degrees.

Pour your cake mix and your pudding mix into your mixing bowl. Add in your vanilla extract, oil or melted butter and your eggs. (If you're using butter and you've just melted it, please also allow it to come back up a little closer to room temperature before pouring it in with the eggs. Otherwise the butter will scramble the eggs and you’ll have to start over.) You can give it a little stir at this point, but don't expect it to combine neatly or fully. There isn't near enough liquid, and we've added extra dry ingredients with the pudding mix.


Take your cupcake pan and place a liner in each of the wells. You'll make a little over a dozen large cupcakes with the amount of batter you'll have. We ended up with 14 and a half (because we lost some batter in transfer from the bowl to the pan) generous sized cupcakes - plan on 15 or 16.


By now, your Guinness should be back down to a more workable temperature. Measure out one cup of your reduced beer. If you have extra, that's okay - just set it aside and use it later to braise or baste some meats. If you've reduced it down further than needed and don't quite have a full cup, that's okay too - you can add a little water back.


Add your cup of Guinness to the other cake ingredients and stir well for about two minutes. If you're using an electric mixer, be aware that the batter will climb up the beaters while you mix. It's a very heavy batter for a cake, and it's also rather sticky - both of these are results of adding in that box of pudding mix. If you're worried about the batter hitting the body of the mixer, just pause and scrape it back down once in a while.


Be attentive and be careful not to over mix the batter - if you mix too long, it will go from thick and fluffy to dense and flat and chewy - and no one wants cupcakes that bounce. Mix until everything is combined, but quit when you stop seeing lumps or variations in color.


Transfer your batter from the mixing bowl to your cupcake liners. Again, this is some sticky stuff. You will likely find yourself needing an extra spoon to make it let go of the first one, and you might want to recruit someone else as extra hands if possible. Those cupcake liners, despite the blob of batter that should hold them down, will attempt to follow the spoon at least once. That's how we lost a cupcake worth of batter - the liner decided gravity wasn't going to hold it back, and suddenly the batter was on the counter and not in the cupcake pan. It was a mournful moment for all - especially the family dogs, who usually get the things that escape pans and plates, but were denied this time.


Once you have your cupcakes liners about 2/3rds full, pop them in the oven for 20 minutes or so. Toothpick test after 20 minutes to make sure they're done (sometimes they need an extra minute or two), and assuming they're fully baked, allow them to cool.


The beer flavor doesn't take over the cupcake, so expect a mostly chocolate flavor with some malty tones to back it up. Frost with whatever you'd like (we like just some simple whipped cream on top) and enjoy!


If you do decide to make this, or something similar, let us know over on our Facebook! We’d love to see what you get up to!

And if you’re in Dallas, and any of your appliances are acting a little... tipsy... don't blame the Guinness. Or the fumes. You cooked most of the alcohol out of it. Instead, give us a call - we'll shape them back up for you. You can reach us at our website or via ((214) 599-0055).