Chill Hacks Unveiled: Mastering Your Fridge's Microzones for Fresher Foods

 From Crisper Drawers to Door Dilemmas - Your Complete Guide to Optimizing Refrigerator Storage and Banishing Food Wastage

Ever wondered why your refrigerator seems like an enigmatic labyrinth of varying temperatures? Brace yourself for a surprising revelation: your fridge isn't the uniform cold box you think it is. Instead, it's a tapestry of microclimates, each with its own purpose and ideal use. Buckle up for a journey into the hidden world of fridge dynamics, where thermodynamics and food storage collide to challenge common assumptions.


Prepare to unravel the mystery behind why your leftovers might fare better on one shelf than another, why your greens shouldn't cozy up with your meats, and why that jar of jam ended up frozen solid in the back. Join us as we break down the misconceptions about your refrigerator's temperature zones and unveil the secrets to optimizing freshness and food safety within its chilly confine


Refrigerator Revelations: Unveiling the Myth of Uniform Temperatures


Let's start with breaking down a common misconception: your refrigerator is not all one temperature. We know it's a strange thought. Most of our clients are very shocked when they discover this. But it's true. 


Instead, your refrigerator is made up of many different microzones. Now, your microzones work based on the concept of thermodynamics. We know, we know, that's not something any of us want to try and dive into on a Wednesday night. And to be frank, it's beyond anything we need to go into. What matters is understanding that heat rises. Even in a cold environment like your refrigerator, heat will always rise*. So, the warmest portions of your refrigerator will be the top shelf of your refrigerator because of that principle, and also the door of your refrigerator because it's constantly being exposed to warm air as you open and close your refrigerator throughout the day. No matter how fast your refrigerator returns to temperature, there is still fluctuation. That fluctuation will directly affect whatever you store on the door of your refrigerator. We'll go into more of that later on in the article. For now, it's enough to understand that it's an issue. 


The Secret Behind Microzones: How Your Fridge Works on Thermodynamics


The different zones in your refrigerator are  your door, top shelf, middle shelf, bottom shelf, and any drawers you have, like a crisper drawer, cheese drawer, or deli meat drawer. Each of these different zones has been engineered for a different purpose, and the shape of the drawer directly impacts how temperature and humidity affect the food inside the drawer.  


Crisper Drawers Decoded: Optimizing Humidity for Fresher Produce


Let's take a quick side note to explain the different drawers that might come with your refrigerator. Your crisper drawer is typically one to two drawers on the bottom of your refrigerator. Whether you have a French door, a single door, or a top-of-the-line Sub Zero refrigerator, the bottommost drawer or drawers is for fruits and vegetables. The reason for this ties into the microclimates like we talked about earlier. This is the coldest part of your refrigerator, and it fluctuates between cold and colder. Now, your fridge's design might be two drawers side by side or one on top of another. We have worked on both varieties. It doesn't matter for the most part. Either way, there is typically a small flap or a slider that allows you to set which one has lower humidity and which one has higher humidity. 


Lower humidity is typically for fruits, and higher humidity is for vegetables. This is where we will get into some exceptions in just a minute. These drawers work on humidity as well as temperature. Your fruits need lower humidity, which the slider or air flap on the drawers allows them to adjust. Just because it's not extra fancy or has dials or switches that you need to work to learn doesn't mean that it's not effective. Companies have discovered what works and, for the time being at least, are sticking to it. Higher humidity allows your vegetables to maintain the most moisture, keeping them from wilting for longer. 


Mastering Middle Shelves: The Stable Haven for Dairy and Deli Delights


But Blogger, you say, what about the shelves in the middle? What are those for? Oh dear, reader, those shelves are, in what we said earlier, the most stable portion of your fridge. This is the section that is most likely to stay at the temperature for what you've set your refrigerator to. These drawers, whether you have one or two, sometimes even more, will be where you store your cheeses and deli meats. Cheeses and deli meats need to be kept away from fluctuations in temperature to ensure that they stay tasty and free from bacteria for as long as possible. They also don't need to worry about humidity like your fruits and vegetables, which is why they are just drawers. 


Strategic Food Placement: Where Every Zone Shines in Your Fridge


Now that you understand how your refrigerator works and how some of the more specialized sections should be used let's look at your fridge as a whole. This breakdown for storing your food comes from years of research into maximizing space, freshness, and food safety. So, at the top of your fridge,  as we mentioned earlier, that is going to be the section that fluctuates the most, and therefore, is the section where you should store already cooked foods; this is your leftovers,  this is the rotisserie chicken that you're going to have tomorrow night for dinner or the green bean casserole that your neighbor brought over because they had a little too much. Things like that. 


Your middle shelves are where you should store your dairy products. Cheeses, butter, eggs, and other things that need to be kept as stable as possible. 


Your bottom shelves are where you store raw meats and fish. If you really wanted to, all of the other shelves, ,could be swapped around. If you follow the other tips we will talk about, your food will stay fresh. Maybe not for as long as they could, but they will stay fresh for about the average length of time that you might expect. For your raw meats and fish, you store them at the bottom of your refrigerator not just to keep them fresh for longer and to butkeep them in that cold air that doesn't fluctuate as much. It's also for food safety. Raw meats tend to leak. You don't want that getting on the rest of your food.  


Now, we're not saying you should just throw a hunk of raw meat or the fish your cousin caught for dinner tonight onto these shelves. You store these on the bottom shelf because they won't leak into the drawers when wrapped properly. Your crisper drawers are designed so things from on top, unless they spill or overflow, won't get into the drawers. Instead, they drip around and under. Your shelves, though, say the top and middle shelves aren't designed the same. Put meat on those shelves, and you will contaminate the shelves below.   


Decoding the Door Dilemma: What to Store (and Avoid) on Your Fridge Door 


The one thing we haven't talked about yet is your refrigerator door. On your refrigerator door, it is good to put things like condiments. They're not bothered much by fluctuating temperatures. Salad dressing falls into the same category. Even the ones you might make yourself can still be stored in the container and left on your fridge door. Soda, water bottles, sports drinks are great to put on your refrigerator door, so they're easy to grab. 


Things that maybe shouldn't go on your door that you wouldn't consider: 

Nut butters

Milk 

Glass bottles 

We've all done it. Heck, in your Blogger's fridge right now (or at least right now as of the time of this initially being written) is a container of milk. The reason you don't want to store it there normally is because it will go bad faster. In our household, however, it doesn't typically last long enough, so we choose to take that risk. Which is what you can do as well. Nut butters, however, and glass bottles are less conditional. Nut butters like almond butter and cashew butter will start to separate when kept at unstable temperatures. They start to either become hard or oily, they don't taste as good, and they're harder to spread. Then you've got glass bottles, which is more of a practicality issue. All it takes is one slam of the door, and there goes all that lovely wine you were planning on sharing. 

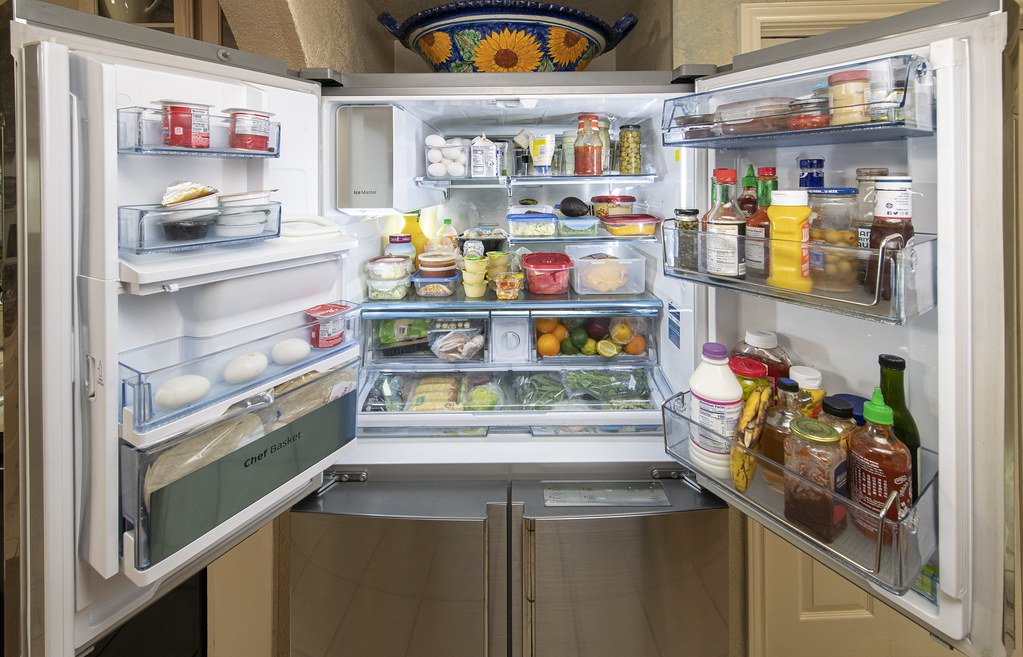
A refrigerator with some things stored properly and some not. How many can you find?

Courtesy of the USDA

Versus, this refrigerator which has taken into consideration the various tips and safety measures that we talked about, and the size and design of this particular refrigerator.

Courtesy of the USDA


The FIFO Method: Saving Money and Maximizing Freshness in Your Fridge


How do you save money then? The answer is the First In First Out method. It is a very simple concept, but it does take a bit of thinking as you implement it. You put the newest foods at the back of the shelf and bring the oldest foods towards the front. You can do this with everything or just things you buy duplicates of. An example would be putting an already open pint of sour cream at the front and a new one at the back of the shelf. 

 We aren't saying you have to do this every day. That would be ridiculous, and you would end up wasting electricity and letting in all the hot air you're trying to avoid. But once a week or so, when you go grocery shopping, do this, and then you have all of the oldest food towards the front automatically when you need to go and plan for meals or just need a quick snack. The First In, First Out method is utilized by restaurants and other corporate-level food services. It's a way to ensure your food is used long before it spoils.  


The Perils of Overstuffing: Why Air Circulation is Key in Your Refrigerator


A final important note that we think cannot be overstated is that you should not be overstuffing any section of your fridge. Your refrigerator cannot do its job properly if it can't breathe. If the air cannot circulate around your refrigerator, the microclimates we discussed will go to extremes. The coldest section, that bottom shelf, and your crispers will end up freezing. Meanwhile, your top shelf and door will be much warmer than they should be, causing things to spoil. This is how you end up pulling out the jar of jam from the back of a shelf and finding out that it's frozen solid in the time that it's been in your refrigerator. While sections like your crispers have an optimum level of food in them, say 67%, the rest of your fridge is more a matter of air being able to move around. That one does take a little bit of trial and error. It becomes much easier if you pay attention and start with the tips we've taught you today. 


Keeping Cool: When to Call for Professional Refrigerator Assistance


Remember, your refrigerator is not just a glorified cold box—it's a meticulously engineered system of microzones. By understanding its nuances, from the fluctuating temperatures of the top shelf to the humidity-controlled crisper drawers, you hold the key to prolonging the freshness of your groceries and minimizing food waste.


So, bid farewell to haphazard food placement and embrace the art of organized refrigeration. Employ the 'First In First Out' method, keep meats low, dairy mid, and condiments on the door, and most importantly, avoid overstuffing to let your fridge breathe. By following these simple strategies, you're not just managing your fridge; you're preserving flavor, maximizing space, and ensuring a longer shelf life for your groceries.


However, if you encounter issues beyond the realm of organization—such as temperature inconsistencies, malfunctioning water lines, or any other fridge-related quandaries—don't hesitate to reach out for professional help. Appliance Rescue Service is here to assist you, whether it's a troubleshooting call or a need for expert maintenance. Contact us today via our website or give us a call to schedule an appointment and ensure your refrigerator runs smoothly, keeping your food fresh and your kitchen hassle-free.

Website

Call: (214) 599-0055 


Additional Reading: 


The Hidden Messages Behind the Odors in Your Refrigerator


Why Is My Refrigerator Making Weird Noises!? 


* If you are a physicist, or other scientist who studies thermodynamics and we have gotten this wrong in certain instances, please understand that we are talking solely about heat in a refrigerator.


Harvest Bliss: Cranberry Pumpkin Nut Bread

A Decadent Fusion of Fall Flavors

Get ready for a delicious adventure with our Cranberry Pumpkin Nut Bread—a recipe that embodies the flavors of fall. It’s not just a bread; it's a hearty combination of pumpkin, spices, and delightful textures. Although it demands a bit of attention, trust me, every effort pays off in each aromatic slice.


Ingredients:

1 cup water, warm, plus enough water to fill a kettle

1 tablespoon active dry yeast

1 15 ounce can plain pumpkin

2 tablespoons sugar

1 1/2 teaspoon ground cinnamon

1/2 teaspoon ground ginger

1/4 teaspoon nutmeg

1/2 teaspoon salt

4 1/2 cups flour, divided

1/2 cup chopped walnuts

1/4 cup dried cranberries


Tools:

parchment paper

Dutch oven, caldero, or four loaf pans

measuring cups and spoons

mixing bowls

tea kettle or pot for water

smaller, heat-proof bowl

colander

clean kitchen towel


Quick word of caution: This will be a messy, time consuming recipe! Do not attempt to do this on Thanksgiving. If you're an experienced baker of bread, you might pull it off. But if you're us... You'll just create a mess and not have the bread til after dinner. 


Well before you intend to get anything going for this recipe, start a tea kettle or a pot of water on the stove. You can use the time while you wait for it to reach a boil to get your other ingredients out.


Once you have all your ingredients handy, begin by measuring your yeast into warm water and setting it aside to double in size. This should take five minutes or so.


Measure the flour, stopping at three and a half cups. Reserve the additional cup in another bowl. Don't forget to level your flour! It's going to be sticky dough and you'll likely be tempted to add more flour, but don't fall for it, and definitely don't sabotage yourself by starting with more than you meant to.


Include your sugar, salt and spices in the dry ingredients. We want to see them evenly mixed into your flour before any wet ingredients join the party, that way you don't end up with bland spots and spots that have too much cinnamon or something.


Around this point, our kettle usually begins to boil. Remove it from the heat, toss the cranberries in the heat proof bowl, and cover them with boiling water. Ignore them for five minutes or so - we just want them to be partially rehydrated so they're not sticky lumps in the bread later. After they've had time to absorb some of the water, strain the water out through the colander.


Add the pumpkin and the yeast mixture to the dry ingredients and stir well. Once you've got a relatively uniform consistency, you can add in the chopped walnuts and the cranberries. This is also the first point that your reserved cup of flour will make an appearance - work about half of it into the sticky dough you have here.


Cover the bowl with a clean kitchen towel and let it rise on the counter for three hours.


At the three hour mark, move the dough to the fridge, keeping it covered with the towel. Keep it in the fridge for at least an hour, or as long as overnight (if you're a forward thinker and got this done long enough ahead of time that you can refrigerate it overnight! Congrats on being wiser than us).


The chilled dough should be easier to work with, but we still recommend a set of food service gloves for this part. Take that reserved flour and dust a surface - a cutting board, the counter, some parchment, the table - whatever you have. We recommend parchment paper for ease of lifting later. Turn the cold dough out onto this floured surface and work it until it's smooth. Allow it to rise again where it sits for about an hour.


Preheat the oven to 450. That is not a typo, we really do mean 450.


In the photos, we've done this as one large boule in a covered pan - but we find the results to be much better if done as two small loaves in average loaf pans, and doing two loaves reduces the cooking time and the risk of burning dramatically. Learning from our mistakes here.


Toss two loaf pans into the oven to heat up with it, keeping the other two loaf pans out on the counter. Divide your dough in two and shape into two even-sized loaves. Place each loaf on its own sheet of parchment paper.


Once the oven has come up to proper temperature, don your oven mitts or grab a towel and remove the pans. Using the parchment to transfer them, place one loaf into each pan. Place both pans onto the middle rack of the oven. Invert the cool pans over top of the pans in the oven (we're using them like the lid of the Dutch oven here). Set a timer for 15 minutes.


At the 15-minute mark, remove the covers and set them aside to cool. Bake the loaves uncovered for another 15 minutes. When the timer is up, turn the oven off and let the loaves sit in there for another five to ten minutes before removing them. Use the parchment to lift them. Allow them to cool before cutting with a serrated knife.


As you savor every bite of this Cranberry Pumpkin Nut Bread, remember that Appliance Rescue Service is here for all your home needs. Share your baking success on our Facebook page and feel free to contact us for any appliance-related queries at (214) 599-0055 or through our website. From repairs to routine maintenance, count on us for all your major appliance requirements. Let the lingering aroma of this delightful bread remind you that we're dedicated to ensuring your home runs smoothly.


Additional Reading 

Impress Your Guests with This Easy-to-Make Apple Pecan French Toast Bake


Escapee From New York: Chocolate Bagels


Household Hauntings: The Frightening Reality of Appliance Neglect

 Don't Let Your Home Become a Haunted House

We’re a day late, but still very much in the spooky spirit at Appliance Rescue Service HQ! We’ve waited all year long for our favorite holiday, and we’re back with some of the terrors that can plague your home. Now join us as we dive into a haunted Halloween story that could take place in your very own kitchen. 


It's a dark and stormy night, as any good Halloween should be. You are baking away in your kitchen, looking forward to handing out goodies for the few brave trick-or-treaters. All is quiet in your home, and it’s looking to be a good night. 


 When you start smelling smoke, you think it must be the cookies you have going in the oven. But no, your oven isn't up to temperature yet, and the cookies are still in front of you. You open up the oven, thinking maybe there's something burning on the bottom, but no, there's nothing there, and yet the smell of smoke is getting stronger. 


You rush around looking for the source, and you keep coming back to your oven. That's when you notice there's a flicker coming from behind. Your wiring finally gave out and caught fire during the preheating stage. 


You rush to turn off the oven and grab your emergency fire extinguisher that you keep handy. Nothing else caught fire; nothing else has been damaged, except for the back of your stove and a bit of your wall. But the smell is gone; the fire is gone. 


You take a deep breath thanking heaven that it's not as bad as it could have been. Except now you hear a dripping. Drip drip drip. You take a deep breath and hope that the trick-or-treaters will forgive you because it seems like there's yet another problem. You start to search, and you find that this time, there is an issue with your dishwasher. It's a matter of your dishwasher valves having given out. You can't unplug it. You aren’t even sure where that plug is. 


So you rush to grab towels from your linen closet and throw them on the floor in front of it, praying that the damage won't be too bad and that you can catch it all in time. What else could possibly go wrong, you moan to yourself. 


Except it's Halloween, and that's a question you should never ask. As you kneel on the floor, picking up soaking wet towels to toss into the wash, there's a rattle, a rattle and a shake, and a vibrating unholy sound that is one part screaming metal and one part rattling of the chains of the Damned. 


You rush to your laundry room to find that it has rattled itself away from the wall and is even louder when you're standing in front of it. The clothes inside of it are perfectly fine, but you're not so certain about the wall. In rattling its way forward, your dryer has shaken down everything from the wall above it and is currently playing tug-of-war with both the electrical outlet and the vent housing. At this point, all you can do is pray that the lint catch has been cleaned recently and that it doesn't catch on fire as well. As you step forward to try and shove the dryer back into place, or maybe unplug it you, you slip. 


Your feet go out from under you, and you land smack on your back, feeling like you’ve been horribly maligned by someone designing a scene for one of the Final Destination movies. You stare up at the ceiling and notice that there are spots of mold creeping across your ceiling. Had they been there long? Were they the reason that this whole night had kicked off? Just one long hallucination induced by black mold? 


We hope you enjoyed that haunted tale, but take heed of the dangers that it represents. As taking care of your home and it’s needs means it will take care of you as well.  Other than the sounds that your dryer might make having been kicked up a little for narrative embellishment, everything we pointed out as a potential failure point for a non-maintained appliance can actually happen. All of these are issues that can occur in any home with any appliance. All of these spooky instances can and do happen in your home when appliances aren't cared for properly or regularly. Some appliances, like your oven or your dishwasher, might be able to get away with only yearly maintenance checks. Others, like your refrigerator, your dryer, or your ice maker, require more frequent checks, typically every 6 months if not every three. 


Appliance Rescue Service offers just that. We can work with you to set up a recurring maintenance schedule so that you don't have to worry about these issues. We review your appliances from top to bottom, looking for issues before they become hazardous to you or your home. If you're interested in finding out more about how we can work with you to ensure your home keeps running smoothly, you can give us a call at  ((214) 599-0055), or reach out to us through our website. We will work with you to set up a time that fits best with your schedule.


Additional Reading
Halloween Horrors in Your Home 

37 Reasons To Have Your Appliances Maintained Regularly


Purple People Eater Pieces

A Frightfully Fruitful Crumble From The Crypt

As we move closer to the best holiday of the year (no objections! - they'll just fall on deaf ears), it's time to start looking at creepy party recipes to feed a crowd of little ghouls, gremlins, goblins, or what have you.


Every year we try to conjure up at least one new spooky recipe. This year's is a dessert - purple people eater pieces.


It's a little bit pie and a little bit dump cake, and it's also a whole lot of mess if not carefully contained. So do be cautious in serving this one to littles or the spill-prone.


Ingredients:

1 1/2 cups frozen blueberries

1/2 cup frozen dragon fruit

1/2 cup brown sugar

1/2 cup water

1 teaspoon lemon juice

1/4 teaspoon five spice

1 container refrigerated biscuit dough


Tools:

large covered pot or Dutch oven

bowl

spoon

measuring cups and spoons

knife

cutting board


Begin with your blueberries - just scoop them out into a bowl. Your measurement doesn't have to be exact. Just get somewhere in the ballpark of a cup and a half.


Add the dragon fruit pieces to the blueberries. We know dragon fruit is not something you find in the produce aisle on a regular basis, but even in the middle of nowhere we were able to pick some up frozen at a big box store. We've also had the opportunity to grab fresh dragon fruit at a local family grocery store. If you don't have the same luck, fear not! Any red- or pink-hued fruit can sub in. Strawberry, cherry, cranberry, pomegranate, guava... Just know the color may not be so vibrant. Dragon fruit is rather exceptionally in-your-face pink.


Measure in your brown sugar and your five spice. We know the five spice doesn't look like much, but just a little of this stuff makes an impact. You'll know it's there.


Dump the bowl into the dutch oven. Measure the water into the same bowl to take up as much of the sugar, spice and fruit juice as possible, and pour it over the fruit and spices in the pan.


Turn the heat on low and give everything in the pan a good stir. The sugar should dissolve right off the bat, but it will take a bit for everything to heat through.


While waiting for it to come up to a simmer, grab your biscuit dough and pop the container open. Split them apart and put them on the cutting board, and cut your biscuits into pieces. We start with roughly quarters, then trim down a little from there. In our experience, there's always one biscuit in the package that's about three times the size of the rest on one side and squished down paper thin on the opposite. That one gets cut into a great many awkwardly shaped chunks.


Give the contents of the pan one more good stir, then drop your funny-shaped biscuit pieces on top of the fruit mixture. From this point on, do not stir.


Once you have your biscuit dough on top of the fruit, increase the heat to medium-low. Cover the pan and allow it to simmer untouched for 15-20 minutes. Stay close to the pan - the smell is the best indicator of when it's done. If you can smell the fruit and spices getting fragrant without lifting the lid on the pan, it's close to done. If you have a clear glass lid that's not too fogged up, it should look syrupy between the pale biscuit pieces.


When you feel like it's ready, turn the heat off and lift the lid. Allow it to breathe and set for five minutes before serving.


Serve in heaping scoops, with or without a little ice cream.


As our spooky culinary adventure comes to a delicious conclusion, we hope you've enjoyed crafting and savoring "Purple People Eater Pieces" as much as we've relished sharing this unearthly treat with you. Let us know over on our Facebook page how it was received! 


Halloween is a time for enchanting flavors and mysterious gatherings, but it can also be a season of unexpected surprises. If, amid the spectral celebrations, you find yourself in need of a visit from one of our trusted repair technicians at Appliance Rescue Service, don't hesitate to reach out at our website or by giving us a call ((214) 599-0055). Just as we've crafted this bewitching dessert to delight your taste buds, our skilled technicians are ready to ensure your appliances continue to perform their culinary magic, ensuring your celebrations remain seamless and your spooky feasts flawless. Wishing you a hauntingly good time this Halloween season!


Additional Reading:

Chocolate Pecan Cake for a Special Date


Sweet Veggie Tropical Curry