Easy Steps to Get Ready for a Garden Party

No, we can’t say “Just buy all of the plants.”


It's the end of spring, and things are heating up. People are planning garden parties, barbecues, and pool parties every weekend between now and September. Preparing for an outdoor party isn't just about the food and who you will invite, though. Much of it takes planning well in advance. And yes, you can just have people come and go and do all the work for you, but sometimes you want to do the work yourself.  You've got to plan out the garden, patio with seating and arrangements, the grill, and then all the food. Fortunately, you're not alone in this, and we can help. 

A simple summer party, with picnic tables, tea cups, saucers, a single, fork and napkin per setting in a well maintained garden.

Courtesy of ThorstenF


Cleaning up the outdoors

Garden

Let's get started then with your garden. Take a look around, and consider where it is now and where you want it to be before guests come. Is it at that point? If so, feel free to skip this! If not, let's dig in. 

By this point in the year, you've probably got weeds coming up in between your bricks and cement as well as in your garden beds. Start with applying a layer of borax in between all of the cracks and let it sit for an hour or so.  While that is going, let's tend to your garden beds and get those weed-free. Make sure that as you pull, you've got a basket to toss them into; this way, they don't get left in the beds to regrow or drop seeds. When you're done with that, it should be time to hit the bricks with your vacuum and gather up all of the borax. Once you've gathered it all up, go ahead and grab your powerwasher. At this point, the weeds are very much dead, and all you need to do is blast them out of existence, so you might as well use the time to give your pathways a scrubbing as well. From here, you can move on to your patio or deck and get rid of the grime for winter. As a last spot, let's go ahead and give the doors coming out onto the patio a quick cleaning. Make sure to pay attention the sills and door frame, as dirt loves to build up there. 

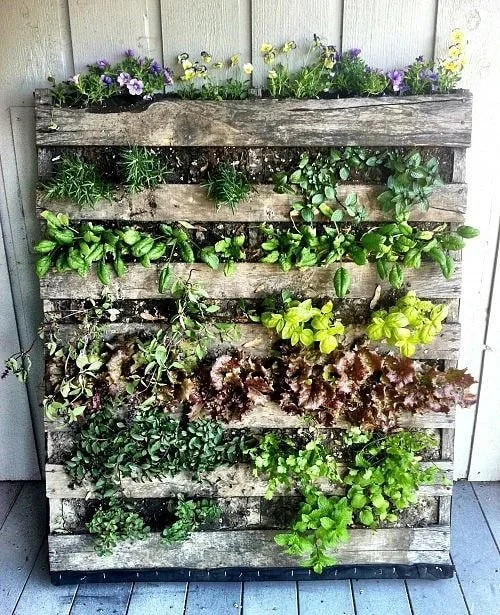
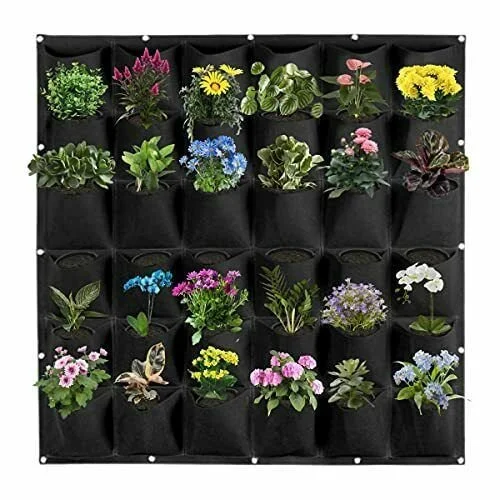
Now that everything's looking nice and shiny, let's talk about plants. Do you have any that you've been meaning to add to your garden but haven't gotten to? Have you read our article about dry gardens and been thinking about trying that out? Now's the time to do it.  Do you have a particular theme that you want your garden to reflect? Or maybe you just want it to be a colorful riot. Whatever it is, it's sure to be the talk of the party. 

a iot of flowers all daiseys of some sort, in red, yellow, purple white and orange.

Courtesy of Carmen


Patio 

Once you've gotten everything cleaned up and your garden sorted, you've got a blank canvas to work from when it comes to planning the party itself. Use this time to think about seating arrangements, cover from the sun, and where you'll have food. Take time to consider how people will move through the space as well. There's nothing worse than having everything become crowded and jumbled because people can't move easily from one area to the next.  Once you've got, it worked out, go ahead and sketch out a plan for it so that you know when you're laying things out later on. 


You've done the hardest part; now, let's jump back into some cleaning. 

While ideally, you'll want to clean your patio furniture at the beginning and end of the season, it's handy to keep some heavy-duty cleaning wipes in a storage area so that you can spot clean as it's needed.  For your furniture, we suggest grabbing your vacuum and using the soft bristle brush to go over everything, to gather up dust and pollen and any debris from your weeding earlier. If you've got wicker furniture, you can tackle that with a kitchen cabinet cleaner. It'll clean away messes without leaving residue or stripping off the varnish from your furniture. You can use a couch protecting spray on your cushions, arm rests, and pillows either just after you take them out of storage for the season or after washing them. It'll protect them from stains and make wiping them clean easier later. 

It's a good idea to invest in some blankets for benches and coordinating table clothes to create a warm, relaxing feeling for your guests the day of the party. Plus, if you choose the right type of blankets (something in cotton or linen), it can help with keeping people cool. Which, given the Texas heat, we could all use.) 

You'll also want to pick up different lights and test them out during the planning stages. Fairy lights are easy to come by, and they create a soft glowing atmosphere while also marking out areas guests can go and can't. Small lanterns on tables can provide pools of light, and if you use citronella oil inside them, you can protect your guests from pests as well. 

A more established garden party, with tiered food displays, multi-piece food settings and separate tables for other foods and cutlery.

Courtesy of daniellam


Setting Up Indoors

Celebrate! You've gotten your outdoor area all set up, and now it's time for the last stage, cleaning up and organizing indoors. 

Let's start by giving everything a good scrub. We're not talking about the usual cleaning up spills and crumbs; we're talking about making sure everything is shiny for guests. Put away any of your small appliances that you won't be using the day of the party. (This is when having an "appliance garage" is fantastic, in our opinion.) You want to make sure that you have enough room for all of your food, dishes, cutlery etc. You also want to make sure that you've got separation space between your food prep area and your serving area. Ideally, this will be prepping in the kitchen and serving outside, but due to heat, bugs, etc, you don't always want to do things that way.  You want to make sure that if you're cooking on a grill outside that, you also have a clear separation between food prep and serving. Nothing is worse than making some delicious burgers and getting everyone sick because you put them onto the same platter you brought the raw meat out on.  


Speaking of your grill, this is a good time to go over it. Is it clean? Have you cleaned out any built-up ashes, fat, gunk, etc? Are the grates clean? Have you made sure that you have enough of your fuel of choice and that the grill itself is sound and whole? Better to check these things now, rather than right before the party when you won't have time to fix it. 

With all of that taken care of, all that's left is to enjoy the day of the event. Spent time with friends and family, enjoy the food you've made and your garden, and relax, knowing you made all of it happen. It's not always easy to put together a garden party, but it is so worth it for the memories we get to share. 

If you do have a party at some point over the weekend, let us know on Facebook and share the photos! We'd love to see what you got up to.


If you wound up here not because you're looking at willingly using your grill but are doing so because your stove quit on you, well, we can still offer help. Believe it or not but we specialize not in organizing backyard parties but in repairing your major appliances. Whether you live in McKinney or Dallas, Coppel or Garland, we have you covered. You can reach out to us on our website or by giving us a call at ((214) 599-0055). We'll work with you to find a time that fits your schedule so that we can get your home running smoothly again. 


Orchard Bread, The Whole Year Round

Using different fruits you can make this tasty treat all year and celebrate the turn of the seasons too!

What's filling, sweet, and easy to carry and won't make you feel like you have a car tire around your middle? Orchard bread. Call it fruitbread, fruitcake, cherrybread, orchard bread, whatever you like. The basic concept is the same. Lots of delicious dried mixed fruits + a sweet bread base.  It's delicious, it's wonderful any time of year, and if you wrap it properly, you'll be able to eat it before it turns into a doorstop. 

Ingredients:

3/4 cup golden raisins

3 Tbsp amber rum

3/4 cup all purpose flour

1/2 tsp baking powder

1/4 tsp baking soda

kosher salt

It doesn’t have to be this particular brand, but you want to make sure that it says unsulphured on the bottle so the recipe turns out right.

1/3 C packed brown sugar (dark or light will work, but we suggest light) 

1 1/2 cups packed dried strawberry halves 

1/3 c dried cherries

1/3 c dried cranberries

3 c walnut halves, lightly toasted 

3 eggs

2 Tbsp unsulphured molasses (so this recipe wouldn't work with blackstrap) 

2 tsp pure vanilla extract 

Tools:

small microwave safe bowl, 9x5 inch loaf pan, parchment paper, large bowl, whisk, a small bowl (doesn't have to be microwave safe this time), silicon spatula, tin foil.

To start off, grab your small bowl, and toss in your golden raisins and rum. Cover them with a plate and microwave until their warm, not steaming, roughly a minute. Set that to the side, keeping it covered and check back on it in 15 minutes to give it a stir, and then again at the 45 minute mark. Leave it alone for a further 15 minutes, making it roughly an hour in total. At that point the raisins should have absorbed most of the rum. Drain off any liquor that's left to either use again at another point, or drink it yourself if you're over age. 

Now preheat your oven to 300*F and make sure that there is a rack in the middle of the oven. Grab your loaf pan and parchment paper. Measure out two sheets of parchment paper, one going lengthwise and one going crosswise. You want enough paper here to push down into the corners of the pan and still have 'handles' hanging over the sides. Start from one corner and work to all of the others, slowly smoothing the paper into the corners so that it's flush. Any bumps or wrinkles in the paper or going to lead to bumps or wrinkles in the bread. Use a stick of butter and apply a layer to the parchment paper, making sure to coat everything within the pan. 

Next up, grab your flour, baking powder, baking soda, 1/2 tsp of your salt and then your brown sugar of choice. Whisk all of it together in a large bowl and make sure to break up any clumps as you go. Set aside your whisk and add in your strawberries, cherries and raisins and toss to coat everything. Add in the walnuts and toss again to combine and coat the walnuts. 

Take a clean small bowl and your whisk and beat together the eggs, molasses, and vanilla until everything is well mixed. Now grab your spatula and add your fruit-nut mixture, folding and mixing to combine and coat all of the pieces with the batter. You want to make sure that there aren't any pockets of dry ingredients on the bottom or at the edge of the bowl. Pour the batter into your loaf pan, scraping the bowl to get any remaining bits into the pan. Tap the pan against the counter several times to release any air bubbles, and use the spatula to smooth the top into an even layer. 

Bake the cake for an hour, rotating the pan after 30 minutes. If your bread is browning too much at the halfway mark, you can cover it loosely with a tent of foil. When the top is a deep golden brown, it's done! Remove it from the oven and place to pan on a wire rack to let it cool. 


When it's finally cool, grab the handles you left yourself and remove the loaf from the pan. Use a bread knife and cut it into thin slices and serve. IF you have any leftovers, they can be wrapped well in wax paper and store it in an airtight container for a week at room temperature. 

You can serve it with various butters or fruit jams for a delicious snacks or breakfasts. You could also work up a quick icing with milk and powdered sugar and drizzle it across the top. 

Courtesy of Peggychoucair


So, what do you think? Are you up for doing some experimental baking this weekend? What other fruits would you add into the mix? Let us know in the comments below or over on our Facebook


If you ended up here instead because your stove isn't working properly, give us a call! You can get hold of us at ((214) 599-0055) or by going to our website to set up an appointment that works for you.

7 Ways To Build a Living Wall

How to build your own living wall, to bring plants into your home for a brighter, healthier home. 

This month we're focusing on outdoors-y things, from setting up for a backyard party, to choosing the best grill for you, and a few others. This week's post is focusing on making your space more inviting with a living wall of plants! It's not just a wonderfully popular trend right now, it's also an amazingly useful and restorative concept to include in your home. Having plants around the home has been proven to be good for you body, mind and soul. Not only does having more green around the home help with your health (provided you choose plants you're not allergic to) but it also gives you a sense of peace when it comes to tending them.  With all of that in mind you're probably asking "how do I make a living wall then Blogger?" Fortunately for you, that's just what we're going to cover, 8 different ways you might make your own at home, whether it's outdoor, or in. 


Pallet Living Wall

Old wooden pallet turned into a series of planters, with many different plants growing every which way.

Photo courtesy of Backyard Boss

If you're looking for a way to get a living wall into place quickly, without having to do much building or designing, a pallet wall is a good choice. Get hold of 2-3 pallets from your local hardware store (they're typically willing to just give them away, but be sure to ask.) Once you've got them home, give them a quick run over with sanding paper, a hammer and possibly a grinding saw, to get rid of any rough or dangerous spots. You can paint or stain them if you want, we like the rough wood look ourselves, but it's up to you how much of the pallet is going to be showing. Next is to choose, do you want the wall to be horizontal, making a low wall, or would you rather have one tall section? Keep in mind that both choices are going to affect how you interact with the plants you choose and caring for them. From here go ahead and attach them to your chosen surface.  Some options here for you: you can attach them to your fence, to a wall of your house, or to build a frame for them. Then your final step is to fill them with earth (take your pick here, there are posts that are far better at discussing the differences in dirt and how they affect plants than us) and fill in the openings with the plants of your choosing. We like ivys as they will flow both up and down, and create a very real "wall" given time. 


Using Mortar Screws

Black angled planters attached to a stone exterior wall with suculent plants spilling out of the planters.

Photo courtesy of Angela Rose Home

If a pallet wall isn't your thing, you might consider attaching planters directly to a wall of your house. Make sure that whichever wall you choose is stable and won't be damaged by having mortar screws driven into it. Then get hold of a set of planters you like and a drill. Drill through the planter and set a starting hole into the mortar of your wall. Then get hold of your mortar screw and attach the planter. Like before, your final step is to fill your planters with your choice of dirt and plants. We think this type of planter set up is great for herbs of different types, giving each planter their own space. 


Fencing or Chicken Wire Living Wall

This one is going to sound a bit weird, but if you have ever seen how ivy grows, you'll understand. Make a wall using either fencing, or chicken wire, or a combination of both. Then choose your plant that will twine and grow up said wall. Honeysuckle? Ivy? Hydrangeas? (Yup, they climb!) Nasturtiums or Climbing Roses? All of these, and so many more are options.  All you need to do is to plant them at the base of you wall, and as they grow, weave them through the gaps. With time you will have a full living wall to add to your backyard. 


Chains Attached to or Connecting Planters

If you're looking for something a little more artistic, this might be up your alley. Start by either building a frame, like an upside-down and very square U. Then attach flat bottomed planters to two lengths of chain, one on either side. Our suggestion is to drill through the sides of your planters and use eyebolts along with washers and nuts on the inside. Repeat this process at heights that work for you, making sure to take into account the heights your desired plants should grow to, plus two inches or so. So if you're using succulents that you plan to keep relatively small, you might only need 5 inches or so between the top of one planter and the bottom of the one above it.  If you want something like onions, though, as an example, you need to consider that they can grow as much as 18 inches in height. 


Planters with Hooks

What if you've already got a wall, though? But it's too large for you to try and fill all of it with dirt to plant in? Or if you live in an area that's rather windy, and you need to be able to bring in your plants during poor weather?  In that case, you might consider planters with hooks on them. If you hang them on the bars of your theoretical wall, then you'll have a lovely plant wall that you can even rearrange! 


 Hanging Fabric with Pockets

This was one that surprised us, but really shouldn't have. There are so many different inventive ways of setting up a planter wall, that someone decided "instead of heavy planters, I'll use fabric." Yup, imagine a roll of dense gardening fabric draped over a wall or section of wall of your choosing, and then sew row after row of pockets onto it. You can do this one indoors or outdoors, and we've seen some that are only 5 or 6 pockets wide, and we've seen some that are 20 wide. This one is versatile for sure, but we have to question how long it will last with the weight of both dirt and plants, and then any flowers or fruit that those plants might bear. 


PVC Pipe Living Wall

Our final version is for when none of these have been quite right. You want something a little more industrial, a little more colorful maybe. In that case a set of PVC pipes might be up your alley. What you'll want for just one unit is a length of PVC pipe, and two caps. Taking just the PVC pipe, cut out a strip, roughly half an inch wide, running the entire length of the pipe. Now attach the bottom cap, probably using glue or plumber's cement to ensure it can't come off. Fill your pipe with dirt up to the point where you want your first plant, and then carefully place the roots inside the pipe, with the 'plant' portion on the outside and slide it down until you hit your first layer of dirt. Repeat this process all the way to the top, and then apply the top cap. To this one, we do not advise using a sealant, just incase you need to be able to move things around. For that same reason, we don't suggest permanently affixing this to the wall, and instead using a different system of your choosing to fix it to the wall. We like the idea of screws similar to what you would find on  a picture frame, but larger. The best thing about this sytem is that you can paint the PVC any color or design you want. Want zebra stripes? Go for it. Aged copper? You've got it! Making it look like something you scavenged out of a long-lost ruin of a bygone scientific age? The sky is the limit. 


What is your favorite out of these options? Do you have one you want to use in your home or are you still thinking about it? Let us know in the comments below or over on our Facebook page. 


If you're tired of talking plants, though, and just want something that works, we can still help. If you've got an oven that won't hold heat or a washer that leaks, we can help. Give us a call at ((214) 599-0055) or visit our contact page to set up an appointment. We'll work with you to diagnose and fix the problem so that your home can start running smoothly again.  We serve everywhere between Dallas and McKinney, from Coppel to Garland, and we're here to help you.

Ginger-Pear Braised Beef

A dish sure to impress, warm, savory and sweet, all at once.


I Don’t Care, Take Me To The Recipe!


You need something nice enough to impress guests and delicious enough that they’ll remember it rather than be bored by more ‘traditional’ guest meals. The answer? Go old-school. Grab a hunk of beef and cook it with ginger, cider, and pears to give it a delicious, warm taste that they won’t forget, but that hasn't been done a million times over. 


Ingredients: 

3 lbs beef chuck roast, trimmed of excess fat

Kosher salt 

Fresh ground black pepper

2 Tbsp neutral-tasting oil. Ex vegetable, canola, or grapeseed

5 yellow onions, thickly sliced

1 tsp dried thyme, crushed

2 tsp ground ginger

1 ½ Tbsp all-purpose flour

1 cup sparkling hard cider, pear, or apple (although pear is preferred) 

½ cup low-sodium chicken broth

3 ripe (but still firm) Bosc, Bartlett, or Anjou pears

¾ tsp cider vinegar

¼ cup chopped fresh parsley 


Tools Needed: 

Knife, cutting board, kitchen twine, Dutch oven, large bowl, slotted spoon, paring knife, peeling knife. 


Start off by grabbing your pears. You’re going to peel the skin off, core them and then chop them into 1-inch pieces. 


Next, grab your beef and set it on a cutting board. Dry it with paper towels and then tie it into a uniform shape with kitchen twine at 2-inch intervals. So your best bet is to start off by wrapping one long strand around the length of the brisket to get the ‘mid line’ and then going at 2-inch intervals up that, so you end up with something similar to a corset around your brisket. Now season liberally with salt and pepper. 


Take your Dutch oven over to the stove, put it on medium-high heat, and warm 1 tbsp of your oil until it’s shimmering. Add the beef to the pot and cook until it’s deeply browned on the bottom. This should take 3-4 minutes, so set a timer and walk away. You don’t want to bother the meat during this process so that you get an even crust on that side. When the time is up, and it’s reached a deep brown, turn it and repeat this for the other three sides. Remove the brisket from the pot and set it aside in a bowl. 


Keep the pot on medium-high and add the remaining oil, and warm until it’s shimmering. Add your onions and an additional 1 tsp of salt and cook, stirring and scraping the bottom of the pot occasionally until your onions are softening and releasing liquid. (This should be roughly 4 minutes.) Turn the heat down to medium-low and keep cooking for an additional 15 minutes, stirring and scraping the bottom of the pot; turn the heat down as needed so that your onions are simmering and not burning. Seriously, “burn” does not taste good in this recipe. Add the thyme, ginger, and flour and continue to cook, stirring until the onions are sticky and golden, roughly 5 minutes. Add your cider, broth, and ½ tsp salt. Stir and scrape the bottom of the pot to loosen and dissolve any browned bits. 


While that’s going, open up your oven, and move a rack to the lower middle, then preheat the oven to 300*F. 


Add the beef back into the pot, and make a slight ‘nest’ in the onions for it. The onions and aus-jus in progress should cover ¾ of the meat. Put the lid on the pot, place it into the oven and allow it to cook for 1 hour and 35 minutes. After that, you’ll add in the pears, stirring them very slightly into the onions. Return the pot to the oven and continue to cook covered until the beef is extremely tender. This should be roughly 2 hours and 15 minutes more. 


Transfer your beef to a cutting board, and using a large slotted spoon, move the onions and pears onto a serving platter; cover loosely with foil to keep warm. 


Pour the liquid from the Dutch oven into a measuring cup and let it rest for 10 minutes, or until all of the fat rises to the surface. Tilt the cup to the side and use a soup spoon to skim off the fat and dispose of it. (Or, if you’re like us, drizzle it over your dog’s food.) Add the vinegar and most of the parsley to the liquid and stir to combine. Taste and adjust the seasoning with salt and pepper if needed. 


Finally, cut the twine off of your brisket and cut it against the grain into ½ inch thick slices. Place the meat on the platter with the onions and pears, pour the juices over the meat and serve. 


If you’re not sure what to have as a side dish, we’d have to suggest roasted sweet potatoes and a fresh loaf of crusty bread. 


Now that you’ve tried it, what do you think? Delicious, right? Let us know over on our Facebook page. We’d love to hear from you. 


Making Your Home Sustainable

Definitions, Retrofitting and Small Choices to Make Your Home Greener and More Sustainable

Table of Contents

Definition

What does that mean for a home?
Some ways you can achieve it. 

Benefits! 


Do you ever wonder what all of the jazz is about being 'sustainable?' What does it even really mean? We're taking a look at that, some ways to retrofit your home to be sustainable and everyday choices you can make. 

Definition

According to Merriam Webster "sustainable" can be defined as: 

-able to be maintained at a certain rate or level.
"sustainable fusion reactions"
-conserving an ecological balance by avoiding depletion of natural resources.
"our fundamental commitment to sustainable development"

What does that mean for a home?

So your home in theory needs to either be "able to be maintained at a certain rate or level" or "conserve an ecological balance by avoiding depletion of natural resources.  Well, that gives us a start, but it's not really clear is it? After all, once a home is built, you're not doing a ton to bring in new materials, or are you? Let's try looking at it this way. A sustainable  home should be one that's either built or retrofitted in a way that it respects resources and their availability, optimizes energy usage and creation (when possible) and uses water wisely. Sustainable homes use low-impact, high-performance materials throughout, and are efficient in terms of manufacturing, shipping and installation. 

So ideally, whether you're retrofitting your home or looking to build from scratch, your home should "respect resources," optimize energy usage, and use water wisely. With that list in mind, that's considerably more manageable to tackle than trying to redo EVERYTHING from the ground up. Wouldn't you say? 

Some ways you can achieve it.

These are meant to be a guide for you, not a step-by-step outline. If you want more information and more in-depth guides, let us know in the comments and we'll expand on it! 

First off, don't try and do everything at once. Pick one section, list what falls under that section in your home, and then look to see what you can change. Out of everything else that we talk about today, that's the most important one to keep in mind. If you try and take everything on at once, you'll burn yourself out before you get it done. 

Both retrofitting and building new will have drawbacks, so consider carefully before you decide. Make a list of pros and cons to get a better grasp on what will affect your day to day life, finances and family. 


Different things you can look at include:

- Building materials - Sustainability isn't just "are these materials going to last a long time," it's also "how are these materials harvested?"; "How are they made?"; and "how are they used?"

-Building methods - Can you have a cool roof? What about designing your home in a way that allows air to move fluidly through the home? 

- Insulation- You want to look at a type of insulation that is sustainably produced, and is also going to protect your home best from loss of heat and cold. 

-Windows - Again, keeping heat and cold in or out of your home, your windows are a big deal. 

-Heat, ventilation and air conditioning

-Plumbing fixtures

- Appliances -  Energy Star appliances 

- Energy generation from solar and wind- If you can generate power on your own property, you can reduce your bills which is always a win. 

- Your habits when it comes to regular maintenance, conservation and green cleaning


For this post, we'll focus on retrofitting your current home, with the potential of covering building from the ground up later. 

Replacing Windows

-Why - It results in less loss of heating/cooling and makes your home quieter. (Which we absolutely love, and bet you will too.) 

-How - Look for windows that are tagged "low solar gain." This means less heat is conducted into your home through the windows. Reflective tech and double glazing are supremely important for keeping even more heat out. It also doesn't hurt to look at windows you can open on a breezy day. 

Appliances 

-We've talked about the Energy Star Seal before and how important that is to cutting your bills. Investing in appliances that are energy efficient is good not only for the environment but also for your environment as they draw less energy from the grid. 

Ditch Your Sprinkler System

-While we are planning on talking about the benefits of getting rid of a 'traditional' lawn, for now let's consider a drip irrigation system. 

Rather than watering your lawn 2-3 times a day just to keep it green, this is more efficient. Instead of soaking your yard and hoping the water gets to the roots, a drip irrigation system uses gravity to go directly to the roots. You save electricity and water. Double Win. 

Every day changes you can make include the following: 

-Draft proof your windows and doors- Seal them at the edges with foam or tape to help them close more firmly and keep drafts out. 

-Invest in curtains or blinds, or both! - We've talked before about the importance during winter or summer of keeping your windows covered, and it's just as important now. While we know that curtains and blinds are as much a matter of design choice as anything else, using both can help cut down on your bills further. 

-Reevaluate your home's insulation - Whether you go through your attic or basement, or take a look at the building plans for your home, check out what type of insulation was used on your home. It might be a project to tackle one room at a time to improve it and keep your home better insulated. 

-Install solar panels 

-Clean your refrigerator's coils - Keeping your refrigerator clean helps to keep it running more smoothly and staying cool. 

-Clean your dryer vent 

- Clean your dishwasher's filter

-Install a water filter that removes microplastics - Let's be frank, no one wants to eat plastic. Right now it's theorized that each of us is eating approximately enough microplastics to form a credit card, every day. Right now the easiest way to stop that is to install a water filter. Although it won't do anything to microplastics in your food, it's a place to start. 

-Replace fluorescent bulbs with LED bulbs

-Clean out your gutters -Having overflowing gutters will not only affect your home, as we've discussed in the past, but it will also keep water from flowing into your drip irrigation system. 


Benefits! 

-Using less water and electricity, results in lower bills for you! 

- Lower maintenance costs 

Since one of the definitions of sustainability is "able to be maintained at a certain rate or level," a well-built green home is going to last for a very long time. Thanks to construction methods, your home will require less maintenance over time, which means less money spent to maintain it. 

- Lower carbon footprint and better for the planet

A house with a green door has a set of leaves coming out of the peak of the roof  to imply that the home is green and sustainable


Do you think you'd like to go sustainable? What reasons are keeping you from doing so? Drop us a line in the comments below or over on our Facebook page. We'd love to hear from you! 

If you're here because your refrigerator isn't keeping cool, or your dryer is taking forever to run, we can help! You can reach out to us on our contact page or by giving us a call at ((214) 599-0055). We'll work with you to set up an appointment that works for your schedule.