
How to build your own living wall, to bring plants into your home for a brighter, healthier home.
This month we're focusing on outdoors-y things, from setting up for a backyard party, to choosing the best grill for you, and a few others. This week's post is focusing on making your space more inviting with a living wall of plants! It's not just a wonderfully popular trend right now, it's also an amazingly useful and restorative concept to include in your home. Having plants around the home has been proven to be good for you body, mind and soul. Not only does having more green around the home help with your health (provided you choose plants you're not allergic to) but it also gives you a sense of peace when it comes to tending them. With all of that in mind you're probably asking "how do I make a living wall then Blogger?" Fortunately for you, that's just what we're going to cover, 8 different ways you might make your own at home, whether it's outdoor, or in.
Pallet Living Wall
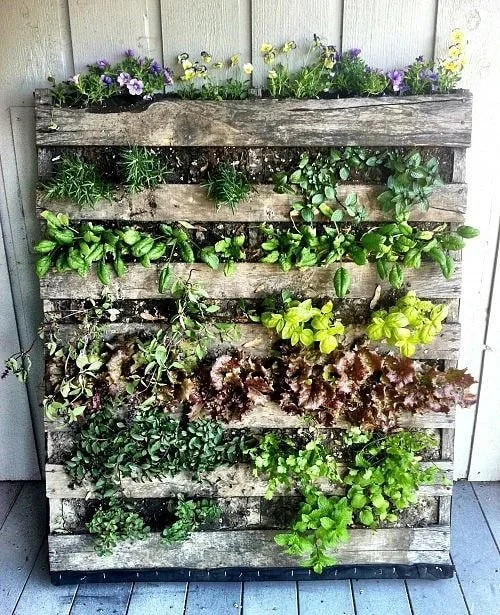
Photo courtesy of Backyard Boss
If you're looking for a way to get a living wall into place quickly, without having to do much building or designing, a pallet wall is a good choice. Get hold of 2-3 pallets from your local hardware store (they're typically willing to just give them away, but be sure to ask.) Once you've got them home, give them a quick run over with sanding paper, a hammer and possibly a grinding saw, to get rid of any rough or dangerous spots. You can paint or stain them if you want, we like the rough wood look ourselves, but it's up to you how much of the pallet is going to be showing. Next is to choose, do you want the wall to be horizontal, making a low wall, or would you rather have one tall section? Keep in mind that both choices are going to affect how you interact with the plants you choose and caring for them. From here go ahead and attach them to your chosen surface. Some options here for you: you can attach them to your fence, to a wall of your house, or to build a frame for them. Then your final step is to fill them with earth (take your pick here, there are posts that are far better at discussing the differences in dirt and how they affect plants than us) and fill in the openings with the plants of your choosing. We like ivys as they will flow both up and down, and create a very real "wall" given time.
Using Mortar Screws

Photo courtesy of Angela Rose Home
If a pallet wall isn't your thing, you might consider attaching planters directly to a wall of your house. Make sure that whichever wall you choose is stable and won't be damaged by having mortar screws driven into it. Then get hold of a set of planters you like and a drill. Drill through the planter and set a starting hole into the mortar of your wall. Then get hold of your mortar screw and attach the planter. Like before, your final step is to fill your planters with your choice of dirt and plants. We think this type of planter set up is great for herbs of different types, giving each planter their own space.
Fencing or Chicken Wire Living Wall
This one is going to sound a bit weird, but if you have ever seen how ivy grows, you'll understand. Make a wall using either fencing, or chicken wire, or a combination of both. Then choose your plant that will twine and grow up said wall. Honeysuckle? Ivy? Hydrangeas? (Yup, they climb!) Nasturtiums or Climbing Roses? All of these, and so many more are options. All you need to do is to plant them at the base of you wall, and as they grow, weave them through the gaps. With time you will have a full living wall to add to your backyard.
Chains Attached to or Connecting Planters

If you're looking for something a little more artistic, this might be up your alley. Start by either building a frame, like an upside-down and very square U. Then attach flat bottomed planters to two lengths of chain, one on either side. Our suggestion is to drill through the sides of your planters and use eyebolts along with washers and nuts on the inside. Repeat this process at heights that work for you, making sure to take into account the heights your desired plants should grow to, plus two inches or so. So if you're using succulents that you plan to keep relatively small, you might only need 5 inches or so between the top of one planter and the bottom of the one above it. If you want something like onions, though, as an example, you need to consider that they can grow as much as 18 inches in height.
Planters with Hooks
What if you've already got a wall, though? But it's too large for you to try and fill all of it with dirt to plant in? Or if you live in an area that's rather windy, and you need to be able to bring in your plants during poor weather? In that case, you might consider planters with hooks on them. If you hang them on the bars of your theoretical wall, then you'll have a lovely plant wall that you can even rearrange!

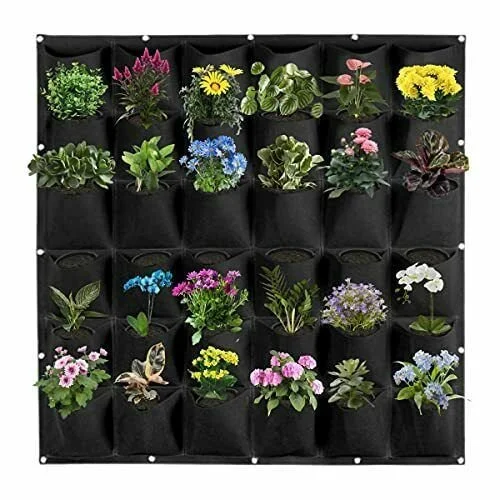
Hanging Fabric with Pockets
This was one that surprised us, but really shouldn't have. There are so many different inventive ways of setting up a planter wall, that someone decided "instead of heavy planters, I'll use fabric." Yup, imagine a roll of dense gardening fabric draped over a wall or section of wall of your choosing, and then sew row after row of pockets onto it. You can do this one indoors or outdoors, and we've seen some that are only 5 or 6 pockets wide, and we've seen some that are 20 wide. This one is versatile for sure, but we have to question how long it will last with the weight of both dirt and plants, and then any flowers or fruit that those plants might bear.
PVC Pipe Living Wall
Our final version is for when none of these have been quite right. You want something a little more industrial, a little more colorful maybe. In that case a set of PVC pipes might be up your alley. What you'll want for just one unit is a length of PVC pipe, and two caps. Taking just the PVC pipe, cut out a strip, roughly half an inch wide, running the entire length of the pipe. Now attach the bottom cap, probably using glue or plumber's cement to ensure it can't come off. Fill your pipe with dirt up to the point where you want your first plant, and then carefully place the roots inside the pipe, with the 'plant' portion on the outside and slide it down until you hit your first layer of dirt. Repeat this process all the way to the top, and then apply the top cap. To this one, we do not advise using a sealant, just incase you need to be able to move things around. For that same reason, we don't suggest permanently affixing this to the wall, and instead using a different system of your choosing to fix it to the wall. We like the idea of screws similar to what you would find on a picture frame, but larger. The best thing about this sytem is that you can paint the PVC any color or design you want. Want zebra stripes? Go for it. Aged copper? You've got it! Making it look like something you scavenged out of a long-lost ruin of a bygone scientific age? The sky is the limit.
What is your favorite out of these options? Do you have one you want to use in your home or are you still thinking about it? Let us know in the comments below or over on our Facebook page.
If you're tired of talking plants, though, and just want something that works, we can still help. If you've got an oven that won't hold heat or a washer that leaks, we can help. Give us a call at ((214) 599-0055) or visit our contact page to set up an appointment. We'll work with you to diagnose and fix the problem so that your home can start running smoothly again. We serve everywhere between Dallas and McKinney, from Coppel to Garland, and we're here to help you.