The “Healthier Than Your Average Sandwich” Sandwich

5 Servings of Veggies in ONE Dinner That Doesn’t Taste Like Sawdust

Like a great many people, you may be looking for ways to boost the nutritional value in your meals. We're always on the lookout for little ways to make the same tasty foods we already love work a little harder. We also love to hide some veggies in other foods, but that's a story for another time.

This time around, we're making chicken sliders. But with veggies. And we aren't just talking about the lettuce and tomato you might put in your sandwich - we're hiding a whole three servings of veggies in the chicken patty itself, and some oats.

We know it sounds crazy. Just trust us here. It still tastes like chicken, but you have a bunch of extra fiber, vitamins and minerals working in your favor now. You know exactly what went into it (unlike some brands of frozen patties, where the ingredients list is so long and so chemical-sounding that by the end you're still not sure whether or not it's food), so the slight difference in color from the norm shouldn't be a shock. And besides, you're putting it on a bun anyway, probably covered in ketchup, barbecue or buffalo sauce and a mountain of lettuce, tomato, pickles and onion.


Ingredients:

1 pound raw ground chicken

3/4 cup quick or old-fashioned plain oatmeal

1/4 cup grated Parmesan or Pecorino-Romano cheese

1 Tablespoon cayenne pepper (you can use paprika instead if someone's not into spicy food)

1/2 teaspoon salt

1/2 teaspoon black pepper

2 Tablespoons powdered chicken bouillon

2 Tablespoons dried parsley 

2 cups butternut squash puree

1 yellow squash

3/4 lb chopped cauliflower

Buns, cheese and sauce or veggies of choice for serving.


Tools:

Knife, cutting board, grater, food processor, measuring cups and spoons, mixing bowls, loaf pan, aluminum foil, cooking spray, meat thermometer. A gallon zip-close plastic bag can also make the process easier, if you have one.


If you're not buying you butternut squash already peeled and cubed, the first thing you should do is preheat the oven to 350 and toss the squash in. It's much easier to skin, cut and mash or blend if it's been roasted first - and roasting it will take about an hour. Your oven needs to preheat anyway, so go ahead and put it to work a little early.

However, if you brought home the peeled, cubed, steamable kind, you've just saved yourself about 40 minutes of waiting, and can skip this part and go right to the steaming process. Steam it according to package directions, and once it's done, just set it aside for a bit. We'll pulverize it later.

Start out by measuring your oatmeal and your grated cheese, cayenne or paprika, salt, pepper, and powdered bouillon into the food processor. Pulse it a couple times for about ten seconds, and once it's fine and powdery, transfer it to another bowl or container to make room in the food processor.

In the event you have a whole head of cauliflower, give it a wash and chop it now. If your cauliflower is the fresh or frozen already-crumbled variety, you get to save a bunch of effort and skip those steps. Whichever one you started with, put it in the steamer or microwave now. It'll need a little time to cook up - but not near as much as the squash. Keep an eye or an ear on it to make sure you don't end up turning it into baby food by overcooking it. Although honestly, if it does turn to mush, it just saves you from having to put it into the food processor later - so pick and choose your battles. (Would you rather poke cauliflower mush out of the steamer basket or scrub it off the food processor blades?)

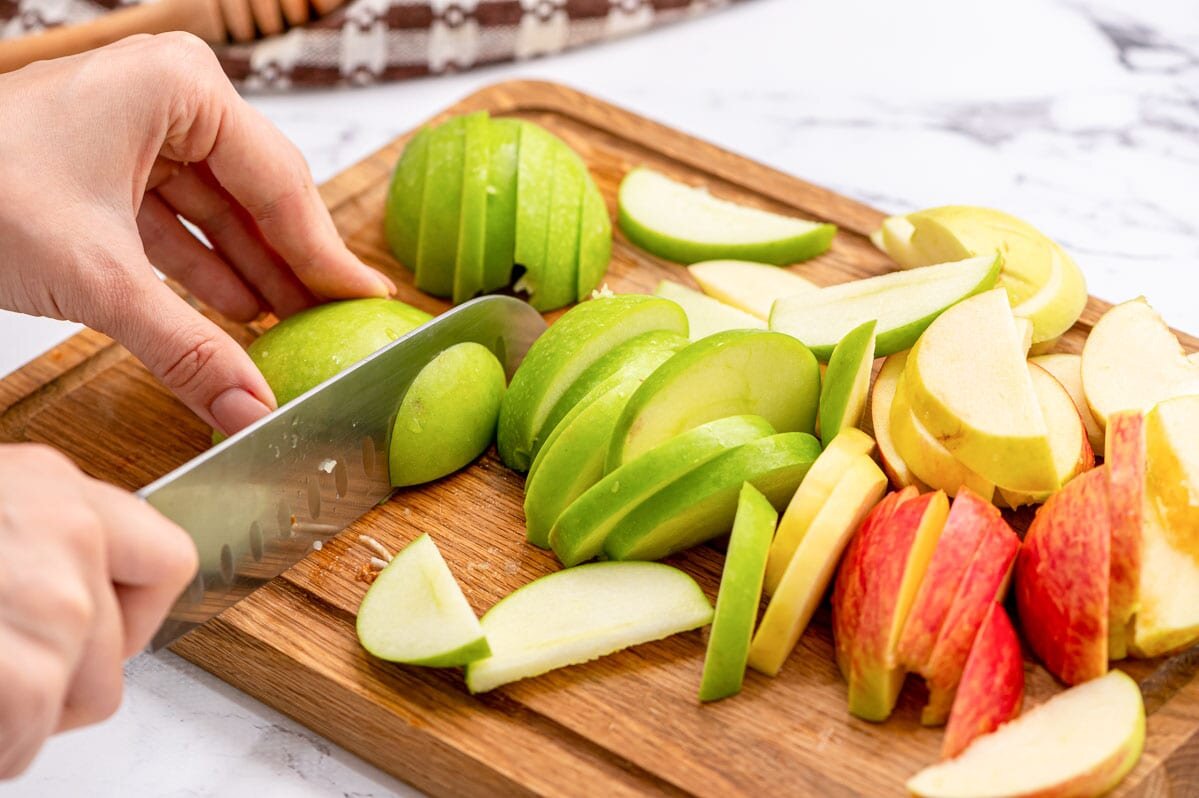
Take your yellow squash and shred it with the fine side of your grater. This will be the first ingredient into the plastic bag, if you're using one - and into the mixing bowl if you're using one of those instead.

Turn your pound of ground chicken into the bag or bowl you just put the shredded squash into. Add the parsley to this mix, too.

About now, that cauliflower should be finishing up. Drain off any excess water and put the cauliflower into the food processor (assuming you didn't choose the cook-it-into-mush route). Give it a couple quick pulses, scraping down the sides occasionally, until most of the major lumps have been pulverized. You don't need it to be totally smooth; the texture helps with holding the chicken mix together. Once it's done in the food processor, add it to the chicken mixture.

This chicken thing will have to sit and wait until your butternut squash is ready to go - so hopefully you planned ahead a little, or you can keep yourself occupied until it's done roasting.

Once your squash is done roasting, peel it and hack it into rough cubes. It should be pretty soft by this point. If you started with a whole squash, you'll likely only need the neck portion of it to make up your two cups. Put the squash cubes into the food processor and give it all a whirl. You'll probably have to pause often and scrape down the sides, as squash tends to be a bit sticky and climb out of reach of the blades.

After you've pureed your squash, add it to the chicken mixture, pour the dry ingredients (oats, cheese, spices) over top, and mix it all together. If you've been working with a plastic bag like we tend to, zip it closed with a little air left in it and try not to be too rough when you squeeze. Containing the mess is a lot harder if you explode the bag by splitting a seam.

Once it's all thoroughly mixed together, line your loaf pan with a layer of aluminum foil and spray it lightly with cooking spray. The end goal is for this chicken to come out in a neat, single piece - although if you end up with chicken sloppy joes, they'll probably still be just as good. More fun for the kids, even.

Transfer your chicken from the mixing bowl or bag into the lined loaf pan, and bake it on the middle rack at 350 degrees for about an hour and a half. Make sure to test the temperature with a meat thermometer before serving - your goal is 165 or higher before we can call it done.

Allow it to cool in the pan for a few minutes after removing it from the oven, which will make removing and slicing it easier. Lift it from the pan using the aluminum foil as a grip, and turn it over on the cutting board. Peel back the foil and slice into half inch pieces. For best results, you can toast them in a frying pan to crisp them up a little on the surface before putting them on a bun and covering with sauces, cheese and whatever other veggies you prefer. * We’ve tried ranch, buffalo, caesar, honey mustard, spicy mustard, sweet Thai chili, barbeque, and Chick-Fil-A's chicken sauce. All of these were varying degrees of good, let us know what you try and think! 

Adding some veggies to the sandwich and/or eating with a side of roasted veggies, carrot sticks or salad can bring you up to all five recommended servings of vegetables with one meal! *Disclaimer: not an excuse to eat potato chips and cookies for the other two meals of the day.

This week’s post was a bit of an experiment. We already had a recipe ready to go, but it just wasn't enough. So we tinkered and we toyed and we cooked some more until we came up with this. It’s a strange concoction, that’s for sure. It’s also amazingly versatile and we’re already discussing all the ways we use this recipe in other meals. What did you think? Let us know over on Facebook, or in the comments below! We love to hear from you and hear what you think about the foods we make. 


What if you’re not here for food though? What if you showed up on our site because your fridge is busted or you need help with your dryer? We can still help you. In fact that is our primary business! If you live in Richardson, or any of the surrounding areas, we aim to be the appliance rescue service for you. We can help with any and all of your major appliances, and we won’t stop until we’ve solved the problem. All you need to do is call us at ((214) 599-0055) or reach out to us via our website


Not Quite Chicken Sandwhich on a French Baguette piled with tomato, lettuce and Onion

4 Things To Find Out Before You Redo Your Bathroom

Why you might not want to grab your tools just yet.


Hold up! Put down the sledgehammer and tile, you’re not ready for that just yet. If you're looking at redoing your bathroom, there are things you need to know beforehand. No, we’re not talking about what you want it to look like, and what all of the fixtures are going to be made of. We’re talking the nuts and bolts that go into your bathroom.  Yes, you do need to know all the details, but this time we’re taking a look at the bare bones. If you’re hiring someone else to handle all of that, no worries!  On the other hand, if you’re more of the DIY type, we’ll walk you through some of the things you’ll need to look for beforehand.


Blueprints… sort of

Starting off, you need to know what your measurements are. We don’t mean just the room itself, but also where the studs and outlets are. The outlets can be changed if you really want to, but we are inclined to suggest leaving that to a professional. The studs on the other hand, you’ll want to grab some graph paper, a pencil, a stud finder and a plumb line. If you don’t have one, you can always improvise by attaching something like a few rings at the end of a length of string. The biggest reason to know where your studs are is so that you know where you can affix things like storage, mirrors, lights etc and where you can’t, such as the cavity where your pipes are. 

Bathroom blueprints and numbers


Begin by sketching out the dimensions of your bathroom. To keep it easy, we like to go 2 squares on the grid is the same as one foot. Now, most rooms are going to have studs on either side of the doors, windows and one side of the outlets. Using that, you can go up to the ceiling of the room and start to use the stud finder. Once you’ve found two of them next to each other, measure between them to find the distance. In modern houses you’ll typically have a stud every 16”. If you don’t have a studfinder, try looking at your crown molding. Typically that’s going to be nailed on a stud. Then you can use the plumb line to drop straight down and figure out where the studs are behind your existing fixtures


A tub is still a tub, no matter where it stands.

Moving on, are you planning to include just a shower, or do you prefer a tub in your ideal bathroom as well? If so, you need to take into consideration how you’re going to frame the tub.  The bare minimum around the sides is 4” of wall, that’s including studs and the drywall. However the wall in front of the tub, if you choose to put one in, can be as thin or thick as you like. We like adding in a bit of a ledge if the chance is given, for two very good reasons. The first is that it gives you somewhere to lay different bath items, a book, your phone, etc. The second is that it gives you room for storage. 

 (Take a look over at Better Homes & Gardens for their ideas on what you can surround a tub with!) 


All of the hidden storage!

Speaking of storage, that leads us straight into our next section. You can never have enough hidden storage. We’ve said it before and we’ll say it a hundred times more, but having empty storage is better than not having enough. If you’re taking the time to redo your bathroom, spend some time here to dream up what would make your life easier as well. Do you have a standing shower separate from a tub? You can put a hidden set of shelves in the gap between the two. What about around the tub? Having hinged panels to store away all of your bath supplies when you’re not using the tub? Or as a place to store extra towels? There is of course the old stand by of a cabinet behind the mirror, but what about having some hidden in between the studs of the wall as well? Having storage is only limited by what you can dream up, and where the pipes or electrical wires for your bathroom are. 


Sub flooring is final, right?

Finally, let’s take a look at your floor. For many, the reason they’ll start looking at redoing their bathroom is that something has happened to the floors, usually flooding. Given the winter we’ve had so far, we know several people who’ve had that happen. While you’re ripping up your current floor, take a look at what’s below it. Was the flooring uneven previous to you taking it up? Spots where it was raised or uneven? Are there any remnants of grout, glue or other materials from previous flooring?  You want to keep an eye out for that so that you know whether it will affect what you lay down next. If not, what about the subfloor? Is it still able to hold weight? Are there any molded or wet patches? Are there places where bugs or other vermin have gotten at it? If so, you’ll need to go about replacing that before you lay down the new floor and fixtures. Las but not least, are you thinking of laying down in-floor heating? If so, now’s the time to look at that and any thing that might make one version better over another, or nix the idea entirely. 

Bathroom sub floor rotted out underneath a toilet


With all of this, you should be ready to start remodeling. Keep in mind that this isn’t everything you need, and that if you’re ever in doubt, it’s always better to call in a professional. If you do opt to sketch out a plan, would you show us over on our Facebook? We’d love to see what you get up to! 


Now, if you’re not here for tips on home remodeling, but for your appliances, we can still help! We’ve got trained professionals to help, no matter what your appliances are getting up to.  Whether it’s something that’s outright broken or you’re just wanting to get some tips on how to maintain your appliances, we can help.  We’re here for all of our clients in Garland and the surrounding areas, and we want to be there for you too. You can get hold of us by calling us at () or by setting up an appointment via our website. Let’s work together to get your home running  smoothly today. 

3 All in One Washer Dryer Combos From LG

We’re looking at the Good, the Bad and the Ugly about these compact appliances. 

A few weeks ago we were looking at dryers, both electric and gas and came across something new. Well, new to your blogger anyway. An All-In-One washer and dryer combo. Now, the majority of our clients don’t need them, but you might have children going off to college or moving out on their own. These units are.. Interesting, and that’s what we’re going to be taking a look at today. We’ve chosen to look at three of them from LG to see what can be done to best exemplify what the machines can do. 


Model: WM3488HW All in One Washer and Dryer Combo

Brand: LG 


Features: 

LG All in one Washer dryer combo in white

Sanitize Setting

Short Cycles

Can dry thick or bulky items

Nine Wash cycles including hand wash garments

Dryer mode kicks on automatically. 

Ventless Dryer 


Notes: An average wash and dry cycle should last between 2-4 hours, depending on size. It’s not the best on the market, but it’s also not the worst.  


Model: WM3998HBA  All-in-One Washer Dryer Combo

Brand: LG

LG 4.5 cu ft black all in one washer and dryer combo


Features: 

4.5 cu ft drum

Three and half hours for a full cycle

Connects to your phone

3 different dryer cycles

Specialty settings including for activewear and wools


Model: LUWM101HWA Smart Wi-Fi Enabled Washer and Dryer Combo

Brand: LG Signature 

LG Signature washer dryer combo in white

Features:

Can be remotely controlled

Has an automatic dispenser for detergent

Can be paired with a pedestal washer. 

Has one of the largest load sizes at 2.8 cu feet


The digital touchpad can be a bit finicky, which is something we don’t like about it. Much like your phone you swipe left or right to access the full menu. Also like your phone, you need to ensure your hands are dry or else the input isn’t recognized. 


The automatic dispenser will gauge the load size and dispense the correct amount. 


After looking over the three different models from LG, here are the good things we could see about an all-in one. They can fit just about anywhere. Depending on your home this could mean that you could tuck it into a corner of your kitchen, or you could have a storage room that you keep it in when its not in use and just wheel it to where you want when it’s laundry day.  If you have a 120V outlet you can put one of the units there, and then when you’re done, wheel it back into storage.  The majority of the models out there, not just the three that we showed today, are ventless. This is great because you don’t have to have external ducting and you don’t have to worry about them filling your home with lint while they run.  Many models are engineered to be conscious of water and energy use.  There are models that can handle thicker materials like bedding, towles and dog beds for those who need those features. 


Naturally though, there are some downsides, and here is where the all-in-one hits some problems. They cost as much, if not more just buying a standard washer and dryer set. They do radiate moisture from both the front and back panels, which is something you need to be aware of whether you set them in one space or have them mobile.  Not all of them are ventless many are, but not all. Then you have the issues that any washer or dryer is going to have, like vibrating, noise levels, and having specific detergents that you can or cannot use. Still we think that despite these drawbacks, an all-in-one does have its uses, depending on what your needs are. 


So, that is three different models of all-in-one washer dryer combos made by LG. We still think that they’re a better option than having to drag your clothes over to the cleaners or a laundromat every week. They do have some drawbacks, but we think that for what they are, they are incredibly useful.  What about you? Do you know anyone who could put one of these to use? Or are you looking to revamp your laundry room and turn it into something else? Let us know in the comments below or over on our Facebook page. We’d love to hear from you. 


Don’t forget that if your appliances are giving you trouble, we’re here for you. Whether you live in  Carrollton or the surrounding areas, we can help. If you’ve got an appliance that’s broken, or you just need some tips on how to maintain them, we want to help. You can give us a call at ((214) 599-0055) or reach out to us through our website. At Appliance Rescue Service, we aim to be the best for you.  


Party Snack Dinners

When you don’t feel like sitting down to a meal, but you need something more.


Super Bowl Sunday has come and gone - and like most families here in the U.S., your family probably ate so many snacks during the big game that dinner went by the wayside last weekend.

Here's the thing, though. Snack-y delicious things can still be considered dinner. There is no rule that you can't eat hors d'oeuvres and party food whenever you feel like making it.


In this post, we'll cover a couple of easy, tasty finger foods you can dash together on a weeknight and share with the family or a visiting friend. (Who says Wednesday can't be family movie night?)


Stuffed "Sandwiches"


It's less of a sandwich and more of a stuffed slice of bread... But it's an uncommon, tasty finger food. Plus, it's neither terribly messy nor expensive to make.


Ingredients:


One large loaf of Italian or French bread

8 oz softened cream cheese (we suggest the garden vegetable flavor Philadelphia brand, or spicy jalapeno flavor if you'd prefer some heat)

3 oz crumbled cooked bacon

1/2 cup matchstick carrots, chopped down

1/2 cup baby spinach, shredded

1/4 cup bell pepper, chopped

1 3 oz package sun-dried tomatoes (we like Bella Sun Luci brand)

handful of black olives, chopped

4 oz shredded cheese of your choice

Fresh or dried parsley, for garnish


Tools:

Cutting board, bread knife, paring knife, baking sheet, large bowl, spoon 


Allow your cream cheese to come up to room temperature while you work; the softer it is, the easier it will be to mix in your other ingredients.


Preheat your oven (or toaster oven if you'd rather) to 350.


Grab the bread knife and cut your loaf of bread into 3/4" to one inch thick slices. Use the paring knife to scoop out the centers of each slice to make each into a shallow bread boat. Make sure you only cut about halfway into the center - you still want it to be able to hold the cream cheese mixture. In the event any of your slices have a hole from an air bubble in the dough, consider covering it over with a spinach leaf to stop too much of the cheese from oozing out during the baking process.


Once your slices are scooped out, place them open side up on your baking sheet.


Chop up your carrots, bell pepper, olives and spinach as fine as you'd like them - and if your tomatoes are large pieces, you might consider cutting them down as well. Transfer all the cut veggies to the bowl.

If you're working with fresh parsley, now is the time to cut it - but don't mix it in with the other veggies.


Toss the crumbled bacon in with the veggies, then add your softened cream cheese. Give everything a good stir to make sure it's evenly distributed.


Spoon an even amount of the cream cheese mixture into each of your scooped out bread slices and level it out.


Cover the top of each slice in shredded cheese.


Bake at 350 until the shredded cheese is melted and the bread is lightly toasted.


Sprinkle on the parsley before serving. These "sandwiches" are best served with chips (which can function as a utensil, too, if the cheese mixture escapes!). 


Peanut Butter Cup Hummus


We know, no one thinks sweet when someone says hummus. But believe it or not, you can make sweet versions! And you can even make them out of things you probably have on hand already.


Once it's ready, use it as a dip for apple slices (Gala apples are excellent for this). The kids will never realize they're eating a vegetable.


Ingredients:


1 cup cooked chickpeas

1 teaspoon vanilla extract

4 tablespoons peanut butter

3 tablespoons honey or corn syrup

5 tablespoons baker's cocoa

2 tablespoons of sweetened condensed milk

a pinch of salt


Tools:

Food processor, measuring cup and spoons, bowl(s) to serve.


Cook up some chickpeas, or open up a can. You'll need about a cup of them, drained and rinsed.

Pour the rinsed chickpeas into the food processor, and measure in the peanut butter, honey and vanilla extract.


Process on low for a few seconds at a time, scraping down the sides when you pause. If the mixture seems too sticky or too inclined to climb up the sides, you can add some water a tablespoon at a time - but be careful not to add too much and thin it out. It can be pretty difficult (and messy!) to dip an apple slice in something soupy.


Once you've got the chickpeas processed down to a mostly smooth consistency, measure in the cocoa and milk and hit the button on the processor again a time or two to mix it all in.


Make sure you taste test at this stage, to figure out whether or not you need more sweetener, and/or how much salt you'd like to add. Everyone's family is different - we recommend finding the pickiest eater in the house and using them as the guinea pig.

Once you've adjusted to account for the picky eaters in the house, scoop some out into a shallow dish for every member of the family and cut up some apples to share. Pretzels also work well with this hummus, as do chunks of banana (toothpicks or forks help cut down on the sticky fingers problem with the bananas).


Hopefully this filling, deceptively healthy “dessert” joins the rotation in your family too!


If you liked this week’s post, drop us a line in the comments below or over on our Facebook, we’d love to hear from you! 


If on the other hand you showed up here because you need help with your appliances, we can help there too. We aim to be the best appliance repair company in Plano and the surrounding area, and that means we’re here, whatever your appliances need. You can reach out to us via our website or by giving us a call at ((214) 599-0055).  

sliced apples tart and sweet varieties


Just How Green Is Your Kitchen Routine?

Do you have room to grow or are you the reigning royalty? 


How green is your kitchen routine really? Sure, you recycle some things, and you work on cutting down your electric bill. But is there more that you can do, without having to go overboard? That's what we're tackling this week with a quick true or false quiz. We'll take a look at different things in your kitchen and what you can do to start making a change in your home. 


True or False: Cooking isn't somewhere you can conserve energy. 

Surprisingly enough, this is false. There's actually a couple of different ways that you can tackle this one. You can start by just not opening your oven while you're cooking or baking. Just like with your fridge, every time the oven door is opened it needs to bring the oven back up to temperature, which means more electricity used. You can also look at reorganizing how you cook your meals. Using an instant pot or making one-pot meals both go a long way towards reducing the amount of energy you're using without being too time-consuming. You've also got batch cooking. By that we mean that you'd do most of your cooking just one or two days during the week. You'd organize your meals for the week so that you used similar components several times, in different ways, you're cutting down on both energy used, grocery money and saving yourself time. 


True or False: I know what cleaners I can make at home, and which I need to purchase. 

This one is as much about being green as it is about being safe. Some cleaners you can make at home, like everyone's favorite mix of vinegar, water and dish soap. Others, like CLR aren't something you want to try mixing, no matter what internet recipes say. Remember, chlorine is not something you should EVER be mixing with other chemicals. 


True or False: My refrigerator is performing at optimal cool. 

This is one we've talked about in the past for cutting down on your electric bill. You can help your fridge run its best, by keeping the coils free from dust, and by leaving enough room for air to circulate in the fridge. So, don't stuff the fridge to the maximum is what we're saying. By packing everything in there, your  fridge can’t breathe and needs to work twice as hard to cool everything down. 


True or False: I let my dishwasher handle the heavy work. 

Empty Dishwasher with a single red cup


You've heard it before, but letting your dishwasher run without it being full just wastes your water. If you make sure to run it at night during non-peak hours, and that it's fully loaded, you'd be surprised by how much you can cut back your water and electricity usage. According to Energy Star, you actually save 75% on your water and energy bills compared to washing by hand or running the dishwasher when it's not full. 


True or False: I know all about reusable containers.

reusable water bottles in blue and silver

You have your standard plastic containers, we all know those. But there are other options these days that might be more versatile to your needs. You can get beeswax reusable wraps, instead of using plastic wrap. Or you can get silicone pouches to replace using ziploc bags. You can also choose to replace your existing plastic containers for something like stainless steel or glass. You can even be really smart and use all of the glass canning jars from different crafts you meant to do off Pinterest. 


True or False: If I buy it, I'm going to find a way to reuse it. 

Speaking of Pinterest, have you ever noticed how many different ideas there are for how to reuse things? You have so many options ranging from containers made from coffee creamers to using soda bottles to make ropes. 


True or False: A leaky faucet isn't that big of a deal. 

Nope. Your blogger thought this wasn't that big of an issue either, and was summarily trounced by her next water bill. A faucet that leaks at 1 drop per second can add up to more than 1500 gallons of water per year. Which means the water isn't being utilized, and it's also costing you. 

So how did you rank? Did you learn anything new or are you the green kitchen queen or king? Let us know in the comments below or over on our Facebook page, we'd love to hear from you. We'd also love to hear any other suggestions you might have on how to green up other areas of your home. 


While we did talk quite a bit about cutting back on your electric and water bills, there's something else that you can do to help. By calling in for regular maintenance for your appliances, you also help cut back on those bills. After all, a machine that isn't running properly isn't going to be using energy efficiently. Whether you want us to take a look and give you tips, or you  have something you need fixed, we're here. We want to be the best in appliance repair for Frisco and that means doing our best by you, our patrons. You can reach out to us via our website or by calling us at ((214) 599-0055). 

fabric bag with the reduce reuse recyle symbol on it, three triangles wrapped around the globe