The Top 7 Kitchen Trends of 2021: Our Predictions

What we expect to be most popular in Garland and the surrounding area. 


2020 is almost over and that means many of us are looking at making changes in our lives and in our homes. For many of us that means looking at the top trends that are going to be popular in the coming year. We're taking a look at the top 7 to see what companies are predicting will be popular in 2021. 


- Colored Stone Counters And Backsplashes

Like we talked about with paint colors it's time to bring color into the kitchen. We at ARS love this idea. Let's move away from sterile White and try out different patterns and natural stones. Bonus points if you want to get the look without spending a ton of money you can do peel and stick tiles for your backsplashes. This also means that you can change them out more easily and test out which ones you like best. 


- Mixing Materials

People spent a lot of time in their kitchens this last year. Learning how to make sourdough, cheeses, or just mastering basic cooking. People want their kitchens to reflect them and part of that is bringing in new materials and textures. We fully expect to see cabinets in wood and wood-textured panels for filling in small spaces around the kitchen.

-Multifunctional spaces 

In the coming year, even more, people are going to be working from home. For many of us, this means having an office space that we can close away. It's not always feasible within the way your home is set up though to dedicate an entire room to an office. Companies have started responding to this new need by offering furniture that can serve both as storage and as a small desk without taking up much space when not in use. We expect to see furniture and design ideas that expand on this need over the next several years. 


-Fluidity between inside and outside

As we talked about over the summer people are breaking down the line between inside and outside. There are not just outdoor kitchens, but outdoor living rooms, offices, and even bedrooms. And people are also looking to bring the outside in with a resurging interest in not just individual plants scattered throughout the home but entire gardens. As Time continues we expect to see this trend go in many different directions.


- All Black Kitchen

We expect the trend of the all white kitchen to continue for at least a few more years. However, there is also a trend that we have seen over the last year towards sleek and elegant all black kitchens. While we don't expect this one to catch on in Texas, you might see it pop up in some of your friends’ or relatives' homes. After all, the South has to deal with quite a bit more heat than just what your oven puts off. 

All black painted cabinetry


- Gold Finishes

Over the last decade we've had copper and bronze finishes. We've had aged versions of both. And stainless steel has still reigned supreme. In the coming year we've seen companies hinting at offering gold finishes for everything from your faucets to your stove knobs to your refrigerator handle. The question is going to be whether we get aged gold next.

Gold finished kitchen faucet


-Portable Fixtures

When so many of us have been trapped in our homes for the last year, and the threat of another full closure on the horizon, it's no surprise that we're restless in our homes. We want to move from room to room, to get up and pace. To that end our lights and audio elephant are becoming more portable. People don't want to fight with wires and plugs to try and get things positioned around the home when you move from place to place. Instead companies are starting to offer ways to take the lights with you as you move. 


Those are our top seven predictions for the trends of 2021. We probably missed some, after all we're only human. Let us know your predictions for the coming year in the comments below or over at our Facebook


If you found this page not because you're looking for how to remodel your kitchen or home in the coming year but because your appliances are driving you up a wall you've still  come to the right place. We aim to be the best appliance repair company in all of Garland and the surrounding area. You can make an appointment by calling us at ((214) 599-0055) or setting up an appointment on our website. We're here to keep your home running.


Freezer Comparisons: Miele versus GE: Who Does It Better?

Ratings/Reviews/Comparison


As Covid-19 stretches longer, and warnings of a nation-wide shutdown loom, many of us are looking at food preservation of one sort or another. The first spot that many of us look at is our freezers. Everything from individual ingredients and spices to full meals can be stored away and frozen. 


 What happens when you and your freezer are on the outs though? Its started to have keep different sections colder than others, or it says it’s at 0*F but really, it’s more like 10*. 


In those cases, many would start looking around for a new freezer. Which to choose though? A freezer is a freezer right? It keeps things cold, and that’s all that matters. Well, not necessarily. Let’s take a look at two of the best rated in the industry and see how they tackle the issue. 


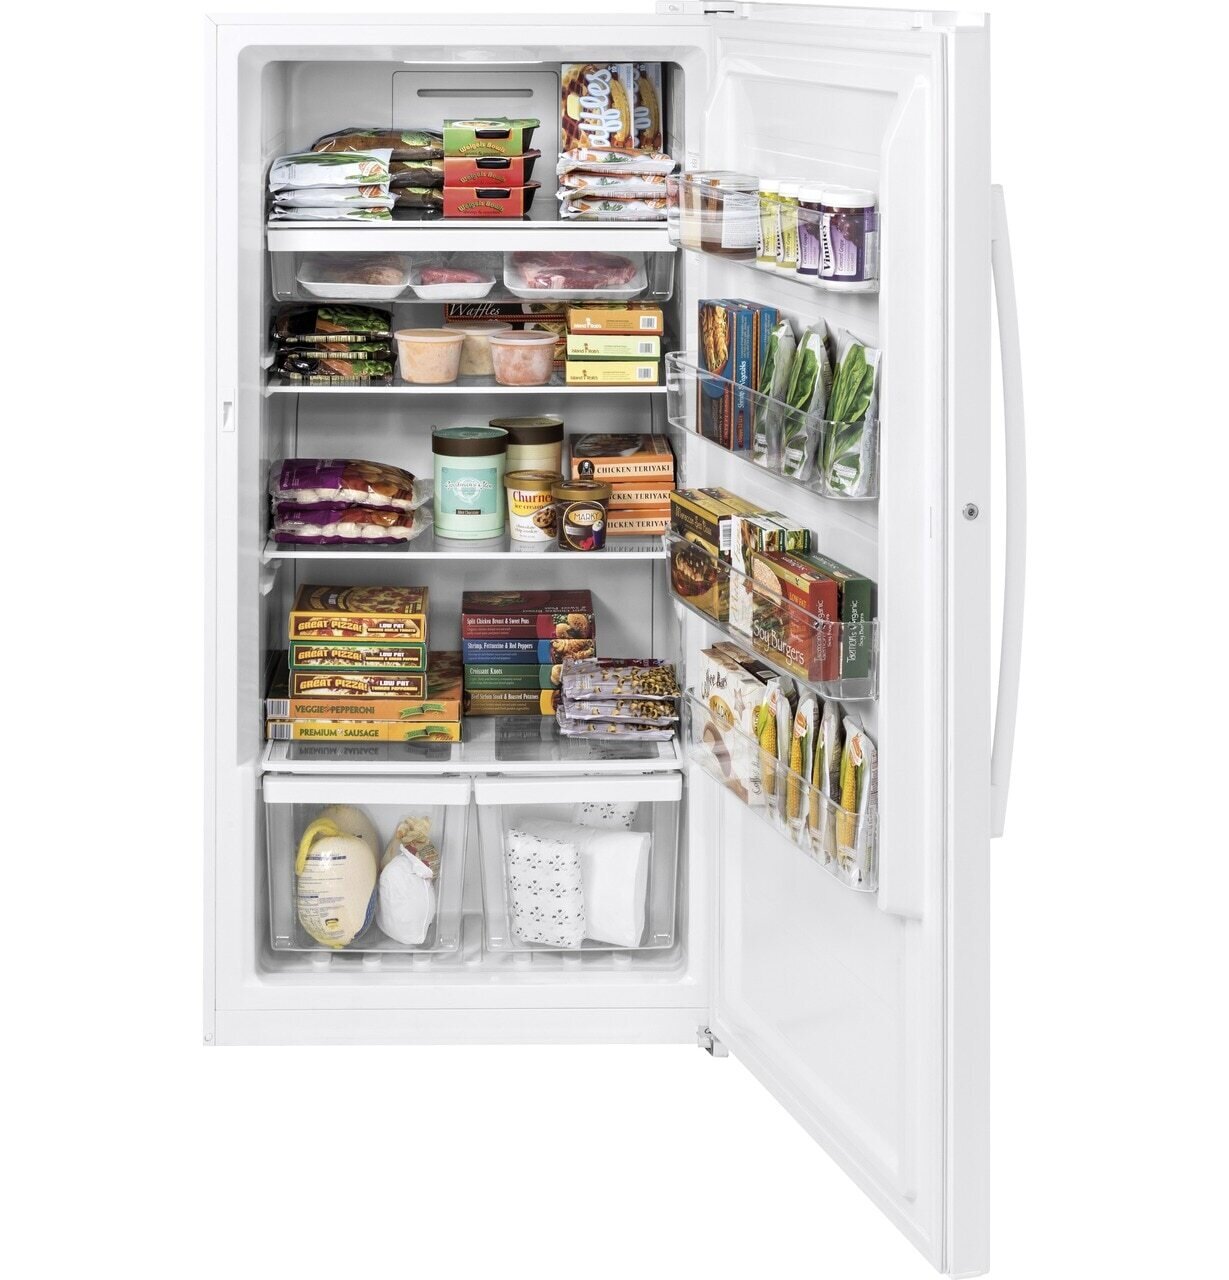
Features of GE - FUF17DLRWW

Starting off let’s look at GE, an American staple. 
-Garage ready

GE knows that the temperatures an American homeowner has to deal with varies widely from one state to the next. To appeal to the broadest market, they’ve made sure that their freezers will maintain temperatures in your garage whether it’s 0*F or 110*F. 


-The highest rated upright freezer lineup in the industry 

Based on the combined data of different major appliance retailers nationwide, GE is rated as the 

best upright freezer in the industry. 


-Lock with key

If nothing will do but to keep your spouse out of your ice cream, or that set of cookie dough you’re saving for Christmas day, this model comes with a lock. (We’re sure there are other reasons that you might need a lock on your freezer, but we all know the need to protect the ice cream.) 


-Clear slide-out freezer bins

Part of the package for this model is four full width, clear-sided freezer bins that slide all the way out, to make it easier to find what you’re looking for. Instead of hunting on your hands and knees, you can grab out the bin you need and look through it on a table, and close the freezer in the meantime. It’s a win for your hands and your electric bill. 


-Audible temperature alarm

What’s worse than getting a meal ready and coming back to the freezer later to find out that you left it open, and now things are defrosting? Not much in our opinion. That’s why GE’s freezer offers an alarm if it gets below a certain point. 


-Exterior electronic temperature control

We’ve talked about how it maintains your set temps, and how it lets you know if that’s changing. But when it comes to actually setting the temperatures, GE is still thinking of you and how to keep your food cold. They’ve placed the temperature controls on the outside, eliminating the need to open the freezer to adjust them. 


-Turbo Freeze

After you’ve grabbed what you need, shut the door and gone about your day, the freezer sets off an extra cold blast of air to bring temperatures back to normal. 

GE free standing freezer


-ENERGY STAR® Qualified

All of that, and it’s still Energy Star rated, which means it’s saving your food and your wallet. 


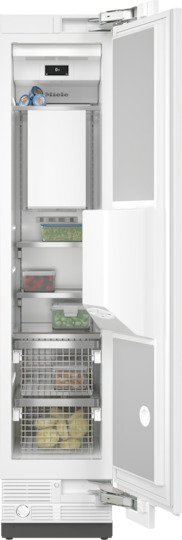
Features of Miele -F 2471 Vi

Now let’s head over to Germany and check out what their giant, Miele, has to offer. 

-Separate water and ice dispensers.

Instead of having to worry about your water freezing in the line, and thus breaking, Miele made it simple. They gave both the water dispenser and ice dispenser their own lines to run off of. 

-Handleless design

If you’ve looked in a decor magazine over the last year, or seen some of our own posts on the matter, you’ve seen that the trend is to have your appliances look more like cabinets. For many of us, this also means a handleless design. Miele is right on board with this trend. 

-Push2open for convenient door-opening assistance

Following right on from the previous feature, they’ve engineered the freezer with an easy push to open system. No handles would seem  like a problem, but thanks to this, you don’t have to worry. A light push and the door pops open. 

-Light floods the interior thanks to LED elements – 

The lights in this freezer are all LED elements, which means they’ll live longer and provide a truer light as well. 

-Communication with the machine could not be easier – WiFi Conn@ct

Why worry about your freezer when you’re out and about? With the Miele app you can check on your freezer no matter where you are. Worried that it’s too warm? You can see that by just pulling out your phone.  Or if you don’t have your phone handy, you can just ask Alexa. 

-Convenient control thanks to color touch display MasterSensor

Miele Freestanding MasterCool freezre

Miele offers an easy to use exterior display for adjusting the temperature settings. 

-Defrosting is a thing of the past

Miele MasterCool appliances offer a NoFrost system. This system keeps cold, dry air circulating around the appliance so that ice doesn’t build up inside the cabinet. It eliminates ice buildup on food also, which means that you can always open and close drawers easily. All of this together has the additional benefit of protecting the freezer’s evaporator units, and being energy efficient. 


Comparison 

After looking at both of them, which do you prefer? The American workhorse or the German glitz? We’re still debating about which one is better ourselves. On the one hand, the GE freezer is perfect if you’re looking to turn your garage into a  second pantry. We could see this being especially useful if you’re a hunter, or have a large family. On the other hand, the Miele fits into your home beautifully. It fits into the connected home of the future, and the NoFrost system means that it also cuts down on the amount of food waste you have to worry about. 


What are your thoughts? Do you have experience with either brand? Let us know over on our Facebook page, or in the comments below. We’d love to hear from you! 


On the other hand, if you’re not looking to replace your freezer just yet,it just needs to have someone take a look, you can always give us a call at ((214) 599-0055). You can also set up an appointment via our website. We aim to be the best appliance repair shop in Carrollton, whether you need help with fixing your freezer, kicking your washer back into shape, or just doing some preventative maintenance, we’re here to help. 


Easy as 1-2-3 Christmas Cookies

Great for Gifts, Parties, Or Just You!


There are just under two weeks until Christmas. In fact, last we looked at a calendar, there are twelve full days until Christmas Eve... At which point the kids are likely going to start commenting that Santa needs some cookies.


In our house, it's tradition that the cookies for Santa are always homemade. The recipes and quantities may change from year to year - and honestly, sometimes we just get caught up in the rhythm of measure-knead-roll-cut-bake-cool-repeat, and end up making way too much.


So, for us, cookies are also Christmas gifts for the other households in our family. A little tray or box of handmade treats is also a cute, enjoyable and inexpensive long-distance (or socially-distanced) way to tell someone else you're thinking of them in this unconventional holiday season.


If homemade cookies sound a little out of your league, don't fret. These aren't terribly difficult. They're among the most crowd-pleasing recipes we know, and they are extra easy to personalize.


We'll start with a go-to favorite: Almond Puff Cookies. We've been making this recipe for almost fifteen years now, and it has never failed to impress. They're soft and fluffy, almost cake-like in texture when fresh. These don't really lend themselves to decorating with royal icing like sugar cookies because of the way they puff. A quick egg wash is often all we do to jazz them up. We like to cut these into bell, star and ornament shapes and wash them with different colors, but we've also included a handful of other decorating ideas your family might enjoy.


Almond Puff Cookies


Ingredients:

5 cups all-purpose flour

2 cups white sugar

1 1/2 c butter, unsalted, melted

4 eggs

2 tsp almond extract

1 tsp vanilla extract

2 tsp baking powder

1 tsp salt


Egg Wash (optional)

1 egg (well-scrambled) per each color you intend to make

2 drops food coloring per color

1 teaspoon water per color


Alternative Decoration Ideas (optional)

Sprinkles

Powdered sugar

Slivered almonds

Sweetened coconut flakes

Melted chocolate drizzle


Example of egg paint on cookies in autumnal red and orange

An example of what the egg paint can look like.

Tools:

Mixing bowls (2), rolling pin, cookie sheet(s), cookie cutter(s), small dishes for egg wash (divide by color), pastry brush, cooling rack, space to make a mess (100% not kidding here, especially if the kids are assisting)


Instructions:


Sift together your flour, sugar, baking powder and salt in one mixing bowl.


In the other mixing bowl, whisk together your extracts, eggs, and cooled melted butter. We do NOT want to cook the eggs quite yet, so please allow your melted butter to cool a little before this step; ideally it's still liquid, but not scalding hot.


Knead together the contents of both mixing bowls. If you feel like the dough is a little too stiff, feel free to add a tiny bit of water to it, but don't go overboard. Too much liquid can't be undone, and a wet dough is very difficult to cut into shapes.


Once you've established a nice lump of dough, squish it down into the bottom of the mixing bowl and put the whole thing in the fridge for about 15 minutes. We like to use this fifteen minute break to start making the egg washes, but if you chose another decoration, you're free to relax for a few.


After your fifteen minutes are up, start preheating the oven to 400.


While the oven heats, turn out your dough onto the counter and roll it to about a quarter inch thick. If you feel like there's not enough room on the counter for the whole ball of dough, divide it and toss half back into the bowl for now. Save yourself the headache of having to pull dough out of the backsplash or from under that knife block you couldn't find another place to put (no, we've never had this happen to us - gee, why do you ask?).


Grab the cookie cutters (the objects, not the little minions you may or may not have clamoring in the background). Either you or your helpers should cut as many shapes as you can from the dough you've rolled out, peel away the excess dough, and gently transfer the shapes to your cookie sheet. Be careful not to stretch or distort them during the transfer - if they're stretched, they'll bake up lumpy and uneven.


If you find yourself struggling with the process of transferring, you might consider rolling the dough out on a cutting board or a sheet of wax paper before cutting your shapes. Having an extra layer you can just pick up and flip over the cookie sheet sometimes makes it easier to get the cookies from Point A to Point B without creating oblong ornaments or lopsided stars. Another trick to try is chilling the cut shapes before moving them to the cookie sheet with a thin metal spatula. If you do use a spatula, try to find a smooth one without slots (as the slots risk tearing up the undersides of your cookies).


Repeat the rolling, cutting, and transferring of shapes until you're out of space on the cookie sheets, or out of dough, or out of patience, whichever comes first.


Once your shapes have been arranged on the cookie sheet, you've reached the ideal time to add an egg wash. Use your pastry brush to lightly coat the tops of your cookies with the color of choice. Try not to use too much, just cover it with a thin layer. You don't want it to puddle around the edges on the cookie sheet, as that gets messy and difficult to clean later.


If you're not doing an egg wash, coconut flakes and slivered almonds will hold up well in the oven, and even toast a bit - but sprinkles will lose some of their color to the moisture in the dough, and that color will leak all over the cookie, so it's better to add them, the powdered sugar, or the chocolate later, after the cookies have been removed from the oven.


Bake your cookies 5-8 minutes at 400 degrees. You'll know they're ready to leave the oven when the edges are golden, the centers are puffed up, and the egg wash (if you used it) is set and shiny.


The cookies are still very soft at this point, so allow them to cool for about two minutes before you move them from the cookie sheet to the cooling rack, where they'll finish setting up.


Should you want to do any further decorating, let the cookies cool about ten more minutes on the cooling rack to ensure they're fully set and ready to be moved about (or boxed up for giving).


After you’ve tried out this week’s recipe, consider letting us see? We would love to get pictures over on our Facebook page to see how your cookies turned out. 


If on the other hand you need your oven fixed, or any of your other major appliances, we can help. Just call us at ((214) 599-0055) or make an appointment over at our website. We aim to be the most reliable appliance repair in Addison and the surrounding areas, and we want to keep your home running smoothly. Whether that’s an oven that won’t heat right for making cookies, or a washing machine that won’t drain right, we’re here to help.

Cookie dough with stars cut out by a child


Organizing Your Fridge for Efficiency and Safety

Or how to keep your food from becoming sentient. 

Have you ever opened up your fridge to have to dig through stacks of leftover food, bags with questionable contents, and a head of lettuce you thought you had thrown out last week? All just to find the one jar of mayo you need for a sandwich. Or what about putting some hamburger onto a plate in your fridge before work, and coming home to find it spilled down all three shelves and now you have a mess to clean up. These situations are ones we all face when we don’t have an organized fridge. Fortunately, there is a way to fix it. 


What Most People Do

Most of us will toss our food into the fridge without any sense of order.  Crushable things might be on top, to keep them away from any damage. On the door, you have the weird and annoying thin shelves that are only good for eggs, drinks, and condiments because what else are you going to fit there? Then you have the drawers at the very bottom that claim that they’re perfect for fruits and vegetables. Except, if you’re like the majority of us, that ends up meaning you have a head of bland lettuce that rolls around for a month, a couple of apples in the other drawer, and one corner that might have been a tomato at one point, but now you’re waiting for it to gain sentience. 


And the rest? The whole great middle of the fridge? That’s Free Territory. That’s where you put leftovers, the meat you’re defrosting for tonight, this week’s lunches, and anything else you can put in there. If it can be stacked, it will be. Of course, that means that if it can be forgotten about, it will be. 

Baby climbing shelves in an open fridge trying to get grapes. Multiple open containers, stacked foods, and spoiled foods.


Why Do I care?

A good question. First off, organizing your fridge will mean that things like the weird semi-sentient tomato are less likely to happen. When you know what you have, you can plan accordingly for your meals, and keep foods from spoiling before they get used.  More importantly, it cuts down on cross-contamination. When you have your foods stacked every which way, and without any clear separation between them, there’s too great a chance for foods to touch things they shouldn’t. There are three different types of cross-contamination that we're talking about.  One might be as simple as one piece of fruit spoiling and then being pressed close to another and causing it to spoil. Or you might go up another level and you’re dealing with two different foods being stored next to each other when they shouldn’t. An example of that is squash and apples. Apples give off ethylene gas which will make the squash turn yellow and spoil before they should have. The third level is the one we hear about in schools, but don’t always think about. Storing raw fish and meat in your fridge, even in the store packaging, is complicated. It doesn’t take much for some of the juices to drip and get onto anything nearby in the fridge. This can be just from you reaching in and grabbing the meat, and it drips off your hand. It can be from overflowing onto lower levels, from any of the edges of the shelf. How it happens, doesn’t really matter. The problem is still that whatever it’s dripped onto, if not properly enclosed, is now unsafe to use. 

Red onions, raw mushrooms, raw chicken, tomatoes, lemon, and garlic all on a cutting board with a large "no' symbol over it.


What You Should Do

You’ve undoubtedly realized that this isn’t a state you want to be in. If nothing else, wasting food bites into your pockets over the long term. How then to organize your refrigerator? With buckets and boxes and time-consuming systems? Sure, you could do that if you have plenty of time, but we certainly don’t. Instead, we looked to the experts to see what they had to say on the matter. 


Let’s start on the door, working from the top shelf down.

The top shelf on your door is best utilized by putting your dairies here. That’s going to mean eggs, butters, and any cheese you use regularly. If you are putting cheeses there, you’re going to want to wrap them in either wax or parchment papers, to keep them isolated from smells. 


The middle shelf should be dedicated to condiments, salad dressings, marinades, and similar concepts. 


Your bottom shelf on the door should be for all beverages, and if it’s large enough, milk. 


There, now your door is all done and dusted. Still with us? On to the body of the fridge. Again, we’ll start at the top and work our way back down. 


The top shelf of the fridge should be used for foods that are ready to eat. This can be everything from foods you’ve already cooked, pre-made meals, salads, pickled foods and fruits, either already sliced or whole. 


Moving on to the middle shelf, or shelves of your fridge. Here is the one thing that doesn’t change much between the original version of your fridge and this new and improved version. Here is where you’re going to put your various leftovers. Tupperware is your friend because then you can put in the other foods on these shelves. Cheeses, that are prepackaged, eggs in a carton, and any cold cuts and sandwich breads.  (Although we will point out that if you are going through a loaf of bread in a week, it’s perfectly acceptable to  keep your bread in a breadbox.) 


Finally, we have the bottom shelf. Here is where you’re going to be putting any meats that are raw. Beef, chicken, pork, fish, it doesn’t matter. It goes here. The ideal method is to store them in sealed containers. So take them out of the store-bought packaging or at least put them into a casserole dish either before you let them defrost or cook them. 


Food Safety stamp in green text.

We’re not ignoring the crisper drawers, don’t worry. However, they’re much easier to deal with because they are sealed. When storing vegetables, there are a few tips for keeping things fresh longer. Start off by washing your veggies before you store them. Wrap them in paper or plastic in order to prevent contamination (better safe than sorry.) For salads and herbs, you’ll want to wrap them in damp paper towels before storing them to prevent them from drying out. 


Now that you know how to organize your fridge to keep your food safe and fresh for the longest amount of time, what do you think? Are you going to make the change or would you rather stick with your current system? Let us know in the comments below or over on our Facebook page. We’d love to hear from you.

If you’re having issues with your refrigerator, or any of your other appliances, we’d love to help! We’re here to serve, whether your refrigerator has stopped running or your dryer is making a really weird rattling noise. You can call us at ((214) 599-0055) or go over to our website to make an appointment.  We want to help all of our clients in Garland and the surrounding areas. 


The ‘Post-Thanksgiving’ Meal Guide

 AKA I’m sick of turkey, please give me something different. 

Congratulations! You've survived Thanksgiving! And by now you've probably even eaten up most of the leftovers.


But that means everyone in the house is getting tired of Thanksgiving leftovers, doesn't it? And we bet they all still want to eat, don't they?


You did all that work just a couple days ago, and they just don't seem to get that you're all cooked out. They - or maybe even your own stomach - still want you to make more food.


No worries! We've got you covered. This post will feature two recipes that you don't have to stress about or fuss over. Everything will come together in 30 minutes or fewer, and you won't have to resort to takeout. 


Shrimp Pesto


Somehow, the kids always seem to think shrimp is fancy. No one needs to know this is a one pot wonder.


Ingredients:

1 12 oz package extra small precooked shrimp

1 lb pasta of choice (we suggest tricolor rotini)

1 8 oz jar pesto sauce (or you can head over here and make your own) 

1/2 cup matchstick carrots

1/2 zucchini, chopped

2 tsp butter

1 tsp minced garlic


Tools:

large pot with lid, colander, cutting board, knife


Fill your pot with water and put it over medium-high heat. Salt the water if desired, and place the lid on the pot.


While the water comes up to boil, wash your zucchini and chop it into small chunks or thin slices, whichever you prefer.


Once the water begins to boil, add your pasta. Please do not put the lid back on the pot after this step, lest you risk a messy boil over.


Bring the water back up to boil and cook your pasta according to package directions. We usually shave a minute or two off the recommended cook time (this house does not appreciate mushy pastas).


In the last two minutes of cook time, toss in the whole bag of shrimp, your carrots and your zucchini and allow it to all cook together.


Drain your pasta, shrimp and veggies. Leave it all in the colander for a minute while you use the pot to melt the butter and sear the garlic.


Once your garlic has been seared, turn the heat down. Empty your jar of sauce into the pot and give it a good stir. Let it warm up a little over medium-low heat, maybe  two minutes or so.


Pour your still warm pasta and veggies into the sauce and stir. A little dash of Parmesan cheese never hurts a dish like this, either. Dinner is ready to plate!


Cornbread Skillet Bake


This one is a little bit pot pie, a little bit casserole, and a lot of "grocery day isn't until tomorrow - what do we have lying around the house?"


Ingredients:

1 lb ground beef

1/2 yellow onion, chopped

1/2 green pepper, chopped

1 Roma tomato, chopped

1 12 oz bag frozen corn

8 oz mild salsa or tomato sauce

1 15 oz can of beans (pinto or black work best)

1 8.5 oz box corn muffin mix  (if you like to make everything from scratch, you can try this

1/3 cup milk plus 1 tablespoon

1 egg

1/2 cup shredded cheese

2 teaspoons garlic powder

1 teaspoon chili powder

1 teaspoon ground cumin

1 teaspoon dried chives

1 tablespoon hot sauce (we like sriracha) - more or less, to taste

salt and pepper, to taste


Tools:

oven-safe skillet, colander, knife, cutting board, mixing bowl, measuring cup/spoon


Start your ground beef browning in the skillet. Season with your garlic, chili powder, cumin, chives, and hot sauce. If your family doesn't care for spicy foods, you can adjust the hot sauce some, but we don't think you should eliminate it entirely - the dish suffers some without the spice for depth. Add however much salt and pepper you'd like.


While the seasoned beef browns, open up your can of beans, drain and rinse. Let them sit in the colander until you've had a chance to get around to the veggies.


Wash and chop your tomato, pepper and onion. If you've got picky eaters, we suggest chopping things extra-fine to hide a little better. You can also adjust amounts, add in or substitute with something your pickiest eaters like better.


Drain the beef, but don't rinse out all your spices. Return it to the skillet and pour your tomato sauce or salsa over it.


Add your chopped veggies in with the beef, then toss in the beans and that bag of frozen corn. Give everything a good stir and let it simmer together, stirring frequently. Try to make sure nothing sticks to the bottom of the skillet and scorches there. In the event it's giving you trouble, you can toss a tablespoon of butter in.


In your mixing bowl, whisk together the milk and the egg. Pour in the contents of the box of corn muffin mix and stir. It will still be a little lumpy, and that's okay. (If you want it to be extra smooth, you can sift the muffin mix before this step.) Let your batter rest a minute or two while you take care of other things - like stirring the beef and veggie mix.


Preheat your oven to 400 degrees.


Remove the beef and veggie mixture from the heat. Give it one more good stir, then pat it down so it's mostly level in the skillet. Sprinkle your shredded cheese in an even layer all over top of it.


Give your batter a quick stir, and then pour it slowly over the top of the mixture in the skillet. Your goal is to cover the top in an even layer of batter without smothering everything or overflowing the skillet.


Once you've got an even layer of cornbread batter in the skillet, set it in the oven for about 15 minutes. If you're working with a larger than average skillet and a thin layer of cornbread batter, it's wiser to check on it after ten minutes or so to avoid over-baking it.


Your casserole is done when a toothpick inserted into the thickest part of the cornbread crust comes out clean.


We cut ours into generous slabs and flipped them into shallow bowls with a spatula. Expect the filling to fall apart a little.


Optional picky-eater-bribery step: Add a dollop of sour cream and guacamole, drizzle some warm salsa con queso over the top and serve with tortilla chips.


Whichever one of these two options you go for, we know you’re in for a treat. We hope that you’ve survived through the holiday, whether it was full of family in person or via video. If you enjoyed our recipes this week, why not head down to the comments or over to our Facebook and let us know? We’d love to hear from you. If on the other hand you ended up here because your appliances have gone on strike after the holiday, head on over to our contact page and set up an appointment for appliance repair. We’re here for all of our clients in Dallas and the surrounding areas.

Dried spices in jars on a wooden board. Rosemary, bay leaves, black pepper, paprika