Spicy Lemon Pepper Shrimp

A Bowl So Delicious You’ll Want To Eat It For All Three Meals

Sometimes you need something spicy. You need something that is going to be so tasty that everyone at the table will be left shocked. Sometimes, you stumble onto that recipe by accident. That’s what happened to us with this recipe.

Ingredients:

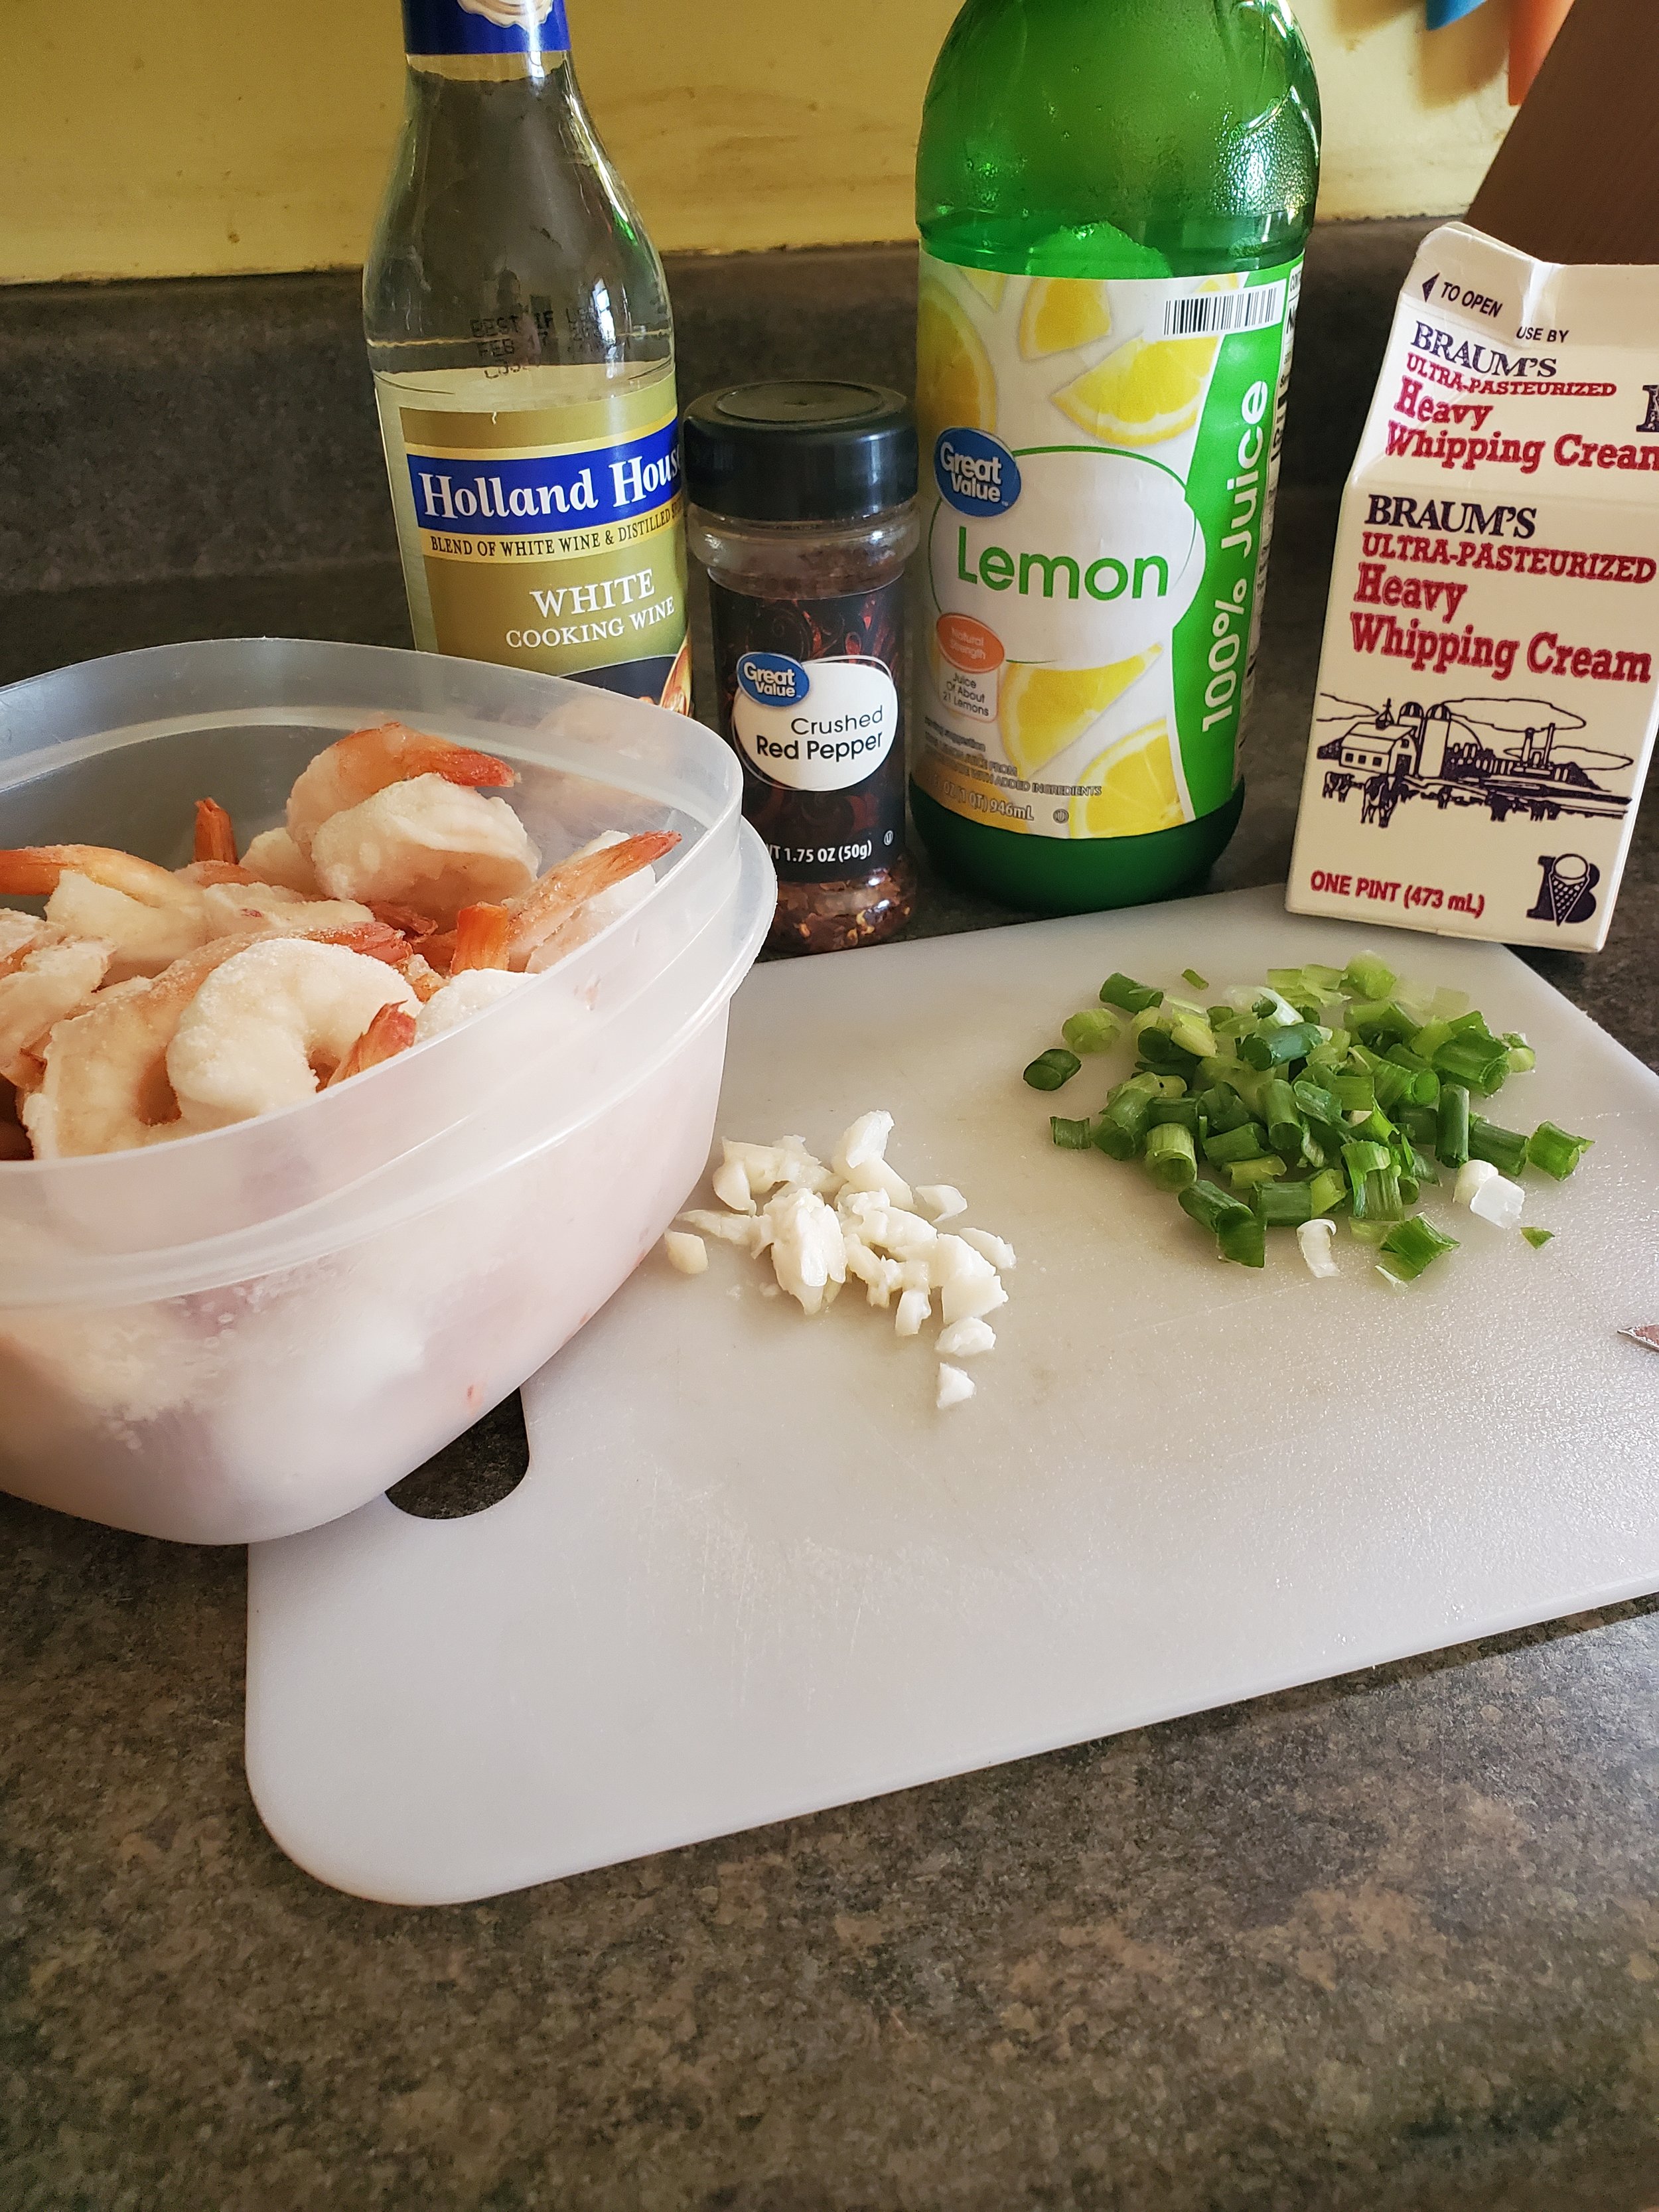
1 lb shrimp, peeled and deveined

1/4 cup white cooking wine

1/4 cup heavy cream

1 tablespoon lemon juice

1 tablespoon olive oil

1 tablespoon butter

2 scallions

2 cloves garlic

1 tablespoon crushed red pepper

1 teaspoon woodfired garlic seasoning (Kinder's brand)

salt and black pepper to taste

Tools:

cutting board

knife

large plastic container with lid

frying pan

measuring cups and spoons

spatula or tongs

Start with your shrimp. We like the pre-peeled frozen kind to cut down on the prep time, but if you don't mind the extra effort, starting with fresh is fine. Just keep in mind how quickly fresh seafood spoils. This is assuredly not a prep-ahead recipe.

Make sure you have your shrimp peeled, deveined, and rinsed. Set them into a large plastic container with a tight-fitting lid. Pour the lemon juice over them, then sprinkle with salt and pepper and woodfired garlic seasoning. Maybe shake in a little extra of that woodfired garlic (the stuff is addicting!). Put the lid on, check to make sure it's fully sealed, then give it a good shake to coat the shrimp.

Wash your scallions, trim them up and chop them. We like to have pretty sizable chunks - but if there are picky eaters involved, feel free to cut them extra fine. Just adjust your cooking time to avoid torching them to a crisp if you do. 

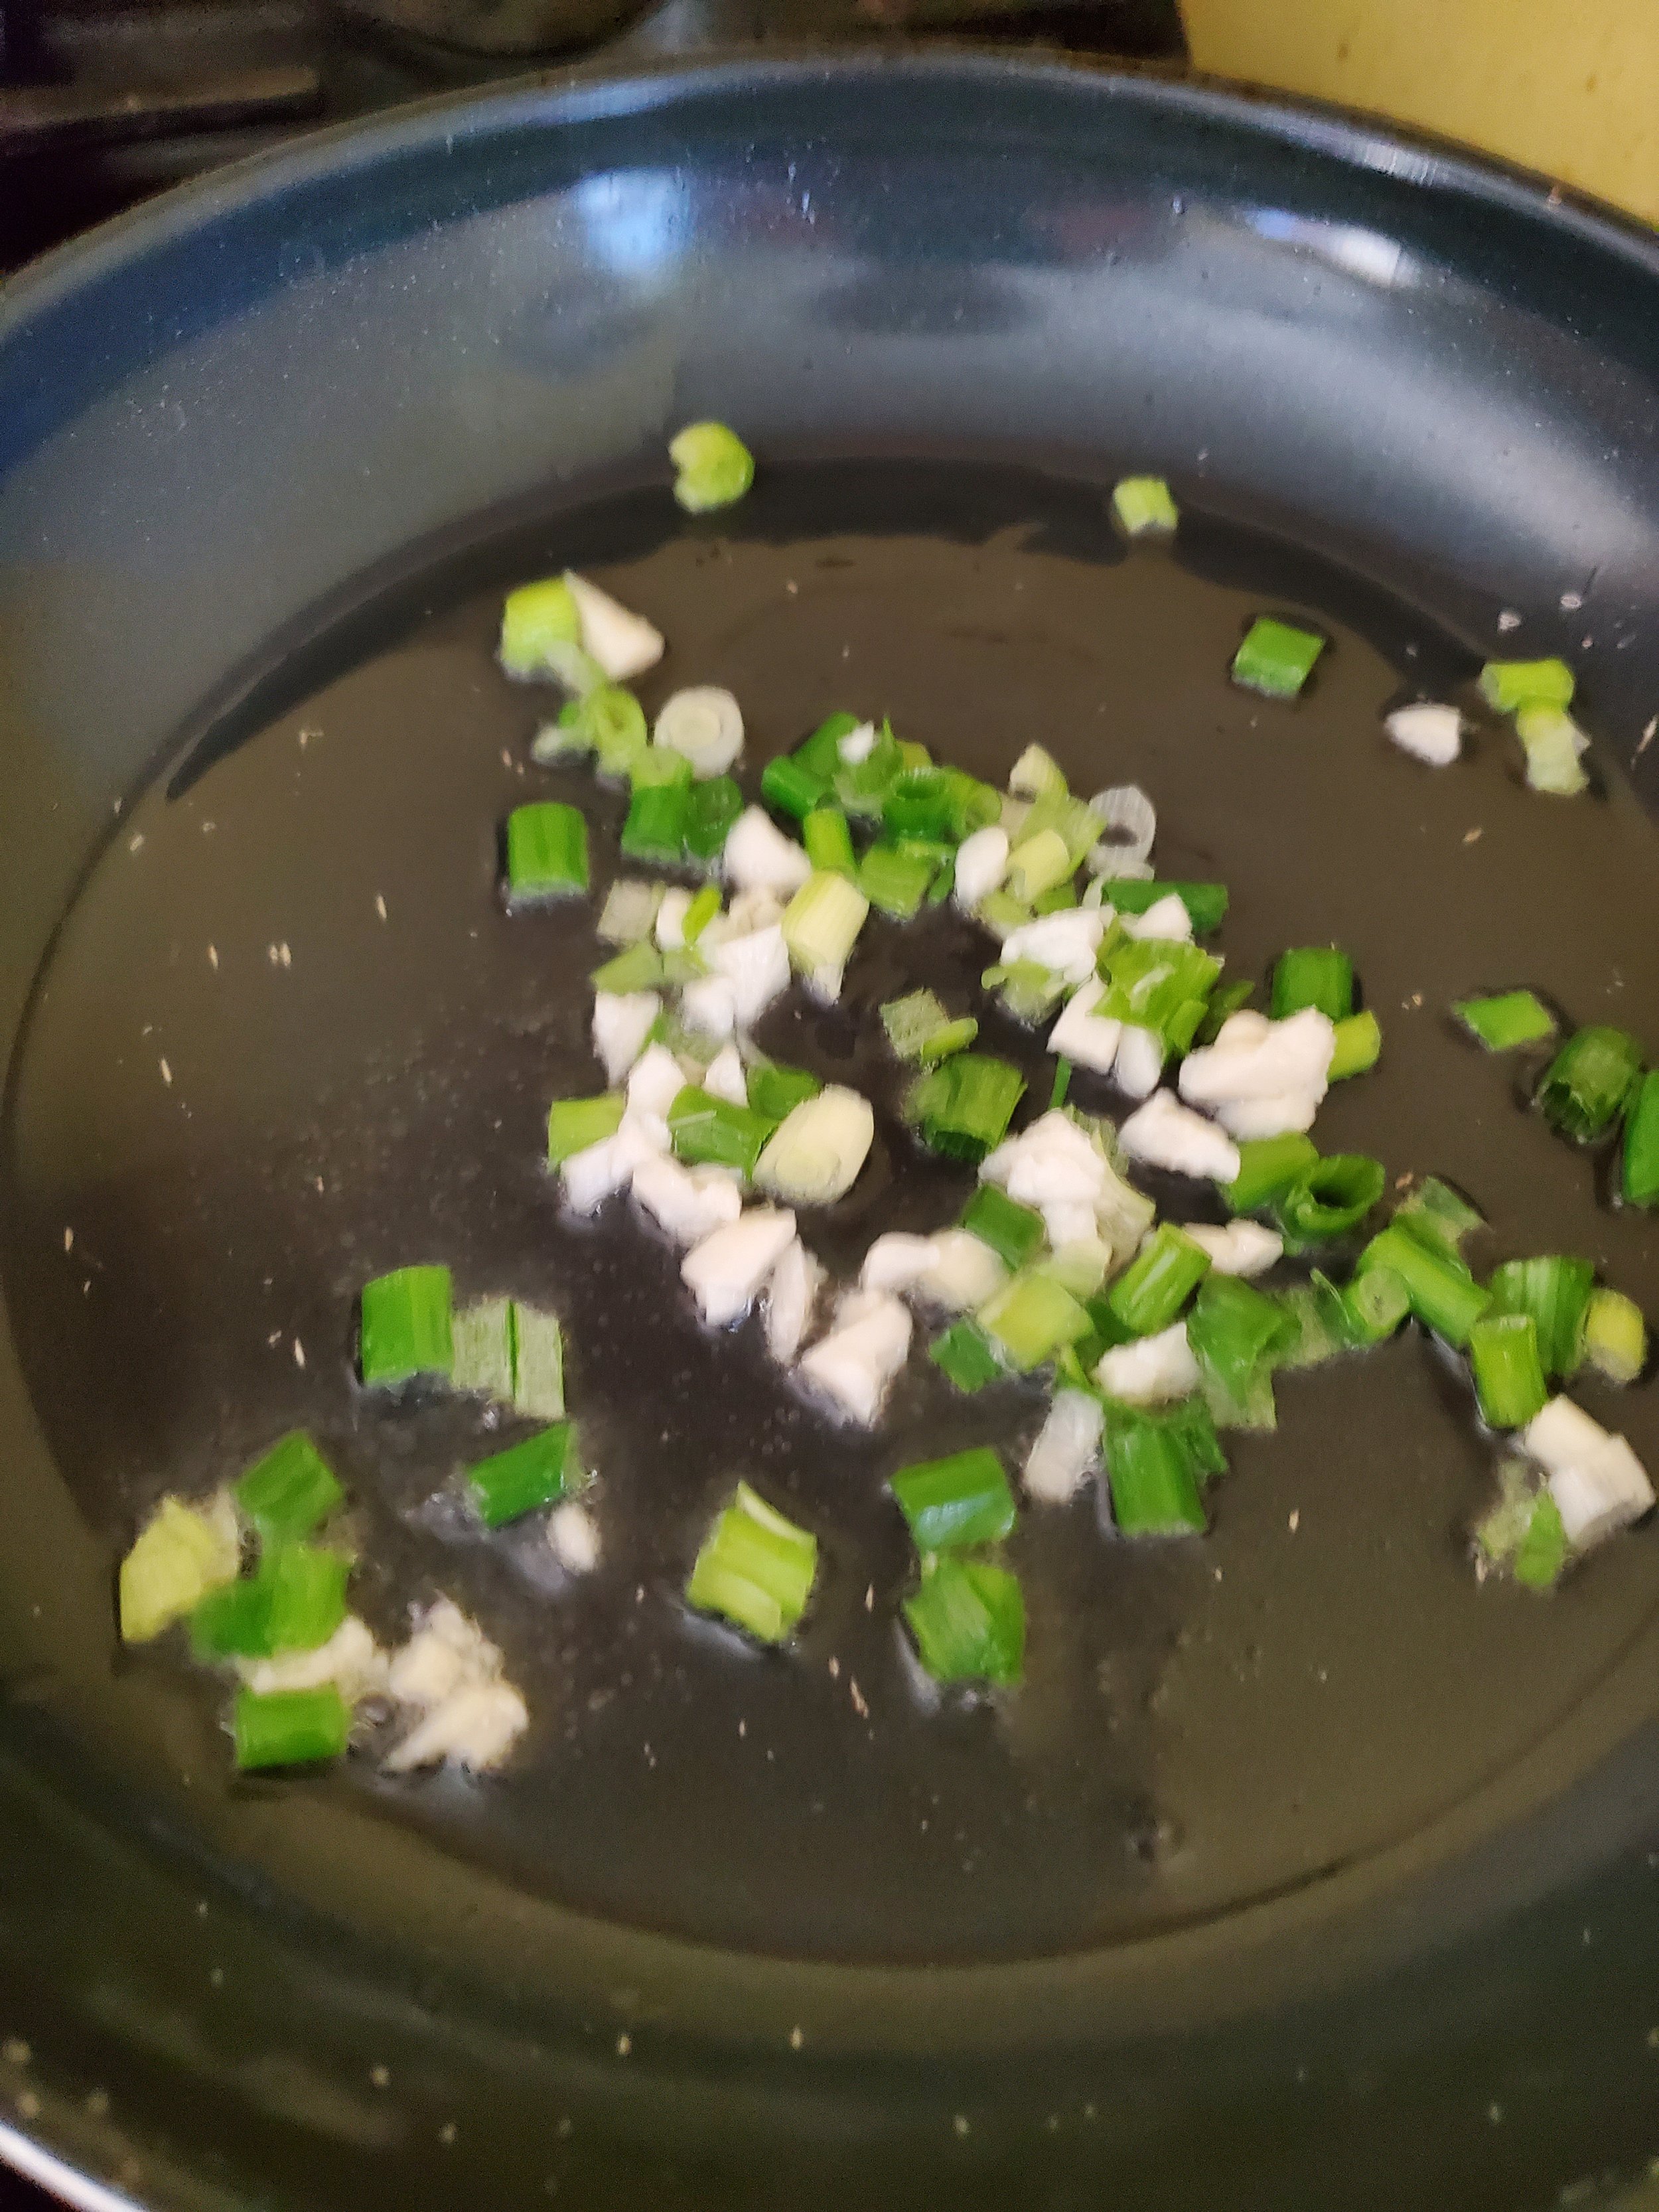
Scrape the scallions to one side of the cutting board and, in your open space, use the flat of your knife to crush the two garlic cloves. Once they're flattened, go over them in a rough chop just to make sure no one gets a big mouthful of garlic later.

Melt your butter in the frying pan over medium heat. Add the olive oil, then dump the scallions and garlic into the pan. Give them a quick stir, then let them simmer there for a couple minutes until fragrant.

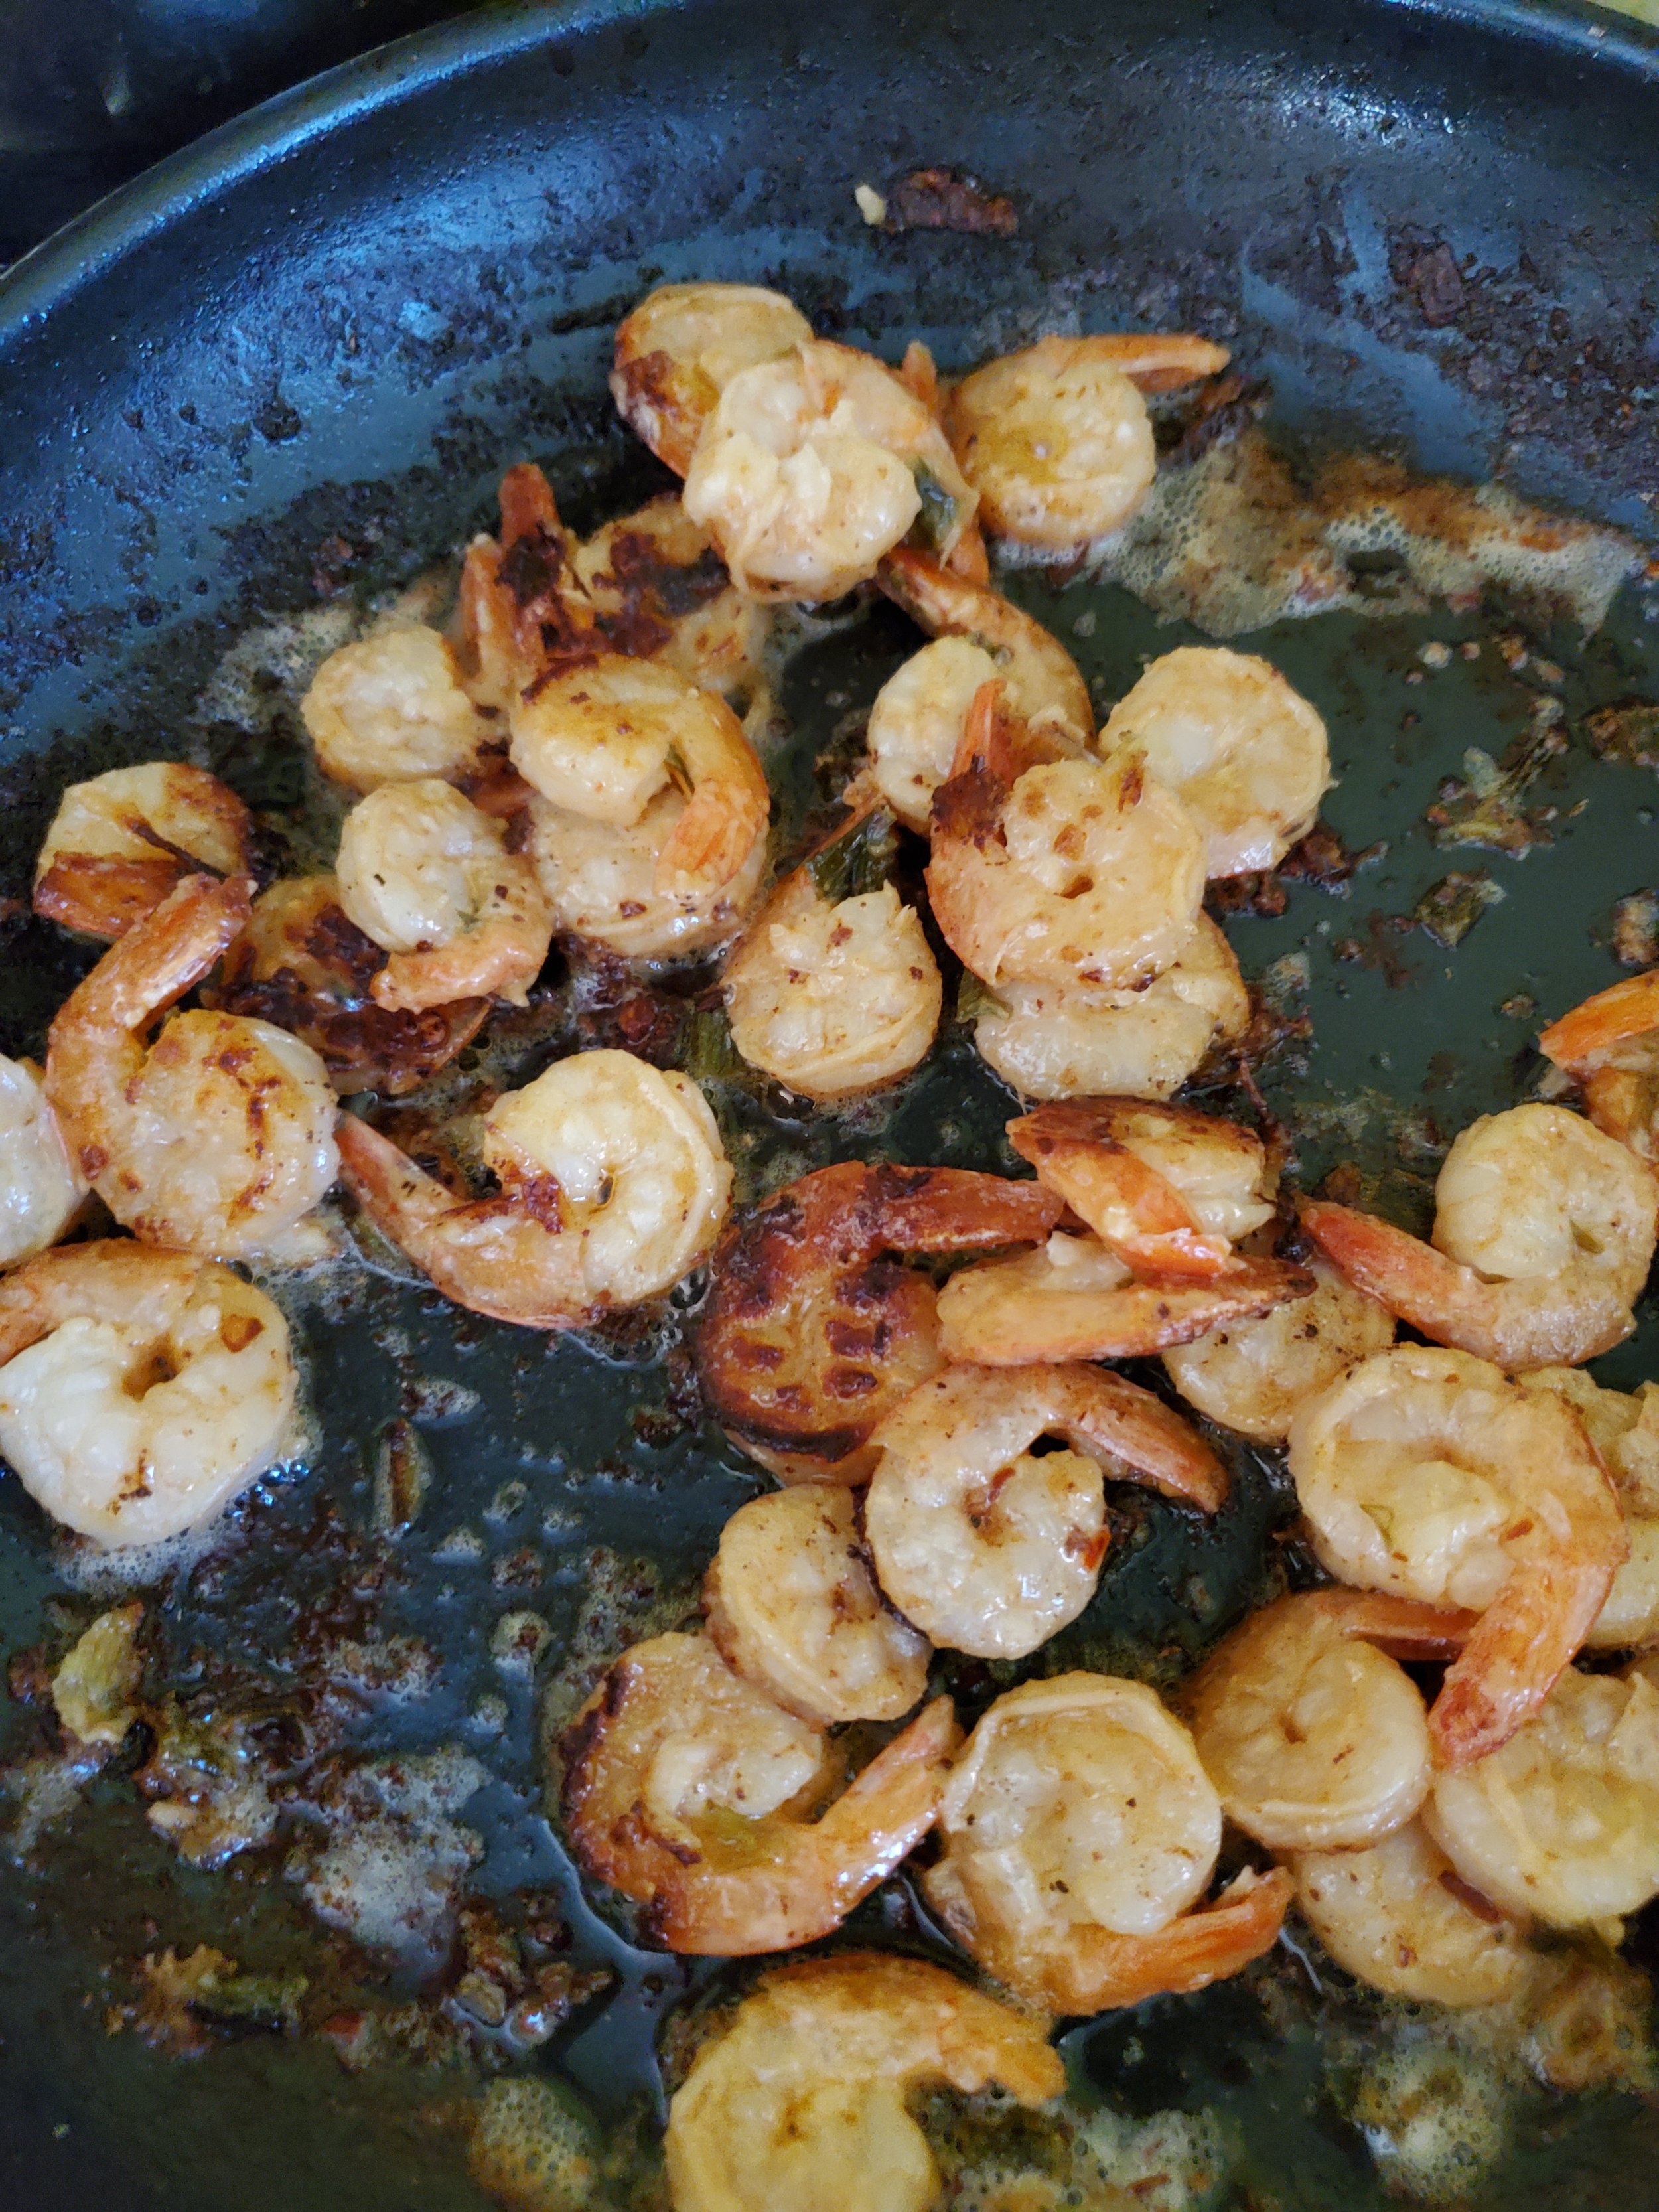
Turn your attention back to the shrimp. Double check the lid (no one wants to wear dinner), and then give them another good shake. Drain out most of the liquid and add the shrimp to the pan. Cook them for three or four minutes, then flip with a spatula or tongs. The "few minutes a side" guideline is very dependent on how large they are. We went for the medium-large shrimp. If you started with the smaller or even salad-size shrimp, reduce the cooking time by a bunch - they cook through so fast! 

Once the shrimp start turning colors (you'll know they're done when they're no longer sort of gray and translucent; a food thermometer should read 145 at the thickest point of the largest shrimp), measure out your white wine and add it to the pan. It will sizzle and pop, but it shouldn't flare. The alcohol content in a cooking wine is relatively low.

Let it reduce for a minute or so, then measure and add your heavy cream. Stir a bunch at this stage to be sure the cream is evenly distributed and there aren't any hot spots in the pan where the wine has already boiled away.

If there's anyone in the family who detests spicy food, this is the time to remove a little for them and put it aside. (Can you tell we have one of those, who also flinches at big pieces of onion or pepper?)

Sprinkle your crushed red pepper generously over the shrimp, give everything in the pan a good stir and a flip, and allow it to simmer another minute longer to let the flavors meld.

While it's totally optional, we like to turn the heat up a little at this step and get a good sear to complement the richness of the sauce. If the pan is looking a little dry, splash a little extra wine or cream into it before turning the heat up.

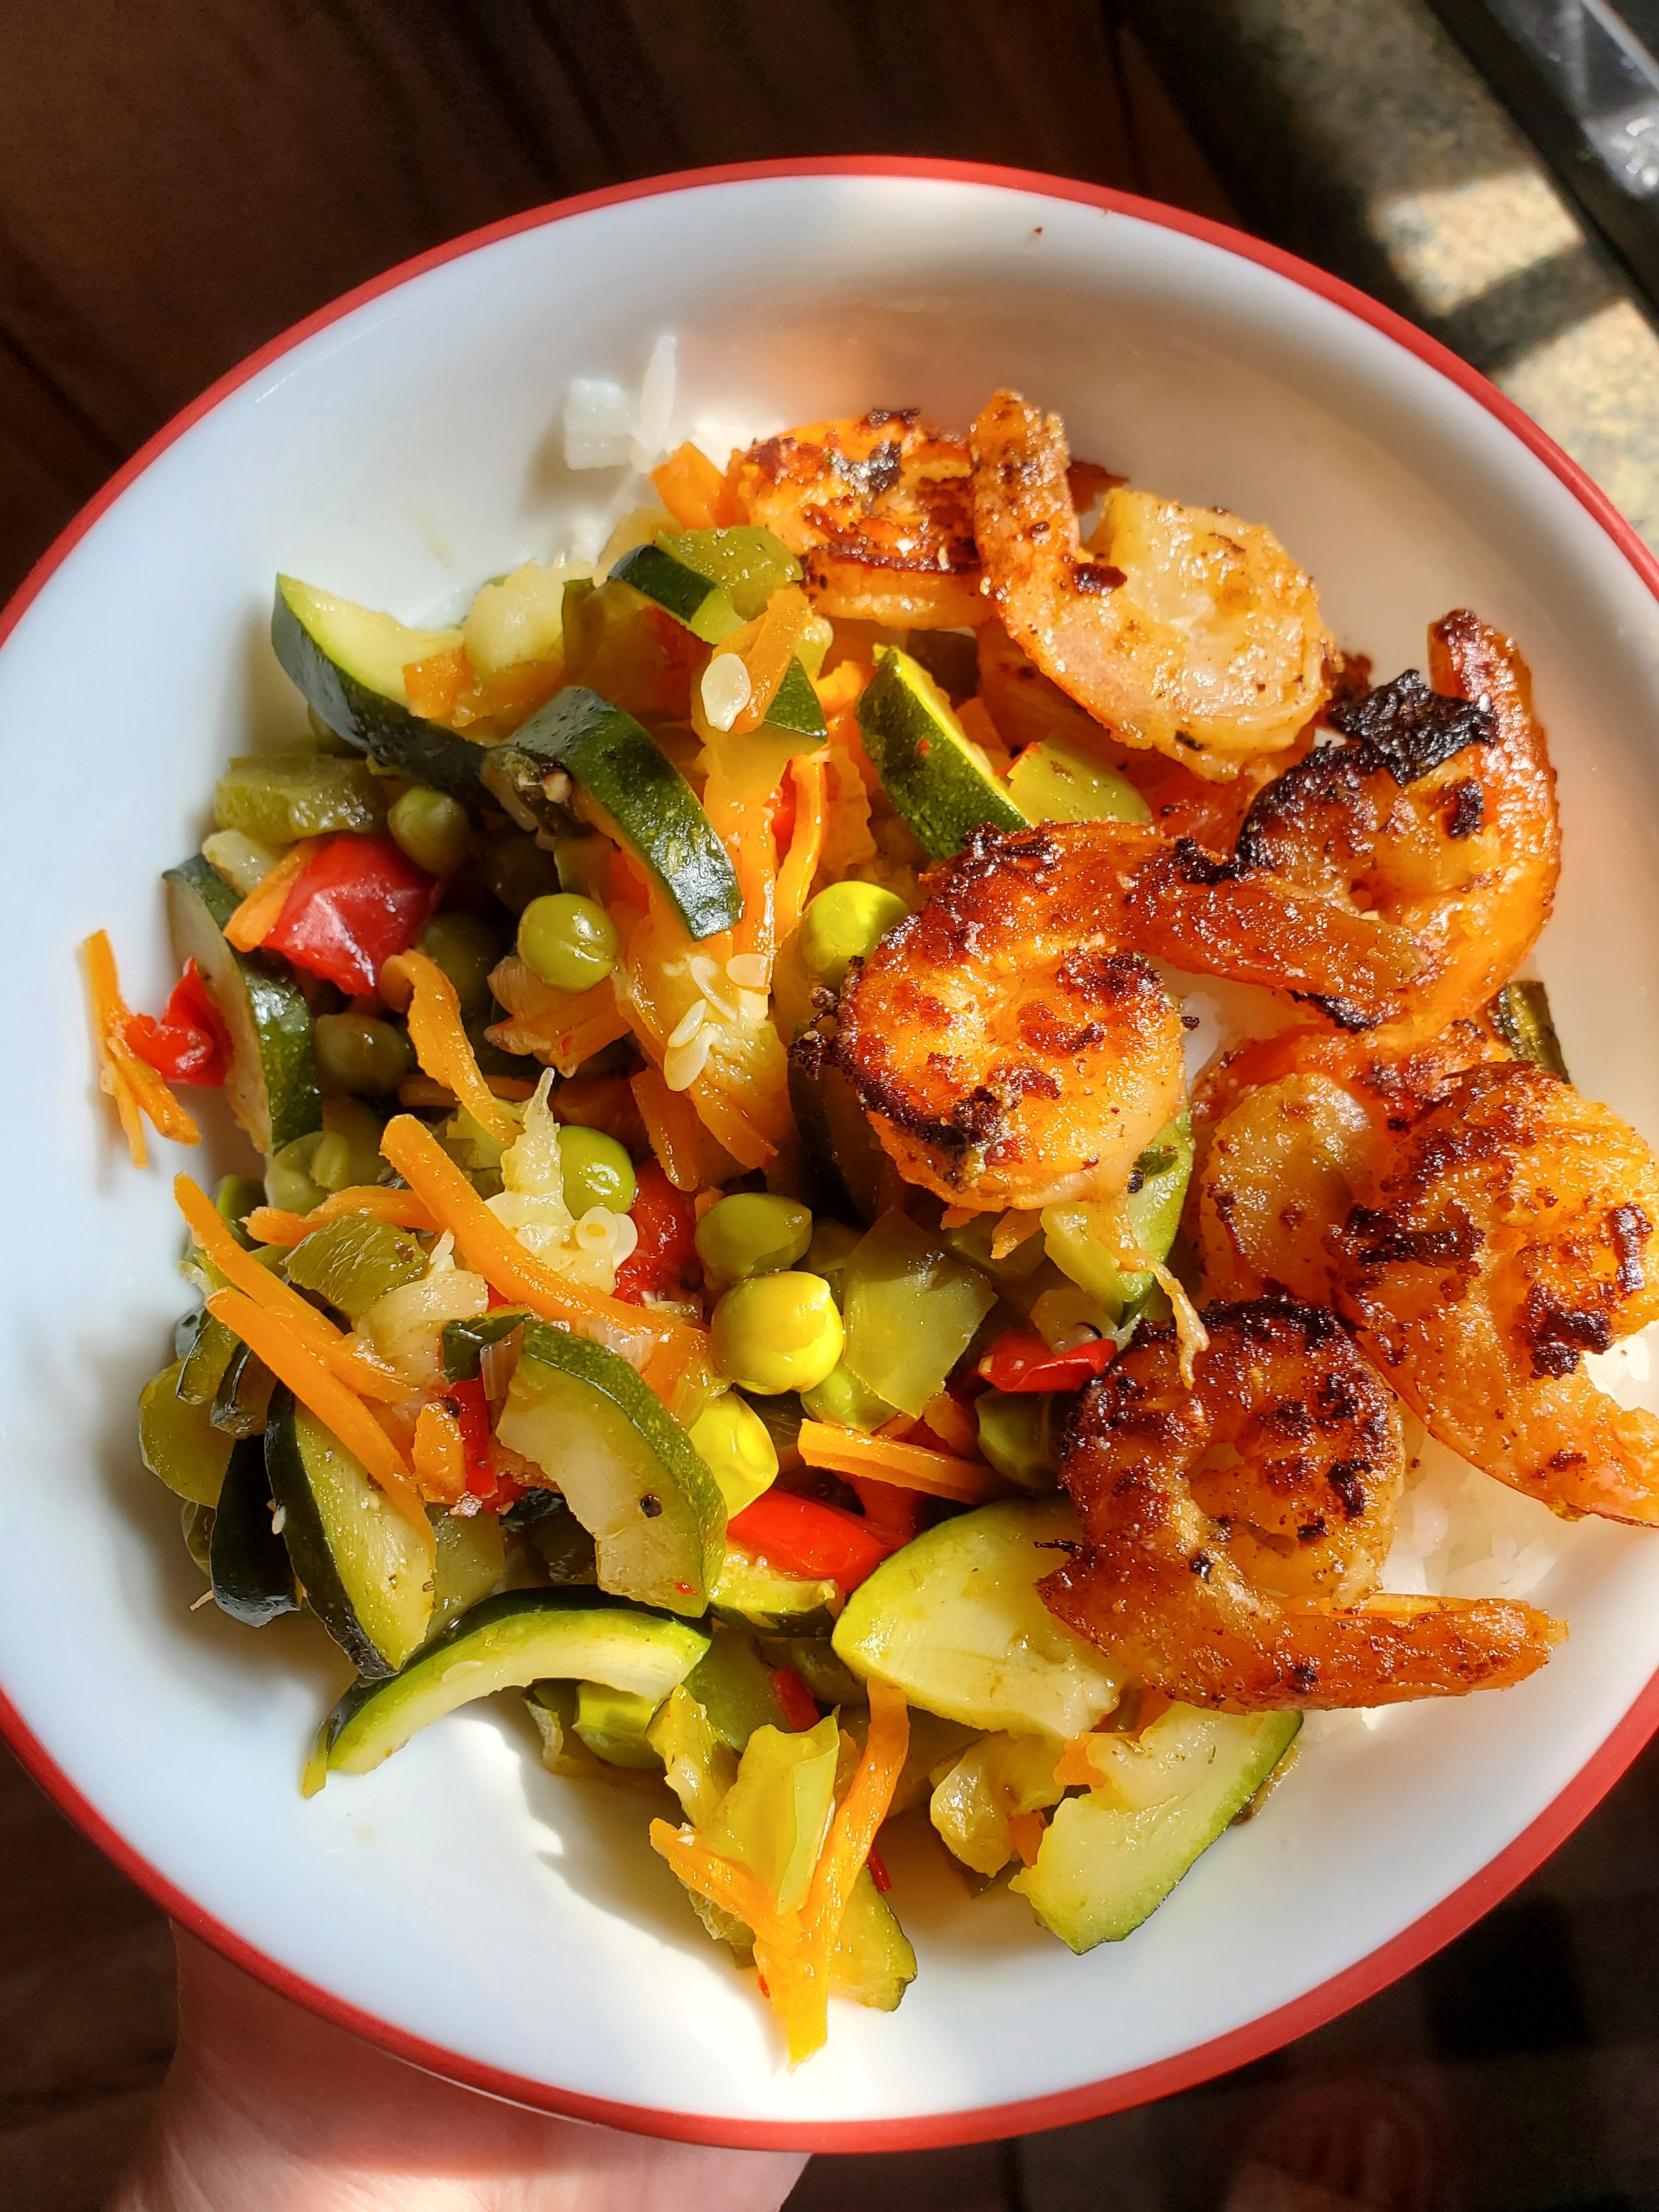
Split it up into even servings before you let anyone know it's ready - this meal sometimes gets fought over if you're not careful!

We think the shrimp is best served over rice with a great big pile of mixed veggies, but it also works with a salad or pasta. Get creative with it - maybe it's a good sandwich filling or a stellar appetizer, too. We just haven't tried it all yet.

 Thanks for checking out our recipe this week! Let us know on our Facebook how it turned out for you!


And remember, if something is going on with any of your appliances  we want to help. Whether it’s some of our posts here on the site, or needing a trained technician to take a look, Appliance Rescue Service is here for you.

5 Simple Ways to Get Rid of Your Old Appliances

Easy Ways To Get Rid Of An Old Appliance If You Can’t Repair It. 


As an appliance repair company, we never like to think of a dryer or oven dying. Sometimes it happens though. You've done everything you can, we've done everything we can, and it's just not possible to fix the trustworthy appliance that you loved. If that's the case,  what do you do? Naturally you're going to want to purchase a new one,  but what are you supposed to do with the old one?


 There are five different resources that you can use for getting rid of an old appliance, whether it is dead as our example or if you decided to purchase a new one and simply need to get rid of the old one because it no longer fits. Those  five options are: 


Donate Your Old Appliance 

Utilize A Buyback Program With A Retailer To Get A New Appliance In Exchange

 Sell Your Old Appliance On A Digital  Marketplace 

Use A Scheduled Pickup By A Retailer Or Recycling Service To Dispose Of Your Old Appliance

Make Use Of The EPA RAD Program To Recycle Your Old Appliance 


Donate It To Someone In Need- 


Courtesy of Vlada Karpovich

Donating things is a great way to give an old item new life. You are continuing the life cycle of an item rather than letting it sit and rot. Donating an appliance also means that it's not leaking chemicals into the environment.  Whether it's clothes, furniture, or appliances, donating things is great for everyone. These items can then be given or sold to people in need, and you get more space in your homes.   If your appliance still functions, and it's just a matter of you having wanted to purchase a new one for quite some time, this might be the best choice. A great example right here in the Dallas area is Habitat for Humanity. 


Utilize A  Buyback Program With A Retailer-

Courtesy of Ekaterina Belinksaya

If you haven't yet purchased a new appliance but are looking to do so, you can look into local retailers and see if they offer a buyback program. Often times its a mix of how new your appliance is. If it's a relatively new appliance, the shop might purchase it and give you a deep discount for a new replacement. If it's an old or damaged appliance, the shop might purchase it and sell it out for parts. In that case, you will probably just get a small discount off of your next purchase. Every retailer is going to be different with how they handle this so your best bet is to go to your favorite place and ask them what they can do for you. Many of them will even throw in pick-up when they drop off your new appliance.


Sell It On A Digital  Marketplace-

Courtesy of Kampus Production

Another solid option, whether your appliance is functional, dying, or dead, is to resell it on a digital marketplace. While you will not likely be able to get the same price as a brand-new appliance, you will be dealing directly with people and able to bargain for a price that fits your needs. Here you can do everything from selling out an appliance that is perfectly functional to selling pieces for people that want to repair their own. This can take a long amount of time, though, and should be considered before choosing this route. What is your timetable for getting rid of your old appliance? Do you need it out immediately or do you have time for it to sit around? 


Use A Scheduled Pickup By A Retailer Or Recycling Service

Your fourth option in Dallas is to look for a business or program that will schedule a pickup for you. This can be anything from a recycling program to a business that will buy junk to an appliance shop that might use it for parts. You might end up paying a fee for this one, though, depending on the business in question. But if you want it gone quickly, this is one way to do it.


Make Use Of The Epa Rad Program-


Finally, our favorite option is the EPA Responsible Appliance Disposal program. The EPA (Environmental Protection Agency)  has contractors they trust to go beyond just scrapping appliances. Instead, these partners go through and recycle every component of your appliances, from steel and plastic down to the freon that is in your refrigerator or your mobile HVAC unit. While it does require extra paperwork, there are both environmental and tax rebates. And who doesn't like to feel good and get to save money?


Do you know anything about how to get rid of appliances that we missed? Let us know over on our Facebook page!

If your oven, refrigerator, dishwasher, dryer or washer did break down, but you’re not ready to give up on it, let us know! Appliance Rescue Service is all about finding ways to fix appliances, whatever brand or model it is. So long as you live in the Dallas area, we want to work with you and help to get your home running smoothly again. You can reach out to us via our contact page or by giving us a call at ((214) 599-0055). 


Taking the Pain Out Of Melted Plastic

Or, How To Get Melted Plastic Out Of Your Oven

Courtesy of Skylar Kang

Your oven is smelling when you turn it on, and you open it to smoke wafting out. You didn’t light something on fire, you just had a piece of plastic get stuck somewhere. It’s a problem we’ve all encountered, and you’re not the only one. Better still, we’ve got all the steps you’ll need to get the plastic out of your oven without damaging it or yourself. 


Different Procedures For Different Ovens!

  • The Racks

  • Electric Ovens

  • Gas Ovens

  • Ovens With Self Cleaning


Before we dig in a quick note about safety. Please do not try and remove the plastic from your oven with your hands at any point.  Use the tools we have suggested or something similar so that you don't hurt yourself. It's also advised to look over the entirety of the post before tackling your issue. Now let's get into the actual methods you need to know

How To Remove Melted Plastic From Your Oven Rack 


If the melted plastic is on your oven racks, congrats this is the easiest outcome for you. All you need to do is remove the rack from your oven and put it either in your sink or outside. You can then use a scraper or butter knife to remove the plastic. Since there isn't a coating on your oven racks you don't have to worry about damaging them. If you are already exhausted from a long day or don't have the hand strength to chip off the plastic, there is an alternative. What you can do is take the rack set it in your sink and take a large pot full of boiling water and pour it consistently over the plastic. This will heat the plastic enough that you should be able to remove it using a wooden tool. 

How To Remove Melted Plastic From Your Electric Oven


If you weren't lucky and you have plastic on the interior of your oven slowly put down the tools. We're not ready for those yet. Instead, grab a plastic bag that is enough to cover the piece of plastic you are looking to remove. Fill that 3/4 of the way with ice. Lay it on the plastic for at least 10 minutes. The idea is to allow the plastic time to retract and become hard and brittle. After 10 minutes you can grab a razor scraper or a butter knife and very carefully lift up from the outside edges of the plastic. Ideally you should be able to pop the whole piece off. If not then hopefully you will be able to break it off piece by piece using this levering action. Again be very careful though as this can damage the inside of your oven. 


As with most cleaning chores this might take more than one round to get it completely clean.


How To Remove Melted Plastic From Your Gas Oven

If you have a gas oven we're going to start by taking a look at the bottom plate of your oven. Some gas ovens have it where the bottom plate can be removed for easy cleaning. If that is the case with yours go ahead and do that and see if you can put the entirety of the plate into the freezer if that is where the plastic ended up. You'll then proceed to trip off the plastic after half an hour or so.


If you don't have a bottom plate that can be removed then go ahead and use the same cold method that we used for the electric oven.


How To Remove Melted Plastic From Your Oven That Can Self Clean 


If you have a self-cleaning oven this one is going to require something entirely different. Instead of your butter knife and razor scraper you are going to want to grab some wooden tools like a wooden spoon or spatula. Now go ahead and open up all of the windows and grab a respirator like you might use if you were painting. 


Courtesy of Thirdman

Now that you are prepared, turn your oven on to a low heat maybe 150° tops. Leave the oven open during this process. Make sure that you are also wearing your mask and that the windows are open during this process. It is going to stink. Every 5 minutes or so go and poke at the plastic to see when it starts to become soft and pliable. For anybody that makes candy think of it like the firm ball stage.  This is when you'll grab your wooden tools and start to carefully pry the plastic up and away from whatever it is stuck to. Do not use a metal item to pry it. Metal can easily damage the inside of your oven. Self cleaning ovens have relatively fragile inner coatings and as such take very little to become utterly wrecked. 


Did that work for you? Did you find something else that worked better? Let us know over on our Facebook page! 


If you got the plastic out, but your oven is still smoking, give us a call ((214) 599-0055), or you can reach out to us via our contact page! We’ll work with you to figure out a time and date that works for you so our expert technicians can come out and help. 


Raisin Bread for Non Raisin Lovers

When You Really Need To Use Up The Raisins You Have, But Your Family Doesn’t Like Them.

Sometimes the weather is hot and unhappy, and it makes you miss your fall and winter foods. That's what's happening for us this week, so we decided to make some raisin bread.

There are a million and a half recipes for raisin bread. We're not going to get up on a soap box and tell you ours is better because... or ours is different because... That seems a little off the point, if nothing else. Your family may already have a standby recipe for this - but if not, you're welcome to try ours out!

Ingredients:

2 1/2 cups flour

1 cup water, warm 

3 teaspoons active dry yeast

1 teaspoon salt

1 teaspoon white sugar

1/3 cup brown sugar

2 teaspoons cinnamon

1/2 teaspoon clove

1 teaspoon oil (we use olive, but sub whatever you like)

1/2 cup raisins, separated so as not to clump

Tools:

mixing bowl

measuring cups and spoons

spoon

parchment paper or silicone mat

kitchen towel

dutch oven or covered oven-safe pan

thermometer

While we know thermometers are not ubiquitous kitchen tools, we strongly advise using one instead of guessing on water temperature. Instant-read digital thermometers are only a few bucks at your nearest big box store. They are absolutely a justifiable expense, between food safety uses (ensuring meats are fully cooked) and baking tasks (like checking water temperature to proof yeast).

Before you get going, it's a good idea to heat up your water. You can run the kitchen tap until it's warm, or you can measure the water cold and heat it in the microwave if your measuring cup is microwave safe. We normally just measure cold water from the tap and zap it in the microwave for 30 seconds or so. Use the thermometer to check the temperature - it should be no colder than 105 degrees and no warmer than 115. Target 110 as the ideal temperature. If it's too hot, it will kill the yeast - but if it's not warm enough, the yeast won't do its job.

Once you're sure the water is the right temperature, mix in the teaspoon of sugar and add the yeast. Give everything a stir (the sugar will partially dissolve, and the yeast will saturate) and let it sit for at least five minutes. You'll know you did it right when the yeast bubbles and begins to increase in size.

Measure your flour, salt, cinnamon and clove into the mixing bowl and use a spoon to combine them. Add the brown sugar and make sure to stir it in - we know there will be some clumps at this point, but it's okay.

Stir in the raisins at this point, making sure they don't go in as one big blob that won't distribute through the dough. We often task a little helper with making sure they're not too stuck together.

Add your oil and the yeast/sugar/water mixture. Stir until you have something that sort of resembles dough - it'll be shaggy and have what look like huge pockets of flour, but don't panic. Get the spoon out of the way and finish the mixing and kneading process with your hands. Don't be afraid to get a little messy on this one (if you really hate the mess, remove jewelry and/or use gloves). Knead until it's mostly smooth and all the flour has been worked in.

Cover the dough with a clean kitchen towel and allow it to rest for an hour or so. Definitely set a timer. Please don't ignore it for four or more hours as we have accidentally done on occasion. Leaving it to rise too long yields a beer-y sourdough flavor that does not complement the raisins.

After the hour is up, preheat your oven to 375. Turn the dough out onto a piece of parchment paper. Knead it a bit more, with the goal of shaping it into a ball. If it's sticky, add some flour to the dough or to your hands, but avoid overdoing it. No one wants chalk instead of bread.

Now pick up that whole piece of parchment paper and plop it into the dutch oven. Put the lid on it and slide it into the oven on a middle rack. Let it bake for 45 minutes, covered. When your timer goes off again, remove the lid but leave the bread in the oven for another 15 minutes.

Around this point it will start to smell "done." Trust your nose. When it smells like bread instead of almost-bread, it's ready. Remove it from the oven and let it cool. Letting it cool is only really important if you want neat slices - if you're fine with them looking a little crumbly and rough around the edges, just go for it. We find it best served toasted and with a little bit of butter.

Let us know how your recipe turns out, we’d love to hear from you over on our Facebook page. 


And if you’re looking to learn more about how we can help you with your appliances, please let us know

Industrial Chic: Transforming Your Space with Rustic Elements

Maybe there’s another way to look at old spaces?

Industrial Decor comes from the '90s as many City centers in North America started transitioning their shut-down warehouses and manufacturing plants into condos or apartment buildings. Instead of trying to pretend that the building hadn't previously been a warehouse, they would feature the details. Industrial Decor became known for preserving that grungy open and exposed feeling. This type of design is mostly about obtaining a cold, eerie look. Rather than something to gentrify, this became the selling point for many of these new homes.


The great thing about industrial decor is that you don't need to have purchased a warehouse to achieve the look. With a bit of outside-of-the-box thinking, you can manage this even in the middle of suburbia. 


 The key elements of industrial interior design include:


A Mix Of Grays, Neutrals, And Rustic Colors 

As is with many different styles, you'll want to start by building up your color palette. While heading straight to Black or White might seem the obvious choice, more natural and worn colors are really what you should look at. If your space has a lot of room, go ahead and utilize an accent wall in some of the darker tones like charcoal gray, or a deep brick, or umber. If on the other hand your space is a little smaller or maybe the ceiling isn't particularly high, go ahead and use something like a light gray rather than straight white. This will give it the open effect, but it won't detract from the look you're trying to gain. You would also be surprised by the amount of blues, charcoals, and brick tones that you can bring in with this decor style.

An example of some options for an industrial design.


A Raw And Unfinished Look 

Courtesy of Abo Adam

Now that you've got your color decided on, let's make the room look unfinished in order to eventually give it a finished cohesive look (haha). What we mean by this is if your room has molding or baseboards? Get rid of them. If you've got a brick or stone fireplace that maybe was painted at some point, strip it down. If you've got wall to wall carpeting and you know you've got wood floors underneath it, rip it out and it was a little bit of oil you'll have an amazing floor. As with many things in our Decor series, these are options. All of these add to the look of a piece being unfinished, but it's up to you decide what you want to go with.

 Concrete Flooring 

Courtesy of Max Rahuboviskiy - Check out the concrete floor!

Given how many of the original industrial buildings would have been floored in concrete, this is a staple of the look. However if you cannot or do not want to rip your house down to concrete floors, there are other ways to achieve the look without having to destroy your house. You can instead get tiles that look like concrete. You can get peel-and-stick flooring for the same look. You can even lay down a vinyl wrap to achieve what you want. Each of these gives you different amounts of flexibility and ingenuity based on your budget and needs.


 Utilitarian Objects 

   Utilitarian objects are ones which serve their purpose without a lot of extraneous detail or ‘fluff’. There is still a sort of austere beauty to pieces that are simple. They bring joy in their simplicity or in how well they do their job. You can balance this by bringing in pop or abstract art and plant life to bring color and detail to a room. 


 A Use Of Old Vintage Factory And Lab Pieces

Courtesy of Farida Najafguliyeva

 If you want to bring in something special, you might look at incorporating antique or vintage factory and lab pieces. You can often pick them up from sales or thrift stores if you happen to live in the city.  Additionally, you can often find some of the classic fixtures and "Edison bulbs" at hardware stores that carry interior lighting. Cogs and gears are often thought of, but you should look beyond that. Look for pieces that can serve a purpose in your home now, such as repurposing an old chain to hold plants or a table top to act as the backing for a mirror. (Of course there are many more options that we could come up with right now, but these are ones we’ve seen.) 


 Large Sectionals 

Courtesy of Olena Bohovyk

Because of the large amounts of space within many transformed warehouses, bigger furniture was better. Being a sectional just means that you can easily take it apart and move it how you want, whether that’s several small seats or one giant couch for everyone to pile onto. 


 Wood And Metal Surfaces 

Courtesy of My walking Diary

Just like the floors and walls were often left bare, you might want to bring in very simple furniture to reflect the same. This is also a good choice if you’re not living in a converted warehouse and want to get the look anyway. Using reclaimed or recycled wood paired with metal piping to construct tables and shelving is a good example of how this can be achieved.  Using antique light fixtures with metal finishes is also something that is very common and fits well with the look. 


As always, we hope that you enjoyed our take on this aspect of home decor. Will you take on an industrial design at some point? Let us know why or why not over on our Facebook page.


If it is not your love of decor but instead your hatred of your malfunctioning dishwasher that has brought you to us today, you're still in the right place. At Appliance Rescue Service, we take care of all major appliances and work with you to get your home running smoothly again. When you reach out to us via our contact page or by giving us a call at ((214) 599-0055), we'll work with you to set up a time and date that works with your schedule to send out one of our experienced technicians. Whether you live in Plano, Carrollton, or Garland, we want to help.