Keep Your Home Running Smoothly with These Simple TLC Tips
While your appliances may not be able to say "thank you," they do a lot to make your life easier. And just like any hardworking partner, they deserve a little appreciation! So why not return the favor? This week, we’re sharing five simple ways you can show some TLC to your appliances—because a little care today means a longer, smoother-running life for them (and fewer headaches for you).
1. Make Sure They're on the Level
In any good relationship, balance is key, including your relationship with your appliances! Ensuring that your appliances are properly leveled might not seem like a big deal, but it can greatly impact their performance and longevity.
Take your refrigerator, for example. If it's not level, you may notice that the door doesn’t close all the way, leading to cool air escaping and higher energy bills. You might also have issues with food and drinks sliding around on uneven shelves. For your washer and dryer, being uneven can cause excessive vibrations that rattle the machine. This leads to damage over time to the gears and motors. A wobbly washer can also "walk" itself out of position, pulling on hoses and a risk of leaks or flooding. And let’s not forget your oven—if it’s sitting at an angle, you could end up with unevenly cooked meals.
The good news? Checking and leveling your appliances is a simple! Many appliances have adjustable feet that you can tweak to ensure they’re sitting evenly. If you’re unsure how to do this, our team at Appliance Rescue Service is happy to help!
2. A Descale Treatment Works Wonders
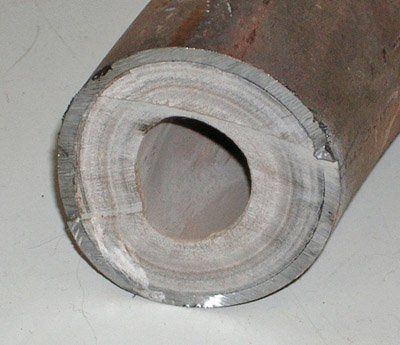
A relaxing spa treatment can leave you feeling refreshed—and your appliances can benefit from that kind of care. Over time, minerals from your water can build up inside appliances that rely on water flow. Your refrigerator, washing machine, and dishwasher are some examples. This buildup, commonly known as scale, can slow down water movement, clog hoses, and even cause parts to wear out prematurely.
If you’ve ever noticed your washing machine taking longer to fill, your dishwasher not cleaning as well as it used to, or your refrigerator’s water dispenser running sluggishly, scale buildup could be the cause. Even if you don’t have hard water, mineral deposits still accumulate over time, making descaling an important part of routine appliance care.
Luckily, keeping buildup at bay is easy! Many appliances have specific descaling products designed for them, and running a cleaning cycle every few months can keep things running smoothly. If you're unsure where to start, a professional technician can help by performing a deep-clean descaling service to get everything back in top shape.
3. Help Them Get Organized
Love isn’t just about grand gestures—sometimes, it’s about the little things, like keeping things neat and organized. Your refrigerator, in particular, benefits from a little tidying up.
An overstuffed fridge isn’t just a hassle when you’re trying to find last night’s leftovers. It can also interfere with airflow, causing uneven cooling. Hot spots and cold spots can develop, leading to food spoiling too quickly or, in some cases, freezing when it shouldn’t. Plus, when your fridge has to work harder to maintain a steady temperature, it uses more energy, which can drive up your electricity bill.
To help your fridge function at its best, take some time to reorganize it:
Keep vents clear so air can circulate freely.
Group similar items together so you can find what you need easily.
Check expiration dates and remove anything past its prime.
Wipe down shelves regularly to keep things clean and fresh.
4. Give Them a Good Scrub
We all feel better after a nice, deep clean—and your appliances are no different! While regular wipe-downs help keep things looking tidy, every now and then, your appliances need a little extra attention to prevent buildup and ensure they keep running smoothly.
Your dishwasher, for example, can collect food particles, soap scum, and grease over time, which can clog filters and reduce its efficiency. Running a cleaning cycle with a dishwasher-safe cleaner once a month helps remove grime and keeps it working properly.
Your washing machine also benefits from a good scrub. Dirt, detergent residue, and even mildew can accumulate inside, especially in front-loading machines. Running a cleaning cycle with a washing machine cleaner or a vinegar solution helps keep unpleasant odors at bay and ensures your clothes come out fresh.
And don’t forget the outside of your appliances! Dust and grease can build up on refrigerator coils, stovetops, and even dryer vents. A quick wipe-down with warm, soapy water or a specialized cleaner can help keep things looking and working their best.
5. Treat Them to a Spa Day (a.k.a. a Maintenance Check)
You might not be able to send your appliances to a spa, but a maintenance check from a professional technician is the next best thing! Regular maintenance is one of the best ways to prevent unexpected breakdowns and costly repairs.
A trained technician can:
Check for signs of wear and tear before they turn into major problems.
Ensure all parts are functioning properly and efficiently.
Clean internal components to remove buildup and improve performance.
Make small adjustments that can extend the life of your appliances.
Think of it like a wellness check-up—your appliances might seem fine, but routine maintenance can catch minor issues before they become major headaches. Whether it’s a refrigerator that isn’t cooling quite like it used to or a dryer that’s taking longer than normal, a professional tune-up can keep everything in peak condition.
A little love goes a long way—especially when it comes to your appliances! Keeping them leveled, descaled, clean, and well-organized can make a big difference in their efficiency and lifespan. And when it’s time for a little extra care, our team at Appliance Rescue Service is here to help! Whether you need a maintenance check, a repair, or just some expert advice, our technicians are ready to keep your home running smoothly.
So go ahead—show your appliances some love today! They’ll thank you with years of reliable service.


