Tornado Prepping Time!

What do you need to know and have to prepare yourself in the event of a tornado?

Table of Contents

Preparing Your Home

Preparing Your Property

Preparing Yourself 

A storm super cell spiraling above a field, with rain to the left.

It’s May and officially tornado season! Although we’re not hoping to run into any, we have to acknowledge the possibility. So, we’re doing what we do best and preparing in advance both our homes, and yours. We’ll look at how to prepare your home, your property, and your family. 

Preparing Your Home 

To start with you want to prepare your home. This should ideally be done long before there is any potential for tornados. So, if you’re reading this and you’re under a tornado watch? That’s not the best time to be doing this. Two weeks ago? That would be the best time. Or this weekend. That works too. Far better late than never. 

Check shutters and doors  - During a storm that can create tornados, you’re dealing with high winds. Your windows and doors are the biggest potential points for debris to make its way into your home, in which case the air outside is going to attempt to make the air inside your home equal to it in pressure. The short answer here is to make sure that your shutters and doors are solid and in good repair. For windows, you might consider getting storm shutters that can withstand high winds and hail. For your doors,  you want to make sure that they have at least three hinges and a door plate secured with 1-inch screws (at minimum.)  

**An important note. There is a myth that leaving your windows open during a storm will prevent your home from suffering damage as it will ‘equalize’ the pressure between the inside an out. This isn’t true. We must stress that doing something like this is going to end with your house being ripped in half. Close your windows and doors tight, make sure they’re covered if you can, and ignore myths like this.**

Check gutters - Your gutters are not the end of the world if you lose them during a storm. What is more of a problem is if they come off and go through a window. Is it common? No. Has it happened? Yes. Can you minimize the possibility of it happening by making sure they’re securely attached to your house? Yup. 

Which room is your safest? - Go through your house and figure out which is the most central and best protected. Ideally, your best bet is going to be something that is either below ground (like a basement) or on your first floor. You want to make sure that the room has as few windows as possible. Finally, if possible, your safe room should be at the center of your home, preferably not sharing an external wall. 

Secure tall furniture - Tall furniture getting knocked over is not only a danger to the furniture but also to you or your pets. Better to go around your home and secure everything with L brackets or straps now and avoid it altogether. Bookcases, china cabinets, entertainment centers, make sure everything that can be secured, is. 

Obtain straps for your appliances- This is one that doesn’t have to be done until you’re actually under a tornado watch, but having the straps there and ready to go is what matters. 

Cut materials for windows - This is another one of the “Do it well in advance” things. You’ll want to cut plywood or plexiglass. One thing we don’t suggest is ‘hurricane film’, at least not when used by itself. While the film will help keep your windows from shattering due to debris, it won’t stop the winds from blowing the window right out of the frame. 

When you’ve decided on your material of choice, we’ll suggest that you measure it so that it sets into the frame of the window in question and that you secure it with long screws. Once you’ve drilled the holes, label which side of the material is top, and tape the screws to it. Store all of them together in a cool dry place that’s easily accessible. 

A wall cloud over a city, with lightning striking down

Preparing Your Property

Preparing your property is something that should both be done ‘all the time’ and also once the season starts. 

Thin your trees - Trim dead branches, get rid of any low-hanging branches that are too close to windows or the roof, etc. 

Shape your trees- For this you might need to bring in a professional. The idea though is for the weight of tree being away from your house so that if it falls, it falls away rather than towards your house. 

Reinforce garage and or shed doors- Just like with the doors to your home, you want to make sure that your doors to your garage or shed are solid and reinforced so that they aren’t going to get blown off. The garage door is one of the most common points for debris to come flying through during a storm. 

Make a plan for your outdoor furniture. - Make a list of where everything can be stored that needs to be taken in. Patio furniture, pool items, grills, plants, everything. By having a list of what needs to be moved in the event of a tornado watch, you’re in better condition not to leave anything out accidentally.  

Anchor propane tanks outside- Your propane tanks on the other hand need to stay outside and be securely strapped down. 

Clean up or store away any heavy debris outside- When you get a tornado watch, this is one of the things you need to do. Go around your property and store away anything you can. We’re not talking about the things that are normally outside. Instead this is the wood project you’re in the middle of, or the garden you’re planting, the bricks you’ve just got in for a walkway etc. 


Preparing Yourself 

Last but not least, you need to make sure that you are prepared to wait out a tornado watch or, heaven forbid, a tornado warning. All of these should be done ahead of time, and checked regularly to ensure nothing has gone off. 

Stock your safe room - Back in the first section you identified which room in your home would work best for a safe room. Now you want to make sure that it’s soft, comfortable and that you and your family can stay there for however long you might need to.  In addition to the list suggested here, we advise keeping the room stocked with portable chargers, a generator, cards, books, and other methods of entertainment. One of the worst things is to be in a safe room for an undetermined amount of time, and being nervous or upset. Having things to keep your mind off the situation is always a great help. We also advise a crank charging radio, to ensure that you can keep apprised of the weather. 

Build kits for your car and as grab-and-go options if your saferoom isn’t an option for some reason. -  These kits should include simplified versions of what you keep in your saferoom. 

Include a kit for any pets - Your pets cannot look out for themselves, nor can they pack an emergency kit, so you should consider what they might need and what might keep them calm under the circumstances. 

Make sure to have all of your important documents- Birth records, death records, marriage certificates, deeds to property, proof of insurance, tax paperwork. If someone has asked for it at some point, you want to make sure that you have it in a secure place. You should also include a list of all of the serial numbers for your electronics, just in case you have to leave and people decide to… help themselves while you’re away. Ideally that would be in your saferoom, but it could also be in an easy-to-grab attache or safebox. 

Check your home and auto insurance - This can be done at any point prior to a tornado warning. It’s best though that if you do live in an area that frequently has tornados to consider having this on your policies. 

Did we miss anything? What do you keep in your safe room in case of a tornado? What about your go-bags? Let us know in the comments below or over on our Facebook page. As always, we love to learn from you! 


If you ended up on our blog because your dryer is rattling and not because of a mini cyclone inside of it, you’re still in the right place. You can reach out to us at ((214) 599-0055) or via our contact page to set up an appointment that works for you. We’ll help you find a time when one of our professionals can come and take a look at your major appliances and get them back to running smoothly.  

7 Areas to Clean Today to Prevent Home Disasters Tomorrow

Also known as: Seven areas to keep clean if you don't want a bigger mess.

Table of Contents

Gutters

Air Ducts 

Dryer Duct

Refrigerator Coils

Washer Filter

Dishwasher Filter

Shower Drain

The worst thing about washing machines is that they have to be cleaned. Most of us don’t even think about that. The problem is that by not doing so, you can end up with some horrible messes. Absolute disasters of messes if we’re being honest.  It’s not just your washing machine though, it’s also several other places around your home that need to be cleaned regularly to prevent a variety of disasters around the home. 

Gutters

When To Do It: Twice a year, best at the end of fall and spring. 

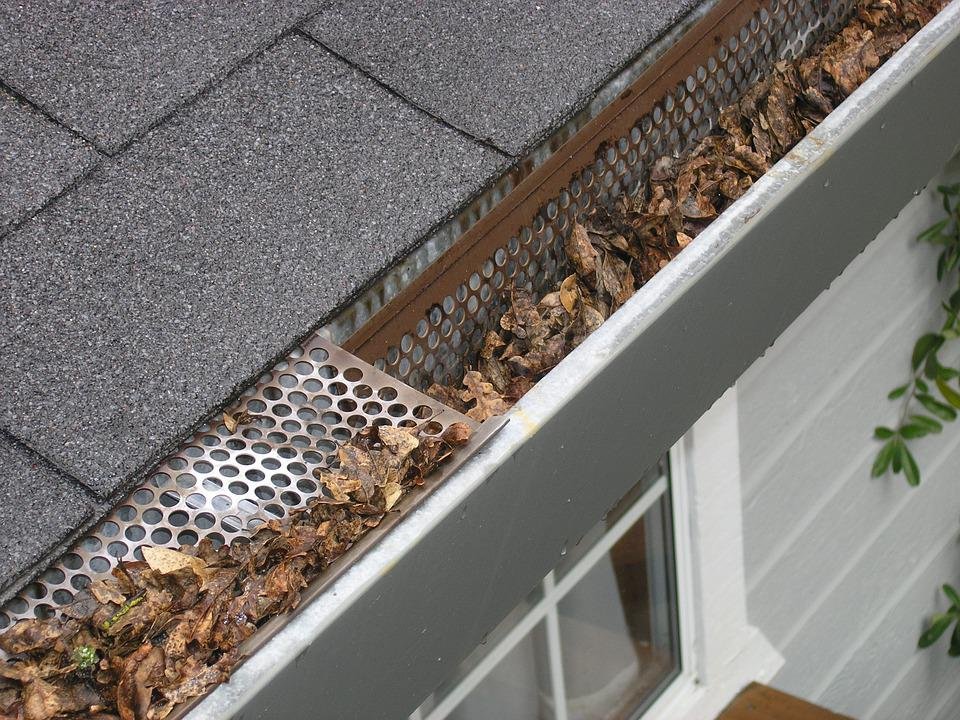
Why To Do It:  If your gutters aren't cleaned regularly, you will get a buildup of leaves and other debris. Not so big a deal, until that starts to rot in summer or freeze in winter. Then the gutters get heavier and over time will start to pull away from your house. Or they might just overflow in certain sections where you don't see it. Which if you're lucky, will lead to an overwatered section of your garden. If you're not lucky it can lead to a molded wall and destabilization of your home's foundation. 

Gutters where the cover has come off leading to debris and leaves getting in which will cause a home disaster and flooding.

How To Do It:  To put it simply, you'll want a three-step process. First, you want to go by eye to look for areas that are damaged or overflowing, or possibly pulling away from the roof. From there you'll need a ladder so that you can go ahead and dig everything out. Whether you're dealing with compacted leaves and debris or just some slight build-up, you'll want gloves and a  trashcan at least. Your final step is using a hose, to check that you've gotten everything cleaned out.  For a more in-depth guide, check out the additional reading at the bottom of the post. 


Air Ducts

 When To Do It: Every 3 to 5 years, fewer if you have pets that shed. 

Why To Do It : This one isn't as obvious a threat to your home.  For many of us it just means a little extra hair or dust floating in our homes. Over time though it can lead to mold, mildew, and fire hazard in your home. Which can sound weird. Mold, mildew and a potential fire hazard? Yup. During the wetter times, air can become trapped in the ducts and the build-up, leading to mold and mildew spreading throughout the ducting system and your home. During dry seasons though, when the material trapped in the system is bone dry, you can end up with a fire hazard. 

Inside an air duct within a home, showing a cleaning snake picking up dust and debris that can cause breathing issues, mold, mildew and fire hazard.

How To Do It: Call a professional for this one. While all of the others can be done with only one or two tools, in order to do the best job of cleaning out all of the ducting in your home, you want to call a professional in. (Sadly, that's not us.  We'll happily fix your appliances though!) 


Dryer Duct

When To Do It: Twice a year, best in spring and fall. 

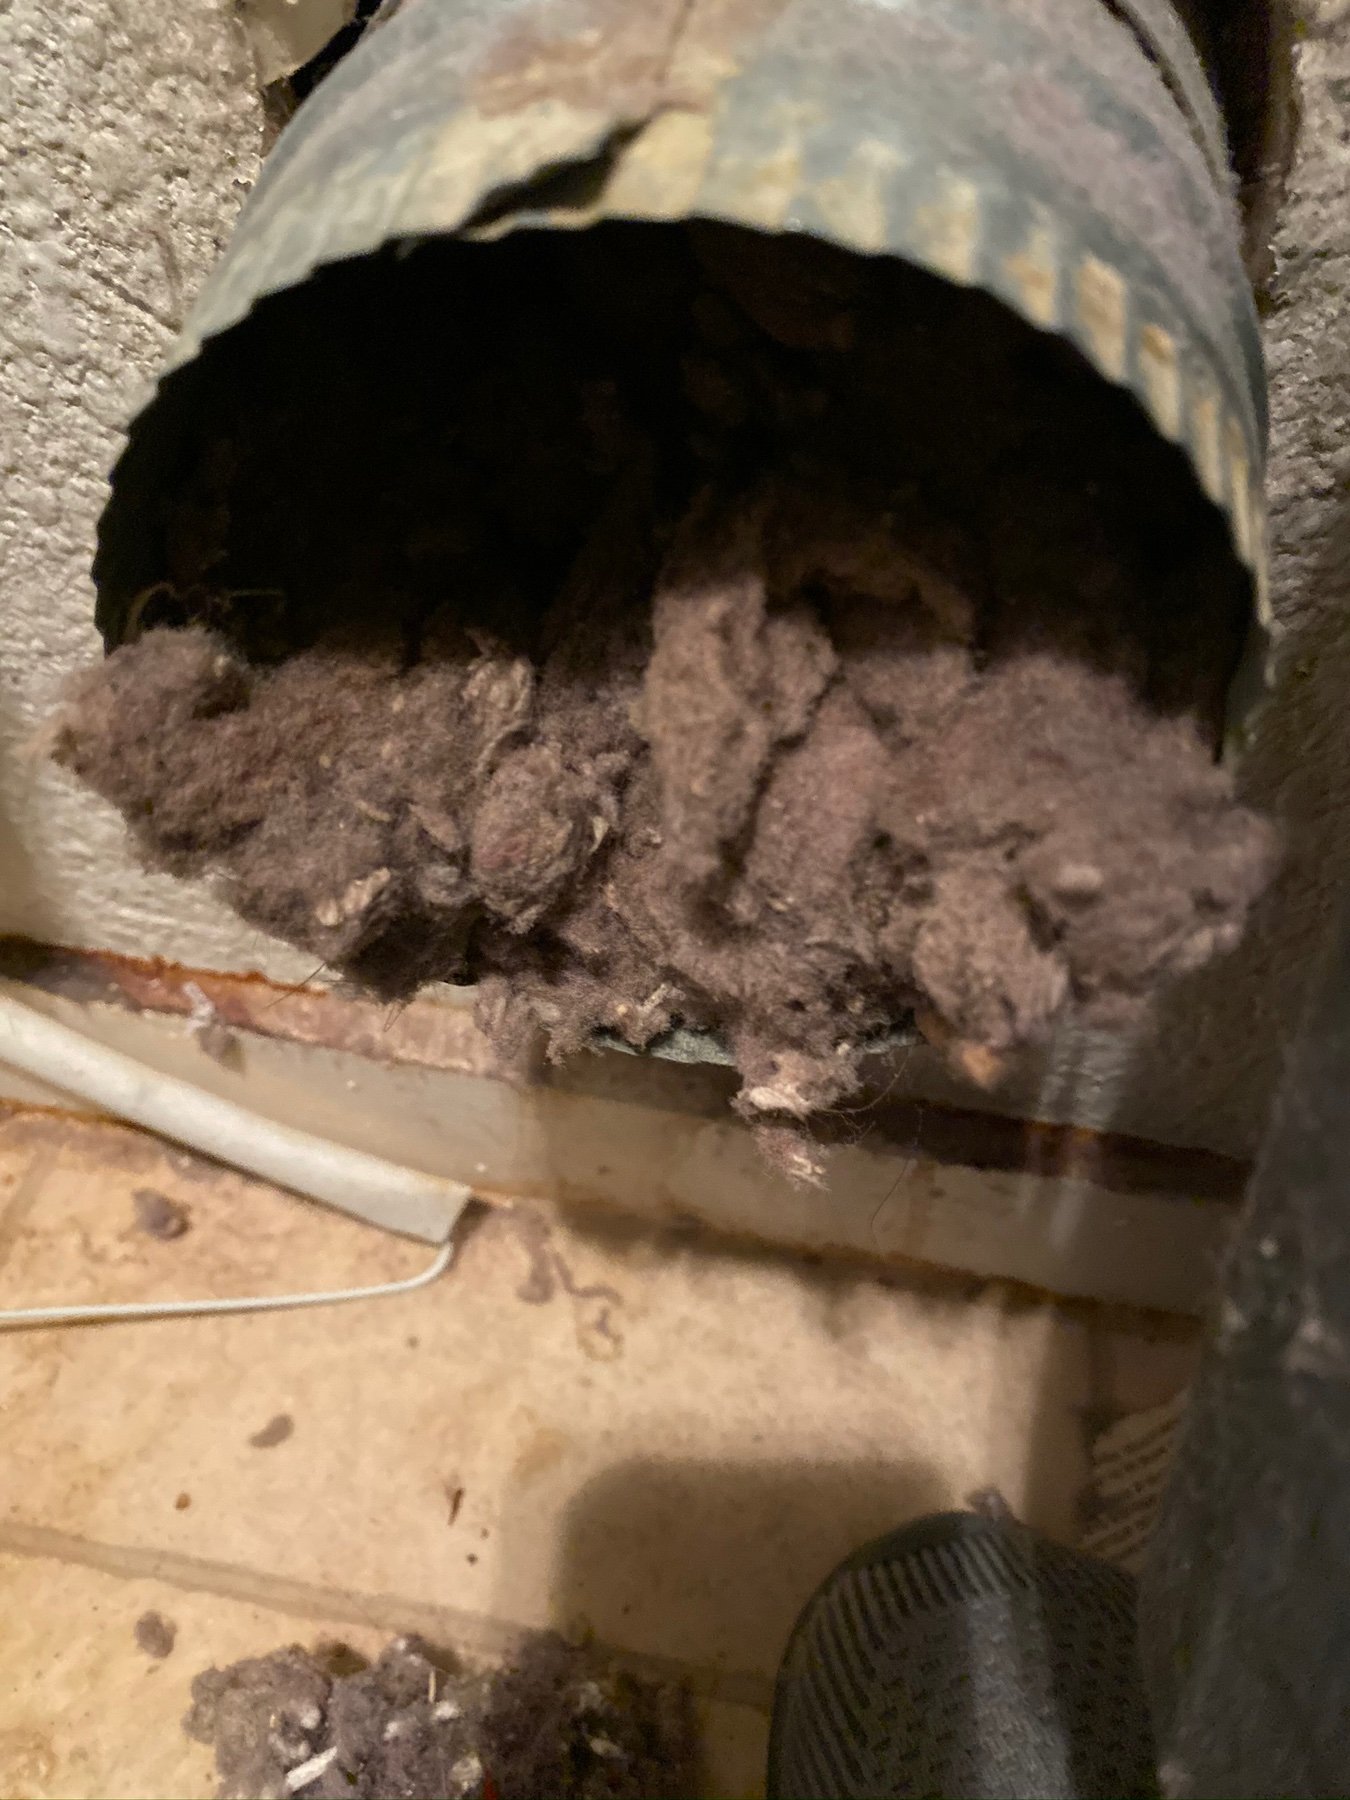
Why To Do It: Much like your air ducts, your dryer duct is sucking dust, dirt, pet hair, dander, and other materials out of the air and your dryer. That gets caught in the dryer duct and over time it becomes compacted. This is a fire hazard, especially given how dry it is kept. While cleaning out your lint trap every time you run your dryer is a good start, it's doesn't get rid of everything. Cleaning it out will also make your dryer work more efficiently and effectively, allowing for air to flow freely. 

Inside a dryer vent full of lint and debris, potential fire hazard especially in Texas

How To Do It: Always start with unplugging and disconnecting your dryer from any sources of power, be it gas or electric. From there, take a vacuum and clean up as much of the inside of the dryer, and the vents inside and outside as possible. Then, use a dryer tool to work the lint-free inside the duct itself. This is a long-handled tool with a brush attachment that you can pick up at your local hardware store for relatively cheap. Once you've done that, grab your vacuum again and suck up everything from where you were working on the duct and from inside the duct itself.  Reconnect everything carefully, turning the power back on as the final step and you're good to go! 

Refrigerator Coils

When To Do It: Once a year, more often if you have pets that shed a lot.

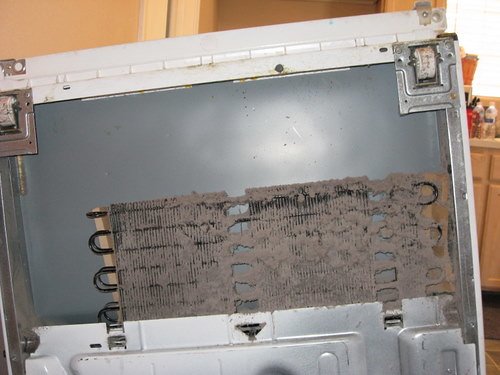
Why To Do It:  The coils are part of the system that keeps your refrigerator cool. If the coils are covered in dust and hair, then your refrigerator has to work overtime and will have a shorter life for it. 

refrigerator cooling coil covered in dust and debris which makes the refrigerator work harder and die sooner

Image courtesy of Mark Florence

How To Do It: Start by transferring as much of your food to a cooler as you can, to lighten the load. Then unplug it and go looking for the coils. Sometimes they'll be under a panel in the front, on the back, or on top if you have a built-in unit. Once you've found your coils, you'll want to grab your vacuum and a dust mask, these coils are going to be covered in a very fine dust that you don't want to breathe in. Now use a long-handled brush to gently scrape away at the coils. You want to go on top of them and between them, trying to remove as much of the dirt as possible. Once you're done with that, vacuum up all of the ick and go enjoy a hot shower. 

Washer Filter


When To Do It: Once a month.

Why To Do It: Your washer filter, as we've discussed in the past, catches much of the larger debris and soap scum that comes off of your clothing during the wash.  If that filter is covered over, with soap, with dirt, with debris, then the water can't pass through and it will begin to back up. It can even lead to the washing machine flooding over, and you needing to clean or even replace your floors. 

How To Do It: Most of the time, a front-loading washer is meant to save you pain and annoyance... Sadly that's not the case when it comes to cleaning your filters. Look on the front for a  small door, and lay out a towel and something like a casserole dish. On opening the door you should find a hose and a drain pump filter. Pull the plug from the hose and let the water empty out into your dish. There's going to be a fair amount of water in there, and it's probably going to reek and be full of ick. Once nothing else is coming out, unscrew the filter, wait for water to stop dripping out of that, and pull out the filter. It will probably have slime on it, and you might even find coins. No, this isn't where the goblins stash all of your lost socks (sadly.) Dump out the filter, and use an old toothbrush and some warm water to scrub it clean. 

If you have a top loading machine, you're in luck! The filter is going to be in the drum or on the back, but check your manual if you can't quite find it. Once you've located it, it's easy to pull out and rinse with hot water. 


Dishwasher Filter


When To Do It: Once a month 

Why To Do It: Your dishwasher filter is much like your washer filter. It collects dirt and food debris and keeps it from going out with the water. (Because that would lead to the drain becoming clogged over time.) At first, this issue can lead to dishes not getting cleaned properly, and with time to the machine flooding. Not fun!


How To Do It: Remove your lower rack and look for a mesh filter on the floor of your dishwasher. If you don't see what we're talking about, grab your manual to find out where the manufacturers hid it. Found it? Ok, at this point, it should be a matter of unscrewing the filter and rinsing it with hot water and soap, and then pop it back in. Nice and easy, and it keeps your kitchen from flooding. 

Shower Drain

When To Do It:  Some will say when the water becomes ankle deep. We say you should do it as soon as you notice the water is beginning to back up.

Why To Do It: Flooding bathtubs. That's all we have to say. And just. EW.  

How To Do It:  Grab a facemask, some old clothes, and a drain snake. Some people will say to start with a drain cleaner, like draino but as long-hair having people, we suggest starting with a snake. Wriggle it around until it goes all the way down your drain and then draw it out. It's going to be gross. It's going to be a lot of hair, dirt, and soap scum. We know.  Depending on when the last time this was done, you might have to do this more than once. Once you've pulled everything that you can out, grab a kettle, boil some water and send that down the drain. Let that do its work and then an hour later, you can hit the drain with a drain cleaner. For best results, we advise letting that sit overnight, this way it's undisturbed for several hours.  If that doesn't clean up the issues with water backing up, we'll advise calling a plumber as the problem could be more than just a clog in your drain. 

Congrats you've just tackled seven of the most common problems in owning a home. As you saw each of these problems can cause serious issues, many of them involving water, soap, and ick going everywhere. Did we miss any areas? Are there appliances or other major areas that you're curious about how to clean? drop us a line over on our Facebook page or in the comments below. We'd love to hear from you. 


If doing all of this cleaning hasn't solved the issues that your refrigerator, washing machine, dishwasher or dryer are giving you, you might want to give us a call. We'll work with you to set up a time that fits your schedule, and help to not only determine what the problem is, but more importantly, to fix it. At Appliance Rescue Service, we're not happy until we've gotten your appliances back in tip-top shape. 

You can call us at ((214) 599-0055) or reach out to us on our contact page to set up an appointment time that works for you. 


Additional Reading:

Gutters 

Cleaning Your Refrigerator

How to Deep Clean Your Dishwasher

Dryer Duct


Spaghetti & Meatballs

With a few secret ingredients…

We're adding a few secret ingredients to this week's recipe. They might sound strange, but they do actually make a delicious addition and add additional vegetables to a meal that is already delicious and easy to convince pickier family members to eat. 


Ingredients

1/2 pound lean ground turkey (you can go with lean ground beef, but it will slightly alter the taste.) 

1 cup breadcrumbs (you can make your own, or grab a jar of Italian breadcrumbs at the store) 

1/2 cup butternut squash puree

1 clove garlic minced 

1 teaspoon salt

1/4 plus 1/8 teaspoon crushed black pepper

Nonstick cooking spray

2 teaspoons olive oil 

1 (26 ounce) can whole peeled tomatoes with their juice, pureed in a blender 

1 tbsp oregano

1 tsp basil

1 tsp onion powder Or 1/2 cup fresh diced onions 

1 tsp thyme 

SMALL pinch marjoram 

SMALL pinch rosemary 

1/2 cup water 

1/4 cup carrot puree

1/4 teaspoon garlic powder

pinch of cayenne pepper 

1 bay leaf

1 pound of spaghetti, whole grain or whole wheat if you can, but it's not mandatory


Purees 

1 large butternut squash

1 lb carrots 


Tools: Chef's knife, cutting board, baking pan, aluminum foil, large pot, blender, food processor, instant pot 


Let's get started with making the purees for the recipes, and if you find you like this, you might find ways to sneak them in other recipes. Grab your carrots and give them a quick wash, then peel off the outer layer. Next, chop them into large chunks (three inches long or so is best for working with an instant pot.) Pour one cup of water to your instant pot, set up the steamer basket or tray, and add your carrots. Set the lid on top, set the pot to steam for 5 minutes, and walk away. This has been a game-changer for us; rather than having to steam veggies for 20-30 minutes, all we need is 10 minutes and our instant pot. Once that's done, grab your food processor and chuck in the carrots.  

Here we're going to say Learn From Our Mistakes. Do not try and puree or blend all of your carrots at once. Don't do it. Whether you're using a food processor or a blender, you will burn out the motor. We know, your blogger did it. Go one to two carrot chunks at a time, with a tablespoon of water, until it's fully blended and there aren't any solid pieces left.  As you finish one section, pour it into a separate bowl, and move on. 


Now once you finish your carrots (or while they're steaming in the instant pot), you can start working on your butternut squash. Start off by splitting it in half. Grab your chef's knife and go down the middle vertically. OR you can cut it horizontally and then cut each of those in half to get at the interior. Once you have your squash split, grab your spoon and scoop out the 'guts' and seeds. You can chuck them, roast them or plant them as you see fit.  Now set your oven to 400*, and lay the squash face down on a lined cookie sheet (or round sides up, if that makes more sense.) You're going to roast the squash for 50 minutes or until soft. Your squash is likely to come out not only looking brown and wrinkled in several spots but also with a bit of the sugars on the sides. It's completely normal and not to be worried about. This time you're going to snag a spoon and scoop out the meat of the squash. Run that through the food processor or blender for two minutes or until smooth. You'll want to add water as needed to make for a smooth consistency and make it possible for your blender to work easily. 


And now, let's go on to the spaghetti! 

In a large bowl, mix the turkey, breadcrumbs, butternut squash puree, garlic, cayenne, 1/2 teaspoon salt, and 1/4 teaspoon black pepper until well combined. Shape the mixture into 1-inch meatballs and place them on a sheet of waxed paper or aluminum foil. One trick that works well for making meatballs is using an ice scoop. We don't advise a melon-baller because the meat is too sticky to come out easily. 

Now, coat a large nonstick skillet or frying pan with cooking spray and set it over high heat. When the skillet is hot, add the olive oil, stir it once around the pan, and then add your meatballs and brown them for 4 to 5 minutes, turning occasionally.  You're not looking to cook them fully at this point, but instead to brown the outside for a delicious taste later. 

In a large pot, add the pureed tomatoes, water, carrot puree, garlic powder, oregano, thyme, basil, onion, marjoram, rosemary, bay leaf, and the remaining 1/2 teaspoon salt and 1/4 teaspoon pepper. Reduce the heat to low and simmer for 15 to 20 minutes, or until the meatballs are no longer pink in the center. Remove the bay leaf; they're not particularly tasty.

Next, bring a large pot of salted water to a boil. (Ideally, you want your water to be as salty as the ocean.) Add the pasta and cook according to package directions until al dente. Before you drain your pasta, take a half cup of water and mix that into the sauce. Next, drain the pasta into a colander.  Spoon a little bit of your sauce into each bowl, then pasta and then more sauce, and top with meatballs. Enjoy! 

What did you think?  Are you willing to try it? We can honestly say that we've made it and enjoyed it for ourselves, and because the vegetables are pureed, they're not easy to spot by sight, taste, or smell.  Let us know what you thought in the comments below or over on our Facebook page. 

Now, if on the other hand, your oven went out while you working on this, or refused to hold a consistent temperature, we can help! You can reach out to us by calling ((214) 599-0055) or on our contact page. You can set up an appointment time that works for you and let us take care of getting your home back and running smoothly.

Five Appliance Trends That Won’t Last

Trends are something we love discussing here on Appliance Repair Service. We’ve talked popular ones, new ones, and ones that died miserable deaths. Now we’re taking a look at different ones that are popular here in 2022.  These are things you may be thinking about jumping on immediately, but we’d advise waiting a while to see how these trends play out, so you aren’t spending thousands of dollars on something you’ll hate in three months. 

Open Concept Kitchens

From the early 2000s up until now, the open concept was the most common style of new home on the market.  They’re all about a home being able to serve multiple purposes with very little change or adjustment. Being able to shift seamlessly from one room to another, and having the family together without having to hunt through different rooms. 


With Covid and the rise of people working from home, the open concept plan doesn’t work either in your kitchen or for your whole house. Being able to separate ourselves out, and find quiet during different points of the day is important. You might need to use one area for an office, or another for your child’s school area, and section those off. You don’t want to hear shouts of “hey, where do we have the oregano” when you’re in the middle of a zoom meeting” if it can be avoided after all. 

The Color of the Year 

Going for the color of the year is something many of us want to do. There are hundreds of blog posts, magazine articles, and social media posts all over the net talking about how to best use Very Peri in your house, your kitchen, or your wardrobe. Many of us want to have the most recent colors or designs when it comes to somewhere we spend a large amount of our time. It’s the same as working on the rest of your house, where you might update every few years and bring in either a color you love or whatever the most popular color series is.  In the kitchen, we’re not talking just about painting your kitchen the color of the year. Many companies also will update their ranges, ovens, and refrigerators to come in new and different colors. (This year for example is seeing many companies adding “Mint Green” as one of the colors they offer?) 


But, we have to point out that color trends change. Like we point out every year, colors that were popular this year may not be next year. A better option might be to choose a color palette that you love and work from that in different ways. You might bring in tile with several of the colors that you like. Or paint your cabinets different colors to blend into the overall pattern.  This allows you to more easily change out colors when you want to refresh, but it also means that you’re standing out on your own. 

Air Sous Vide 

Think about the concept of sous vide, if you’ve ever run into it. If you haven’t, it’s a process of sealing food into a bag and boiling it until it’s cooked just right. Air sous vide then, is the same concept, except you’re using air. 

There are too many mixed thoughts on this one and not enough hard reviews about how well it works or recipes that are repeatable. We don’t recommend getting this one until (and if) they manage to solidify the way it works.

Smart Appliances

We’ve spoken before about smart appliances, both the uses of them and the downsides. We want them to be able to do all sorts of things and make our homes more automated so that we can focus on other aspects of our lives. The truth is though, that propaganda is just that, propaganda. Smart appliances might promise you the moon, but they aren’t there yet. 


With this one, we advise keeping a level head on what they can do vs what they can’t. Instead of thinking that your oven will cook you a perfect steak with potatoes and broccoli on the side and a perfect bearnaise sauce on the side.  Instead, it’s able to turn on when you tell it to, alert you when it’s come to the proper temperature and let you know when what you’re cooking has finished cooking. 

Dual Dishwashers In Your Kitchen

This one is lovely, honestly. It’s just a matter of what do you need? Do you need to have two dishwashers in your kitchen? Do you entertain a couple of times a week and deal with all of the dishes inherent in that? Or do you have a large family that you prepare food for and you need to be able to wash all of the dishes easily and without leaving yourself exhausted?
If the answer to that is no, then you might want to reconsider whether you want to bring a second dishwasher into your home. While it’s really popular, it’s not always needed, in which case, why bother? Instead, take a look at how much you use your current dishwasher. Would a larger one be beneficial for you? Do you need a different style? Maybe one that can handle larger pots and pans due to the amount of cooking/baking you do now? 


Do you have any of these already or are you looking at getting them? Let us know over on our Facebook page, or in the comments below! 


Don’t forget that we can also help with the appliances you have already. If your dishwasher is refusing to clean dishes or isn’t draining fully, we can help. Call us at ((214) 599-0055) or reach out to us on our contact page.  


Top 5 Things You're Cleaning Wrong

How often do you think something is broken when really it just needed to be cleaned in order to work properly? Did you know that improper cleaning is one of the biggest reasons a tool or appliance can break? We've seen it too many times, so this week we're taking a look at 5 of the areas many of you are cleaning wrong. 

Your Dishwasher

If you're noticing your plates and silverware aren't coming out clean, it might be time to clean your dishwasher. Many people will just toss in a packet from the store that claims to do it all. Then a few weeks later the dishwasher is having trouble again, and you're wondering why you wasted your money in the first place. 

Mix up some hot water and dish soap, grab an old toothbrush, and attack the inside of your door. You'll want to spend time on the detergent capsule and cap (the place where you actually put the detergent in) and any other nooks and crannies where you notice a build-up of hard water, detergent, scum or dirt. Next, remove the racks and use paper towels to get rid of all of the food and debris at the bottom of the dishwasher. While you have the racks out, give them a once over to see if they have any cuts, nicks, or built-up gunk that might cause problems. Once you've done that, put the racks back in and run it while empty. Once you've got that taken care of, take out all of the accessories and give them a thorough cleaning with hot water and soap. Your final step is to pull out the filter, which will be located at the back of your dishwasher. Use just hot water to rinse it out and carefully scrub away any debris that may have become lodged in it.

Open dishwasher being loaded full of dishes

Your Washing Machine

Many of us think that a washing machine should keep itself clean. After all, it's washing your clothes. Unfortunately, it doesn't work that way, and soap scum can build up inside your washing machine, leading to dirty clothes.  Just like with your dishwasher, there are soaps at the store that will claim to clean your machine, and they do work for a time. These can actually do a good job at getting your drum clean. Unfortunately, there's more to your washing machine than just the drum. 

For this you're going to want to start with finding any seals or gaskets and carefully checking and cleaning those. We're talking super delicate; you don't want these to crack or become dislodged and leak everywhere.  From there you're going to grab white vinegar and use that mixed with water to clean the inside of your drum using a toothbrush and a sponge as needed.  It's not a difficult process, but it is one you should consider doing once every six months. 

We covered this more in-depth in one of our more recent posts, which we'll link down below in the additional reading section. 

Peeling open the gasket of the washing machine to display built up dirt and soap scum inside of it

Your Oven

We've talked a fair bit about how not to clean your oven. In truth, we cover it every year. We tell you not to trust the shiny "self-clean" button that it is full of lies. We remind you that using the self-clean button will often mean getting an entirely new oven. (Yes, it's clean at that point, but did you really want to spend that much money just to 'clean' your oven?) 

So, how should you do it?  Grab a pyrex pan or something else that's oven-safe and fill it with two inches of water. Set your oven to 225*F and put the pan in the oven. If this is the first time you're cleaning your oven, we advise letting it work for 30 minutes. If you keep your oven relatively clean, you can do half that.  Turn the oven off at that point and let it cool until you can touch the walls safely. At that point, add some dish soap to the pan, grab a soft sponge and start scrubbing.  Once you're done, make sure to go over everything again with clean water, cleaning away the soap. 

Like many things, we suggest doing this once a month. 

Open oven showing fish in one tray and leeks in another.

Your Cast Iron Skillets

We love our cast iron skillets. It's the only way to properly cook sausage and gravy in our opinion. BUT They're a pain to clean if you aren't sure about what you're doing.  Your blogger ruined one of her first pans by using soap. Learn from her mistakes and don't use soap on your cast iron skillets. 

There's a 'seasoning' coat that has to be baked into the pan at a high temperature. Each use of a skillet will add together for an overall flavor that builds over time. There are only three steps that have to be done to keep your pan clean and happy. After you're done cooking and the pan is still hot, use hot water to rinse the pan. Wipe down the pan with a soft sponge, without any soap, rinse it again, and then pat it dry. Your final step is to rub in a thin layer of oil using a paper towel. 

If your pan is dirty with rust or food that just won't come off, grab some kosher salt and ice and use that to scrub the pan, afterward repeating the steps above.

Your Refrigerator

Sounds easy right? Just take everything out and wipe it all down? Well, yeah. That's the majority of what you need to do. Cleaning your refrigerator is more of a time-consuming process than anything, and that's because you need to clean everything so thoroughly. If you don't take everything out, you can have crumbs or liquids pushed into the corners that start to mold or rot. We advise grabbing a large ice chest, putting everything in that, and then tackling your refrigerator with a vacuum, a sponge, and then a toothbrush, in that order. The vacuum is to get out debris, the sponge is for general cleaning, and the toothbrush is to get rid of any build-up you might have in corners or shelf slides. 

Refrigerator is empty and being cleaned with a spray bottle and cloth

Image credit: Marco Verch


Which ones did you already know, and which ones surprised you? Let us know over on our Facebook page, or in the comments below. What other areas do you want us to tackle? Tell us that too! 


If you've tried cleaning and you're still having trouble with your appliances, let us know! We service all major appliances from all major brands. If we don't know what's going on, we'll keep digging until we figure things out. You can set up an appointment with us on our contact page or by reaching out to us at ((214) 599-0055). If you live somewhere between Dallas and McKinney or Garland and Coppell, we can help.  


Additional Reading: 

Why you should clean your washing machine, and how. 

How to clean your refrigerator

Self-Cleaning Ovens