Week-End Stir Fry to fill you up for days

We love this recipe and we hope you do too.

We're going for a filling meal with this one - one that's going to last for several days in the fridge. You can downsize if you want to, OR break portions down and freeze them for later noms. You can also swap out different proteins, based on what you want. You can add more or less of individual ingredients until you're happy with the amounts and variety of food. This is one of our favorite ways to use up left over bits and pieces of different veggies at the end of the week. 


 Ingredients

Bell peppers (preferably red, possibly orange and yellow. But we don't advise green peppers for this meal.) 

Carrots 

2 can Baby Corn

2 can Water Chestnuts

Broccoli

Snap Peas

White Onion

Chicken  - Preferably already breaded, but if not, you can DIY it. 

Rice Noodles  (or soba, both will work) 


Hoisin Sauce

Brown sugar

Fresh garlic

Sesame seed oil 


Tools: Grater, Chef's knife, cutting board, frying pan or wok, 6qt pot, measuring cups and spoons, Slotted spoon and chopsticks 


Instructions

We could just go with "chop the veggies," but we're not doing that to you. For the peppers, go ahead and start by cutting them into quarters and cleaning out the pieces of the white pith and the seeds. Then cut them into strips, and cut those strips into either chunks or halves, depending on how much you like peppers.  For your carrots, we suggest using a mandolin grater or cutting them on an angle. You want them to be relatively thin so that they'll cook up easily. For your onion, you want to dice it. Next grab your broccoli and break it down into small florets so that sauteing will be enough to cook it. 

Next, grab a wok, a caldera or an oversized frying pan. Set the heat to medium, and when the pan is hot, pour in two tablespoons of sesame seed oil. Next add your garlic and onions and add those to the pan, tossing occasionally. Once your onions have gone for a minute, add in the carrots and broccoli, moving them around the pan so that nothing burns. Once the carrots are bendy, add in your red peppers and snap peas. You want to cook them until they are nice and sauteed. Finally add in your water chestnuts and baby corn. Those you're adding in just so they're heated through. At that point, pour everything into a heat proof container and set it to the side. 

In a separate pot, bring water to boil, and add your soba noodles and boil for 6-7 minutes or until cooked, but still slightly firm. Reserve one cup of the pasta water, and drain the rest, setting aside the noodles.

Cook chicken in wok, as if on a frying pan, checking and turning regularly to keep anything from burning.  Once it's fully cooked, you can remove it and chop it up if you want, or leave it as is.  

Now for our sauce. This one is... as odd as it sounds, mostly based on how you're feeling today. Start off by peeling and chopping your garlic, and tossing it into your wok, to sauté. We're not going to say how much to use here, because it's based on a) how much food you've made and b) how much you like garlic. We would advise starting with a ratio of 1 clove: 1/2 cup of brown sugar :1 tbsp of sesame oil: 1/2 cup of water, but there's no reason to stick with that. Now add in 1/2 cup of brown sugar, 1 tbsp of sesame oil, and 1/2 cup of water, mixing slowly and thoroughly. 

Once your sugar is fully melted and integrated, grab your chicken and add that back to the pan, coating all sides. Now add your veggies and repeat the process, and finally your soba noodles. 

If you want to add in a bit of kick, you might consider adding some crushed red pepper or Sriracha during the making of the sauce, but that's up to the individual. 


Let us know what you make over on our Facebook page or down in the comments. We'd love to see photos of what your meal ends up looking like! 


Now if you're looking for help because your stove is having issues, refusing to light, refusing to stay lit or is sputtering, we can help! You can call us today at ((214) 599-0055) or go to our contact page and make an appointment today.  We'll work with you to find a time that works for your schedule. 

Make Your Garden Thrive Even In a Drought

Dry Plants That Fit in Texas 

Table of Contents: 

Gravel- Uses, and benefits 

Design Tips

Examples of Plants 


Let's face it, gardening in Texas can be.. complicated. You have to deal with unpredictable weather, heat that goes all over the place, and never knowing if you're going to have a tornado drop on your head. It's great! If you are brave enough to work with the elements, though, you can find that it's possible to grow plants that not only are beautiful but can survive even in drought years in Texas. 


We'll start off by saying that we aren't professionals at this. What we are are people like you that live in Texas and have had many plants die under our care, despite our best attempts. To that end, we're looking at how to transform your garden into a beautiful, functional space with plants that will grow back year after year.  


It sounds weird to say, "ok, the first thing your garden is going to need is gravel," but, well, it's true? When you're dealing with a garden that you want coming back year after year, you need to limit water consumption. The biggest abuser you have? Your grass. Grass is an extremely thirsty plant, not to mention finicky! Imagine if you didn't have to fight with that any longer? No more mowing, no more watering and weeding, and hoping temperatures don't reach up so high the roots burn or so low they freeze.  Oh, and did we mention that the water you are saving can be put to plants you love?  Are you sold? Great! 

So now that you're looking at different types of gravel, there are a few things to keep in mind. 

- There are a TON of color options. It's fantastic. Whether you're going for a light and airy feeling or something a bit more earthy, there's guaranteed to be gravel for you. 

-Since you don't have to stick to specific planters or worry about grass roots, you can put your plants anywhere! And just use the gravel as filler in-between. 

- Make sure to add raking and replenishing to your calendar. You should only half to do it twice a year, though, instead of standing out there for hours every weekend. 


Design Tips for a Dry Garden 

Now that we've got you sold on the benefits of gravel, let's consider how to design your dream garden.  Start by grabbing a layout of your property. Whether you're working in just one section of your home (ie just your front yard or just your backyard) or you want to blend the areas together, you need an idea of how your property looks so that you can plan things.  Once you've got that, add in any permanent features you've got on your property. Do you have a deck that you're putting in? What about trees around the property that you want to take advantage of? (Hint, you definitely should take advantage of the trees you have, as they provide shade for your other plants.)  Basically, you'll want to sketch out anything that is definitely staying on the property or any major changes that you know you're making.  From there, consider a few things. 

- Repeating plants in random areas gives a cohesive and pleasing look, without being too manicured. (Unless that's the look you're going for.) It also guides the eye throughout the garden, creating a flow that is pleasing whether you're walking or just looking around. 

- Use light and airy plants like pampas, fountain grass, and kangaroo paw. These not only add color to the landscape, but their beautiful foliage adds texture and movement all year long. 

- Use pavers across the entrances to areas to keep gravel contained. This way, you're doing less in the way of sweeping/raking/corralling. And it means that any plant material from 'outside' your garden can easily be scraped off. 


-For stepping stones, borders, or other breaks in the gravel, you can get really creative. You can use everything from large stones to slices of wood, reclaimed wood, or timbers. 


Choosing Plants 

Honestly, this step is simultaneously really easy while also being really difficult. We know, we've been full of conundrums this week. We're sorry. So let's look at the hard part and get that out of the way. What you want to do is compile a list of drought-resistant plants. While we do have a few examples for you to consider, we're not going to say that this is all of them.  The easy part is going through and choosing which of those plants are most appealing to you. Do you like to focus on light and airy plants? Do you want to focus on color throughout the year? What about a focus on plants that are useful in medicine or around the home? Your answer is going to change which of the plants you choose and how your garden is going to end up looking. One thing we do want to say, though, is that just because these are water-wise plants doesn't make them all bland and boring. 

You can have many beautiful flowering plants in your garden like the Kangaroo Paw, Disoma,  California Poppies, or Mediterranean Lavender. Adding in "Blue Cloud" salvia will give you a beautiful shrub all summer, while the "Teddy Bear" magnolia offers up a beautiful bronze on the underside of its leaves all year long. 

If you enjoy cacti and succulents, those can be an option to mix throughout your yard, and still create a beautiful array of flowers for you to enjoy. Check out barrel cacti for some examples.  

If you want something that's hardy but would do well in the shade of a tree, check out the cordylines. They do best in shaded areas, add texture to your yard, and are a stunning red or pink. You might consider mixing in coastal rosemary around the edges of those areas, as they love the shade, but they also enjoy well-drained areas. 


Whichever plants you choose, make sure to talk to experienced gardeners so that you can get the best tips for caring for your yard, whatever the weather brings. We hope that you'll consider showing us what you plant in your yard, whether it's great big cacti, beautiful flowers or an herb garden. Let us know over on Facebook what you get up to. 


If that's not what brought you to our humble corner of the internet, it might be that you're in need of appliance repair. And yep, you're still in the right place. If your dishwasher is broken or your dryer is busted, we can help. You can reach out to us by phone at ((214) 599-0055) or by heading over to our contact page. We'll work with you to set up an appointment that works with your schedule to get your home running again.

gravel path leading to a fence with plants in various states of fall colors. No grass in sight.


Smart Home - Getting Started (2022)

Everything you need to get started

When it comes to making your home smart, it can be confusing. There are so many different products, and systems that it's hard to know where to start.  You need to know which systems you want, what you want your home to be able to do, how to keep it all safe. Sometimes, you feel like giving up. Fortunately, as with many things, if you take it one step at a time, you can make it all make sense. 

Choose Your Core

This is where you start. If you're just shopping and randomly grabbing things that you like, they might not all work together. Instead, a way to do it is like planning a garden. You choose your tools with intention, and that starts by looking at the core. Which system do you want your home to run on? Is it Google's Assistant? Do you want to rely on Amazon's Alexa? Or do you want Apple's Siri? All of these have different toys, tech and background devices that achieve similar functions. Getting them to cross connect though? While it can be done, it's not easy. 

Can Your Home Handle It? 

We don't just mean the electrical grid, although that matters too. Instead, we're going to take a look at your internet. Have you ever had a group of friends over and everyone was on the internet for one reason or another? Maybe you're on because you've got music playing. Your brother is showing you the latest sports news. Your mom and your sister are discussing the latest politics, and your dad is browsing youtube. All of those people on the internet, will typically slow it down some, at least enough that you can notice it in comparison to how it is when you're the only one home. When you add smart devices, they are always on that network. Even if it's only checking in to see if you've said anything, they are always there. Which means that your internet is going to slow down. 

How do you prevent that then? By making sure your internet is at least 200 megabits per second or shortened as Mbps. By having at least that much, you'll be able to handle several devices on your network.


Create That Backup Plan!

What about when you have a blackout? Not like the great snow'pocalypse, but a summer blackout that lasts for a few hours or maybe a day. In that case, you might look into getting a backup battery for your internet modem. Just because the power is out in your home, in your street, in your city, it doesn't guarantee that your internet will be out. (Yes, it sounds odd, but we promise.) So, the best way to handle that is by purchasing a backup battery like these over at The Tool Review. The 10+ Best Battery Backup For Wifi Router Reviews in 2022: Top-Picks, Best Deals| Tool Review


Keeping It Hack Free

How many of these questions can be answered with your password? 

- Your birthday

- Your phone number

- Your spouse's name/birthdate/phone number

-Your favorite pet

-Your favorite sports team

-Your favorite book or tv show

If any of those are part of your password, you need to reconsider how you come up with your passwords.  You /can/ still use a combination of words and numbers, but they need to be ones that can't easily be answered. Grab a thesaurus and go looking for a word you associate with the account. Swap out all the letters you can for letters or symbols. and voila! You've got a strong password. 

Now, DON"T store that beautiful password on your computer. If you're like many people you might have been storing your password in a google docs file, a spreadsheet or a sticky note. No. All of those can be accessed by others. Instead consider one of the following. 

- A  password protection service like Dashlane. 

-A file you keep offline and saved to a USB. 

- An actual notebook for your passwords 

If you're going with the last two, don't tell anyone what they are, or write "Passwords" on the outside. While it's unlikely that someone will want to steal your work passwords, you would be surprised at the number of people who would be interested in stealing your bank or medical passwords. 

Now that we have your home set up and secure, let's take a look at what type of smart devices would best suit you at home. 

What Type of Smart Home Represents You? 

Are you an entertainer? Having friends and guests over most weekends and during the week too if you can? Then you might look into smart lights, a tv and a sound system. This way you can say "Hey Google! Turn the lights on X and play Y." And while you're working on that you can ask google for the contents of your fridge with a smart fridge to make sure that you always know what you have on hand for taking care of your guests. 


If on the other hand you're a homebody, you're more focused on keeping your comfy and secure. In which case, you'll want to add a system for thermostats, sounds, lights, a garage door opener, and a security system. The thermostats, sounds and lights can all be programmed to a 'routine' where once it's a certain time, your home system will turn everything to the settings you choose. The garage door opener isn't much different than a button activated one, but it's nice to be able to say "Hey Google, open the garage" as you're heading out the door. As for smart security systems, while they have many, many different features, one we particularly like is being able to pull up the feed directly on your phone or video hub to see if that was a raccoon you heard or an intruder. 


Our last category is one that many of us have been wanting since we were kids and is now becoming possible. The Jetsons! Although most of the systems won't talk to you or offer witty repartee like Rosie did, you can set up your home system to vacuum and mop for you. While the systems aren't perfect just yet, they definitely make your life easier, and isn't' that the point? 


What do you think? Which category of smart tools do you most want to get? Do you have some that we missed out on? Let us know in the comments below or over on our Facebook page, we'd love to hear from you! 


If you ended up here not for smart homes, but because of your already smart appliances (or 'dumb' ones, we work on them all) you're still in the right place! Everywhere from Carrollton to The Colony, to Coppell, we'll here for you and ready to help. Reach out to us on our contact page or by calling us at ((214) 599-0055). 


Smart home tablet central core

Chicken and Vegetable Quinoa

All the best of chicken soup without the soup

I Don’t Care, Take Me To the Recipe!

March is.. March. We've had snow, we've had rain, and we've had temperatures so cold your blogger thought she might turn into an ice-pop. BUT! This is part of March and we accept it as it is, we just need warm hearty foods to combat it. With that in mind we went digging to see what we could come up with. Chicken soup? We've done it. Stew? We've done that too. What about biscuits? Nope. We needed something hearty and warm that would still give you enough energy to tackle all of the gardening many of us want to do now that it's (theoretically) spring. With that, we bring you something new. Take the best of chicken soup and dumplings and then make it easy to eat on the run. That's this recipe and we know we're already eager for fall to get here so we have an excuse to make it again. 

Ingredients 

1/2 cup tricolor quinoa

1 cup water

2 whole carrots or 10 baby carrots

2 stalks celery

1 can campbells cream of chicken soup 10.5 oz 

1/2 tsp garlic powder

1 tsp parsley flakes 


Tools: Large skillet with lid, stirring spoon, measuring cups and spoons,  knife, cutting board, fine sieve (possibly can opener) 


Measure out your half cup of quinoa. We find it easiest to use a much larger measuring cup for this, as it leave plenty of room for your next step. On top of that it means that you aren't going to have the grains bouncing out of the cup due to static. (We wish we were kidding on that one.) 

Rinse your quinoa and drain through a fine sieve.  Quinoa often has a bitter outer coating (naturally! It's not a byproduct of harvesting or processing - it's there to keep the grain from being eaten) that will throw off the flavor of whatever you're making with it. Just run it under cold water, swirling it around a few times under the water, then remove it and tap until most of the water has drained out. Repeat this until your water runs clear. You can skip this step if the package says "pre-washed" or "pre-rinsed." 

Once your quinoa has been rinsed and drained, drop it into your ungreased skillet and turn up the heat. We use medium-low heat, but feel free to adjust for your own preferences The goal here is to dry the individual grains and lightly toast them. Keep them moving during this step to make sure they don't end up scorched on one side and soggy on the other. A wooden spoon is best for this step so it doesn't transfer the heat the way a metal one will or melt like a silicone one can. 

When you feel your quinoa has been sufficiently toasted, add your water and turn the heat down as low as it will go. Turn your attention to the vegetables. Like the quinoa, these will need to be washed. Rinse all of them in clean, cold water for 30 seconds or so and then pat them dry. No need for soaps or produce washes. 

After your veggies are dry, chop them down to quarter inch pieces. Push them off the cutting board into the pan with the quinoa and water and give everything a stir. We advise doing the carrots first and then the celery to give the carrots more time to cook. Turn the heat up to medium, then measure in your parsley flakes and garlic powder. Give everything another good stir and put the lid on. Allow everything to simmer for five minutes while covered. 

Open up your can of soup. For ours, we used cream of chicken - but you're welcome to use whatever cream soup you'd like - perhaps cream of mushroom to make this a vegetarian recipe. Maybe even cream of shrimp if you're feeling particularly adventurous. We might avoid cream of celery (too much celery is in fact a thing in our opinion) - but maybe celery is your favorite food. Experiment and let us know what you discover! 

Pour your soup over the quinoa and vegetable mixture. We know the water hasn't had a chance to be fully absorbed by the quinoa, and that's fine. It's part of why we're not adding any water to the condensed soup. 

Once again, give everything a stir - but this time, let it simmer uncovered. Continue to stir frequently and watch for the individual grains to uncurl - that's how you know your dish is done.  

Allow it to sit for two to five minutes and stir once more before serving.  

This meal tastes even better the next day after the quinoa has had a chance to really soak up the soup. So, if you're making this as a meal for a  whole week's worth of lunches, you're in for a treat. 


We will add that additional veggies are something we are always going to advocate, so some examples you might consider adding are: pearl onions, green beans, corn, (more) carrots, parsnips, or turnips. Alternatively, you can just double, or even triple the quantities of the vegetables and experiment from there. We will say that if you're going to do that you /might/ need to add more in the way of water to ensure that your quinoa gets enough, but go with caution. 

Some other additions you might consider, to mix things up. 

Beans - great for additional fiber and protein, as well as making sure you have enough energy for the day. 

Chicken- If you're already adding in cream of chicken, and you have some leftover chicken in the fridge, it's a great way to get that used up and bulk up the meal. 

Diced and sauteed mushrooms - Although we wouldn't advise adding them in during the standard cooking process, we definitely think some sauteed mushrooms would go great with this. 

Shrimp - If you're looking to be adventurous, might as well go all in and add some actual shrimp to the meal. You can get them already pre-cooked in the grocery store for relatively cheap and just heat them back up in the pan before adding them on top. Again, because of how delicate the shrimp can be, we don't advise adding them during the standard cooking process. 


With that, we're handing this recipe over to you! What do you think? Like it, love it, hate it? Let us know in the comments below or over on our Facebook page. If you end up making it, let us know how it goes, we'd love to hear from you! 


If you wound up here not searching for food, but because your dryer is making  a strange whining sound, we can help. (although we are confused how you ended up on this page and not our post about dryer sounds, we hope you enjoyed the recipe anyway.) You can get hold of us over on our contact page or by giving us a call at ((214) 599-0055). We'll work with you to choose a date and time that works for your schedule so we can get to the heart of the problem and get your home running smoothly again. 


7 New Ways To Use Wallpaper At Home

We Know They’ll Change How You Look At It


You want to bring color and texture, light and pattern to your home, but you're not sure where to start. Well, the easy answer is to check out wallpapers. Thanks to many different new concepts in the field, we've got a ton of different patterns. You want Asian inspired papers? You've got it. You want something art deco? You can find that too. You want it to look like you're living in a jungle? You can get that too. Small prints, large prints, it doesn't matter. What's better is that there are now removeable papers so that if you end up deciding you don't like it, or you're renting, or you just want to redecorate, you can. The most important thing to keep in mind about wallpaper though? You don't just have to use it in large rooms like your grandparents did. Let's take a look at 7 ways you can bring wallpaper into your home. 

Make A Small Space Larger

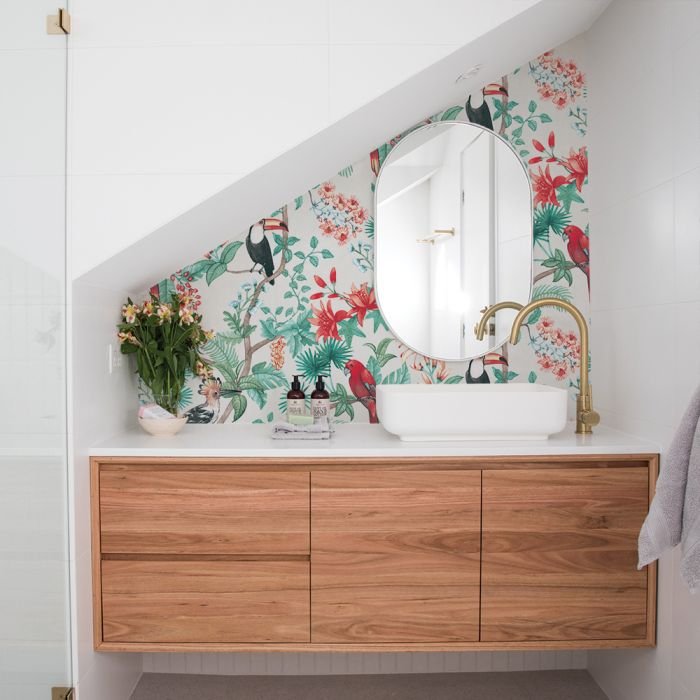
So you've got a small powder room downstairs that's really just for guests. Maybe it's tucked under the stairs, and has a slanted ceiling. It's hard to bring light and color to a space like that, but wallpaper and a mirror can help. Bring in a bold design on the upper half of the room, or even along one wall and the slanted ceiling, and a mirror. Together the two of them will open up the space making it feel much larger. 

This oversized pattern makes the room feel much larger.

Image from Tempaper

Although we don’t get why this works, you can’t help but admit that it does. This oversized pattern makes the room feel much larger.


Paper The Ceiling

Image from Tempaper

The pattern in this one echoes the shape of the light fixture, but you don’t have to do it that way.

You were probably looking at us like we were crazy in the last one, right? Wallpaper the ceiling? It's actually a great thing for any room, not just smaller ones. If you're looking for something to bring in a pop of color and texture to a room, but you don't want it on one of the walls, the ceiling is a great way to add that in. Whether your room is large or small, you can make use of wallpaper to add some much-needed movement to a room. 

Light It Up! 

Not keen on the ceiling idea? How are you at crafts? You can use wallpaper to make your own origami lamp, to paper the outside of an old lampshade, or as a hidden touch on the inside on a shade. Any one of these would take no more than a day, and all of them add a pop of color to your home in an unexpected and very custom way. 


Use Small Patterns On Large Spaces

What if you've already got an amazing living room? You want to bring in some color but you don't want to take away from the rug or the wall art that you searched all over for. No worries! This is when you grab a coordinating pattern that's small in size. Using something that repeats the shapes in the room means that the paper will highlight those features instead of battling them. By keeping the pattern small, it fades into the background, just subtly reinforcing it, rather being an obvious and in-your-face attention grabber. 

a Small pattern of flowers on a green background, fades into the background allowing the curves of the room to be more prominent

Image from Tempaper

A small pattern of flowers on a green background, fades into the background allowing the curves of the room to be more prominent


DIY Wall Art

None of these working for you? What about some wall art? If you've got some wallpaper that you love, but you can't choose where to put it, one way to use it is as wall art, instead. This works best with a large pattern, but you can do it with anything, depending on how creative you can get. Start by figuring out how the pattern looks best. Is it a single panel that can fit on one long canvas? Would it be better if it was on multiple canvases? What about broken up on several smaller frames?  There's a bunch of different ways you can use wallpaper as art. We love taking one long panel, painting it and framing it. If you want an indepth tutorial, check out this example from Thrifty Decor Chick for a step-by-step guide. (We started to write our own for the examples above and realized that would be an entire post on its own!) 

Large wallpaper pattern framed for a DIY look

Image from Tempaper

Framing your wallpaper like this allows you to have the best of both worlds, a gorgeous pattern that doubles as artwork.

Example of a small pattern that could be cut apart for a gallery wall

Image from Tempaper

Or you could cut apart this panel, and frame the different peonies to look like a gallery wall.


Create Some Custom Trays For Your Home 

What about something entirely unique? You want wallpaper, but you don't want to spend a weekend covering the walls. You don't want to choose just one pattern either.  Alright then, what about making some custom trays? A good tray can be used anywhere in the home, whether it's on the dining table for corralling your napkins and seasonings for the meal, in the entryway for mail, or for when you're making up a quick meal for a day in bed.  So grab (or make) a tray of your own, and then decoupage a bit of wallpaper on the bottom of the tray, both the inside and underside. This way you can be constantly rotating out color in your home, without having to commit to any one pattern for long. We suggest using sample pieces for a project like this. 

Light Up Your Stairs

Images from Tempaper

Look at that amazing pattern! Those colors look amazing and they echo what you see in the pillows to the right.

What about the stairs? You go up and down your stairs so many times per day, why not bring some color in? In one day, or at most a weekend, you can bring in some color to your stairs and give that whole area some new life. Whether you choose a large pattern or a small one, it'll be entirely unique. We do recommend using removable wallpaper here though, both in case you get tired in the future and also so that when you need to inevitably replace a piece, you'll be able to do it much more easily. 

What do you think? Are you excited to dress up your home a bit? Are you going to start looking for sneaky ways to add additional color and design? Let us know over at our Facebook page, we'd love to hear (and see) what you get up to! 

What about those of you who aren't though? You wound up here not for decorating advice, but because you needed help with your appliances. Don't worry, we've got you covered. At Appliance Rescue Service, whether you're in Dallas or McKinney, Plano, or Allen, we've got your best interest at heart. We'll work on any of your major appliances, and work with you to make sure you know what happened to cause the current issue. If that sounds more like what you need, give us a call at ((214) 599-0055) or go to our contact page to set up an appointment that works with your schedule. We're here to keep your home running smoothly.