vegetables

Healthy and Flavorful: A Caponata Recipe That You'll Love

Because who says you can’t have both in one recipe? 

Have you ever realized that a lot of companies that claim to make healthy food, also make it really bland? It’s flavorless and lacks texture, and the best you can say is that it doesn’t leave you feeling sick. 


Yeah, we know those meals, and we hate them. SO, we’re offering up this recipe for Caponata, an easy veggie recipe that is packed full of flavor and will leave you full. If you want you can also pair it alongside a smaller portion of pasta or polenta for a more filling meal, or as a lunch made up of leftovers. 

Ingredients:

1 lb eggplant

1 cup pine nuts

1 red bell pepper

1 yellow bell pepper

2 carrots

3 green onions

1 rib celery

1/2 cup currants

1/3 cup olive oil (+/-)

3 tablespoons red wine vinegar

2 cloves garlic

3 tablespoons tomato paste

2 tablespoons parsley

1 tablespoon basil

1 tablespoon sugar

salt and pepper to taste

Tools:

Baking sheet (1/2 size for toaster oven)

Cutting board

Knife

Bowl (x2)

Cheese grater (optional)

Large frying pan with lid

Measuring cups and spoons

Fine sieve or colander

Can opener

Timer

Serving spoon

Let us start off by saying that caponata is a very flexible recipe (sub things in or out as you wish), but it is not a picky eater approved recipe. Please do not attempt to feed this to fussy small fries or to the family members whose gut-check reaction to anything vegetable is "why?" or "ew." We will not be held responsible for the griping.

Be prepared to spend a good deal of time cutting vegetables for this recipe. We highly recommend toasting the pine nuts (just as they are, don't be tempted to oil or season them) in the oven for about 15 minutes while you chop your many veggies. At least that way you're making progress on two fronts while you bore yourself chopping, and it adds some nice depth of flavor to the final product.

As always: be sure to wash your produce!

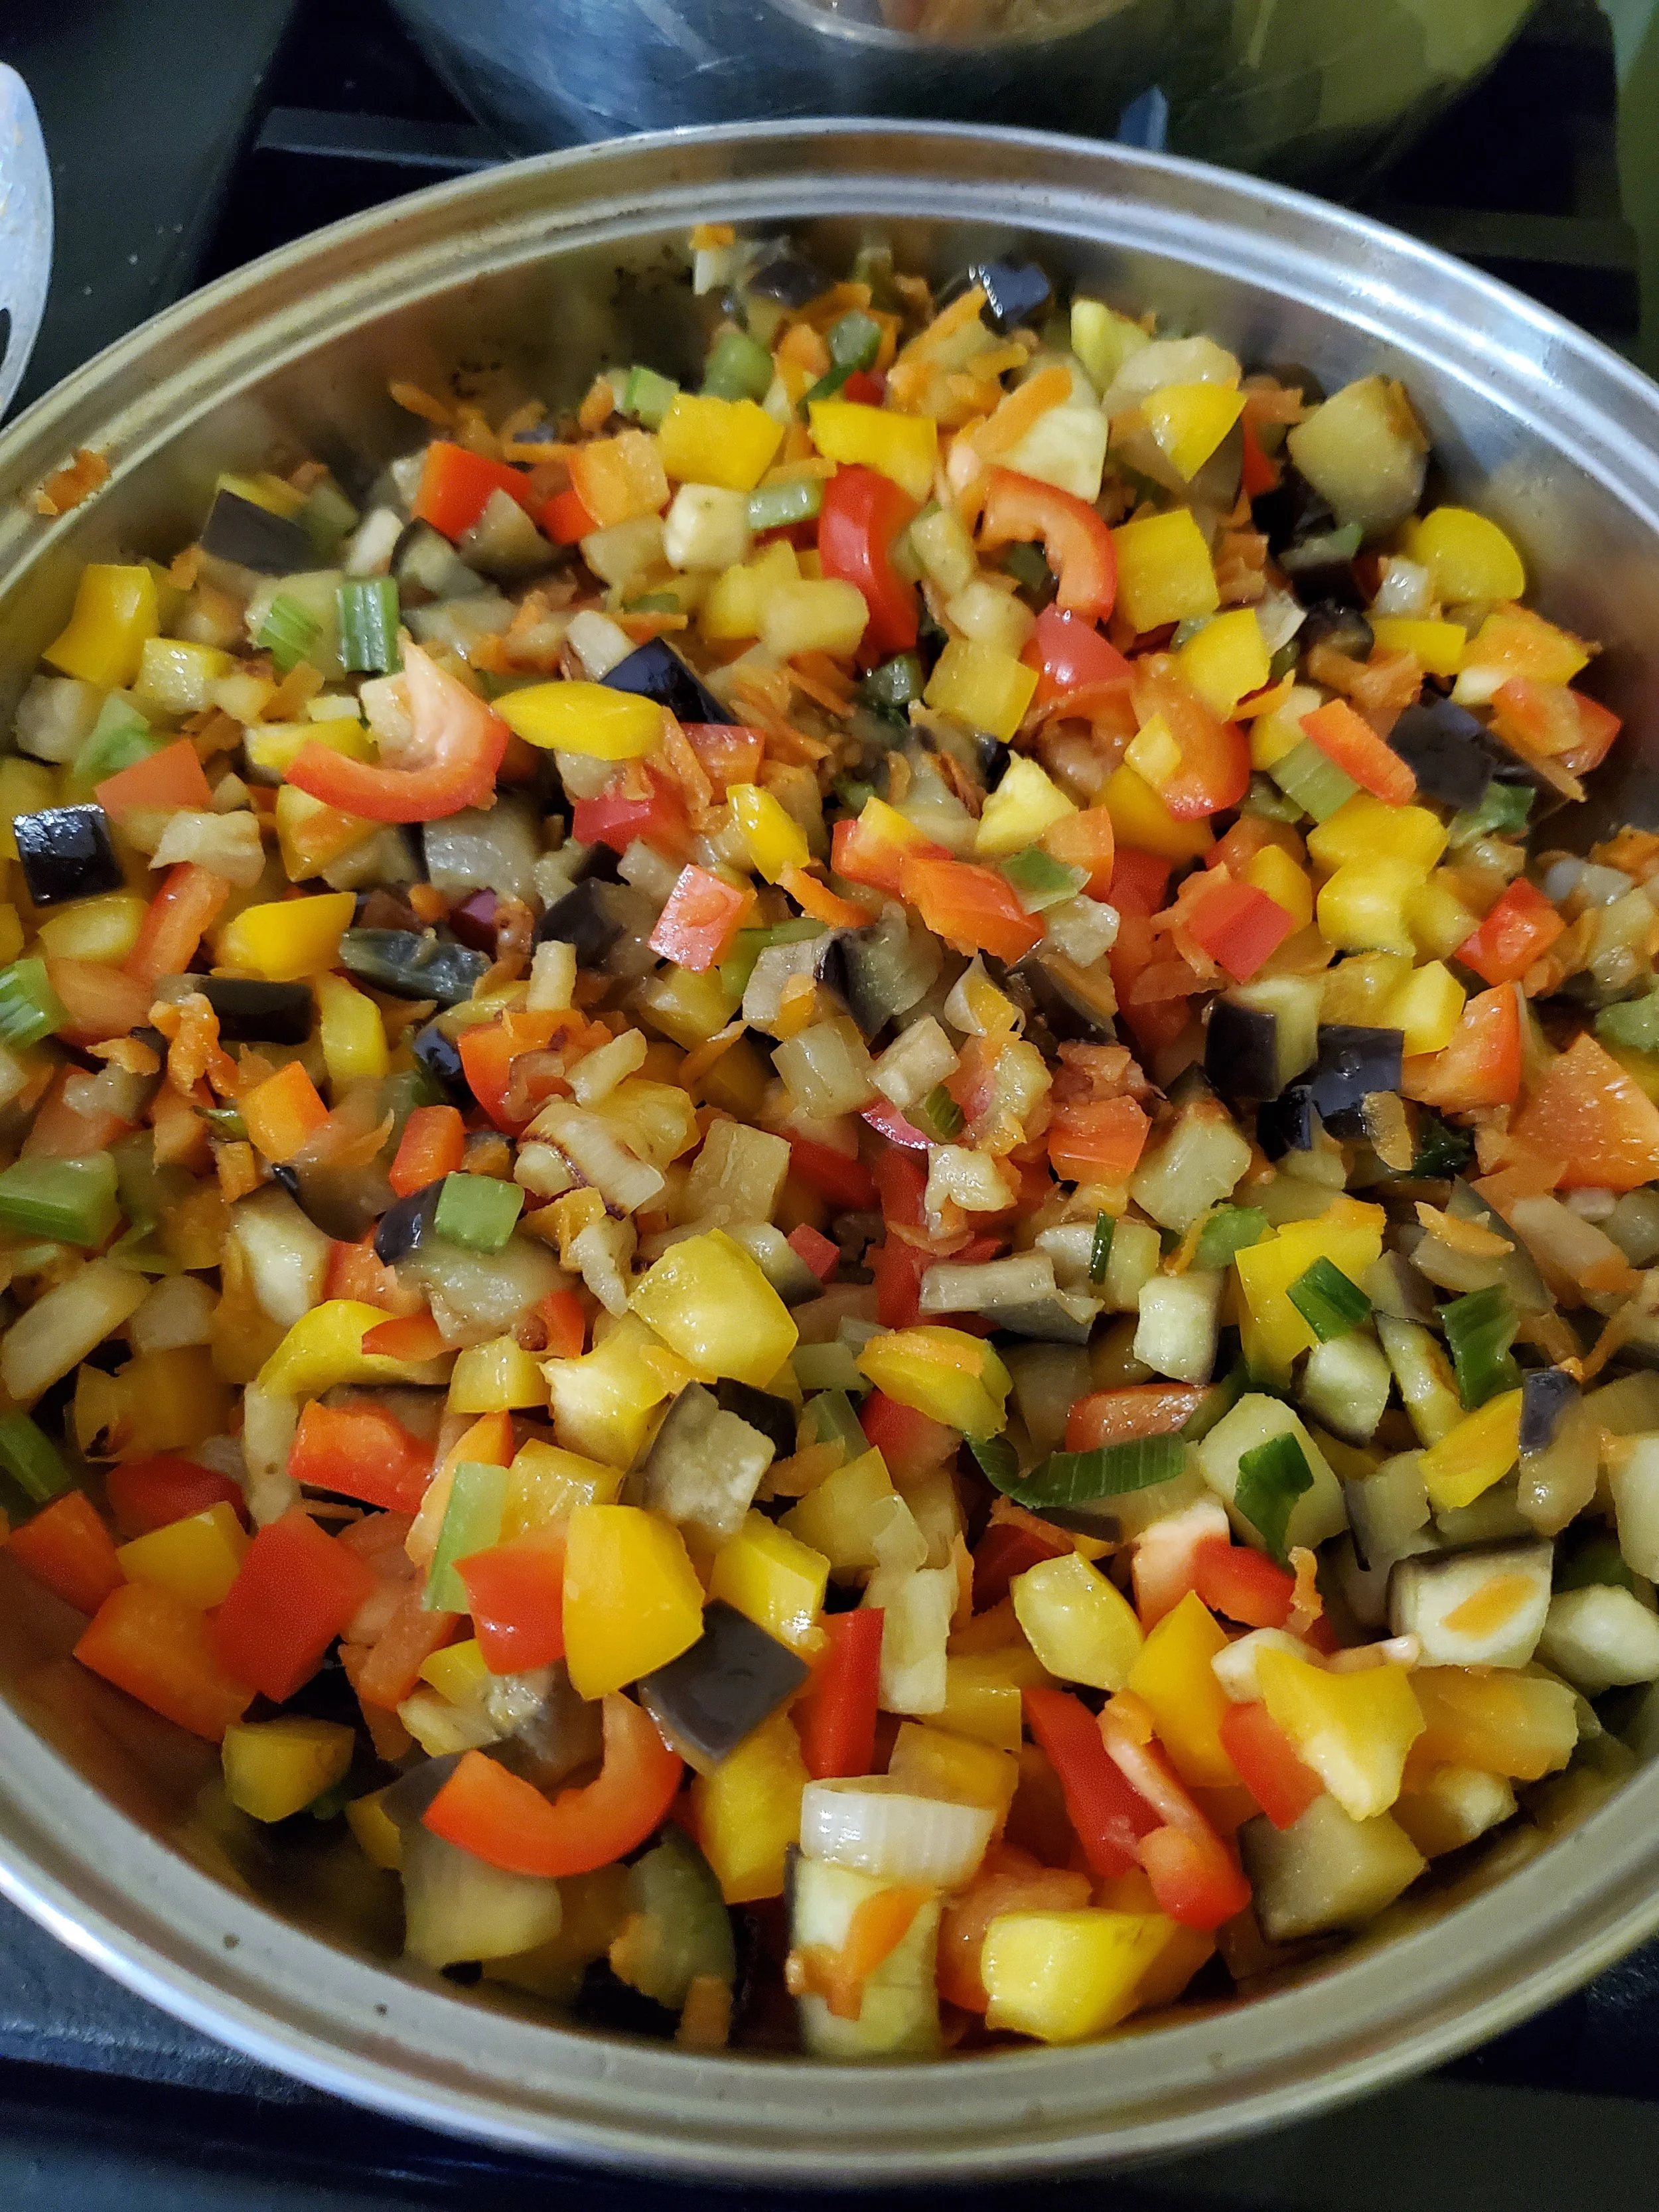
Start with the eggplant. Trim the top off, and halve it down the center so you have a flat side to set it on while you cut. No one likes escaping veggies, or nicking fingers trying to catch them. Your goal is to cut this large, funny-looking vegetable into a half inch dice. Once you get it diced, move it to one of the two bowls.

Next up will be your green onions. Trim them up and just roughly chop them, then dump them into the bowl with the eggplant.

Mince or slice your garlic (some families have strong feelings about a preference here, but we don't much care as long as it lands in the pan), and toss it in with the eggplant and the green onion.

That lonely single rib of celery goes next. We find it easiest to cut it lengthwise into thirds before we start the widthwise cuts, that way the chunks of celery aren't so big they end up accidentally taking over the meal. Once it's cut, those pieces go in with the rest so far.

And the carrots you've got can either be chopped or shredded. The regular carrots at our grocery store were sad looking this week, so we subbed in a double handful of baby carrots and shredded them for uniformity. The carrots join the others in the bowl.

That bowl is looking pretty full, isn't it? Time to start on the next.

Take the tops off your peppers and remove and discard the seeds and ribs. Chop down to half-inch dice like the eggplant and move them to the second bowl. 

Now you're finally done with the cutting board and the knife, just in time to need a measuring cup!

Measure out your currants and toss them in with the peppers.

Take the capers out of their jar, but don't add them to the bowl yet. These little guys are STRONG, so plop them into a sieve or colander and rinse them thoroughly. Once they're drained, they can join the currants and peppers. 

Toss your parsley and basil on top of that second bowl.

And right about now, the timer should be going off for those pine nuts. Just turn off the heat and let them sit for a while; their turn will arrive soon enough.

Now we move our attention to the frying pan on the stove. Pour enough olive oil to coat the bottom of the pan and light the burner. Set to just over medium and heat until the oil starts to shimmer. Be careful not to set it too high - olive oil has a low smoke point, and you do not want the smoke detector to give you an unnecessary wake up call.

Once the oil is hot, dump the eggplant bowl into the pan. We know it looks like there's not going to be room for anything else - don't worry, it will cook down. Give it a quick stir, then cover the pan. Set a timer for six minutes. Stir occasionally during that time.

When your six minutes are up, push the eggplant mixture to one side of the pan. Add a little more oil, then the bowl of peppers. Stir again and let it cook, uncovered this time, for another three or four minutes.

As the peppers soften up, you're safe to add the pine nuts. Just pour them all in there and give everything another stir. You'll probably need to add another splash of oil at this point, along with the red wine vinegar, the tomato paste and the sugar. (Adding the sugar here offsets the funky smell of the vinegar and helps balance the acidic, tinny taste of the tomato paste.)

Stir. A lot.

We know that tomato paste looks like it's never going to stop being a blob in the middle of the pan... But give it time, and don't quit stirring.

Once everything is incorporated (finally!), use a serving spoon to scoop out a serving to enjoy. We put ours over polenta, but that part is totally up to you.


Let us know over at our Facebook page what you thought of this recipe. We love hearing how they turned out for you. 


And if you need new appliance performance, preferably also without the jumbo-sized price tag, maybe reach out to our service department. You can reach them through our contact page, or by giving us a call at ((214) 599-0055)


5 Smoothie Recipes For Quick Meals

Smoothies make a great grab-and-go meal when you need something filling but not over the top.

We love making smoothies because you can grab them and go. A bit of prep, a bit of noise and then toss it all into the freezer and you can have a week's worth of breakfasts or lunches that are healthy and filling ready to go.  If you do it right, you can even use them to lose weight. We're not promising crazy results, we're looking at recipes that are shown to be filling, taste good and are actually healthy for you. 

The one universal tool that you're going to need for this list is a blender. It doesn't have to be the most expensive blender on the market,  you just need it to be powerful enough to chop through frozen fruits, vegetables and ice. As to those fruits and veggies. While fresh ones are fantastic, you can work with frozen just as easily. Finally, we did something we don't usually do and that's given the calorie count for each recipe.  We've done that so that you can see how much goes into these and make your choices accordingly. Keep in mind that calories aren't necessarily bad so much as  a "my body needs x number of calories to function." 

Now, on to the smoothies.

Peach Crumble Smoothie

  • 1/4 c rolled oats

    1/2 Banana - Frozen is best so that they chill everything

    1 c peaches - Fresh is best, but the frozen is tasty and easy to get hold of.

    1 c milk - You can swap out cows milk for any other type that you like, including almond milk which turns out very nicely, and lowers the calorie count further. If you do decide to go with almond milk, we suggest upping your vanilla to 2 tsp.

    1 tsp brown sugar

    1/2 tsp cinnamon

    1 tsp vanilla

  • With this one we're going to start with a choice. Do you like boba? If you don't know what boba tea is yet, consider instead whether you like texture in your smoothies. If the answer is yes, go ahead and skip this step.

    If the answer is no, then you need to take your chia seeds and add them to your oats and toss both into the blender. Pulse those until you end up with a fine powder, dump it into a bowl and set it to the side.

    Next up grab your pears and blueberries and toss those into the blender. You can take your choice on whether you want to add in the juice of the pears or not. If it's for a dessert smoothie, we think it's a great idea. If not, you might want to avoid that idea.

    Now add your powdered goods back in and blend till smooth. Congrats, Smoothie!

Tropical Smoothie

  • 1/2 cup rolled oats

    2 large peaches (Frozen is fine, fresh is better.)

    3 cup frozen mango

    1 medium banana (Ditto on the frozen vs fresh)

    1/4 cup Greek yogurt

    1/8 cup orange juice

    1 cup coconut water or almond milk

  • Start by adding your oats to the blender and pulsing until your oats are a fine powder. Pour them into a bowl and set them aside.

    Then, if you're working with fresh bananas and peaches you're going to need to slice up the banana and pit and slice the peaches.

    Next, toss your fruit into the blender and let it go. Add in all of the other ingredients together and blend till smooth. For your blogger, this is a full meal thanks to the addition of the oats. Make sure to test it yourself before you rely on it though.

Peach and Mint Smoothie

  • 2 large peaches (as per everything else, you can use frozen and be just fine, although yes, fresh is better. If it's the right season we suggest trying both white and yellow peaches and see which you like better.)

    ½ cup plain yogurt

    12 large fresh mint leaves (no, dried really doesn't work here)

    2 teaspoon lime juice (fresh is always better, but if you can't, bottled will work just fine)

    12 ice cubes (or you can play around and add more. This is for how thick you want your smoothie to be.)

    2 teaspoon honey or your sweetner of choice, but it really does taste good with clover honey

  • Alright! Grab everything and chuck it into your blender. Hit blend until it's smooth. Enjoy!

Irish Cake Smoothie

  • 1 1/3 cup Rolled Oats

    4 tablespoons Flaxseeds

    5oz Frozen Spinach

    1 teaspoon Ground Ginger

    1/2 teaspoon Cinnamon

    2 1/2 cups Water

  • This is a surprisingly filling recipe, although we're still trying to wrap our heads around /why/ it is.

    Start off by putting both your rolled oats and the flaxseed into your blender and pulse until you've got a fine powder.

    Add in your spinach, ginger, cinnamon and water and mix until smooth.

    Thanks to the amount of water this is a thinner smoothie than others on the list, but it will give you plenty of get up and go.

Blueberry and Pear Smoothie

  • 16 oz frozen blueberries

    1 14 oz can of pears

    2 Tbsp of chia seeds

    1 cup of rolled oats

  • In your blogger's house, this is one that's turned to often, as bananas are actually pretty easy to freeze. Just slice them up when they're at peak ripeness and toss them into the freezer in a freezer safe bag or container. Then you can use them as you need, rather than worrying that they'll go bad.

    When you're ready to make your smoothie, don't just toss everything in at the same time. We suggest starting with the rolled oats. Pulse those until you have nothing but powder left so that it mixes into the smoothie more easily. Dump that into a bowl and set it aside. Now add in your frozens and your milk, and blend until smooth. At this point you can add all of your other ingredients in, including the oats, and blend until smooth. If you find that you want the smoothie to be thinner than it is, feel free to add in more milk, keeping in mind that that is going to boost the calorie count.

For any of the recipes we've shared, you can make adjustments, in fact, we suggest that you do. Take them and try out more of one thing and less of something else. Add in more oats if you want to be full for longer and less if it's meant to be just a light snack between meals. 

All of these can be stored in one of two ways, depending on the space you have.

- You can get yourself a silicone ice mold (choose your shape and depth preference), pour in the smoothies and let them freeze, then transfer those into a freezer bag or container for easier storing. 

-Alternatively, you can freeze them in freezer safe glasses/jars so that all you need to do is transfer them to the fridge 24 hours before you plan to drink them and let them defrost that way. 

Both options work, and it's really just dependent on how much freezer space you have available. 

You've probably noticed that our recipes have a LOT of peaches in them. That's because peach is a super sweet fruit that's easy to freeze and get your hands on year-round, but it's hard to overpower. So it works well with different vegetables and other fruits that you want to work into your diet. 

If you try out any of our recipes, please let us know how it goes! We'd love to hear from you in the comments below or over on our Facebook page.  


If you're turning to smoothies because your stove is currently not working (rather than the Texas heat..) we can help. You can give us a call at our office ((214) 599-0055), or reach out via our contact page to set up an appointment. At Appliance Rescue Service, we'll work with you to figure out what the problem is and get your home running smoothly again. 

Spaghetti & Meatballs

With a few secret ingredients…

We're adding a few secret ingredients to this week's recipe. They might sound strange, but they do actually make a delicious addition and add additional vegetables to a meal that is already delicious and easy to convince pickier family members to eat. 


Ingredients

1/2 pound lean ground turkey (you can go with lean ground beef, but it will slightly alter the taste.) 

1 cup breadcrumbs (you can make your own, or grab a jar of Italian breadcrumbs at the store) 

1/2 cup butternut squash puree

1 clove garlic minced 

1 teaspoon salt

1/4 plus 1/8 teaspoon crushed black pepper

Nonstick cooking spray

2 teaspoons olive oil 

1 (26 ounce) can whole peeled tomatoes with their juice, pureed in a blender 

1 tbsp oregano

1 tsp basil

1 tsp onion powder Or 1/2 cup fresh diced onions 

1 tsp thyme 

SMALL pinch marjoram 

SMALL pinch rosemary 

1/2 cup water 

1/4 cup carrot puree

1/4 teaspoon garlic powder

pinch of cayenne pepper 

1 bay leaf

1 pound of spaghetti, whole grain or whole wheat if you can, but it's not mandatory


Purees 

1 large butternut squash

1 lb carrots 


Tools: Chef's knife, cutting board, baking pan, aluminum foil, large pot, blender, food processor, instant pot 


Let's get started with making the purees for the recipes, and if you find you like this, you might find ways to sneak them in other recipes. Grab your carrots and give them a quick wash, then peel off the outer layer. Next, chop them into large chunks (three inches long or so is best for working with an instant pot.) Pour one cup of water to your instant pot, set up the steamer basket or tray, and add your carrots. Set the lid on top, set the pot to steam for 5 minutes, and walk away. This has been a game-changer for us; rather than having to steam veggies for 20-30 minutes, all we need is 10 minutes and our instant pot. Once that's done, grab your food processor and chuck in the carrots.  

Here we're going to say Learn From Our Mistakes. Do not try and puree or blend all of your carrots at once. Don't do it. Whether you're using a food processor or a blender, you will burn out the motor. We know, your blogger did it. Go one to two carrot chunks at a time, with a tablespoon of water, until it's fully blended and there aren't any solid pieces left.  As you finish one section, pour it into a separate bowl, and move on. 


Now once you finish your carrots (or while they're steaming in the instant pot), you can start working on your butternut squash. Start off by splitting it in half. Grab your chef's knife and go down the middle vertically. OR you can cut it horizontally and then cut each of those in half to get at the interior. Once you have your squash split, grab your spoon and scoop out the 'guts' and seeds. You can chuck them, roast them or plant them as you see fit.  Now set your oven to 400*, and lay the squash face down on a lined cookie sheet (or round sides up, if that makes more sense.) You're going to roast the squash for 50 minutes or until soft. Your squash is likely to come out not only looking brown and wrinkled in several spots but also with a bit of the sugars on the sides. It's completely normal and not to be worried about. This time you're going to snag a spoon and scoop out the meat of the squash. Run that through the food processor or blender for two minutes or until smooth. You'll want to add water as needed to make for a smooth consistency and make it possible for your blender to work easily. 


And now, let's go on to the spaghetti! 

In a large bowl, mix the turkey, breadcrumbs, butternut squash puree, garlic, cayenne, 1/2 teaspoon salt, and 1/4 teaspoon black pepper until well combined. Shape the mixture into 1-inch meatballs and place them on a sheet of waxed paper or aluminum foil. One trick that works well for making meatballs is using an ice scoop. We don't advise a melon-baller because the meat is too sticky to come out easily. 

Now, coat a large nonstick skillet or frying pan with cooking spray and set it over high heat. When the skillet is hot, add the olive oil, stir it once around the pan, and then add your meatballs and brown them for 4 to 5 minutes, turning occasionally.  You're not looking to cook them fully at this point, but instead to brown the outside for a delicious taste later. 

In a large pot, add the pureed tomatoes, water, carrot puree, garlic powder, oregano, thyme, basil, onion, marjoram, rosemary, bay leaf, and the remaining 1/2 teaspoon salt and 1/4 teaspoon pepper. Reduce the heat to low and simmer for 15 to 20 minutes, or until the meatballs are no longer pink in the center. Remove the bay leaf; they're not particularly tasty.

Next, bring a large pot of salted water to a boil. (Ideally, you want your water to be as salty as the ocean.) Add the pasta and cook according to package directions until al dente. Before you drain your pasta, take a half cup of water and mix that into the sauce. Next, drain the pasta into a colander.  Spoon a little bit of your sauce into each bowl, then pasta and then more sauce, and top with meatballs. Enjoy! 

What did you think?  Are you willing to try it? We can honestly say that we've made it and enjoyed it for ourselves, and because the vegetables are pureed, they're not easy to spot by sight, taste, or smell.  Let us know what you thought in the comments below or over on our Facebook page. 

Now, if on the other hand, your oven went out while you working on this, or refused to hold a consistent temperature, we can help! You can reach out to us by calling ((214) 599-0055) or on our contact page. You can set up an appointment time that works for you and let us take care of getting your home back and running smoothly.

Broccoli & Cauliflower Soup

Warming, delicious and surprisingly easy to put together!

I don’t care! Take me to the recipe!

Few things can help warm someone up in winter like a nice hot soup, and rarely will anyone object to soup, even with the veggies in it. That is exactly why we chose it for this week’s recipe. With a delightful vegetable stock and some baked chicken to complement it, this makes an excellent choice for a medium effort meal for lunch or dinner.


Some recipes take a little bit of work to get just right, and bouncing ideas off of other cooks is never a bad idea. That certainly happened with this recipe, where different ways to get the vegetable stock just right were debated with our not-so-resident cooking friend until we settled on this particular version. The biggest question was whether to blend everything, or only the broccoli and cauliflower. We hope all the conversation has produced something quite delicious for you to enjoy.


Things you'll need:


Ingredients

  • Broccoli 

  • Cauliflower 

  • Carrots

  • Celery

  • White Onion

  • 3 Tbsp Butter

  • Roasted garlic bullion (or similar)

  • One rotisserie chicken


Equipment: 

  • Vegetable knife

  • Cutting board(s)

  • Chef's Knife

  • Large Pot

  • Blender

You will want to start off by chopping up your carrots, celery, and onion. For the carrots and celery, aim to do smaller pieces, maybe one to two centimeters in size. For your onion, go ahead and mince it and aim for a roughly similar size, if possible. Place these into a bowl separate from the other ingredients, and sprinkle salt and pepper to taste.

Moving on to the broccoli, you will want to hold it upside down and chop off the florets a few pieces at a time. You’re aiming for pieces roughly an inch and a half long. Once you’ve done that, you’ll be left with a fairly long and bare stem. Go ahead and chop the stem into pieces roughly half an inch long. Now, repeat the same general process with your cauliflower. Once that has been completed, go ahead and place them into a separate bowl from your other vegetables, sprinkle in any salt and pepper you deem necessary, and give them a toss to help more evenly mix and spice everything.


Next, get your pot and put it on medium heat on the stove. Put in your butter and allow it to melt. Once it is melted, put in the garlic bullion and thoroughly mix it until it is a single, smooth texture. Once that has been done, add in the celery, carrots, and onion, allowing them to become softened. The biggest thing you’re looking for is when the onions begin to turn clear.


Once your onions have become transparent, add in the broccoli and cauliflower, along with a cup of water, and turn the heat down to a nice simmer. You want the broccoli and cauliflower to become soft, easy to push a fork into, but not squishy and “dead” feeling.


Now, strain out all of your vegetables and put them into your blender, adding in a cup of the broth they were in. Next, add in an additional five cups of water to your pot, and mix up the remaining stock.


Start pulsing your vegetables, slowly working your way up until you have a puree. You want a smooth consistency at this stage. Once you’ve done that, you will want to mix the puree back into the pot. From there, go ahead and give it a quick taste to see how you like it. Add spices as needed, or, leave it alone if you think it’s already good to go.


Next, take out your rotisserie chicken, and cut off whatever sections you think would be best with this soup. Our recommendation is to cut the meat off of the breast, since it tends to provide some excellently tender meat. An additional area to consider would be the thigh, as it tends to provide a similar quality of meat, but may take a little more work to cut off of the bird. We chose to chop this chicken up into strips, but cubes of meat would also work very well. Put this in with your soup, and it is ready to serve.

We hope you find this to be quite a delectable soup. While this recipe calls for chicken, the vegetable stock could be paired with other things, and we would love to hear about any ideas you have with this recipe! Feel free to tell us about your opinion of this recipe, and any modifications you make, in the comment section here, or over on our Facebook page! We’d love to hear from you, and if you have any issues with your appliances while cooking, feel free to give us a call or hop over to our appointments page.