Very Peri - The Color of 2022

Red & blue, bright and soothing, a color of contradictions.

Welcome to 2022 everyone! We’re taking a look at Pantone’s Color of the Year and how you can bring it into your home.


 This year’s color is a first for Pantone in their 28-year run. Instead of going with already existing colors, they created a new one. The color of the year for 2022 is Very Peri “Very Peri is a  new red-violet infused blue hue.” Pantone said that they created the color because “Creating a new color for the first time in the history of our Pantone Color of the Year educational color program reflects the global innovation and transformation taking place. As society continues to recognize color as a critical form of communication, and a way to express and affect ideas and emotions and engage and connect, the complexity of this new red-violet-infused blue hue highlights the expansive possibilities that lay before us”.” We think it’s going a bit much for the color terms, but it’s a beautiful color. A beautiful mix between red and blue, and it’s surprisingly soothing, while also making us feel rather playful? It’s a confusing color, but pleasing. We can see it being used almost anywhere, primarily in terms of fabrics and accent walls. We could even see it in a child’s playroom or nursery. 

Pantone

What about the colors that Very Peri pairs with though? No color exists by itself, so what does VP pair with? Fortunately, Pantone has given us several very different palettes. 


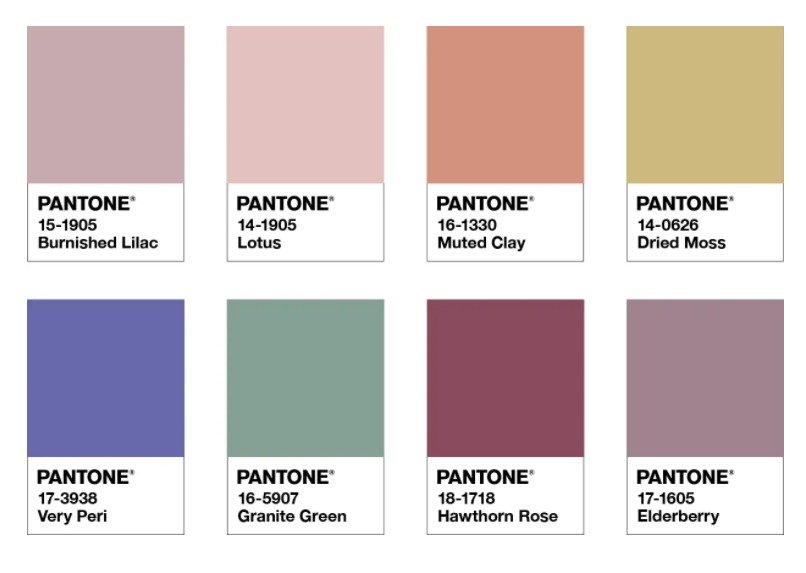
The first one, Balancing act, is a very aptly named palette. It’s a balanced palette with both cool tones and warm tones, making each one pop in different ways. There are four neutral roses in the palette that we can see being used for carpets and furniture, with the two greens, very peri and the clay color, being used for different pops of color in a room. Alternatively, we could see the walls being painted in the different roses, with very peri being used for an accent wall. 

A palette of 8 different colors from Pantone. Burnished Lilac, Lotus, Muted Clay, Dried Moss, Very Peri, Granite Green, Hawthorn Rose & Elderberry

Pantone

Our next palette is called Wellspring. This one is full of lush greens, blues, and purples, with the wild card “dirty chai’ thrown into the mix. This one we see not so much for a living room, but for a personal office, although we would say to stick to neutrals for your flooring. Unless you want to do one of these strong colors? Then we say go for it, but we’ll leave it to you.  We love this rich mix of colors, very reminiscent of a day in the garden, which is why we could see it working in a personal office. Use the different colors and their vibrancy to encourage you to reach your max every day. 

A palette of 8 colors from Pantone. Greenbriar, Foliage, Treetop, Celery, Chai Tea, Dewberry, Very Peri, Eggshell Blue.

Pantone

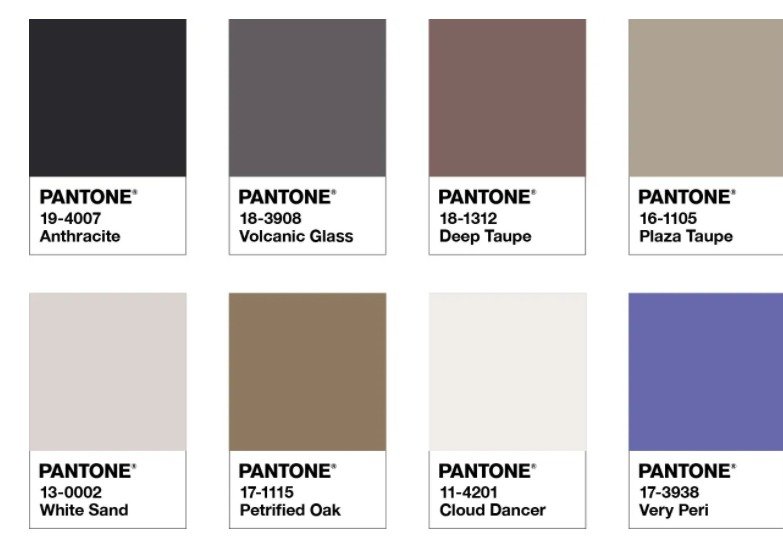
Our third palette is Star of the Show, and that is exactly what very peri is in this palette. This time we’re looking at a mix of different true neutrals, creams, browns, greys, and black. This palette would work almost anywhere. You would end up using the neutrals of the palette over everything, from the wall, to the floor, to the furniture. Then you bring back in very peri to make everything pop. That color could be used anywhere you wanted to bring interest. A doorway, behind a picture gallery, highlighting the prime focus of the room, whatever. 

A palette of 8 colors from Pantone. Anthracite, Volcanic Glass, Deep Taupe, Plaza Taupe, White Sand, Petrified Oak, Cloud Dancer, Very Peri

Pantone

Our final palette, at least directly from Pantone, is called Amusements. This one is full of bright, eye-popping colors that we think (hope?) is really going to be left to the clothing industry. These colors are so bright that we can see how people are going to love them, but we also are uncertain how many companies will put out items in these colors. (Although we will include a link to our article involving vinyl wraps for your appliances down below.) 

A palette of 8 colors from Pantone. Tawny Orange, Very Peri, Iced Coffee, Pink Flambe, Fuchsia Pink, Paradise Pink, Cornsilk, Tourmaline

Pantone

So that’s the color of the year for 2022! What do you think? Where do you plan to use it in your homes? Do you like the color at all? We’re still trying to figure it out for ourselves, but we want to hear from you. Let us know your thoughts on the color and its coordinating color palettes over on our Facebook page. As usual, we’d love to hear from you! 


If on the other hand you got lost on our page because you were looking for help with your appliances, you are actually in the right space. We can help you whether you’re looking for someone to fix your washing machine or your dishwasher, your stove, or your refrigerator, we can help. You can set up an appointment on our webpage or by giving us a call at ((214) 599-0055). 


Comparing 3 Different Leaf Blowers

How do you best deal with the leaf invasion?

With winter just now coming into season, many people are finally getting to rest, not having to rake up piles upon piles of fall leaves. No matter how much fun the piles of leaves are to fall into, they can be a hassle to clean up. Thankfully for those with a variety of trees in their yards, there’s a wide variety of leaf blowers for almost any budget, and a few different types to suit your individual needs.


Generally, there are three types of leaf blower: Plug-in, battery powered, and gas-powered.


Plug-in leaf blowers tend to be the smallest and least powerful options, but are also the most budget friendly by far, with many good options coming in below one hundred dollars in price. That being said, they do come with the issue of cord length limitations. But, for the budget, they’re hard to beat.


Battery powered models are the next step up in size, power, and price, and have free reign to go wherever you do with no worries about cords. Now, don’t worry about spending a fortune on D batteries for these - new models are designed by power tool companies to take the same rechargeable batteries used for things like hand drills!


The final, and largest, type of leaf blower is gas-powered. They tend to weigh the most, but have the absolute most power compared to other models. These are very common options for professional landscapers, but are also a very popular choice for those with larger properties to clean up. Excellent for dealing with large amounts of leaves, but with a hefty price point - not factoring in the cost of gasoline and oil for it. 


An additional consideration is the configuration of your leaf blower. Generally, the most common option is a handheld leaf blower, and for most people, this option will do just fine. However, some very large models come in a backpack configuration, allowing more comfortable shouldering of the weight while offering more power than their handheld counterparts, albeit at a higher price.


First - Plug-in model -

Black & Decker 7 amp 180mph corded leaf blower

Price at time of writing - $30.00

Our first recommendation is a small four and a half pound machine produced by black and decker at a nigh on unbeatable price point for the quality. Pretty serious power for its size and price, this is a great choice for homes that don’t need a large leaf blower to handle things come fall.


WRITER'S CHOICE OPTION

Second - Battery powered model

Greenworks 24V 90/130 MPH Dual Speed Cordless Leaf Blower

Price at time of writing - $80.00

Our next pick is a bit more pricey but comes with quite a bit of extra utility. While it isn’t quite as fast as the corded model, this is a far more mobile option, and best of all comes with a rechargeable battery capable of being used with any other GreenWorks power tools and garden tools! This is an excellent choice for those of you making use of GreenWorks tools, and for those of you with a larger area to go over without necessarily needing something gas-powered to handle things.


Third - Gas-powered model

Husqvarna 125B handheld leaf blower

Price at time of writing - $180.00

The third recommendation we have, for a bit of a larger budget, is one made by a company most well known today for their motorcycles. That being said, the 28cc gasoline engine in this handheld leaf blower delivers excellent power and solid mobility for the size. Overall, a very impressive leaf blower, and an excellent choice for those needing power to handle a very large area. Now, we must warn you - The cost of this option is not just upfront with the leaf blower itself, but also with the cost of gasoline and oil to mix in for its tiny two-stroke engine. That being said, the power can’t be beaten.

Fourth - Backpack leaf blower

Husqvarna 150BT backpack leaf blower

Price at time of writing - $300.00

Our largest and most expensive option on this list, another offering from Husqvarna. Backpack leaf blowers are more common to see in the hands of professional landscaping crews for businesses and people’s homes, but they’re an excellent option for people with massive areas to de-leaf every fall. These provide the absolute most power, but are also the absolute priciest, and for smaller properties, can really be overkill. 

These are the general types of leaf blower, and a few good examples of each. Options range well with price as well as size, to suit whatever needs your home has. Of course, any option works for any size property, but it is never a bad idea to consider your needs versus what options you have. We would love to hear what choice you made, as well as what comments you have on these offerings. Feel free to comment here, or go over to our Facebook page to talk to us about it, and if you notice any problems with your appliances, feel free to give us a call at ((214) 599-0055) or schedule an appointment here on our website!


Broccoli & Cauliflower Soup

Warming, delicious and surprisingly easy to put together!

I don’t care! Take me to the recipe!

Few things can help warm someone up in winter like a nice hot soup, and rarely will anyone object to soup, even with the veggies in it. That is exactly why we chose it for this week’s recipe. With a delightful vegetable stock and some baked chicken to complement it, this makes an excellent choice for a medium effort meal for lunch or dinner.


Some recipes take a little bit of work to get just right, and bouncing ideas off of other cooks is never a bad idea. That certainly happened with this recipe, where different ways to get the vegetable stock just right were debated with our not-so-resident cooking friend until we settled on this particular version. The biggest question was whether to blend everything, or only the broccoli and cauliflower. We hope all the conversation has produced something quite delicious for you to enjoy.


Things you'll need:


Ingredients

  • Broccoli 

  • Cauliflower 

  • Carrots

  • Celery

  • White Onion

  • 3 Tbsp Butter

  • Roasted garlic bullion (or similar)

  • One rotisserie chicken


Equipment: 

  • Vegetable knife

  • Cutting board(s)

  • Chef's Knife

  • Large Pot

  • Blender

You will want to start off by chopping up your carrots, celery, and onion. For the carrots and celery, aim to do smaller pieces, maybe one to two centimeters in size. For your onion, go ahead and mince it and aim for a roughly similar size, if possible. Place these into a bowl separate from the other ingredients, and sprinkle salt and pepper to taste.

Moving on to the broccoli, you will want to hold it upside down and chop off the florets a few pieces at a time. You’re aiming for pieces roughly an inch and a half long. Once you’ve done that, you’ll be left with a fairly long and bare stem. Go ahead and chop the stem into pieces roughly half an inch long. Now, repeat the same general process with your cauliflower. Once that has been completed, go ahead and place them into a separate bowl from your other vegetables, sprinkle in any salt and pepper you deem necessary, and give them a toss to help more evenly mix and spice everything.


Next, get your pot and put it on medium heat on the stove. Put in your butter and allow it to melt. Once it is melted, put in the garlic bullion and thoroughly mix it until it is a single, smooth texture. Once that has been done, add in the celery, carrots, and onion, allowing them to become softened. The biggest thing you’re looking for is when the onions begin to turn clear.


Once your onions have become transparent, add in the broccoli and cauliflower, along with a cup of water, and turn the heat down to a nice simmer. You want the broccoli and cauliflower to become soft, easy to push a fork into, but not squishy and “dead” feeling.


Now, strain out all of your vegetables and put them into your blender, adding in a cup of the broth they were in. Next, add in an additional five cups of water to your pot, and mix up the remaining stock.


Start pulsing your vegetables, slowly working your way up until you have a puree. You want a smooth consistency at this stage. Once you’ve done that, you will want to mix the puree back into the pot. From there, go ahead and give it a quick taste to see how you like it. Add spices as needed, or, leave it alone if you think it’s already good to go.


Next, take out your rotisserie chicken, and cut off whatever sections you think would be best with this soup. Our recommendation is to cut the meat off of the breast, since it tends to provide some excellently tender meat. An additional area to consider would be the thigh, as it tends to provide a similar quality of meat, but may take a little more work to cut off of the bird. We chose to chop this chicken up into strips, but cubes of meat would also work very well. Put this in with your soup, and it is ready to serve.

We hope you find this to be quite a delectable soup. While this recipe calls for chicken, the vegetable stock could be paired with other things, and we would love to hear about any ideas you have with this recipe! Feel free to tell us about your opinion of this recipe, and any modifications you make, in the comment section here, or over on our Facebook page! We’d love to hear from you, and if you have any issues with your appliances while cooking, feel free to give us a call or hop over to our appointments page.

Stove Deep Dive

All about stoves, how they work and the differences to expect.

Table of Contents

Types

Surfaces

Burners

Ventilation

Features

Additional Reading

When was the last time you had to go looking at a new stove? Do you remember how many different options there were? Not to worry, we’re taking a look at them this week to see what main features exist in stoves and how to find the one that best fits you. Let’s dive in. 

Types


Electric

Let's start off by looking at THE most common type of cooktop you're likely to encounter when looking to purchase a new stovetop, an electric stove. They are the single most popular variety in the United States, and the easiest to find. They're also the easiest to set up, as most kitchens will already have an outlet that's heavy enough to handle the power draw of an electric stove. Due to the popularity they're also fairly inexpensive to pickup which makes them great for someone who is on a budget or is just looking to put their money elsewhere.  They're also typically very easy to clean, no matter whether you get a cooktop with coils or without. 


Since you don't need an 'ignition' as soon as you turn on a burner it will begin to heat. However, because the heat is cumulative rather than immediate, it does take more time than a gas stove to heat up. This also means that it takes longer to cool off by comparison to a gas stove.  Since there isn't an open flame of any sort though, many people prefer an electric stove over a gas one. 


There are some drawbacks to an electric stove though. One is that if your home loses power, you lose your stove as well. The other is that while there are energy efficient stoves, as of right now an electric stove is still going to be a significant chunk of your electric bill. A final, smaller point is that you do have to be careful about what pots and pans you purchase. Make sure to do research ahead of time as some types can scratch, damage or shatter your cooktop if you make the wrong purchase. 


Gas


Next up, let's take a look at gas stovetops.  A gas stovetop has a number of benefits to it, the primary one is how quickly they heat. Due to their instant flames as soon as you turn on a burner you begin to heat the room (and the food you're wanting to cook.) With that visual element, you also have very precise control over the temperature of your burners. Although it's more intuitive than just setting the burner to high, medium or low, you get the upside of being able to see over time how the heat affects your recipes. The speed with which the flame responds also means that you can cool what you're cooking much more quickly by lowering the flame. All of this boils down (ha!) to being less likely to burn your food. 


Another benefit of such quick temperature response is that you can heat up or cool down the pan you're using. So if you've got pets, small children or you're just working in tight spaces, you're less likely to burn yourself thanks to how quickly a gas stove will cool off. This also means that you don't have to worry about a pan getting damaged by the stove OR that a pan is going to damage your stove in some way. 


A gas stove is able to still be used even if your power is out. You'll need to use a match or lighter to get the burner lit, but you'll still be able to cook or boil water if you need to, to heat your home in the event of a winter storm.  Under normal circumstances a small bit of electricity will be used to 'spark' and ignite the burner when you turn it on. 


There are two factors though that you do need to pay attention to when it comes to purchasing a gas stove for your home. If you don't already have a gas stove, you're going to need to have a gas pipeline run. That can be expensive as it's not typically done on construction for new buildings these days. Fortunately the price of having the line run will pay for itself over time when you don't have to worry as much about your electric bill. You also need to make sure that you have some type of ventilation set up. We'll talk about it more down below, but you have two options when it comes to ventilation. An overhead hood and a downdraft extractor. Both are good options, so long as you actually use them. While a gas oven is by and far superior in terms of precise temperature control, it does burn gas, which you don't want to be breathing over an extended period of time. Make sure to always have your fans on while you're using you stove. 


It is possible to have a combination of a gas stove and an electric oven, or vice a versa, although it's not common. You can also choose to have them as separate appliances, setting the stovetop into your counter and the having a single or double oven in your wall.  Both of these are wonderful options if you've got the space for them in your kitchen as they spread out the cooking area in your kitchen and mean you aren't fighting for space when cooking multiple things at once. 


Induction 

If a gas stove isn't fast enough for you,  then you're going to want an induction stove. We'll tell you off the bat that the benefits of these stoves are weighed against their hefty price tag. While the heat from an electric or gas stove is going to transfer across the entirety of the cookstove to some degree, an induction stove doesn't work that way. The stoves are ceramic with different 'zones' built into them. Instead of applying heat to the outside of your pot and the heat transferring to the material inside, the heat is created directly inside your cooking pot. Once you take the pot off the stove, the heat immediately is turned off. The good news here is that the stovetop is never as hot as an electric stove or a gas stove is going to be.  The downside though is that you need to purchase an entirely new set of pots and pans to go along with your new stove. The two work together much like velcro.  A normal pot doesn't have the elements needed for it to work with the stove, and so it won't. The elements within the stove won't 'register' the pan and so it won't turn on. 


You also have to be very careful with an induction stovetop as you can shatter the surface of them if you're not careful in how you put things down. 


Surface

When it comes to the surface of your stovetop, you have two different options, coils or smooth cooktops. 

A coiled cooktop can be either electric or gas. A smooth cooktop is only going to be electric or induction. 

The benefits to going with a coiled cooktop is that they're extremely durable, easy to clean and they will stand up to years of use and abuse. It doesn't matter how hard you scrub your stovetop to get rid of a mess, it's not going to damage the coils.  Your cookware won't either, even if you're dragging out that giant dutch oven that you have. 

A few downsides to keep in mind are that  while they do heat quickly, coils also hold onto that heat for a long time. You will also need to check them periodically (every 4 months or so is pretty good) to make sure that each coil's connection to the power source is still in working condition if you're dealing with an electric stove. If you're dealing with a gas stove you'll want to make sure that the burner is clean and free of debris. 


The other type of cooktop option you have is a smooth cooktop.  People love them for three key reasons. One, they're supremely easy to clean. You don't have to remove anything, unplug anything or get under anything in order to get them shining like new. All you need is the special paste that is designed for the job and you're good to go. Reason number two is that they heat up your pots and pans, without heating your kitchen. If you live in Texas, it makes it that little bit more bearable for cooking during the summer.  Three, you don't need to worry about little hands or paws getting burned because they touched the stove at the wrong time. A fourth one, is how seamlessly they fit into a modern design. They are the latest in cooking technology and we know people love to upgrade to the latest and greatest. 


A few downsides do come with working with a smooth cooktop though. As we said, you do have to be careful about which cookware you use. You're also going to have to be aware of how you move that cookware though. Or any groceries or anything else that you move around in your kitchen. The surface of a smooth cooktop, whether electric or induction is going to be fragile. They can be easily scratched by 'sliding' pots and pans over them. Even worse is how easily they can be shattered by putting something heavy on top of them without paying attetion to how you set it down. 


So, which type of surface do you think you want? 

Burners

Number of burners

You can get your stove in a variety of different number of burners, 2, 4, 5, or 6.  How large you want it to be is going to dictate how many things you can cook on it at once. Take into consideration a few things when you're shopping .

-How often do you end up saying "I need more space?" 

-How often do you use all of the burners on your current stove? Not just at once, but the different sizes? 

-Do you have the space in your kitchen for a larger stovetop that it would need if you got one with more burners? 

-Would getting a second smaller stovetop in addition to your current one benefit you, rather than getting one large one? 


All of these are ways to look at what type of stovetop you might consider getting next as the number of burners you have will directly impact the size and placement of your new stove.   We will say that getting a stove that has five burners in electric is very difficult but getting one that is 6 burners and electric is possible. 


Automatic reignite

A useful feature that you might want to look into is automatic re-ignition if you're looking to get a gas stove. Occasionally with a gas stove the flame might go out on a burner, or on multiple burners without you noticing. This can throw off cooking times and temperatures if too much time passes. With this feature that's not a concern as the stove will automatically re-ignite after it senses that a burner has gone out. 


Continuous grates

If you want to make your gas stovetop more professional looking, you might consider getting continuous grates for your stove. Instead of having a single grate over one burner, you combine two f them together into one long, smooth line. Yes, they're heavier, but the make the stove look more appealing and 'finished' according to many homeowners. 


Stove top griddles

On the other hand, if you're looking at your stove and wondering why you need pots and pans, a griddle might be more your thing. These can be added to either a gas stove or an electric, but as of yet it's not happening on an induction. These heat more smoothly and evenly than a griddle that you just lay on top of preexisting burners. Great for making every meal of the day without needing to use mutliple dishes. Eggs, bacon and sausage? Check. Grilled cheese sandwich? Check. Sausage with peppers and mushrooms? Check.  There's a huge amount of  food that you can make on a griddle. 

Ventilation

A downdraft stove with vents both at the back of the stove and in a strip along the center

We mentioned earlier that you need a ventilation system with a gas stove, and many people choose to have them with electric and induction stoves too, just in case you burn something. One option is a downdraft cooktop. This option, instead of having a fan or range hood, has a small vent built into the cooktop. It's built into the back of the cooktop or in between the burners to suck steam and smoke away. This also gives you back the space over your stovetop to be used for lighting or additional storage. 

A slim rangehood over a stove and oven with additional lighting

Or, if you prefer going with a traditional range hood, that's also an option. You can choose what it looks like and whether it's a centerpiece of the kitchen, or if it blends into the walls.  

Regardless of which one you choose,  the important point, even if you have an induction stovetop, is to have a way to pull the steam and smoke safely out of your kitchen so that you can breathe and see easily while you're in the kitchen. 

Features


Speed heat

Some recent stoves have started to make it so that you can very quickly bring a pot of water to boil. While water is what they typically show, ‘speed heat’ can be applied to anything. It will be one of your burners for those times when you need to make things go that little bit faster. 


Safety

Who hasn’t accidentally burned themselves on a burner because you weren’t looking closely enough? Two safety features that we love for stoves are auto-shutoff and a heat indicator. The auto-shutoff makes it so that you can set a timer for what you’re cooking. After that point, the burner will shut off and you don't have to risk your food burning if you have to step away or forget to turn it off. The heat indicator is just that. It might be at the front right next to the burner knobs, or it might be on the control panel at the back. Either way it will be a light of some sort to show you that the burner is still hot. 


Wi-Fi

There are stoves now that come with wi-fi and app connectivity to make it so that you can keep an eye on your stove from anywhere. 


Controls

When it comes to controlling your stove, as of right now at least, you’ve got two options on most stoves. You can have knobs to turn on an individual burner. Or you can have digital controls that activate just when you touch the panel. These are great if you’re struggling to handle knobs due to arthritis or something similar. 


That’s our deep dive on stoves! Let us know what you think in the comments below or over on our Facebook page. Are you looking to get a new stove? Are you trying to figure out what features you want to change in your current one? We’d love to know. 


On the other hand, if you’ve already got a stove you love and it’s just not working right, give us a call or head to our appointment page. No matter what’s going on Appliance Rescue Service will work with you to figure out what’s happening and get it fixed. 

19 Essentials to Setting up a Gorgeous Guest Room

Tricks For Making Your Guest Room Luxurious For The Holidays

Whether you have someone staying for a single night or over the entire holiday season, a well kept guest room is a must. Making the guest room a place to relax sets up the excellent experience you want for your guests.  Here is a good checklist for how to set up that room.


Having a well laid out  and carefully considered guest room can often help make your guests feel more welcome in your home, and can make their stay just a little more comfortable. It helps them to focus on the things that they came over for, spending time with you! So, here are some good ways to help change your dusty old spare room into a place fit for any guest.


Let’s start off with sanitization items. Between the new COVID variant and the general germs that tend to go around during the winter, it’s a good idea to have some of these handy, especially for a guest who’s away from home.

  • Extra masks, in case your guests forgot to bring any. Unused disposable masks or new reusable masks will work for this one.

  • Hand sanitizer. It’s always useful to have a bit of this on hand in case it’s needed.

  • Tissues & paper towels. These are items that you would rarely think about until you need them, and having them close by will massively improve your guests’ experience.


Next up, the bathroom. You want to make sure it is well stocked, not only with the essentials, but maybe with some things that your guests would need but could easily be forgotten.

  • Extra towels. Always good to have a spare towel just in case, and one already being there will put many guests at ease.

  • Extra toiletries. Extra toilet paper, hand soap, and even an unopened pack of toothbrushes will help a lot, and will never be a problem to have handy.

  • Ibuprofen, antacids, alcohol wipes, and band-aids. Always good to have common first aid items close at hand, and these more common items are always a good addition.


A luggage rack in the closet will help a lot, especially if your guests have packed for several days. It will generally make life easier when it comes time to pack up before they go.


Now, for some of the basic life items that are always good to have in the room.

  • An Iron and ironing board. These are especially useful if you’ve got a guest who brings their sunday best with them, in case they need to press out a couple wrinkles.

  • An alarm clock. A small digital clock will do, but you can go for a more traditional mechanical design if it will fit the room better. 

  • Bottled water. A useful thing to have on hand, especially if your guests are among the many people who prefer to drink some type of filtered water over straight tap water.

  • A spare USB charger/charger cube. Try to include multiple if your guests have multiple devices. Most stores carry multipurpose cables for charging several different devices, you may consider one of these.

  • A sleeping mask and ear plugs. Occasionally, you may have guests who are used to a very dark and quiet sleeping environment, and having a sleeping mask and some ear plugs on hand will make their stay a little more comfortable.

  • A small heater and a small humidifier. These will be very useful for adjusting the environment of the room to your guests’ liking, helping them enjoy the stay just a little bit more.

  • A note with any important info, such as the wifi password. It goes a long way to have these important bits of info written down, that way they’ve got a quick reference at hand for any important things about the house.


The final step in preparing the room is going to be to get the bed ready for your guests. Here’s a good formula to follow for it:

  • Start with the mattress. Strip everything off, and if it’s been a while since it’s been used, go ahead and flip the mattress and spray it with lysol to freshen it up a little bit.

  • Next, do the sheets. Go for something with a high degree of breathability, such as linen or cotton.

  • The next layer should be a comforter or duvet of some sort as your “main” blanket.

  • Put on two to four pillows, and we suggest using either cotton or silk pillowcases to add a bit of a luxe feeling.

  • Next, fold a couple spare blankets and maybe add a couple spare pillows at the foot of the bed, in case the guests need them.


And there we are! We hope that this helps you set up a very comfortable space for your guests, and makes their stay at your home just that little bit better. If you have further tips for making the most of your visiting guests, let us know over on Facebook, we’d love to hear from you!


If on the other hand you wound up here because some of your kitchen appliances are acting up, or your dryer refuses to cooperate when trying to set up that guest room, stop off on our appointment page. We’ll get your home back to tip top shape no matter what’s going on.


A luxurious bedroom with a window, reading lamps, a tea set and a chair. Meant to be a relaxing place for the holidays.