Dishing on Beeswax Food Wraps

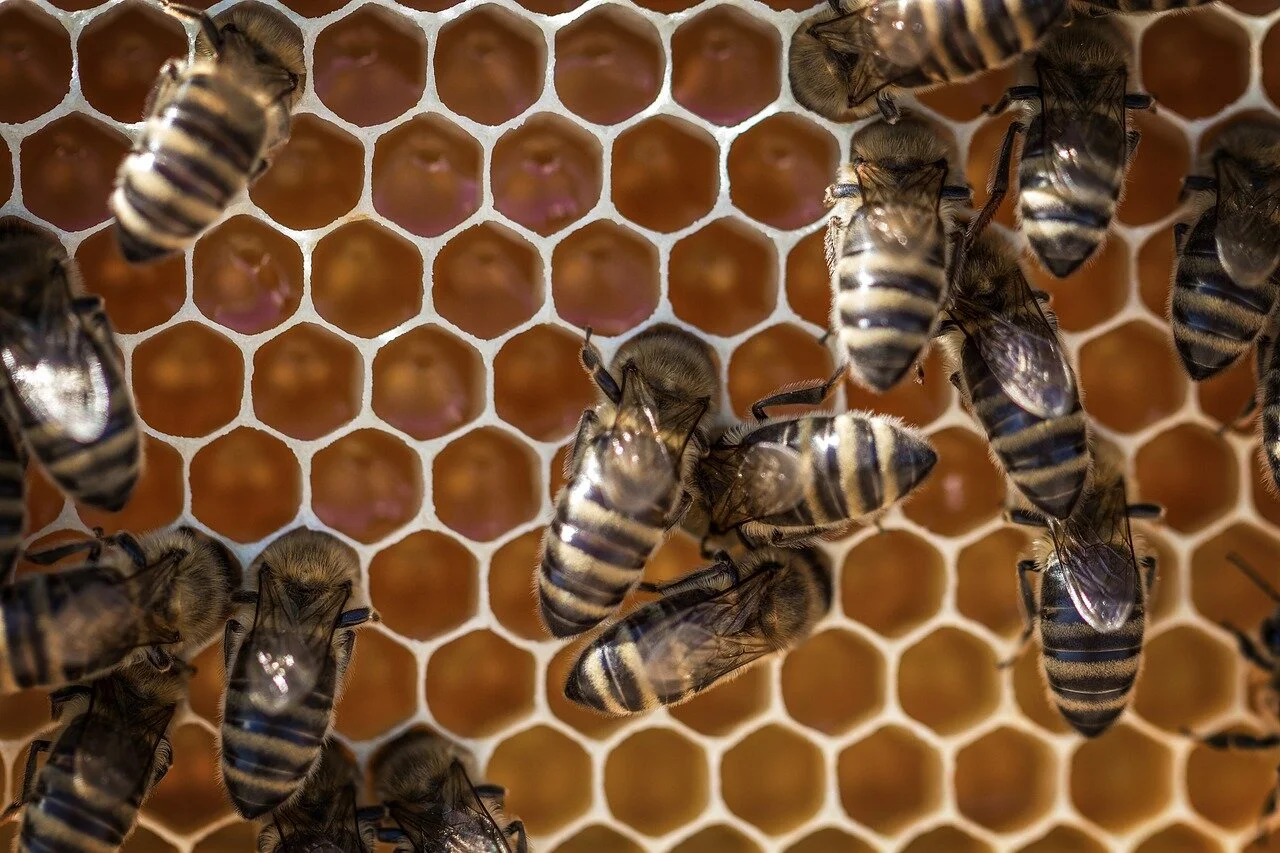
Are they worth the hype, or not worth the buzz?


If you’re looking at greening up your kitchen routine, you’ve almost certainly looked at ways to store food without plastic. Silicone bags and containers, glass jars, stainless steel containers, or stretchy non-plastic lids. But the silicone comes in set sizes, and they’re expensive. Glass jars break, and stainless steel everything gets not only heavy, but LOUD. And the stretchy lids? Those break too. You love plastic wrap for its versatility, and ease, there has to be a way to use something similar. Lucky you, there is, and you’ve probably seen it. Beeswax reusable food wraps. They’re reusable, come in multiple sizes, and if you’re of a DIY bent, you can actually make your own. 


The Good 

Straight off the bat, let’s answer the question you’re here for. Are beeswax reusable food wraps any good for preserving food? Yes, they are. You can use them for preserving fruits, vegetables, cakes or leftovers. You can use them to cover dishes, wrap around a sandwich or just wrap half an onion. Using them for a replacement for storing food in the short term, is perfect in our opinion. The fabric will eventually wear out, but this means that they can be used in your garden or as a  fire starter, so you’re still keeping waste out of landfills. 


Now, those of you paying close attention might notice that we stressed only using these for short-term storage. In researching, we found that the wraps did best at preserving foods between 1-3 days. Our favorite maker, Abeego, claims that their wraps keep food fresh for up to a week. So if you’re taking a dish for lunch, or you’re going to use the rest of that avocado in dinner a few days from now, they’re ideal. 


The Bad


However, if you’re looking for storing something for longer than a week, we suggest looking for something else. They do have a few other drawbacks, but this is the biggest. As to what those other drawbacks are, they all have to do with the construction of the wraps. Thanks to the wax coating, you will get a light coat of wax and oil on your hands or dishes when using them. This is inevitable since it’s your body heat that makes the wraps pliable for use. Fortunately, this is food-safe wax and easily washes off. As we just mentioned, your body heat melts the wax. You need that in order for it to be shaped and to seal to itself. However, this also means that you don’t want to leave the wraps near your stove or exposed in your car, or somewhere else where it will be very warm.  

Now that you know what they’re good at and what they’re not, some of you have hopefully decided still to purchase them. That’s great! We’ll show you how to take care of them. 


How To Care For Them


For cleaning them, you can either brush them off or wash them. Brushing them off works when you’re dealing with a dry food like cake, or bread. Something that’s going to be just crumbs. When washing them you need to use cold water, soap and a soft sponge. Wash carefully and then lay it out to dry. For storage, you can either roll your wraps onto  roll similar to plastic wrap, or you can fold them. Taken care of properly, a good wrap will last roughly a year before the wax ‘gives out.’ Now, provided the weave of the fabric is still solid at the end of that year, you can ‘revive’ your wraps. The Art of Doing Stuff shows you how over at their blog. This means that you can continue to use your wraps even longer, saving your wallet. 

Beeswax, honeycomb and bees


How To Get Them

A quick note before we ‘wrap’ things up. You don’t have to purchase beeswax wraps. If you want to, you can make your own, following the guide of Mountain Rose Herbs. They walk you through both their failures and their successes before they give you the recipe and steps you’ll need. This offers the benefit of being able to size them just how you want or need to best fit your life. On the other hand if you’re thinking “who has the time,” we get it. In that case, a good quality wrap is going to cost you between $6 - $9 for a single one, with the best coming from Abeego. 

After looking all of that over, we think we’re willing to give beeswax wraps a chance in our own kitchens. They seem like a great way to stop fighting with cling wrap, and keep a little more plastic out of the landfill. What about you? Are you looking at getting some or making some of your own? Let us know in the comments below or over on our Facebook page. If you’re willing, we’d even love to see some pictures of the process! 


Now, if you landed here not because you’re looking to remove plastic from your kitchen, but because plastic melted in your dishwasher, we can still help. Or if you’re having any other issues with your major appliances, from your fridge to your ice maker, your dryer to your oven. At Appliance Rescue Service, we aim to be the best in the Colony, and that means taking the best care possible of YOU our clients.  You can get hold of us here on our website or via phone at ((214) 599-0055). We hope to see you next week.


Decluttering The Kitchen

How do you get from Clutter to Clean?


Clutter. Everyone gets it. You let things go for a little while, people give you gifts, things come as free bonuses when you order something and before you know it your countertop is buried. So what do you do about it? How are you supposed to get your kitchen organized when there’s all of this stuff? 

You know you want to organize your kitchen., but you’re not quite sure what that looks like. The answer then is to back up and look at the idea you have. 


When you close your eyes, what do you see? Do you envision a series of open cabinets showing off the beautiful dishes or tools  you’ve collected? Or do you want clean minimal lines with everything hidden away behind paneling unless you’re working there? What about a kitchen that’s so organized you can lay your hands on anything within 30 seconds? Which one appeals most to you? 


You’re here to declutter, so the question is, how? How does this idea mesh with paring down the mountains of stuff in your kitchen? 


The Aesthetic - 

 If you said you wanted to focus on highlighting different aspects of your kitchen, this is for you. Think about how everything in your ideal kitchen fits together. Pick the cabinets you want to use as your display. Start there and arrange what you’re showing off to their best advantage. Now, are you going to have no cabinet doors? Or would you rather go with glass? Once you have that done, move around the kitchen from there, keeping in mind that everything should point back towards that central display.  How do you want your countertops to look?  If you want to move things off your counters, consider how you can use vertical spaces. What can you hang from your ceiling or on the walls?  If you’re going for everything being open cabinets, we suggest looking at boxes and baskets that coordinate for storing all of the smaller things that you need day to day, ingredients, pans and the like. 

modern-kitchen-with-black-cabinets-and-open-shelving.jpg


The Minimalist - 

Here you’re looking to have everything hidden away and neat. So your best bet is to start by paring down and repurposing drawers. Start by going through everything in your kitchen. Could it be better served by storing it elsewhere? Do you actually need that little ceramic palm tree that Aunt Katie picked up when she was in the Bahamas? Once you’ve pared down as far as you can, go back and sort things into groups. Now let’s take a look at your drawers. One of the things that storing everything away means is repurposing the drawers you have into new and useful shapes. This can be everything from creating a custom knife block inside of a drawer, to having a smaller drawer set inside of a second one to maximize the use of the space. There's a lot of ‘dead’ space in traditional cabinets that you can put to use if you get creative. 


The Utilitarian -

Much like the Minimalist, you’re going to want to start by paring down. If it doesn’t serve a purpose, donate it. If it’s out of date, get rid of it. Now that you have that done, you’re going to think about how you use your kitchen. Do you have one spot that you always use for working on and another for plating? Do you have an island in your kitchen that you use just for entertaining guests and mixing drinks? Think about these things and organize around them. Taking two of our examples, your work area and an entertaining area. You’d want to arrange things so that your mixing bowls, knives, and cutting mats were at your prep area, while your glasses and drink supplies were where you entertain guests. The name of the game is keeping things at hand for different areas. Much like the Minimalist, it might behoove you to look into custom storage, but unlike them, you can also put your countertop or vertical space to use the way the Aesthetic can. (In our opinion, this is the best of both worlds, but that’s just us!) 

organized kitchen in white with jars of pantry staples along one wall


Now that we’ve taken a  look at your kitchen and how to make it fit what you want, go get it! Remember, the easiest way to go about this is to picture the end and work your way backwards. 

Where do you fit in? Are you an Aesthetic or a Utilitarian? What about a Minimalist? Let us know in the comments below or over on our Facebook page. Or you can send us a picture of your ideal kitchen! We’d love to see! 

If on the other hand you’re here because something in your kitchen is broken, we’re still here for you! Appliance Rescue Services is the best appliance service in McKinney and the surrounding area because we care about YOU, our clients. If one of your major appliances isn’t working right, we want to hear about it. You can call us at (214)-599-0055 or visit our website to make an appointment. We want to help keep your home running smoothly


4 Things To Find Out Before You Redo Your Bathroom

Why you might not want to grab your tools just yet.


Hold up! Put down the sledgehammer and tile, you’re not ready for that just yet. If you're looking at redoing your bathroom, there are things you need to know beforehand. No, we’re not talking about what you want it to look like, and what all of the fixtures are going to be made of. We’re talking the nuts and bolts that go into your bathroom.  Yes, you do need to know all the details, but this time we’re taking a look at the bare bones. If you’re hiring someone else to handle all of that, no worries!  On the other hand, if you’re more of the DIY type, we’ll walk you through some of the things you’ll need to look for beforehand.


Blueprints… sort of

Starting off, you need to know what your measurements are. We don’t mean just the room itself, but also where the studs and outlets are. The outlets can be changed if you really want to, but we are inclined to suggest leaving that to a professional. The studs on the other hand, you’ll want to grab some graph paper, a pencil, a stud finder and a plumb line. If you don’t have one, you can always improvise by attaching something like a few rings at the end of a length of string. The biggest reason to know where your studs are is so that you know where you can affix things like storage, mirrors, lights etc and where you can’t, such as the cavity where your pipes are. 

Bathroom blueprints and numbers


Begin by sketching out the dimensions of your bathroom. To keep it easy, we like to go 2 squares on the grid is the same as one foot. Now, most rooms are going to have studs on either side of the doors, windows and one side of the outlets. Using that, you can go up to the ceiling of the room and start to use the stud finder. Once you’ve found two of them next to each other, measure between them to find the distance. In modern houses you’ll typically have a stud every 16”. If you don’t have a studfinder, try looking at your crown molding. Typically that’s going to be nailed on a stud. Then you can use the plumb line to drop straight down and figure out where the studs are behind your existing fixtures


A tub is still a tub, no matter where it stands.

Moving on, are you planning to include just a shower, or do you prefer a tub in your ideal bathroom as well? If so, you need to take into consideration how you’re going to frame the tub.  The bare minimum around the sides is 4” of wall, that’s including studs and the drywall. However the wall in front of the tub, if you choose to put one in, can be as thin or thick as you like. We like adding in a bit of a ledge if the chance is given, for two very good reasons. The first is that it gives you somewhere to lay different bath items, a book, your phone, etc. The second is that it gives you room for storage. 

 (Take a look over at Better Homes & Gardens for their ideas on what you can surround a tub with!) 


All of the hidden storage!

Speaking of storage, that leads us straight into our next section. You can never have enough hidden storage. We’ve said it before and we’ll say it a hundred times more, but having empty storage is better than not having enough. If you’re taking the time to redo your bathroom, spend some time here to dream up what would make your life easier as well. Do you have a standing shower separate from a tub? You can put a hidden set of shelves in the gap between the two. What about around the tub? Having hinged panels to store away all of your bath supplies when you’re not using the tub? Or as a place to store extra towels? There is of course the old stand by of a cabinet behind the mirror, but what about having some hidden in between the studs of the wall as well? Having storage is only limited by what you can dream up, and where the pipes or electrical wires for your bathroom are. 


Sub flooring is final, right?

Finally, let’s take a look at your floor. For many, the reason they’ll start looking at redoing their bathroom is that something has happened to the floors, usually flooding. Given the winter we’ve had so far, we know several people who’ve had that happen. While you’re ripping up your current floor, take a look at what’s below it. Was the flooring uneven previous to you taking it up? Spots where it was raised or uneven? Are there any remnants of grout, glue or other materials from previous flooring?  You want to keep an eye out for that so that you know whether it will affect what you lay down next. If not, what about the subfloor? Is it still able to hold weight? Are there any molded or wet patches? Are there places where bugs or other vermin have gotten at it? If so, you’ll need to go about replacing that before you lay down the new floor and fixtures. Las but not least, are you thinking of laying down in-floor heating? If so, now’s the time to look at that and any thing that might make one version better over another, or nix the idea entirely. 

Bathroom sub floor rotted out underneath a toilet


With all of this, you should be ready to start remodeling. Keep in mind that this isn’t everything you need, and that if you’re ever in doubt, it’s always better to call in a professional. If you do opt to sketch out a plan, would you show us over on our Facebook? We’d love to see what you get up to! 


Now, if you’re not here for tips on home remodeling, but for your appliances, we can still help! We’ve got trained professionals to help, no matter what your appliances are getting up to.  Whether it’s something that’s outright broken or you’re just wanting to get some tips on how to maintain your appliances, we can help.  We’re here for all of our clients in Garland and the surrounding areas, and we want to be there for you too. You can get hold of us by calling us at () or by setting up an appointment via our website. Let’s work together to get your home running  smoothly today. 

Caring for Your Countertops

How to clean and care for your countertops, whatever the material.


Have you ever accidentally left something on the counter overnight and woke to find a stain? Then, no matter what you do, that stain just won’t come up. It’s one of the most frustrating things. We’re here to help. This week we’re diving into 6 of the most common types of countertops and how to clean and care for them. 


Concrete

Concrete is a relative newcomer to the countertop arena. It’s heavy and complicated in terms of installation. However, the various ways that it can be customized with texture and acid staining make it worth it for some homeowners. It is also heat and scratch resistant. The biggest  downside is that concrete is naturally porous. In order to care for it, you need to seal it regularly, or every one to three years. 

For cleaning, what you need isn’t difficult.  You’ll need a sponge, dish soap, water, rubbing alcohol, a spray bottle and a dish towel. Start off by cleaning the counters from any small appliances, or crumbs. Then using just regular soap, water and a sponge to scrub the counter down. Rinse the sponge and wipe it down to remove the bubbles and gunk. Once you’ve gotten the counter clean mix ¼ cup rubbing alcohol to 2 cups of water in your spray bottle. Spray them down, wait for 3 minutes and then wipe them down with the dish towel. The point here is to disinfect the counters after they’ve been cleaned. 


Granite

Granite is THE countertop material if price isn’t something you’re concerned about. It’s strong and durable, with almost 3000 colors and types available for you to choose from. The downside to it is that it is still a porous stone that requires sealing to avoid stains. Unlike concrete, a resealing schedule isn’t a ‘schedule’ so much as ‘when you see it needs it.’ You should be looking at the color and porosity of the granite to determine how often you have to do it. Most of the time, that’s going to be between 1-5 years. 

Cleaning granite is much the same as cleaning concrete. However, it can get stubborn stains. These can be removed using a razor. You’ll want to try this after you’ve cleaned down the counter to the best of your abilities. Lay the edge of the blade on the counter and scrape away at the built up gunk. Once you’ve gotten rid of it, wipe down the counter again with a sponge and soapy water.


Marble

This beautiful stone is  gorgeous to look at, but a pain in the neck to maintain! It has a penchant to scratch and stain, because of how pale most marbles are. Fortunately there are newer sealers that can slightly curtail these issues if they are applied on a regular schedule. Marble has the shortest resealing time at every 3-6 months. However there are sealant sprays that you can make use of on a monthly basis that make the process much easier.
Cleaning marble however is easy to do and just takes a sponge and some soapy water. 


Soapstone

Soapstone has a very recent reappearance in the countertop arena, having previously been deemed too dark. It is a very attractive alternative to granite in that it takes on a patina over time that is gorgeous. It must be treated regularly with mineral oil. The reapplication process is easy  enough, and is determined by how often you cook in your kitchen. Some people might need to reapply it every month, while others might manage every three.  

Cleaning soapstone is easy and a sponge with soapy water will usually do the trick. If you have something really stuck on there you can use something like Ajax or Comet, or a ny other standard household cleaner. 


Laminate

Laminate is one of the most affordable options on our list, and also the easiest to clean. Laminate doesn’t stain anywhere near as easily as some of the other options on our list. However,it can be scratched or chipped, so we don’t advise cutting directly on your laminate countertops. When it comes to cleaning, the most difficult spot might be the seams where the backsplash and the counter meet. Food can get into them and be a pain to get back out. We advise carefully taking a razor blade to them to clean out any debris and built-up gunk. 


Butcher Block

If you want the look of wood,  but something a bit heftier, go for  butcher block. It’s easy to clean and lasts for an age if properly looked after. It can be cut or scratched by knive. Water and stains can also do damage over time. However, these damages can be sanded out and resealed as needed. Much like soapstone, butcher block does need to be oiled regularly. However with butcher block, it’s a standard of once a month at minimum. This is to prevent your lovely butcher block from drying out and cracking. 


Those are six of the most common  countertop varieties and how you go about caring for them. Which type do you have? Did we miss something important about caring for those we listed? Do you have any questions about a type we didn’t cover? Let us know in the comments below or over on our Facebook page. 


Don’t forget that while you’re caring for your counters, we want to help care for your appliances. So whether it’s in your kitchen or your laundry room, we’re here to help. We aim to be the best in appliance repair for Addison and the surrounding areas. If you need help, we’re here for you. You can get hold of us via phone ((214) 599-0055) or via our website to schedule an appointment


Bringing Color To Your Kitchen

 How and Why You Should Bring Colored Appliances Into Your Kitchen 


We’ve been stuck in our homes for so long that we’re getting bored. We can't speak for anyone else, but we want colorful appliances! We're sick of stainless steel and matte black. It's been the defacto for the last two decades and we want something new. We’ve had neutral kitchens and a lack of color in our homes for several years now. It’s time to bring back color.  After the year we’ve all been through, we’ve come to realize that every element of our homes should speak to us. The colors we bring into them are no different. Yes, you can paint the walls or the cabinets, but why stop there? Shouldn’t your kitchen be just as much an expression of you as the rest of your home? 


 We know, change can be intimidating. There are lots of ways to do it though and they can range from purchasing new appliances in the color of your choice, to fixing panels to them, to getting a custom vinyl wrap. Let’s take a look at some colors that have been popular for this year, and are expected for next year first though. 


What Colors Are Popping Up

One of the few bright spots of many of us staying at home this year is that we ended up rediscovering our love of color. The 2020 colors as predicted by Pantone and other top color companies were ochre, magenta, creams (in all shades), navy blue and dusty teal. We definitely saw these make a comeback this year,  and we hope they're going to  stick around for several years to come. 


Going into 2021 colors are expected to pop even more as people get bored of being home. We're expecting jewel tones, aquamarine and neons. We can't say what the world is going to look like next year, but we can say it will certainly be colorful, and hopefully that will include your kitchen.  One of the companies we’re going to talk about, Blue Star, has already gotten on board with the aquamarines. 

Woman in Kitchen and Blue Star oven in Aquamarine


If you’re starting to warm up to the idea of a color in your kitchen, your next question is going to be ‘how do I get them?’  You’ve got three choices. You can purchase them from a company, and hope that they offer a color you like. Many do offer custom colors, but that still takes time to get it just right. You can put panels over the appliance, but then it’s not exactly the appliance that’s colored, it’s the walls around it. We like this one if you want your kitchen to have a very organized and contained feel.  Or you can go with a custom vinyl wrap, which while it does mean finding someone that’s willing to do it, means you can get really crazy in color, patterns, anything your heart desires. 


Companies With Color 

If you want to purchase from a company, we have a selection of them.
You have Blue Star, with their focus on professional quality cooking. We love their suite for 2021. They let you customize how your stovetop is going to be laid out, colors and finishes, the colors of the knobs, handles and details as well as how your doors are laid out. You can craft your ideal kitchen suite and know that it is entirely your own. 

Blue Star Full Kitchen with double oven, microwave and vent hood


Admittedly American Range is more focused on restaurant level cooking gear, but they do offer a residential line for those of you that swear by them. They come in a wide range of colors, both matte and gloss finishes. The one draw back with your oven is that they only paint the doors and the kick plates. The control panel has to remain stainless. 


Unlike the previous two brands, Capital has both preset models and configurations, with a selection of colors that they have on hand, as well as offering custom color and configuration options. They focus on luxury residential appliances, but the only one they offer custom colors on is your range. 

Capital dual oven range in wine


Dacor is much like Capital. They too focus on providing luxury kitchen appliances, but they only offer color options for your range  


Out of all of the brands we’ve looked at, Ilve is, to us at least, the most detailed and luxurious. However, since  they only make ranges,  they still aren’t a perfect fit if you’re wanting all of your appliances to be a single color. 

Ilve Oven with burnished brown and bright copper accents


The problem with buying colored appliances is that even if you want to keep the same color in 8-12 years when you replace it, you might not be able to. Many brands will only keep colors for so long as they’re producing sales, especially if it's a full suite. 


Paintable, Replaceable Panels

What if you have a brand you already love and you don't want to replace it? Then you might want to consider installing panels. You can do that on your own, or you can have someone else apply them. The upside is that you can paint those as many times as you want. You can make the panels match your existing cabinetry and have a very sleek look. The downside is that if you love the shape of your appliances, or don't like everything being square and cabinet-like, this might not be for you. 


Go Wild With Decals 

Or you can use custom vinyl decals . Elise  of A Beautiful Mess figured out that you can get vinyl decals of your preferred color installed, if you’re willing to look around. She ended up going to a custom vinyl shop, which usually does cars, buses and the like. They were more than willing to help her out though and even installed the wrap professionally. As Elise points out “I’ve worked with big surfaces of vinyl before, and it’s very tricky to avoid wrinkles completely. I valued the polished look more than saving a bit more $ in this instance.” The vinyl is removable, easy to clean and heat resistant up to 900* F. All of which mean it’s great for any of your appliances in your kitchen. Just think, you could change it out every other year if that’s what you’re up for. Or add additional decals for different holidays throughout the year. We love this idea the most because it makes your appliances a full extension of you and what you want them to be. 


We’re thinking that custom vinyl wraps are going to become very popular soon, once people realize just how versatile they are. What about you? How are you going to color your kitchen? Are you going to go with a company like Blue Star? Or do you like how panels look in the kitchen? Or do you want to do something insane and personal  with a vinyl wrap? Let us know in the comments below or over on our Facebook page. We’d love to hear from you. In the event that you end up having issues with one of your appliances in the meantime, we’re only a phone call or click away. 


Disclaimer: The images used herein belong to their respective companies.