7 New Ways To Use Wallpaper At Home

We Know They’ll Change How You Look At It


You want to bring color and texture, light and pattern to your home, but you're not sure where to start. Well, the easy answer is to check out wallpapers. Thanks to many different new concepts in the field, we've got a ton of different patterns. You want Asian inspired papers? You've got it. You want something art deco? You can find that too. You want it to look like you're living in a jungle? You can get that too. Small prints, large prints, it doesn't matter. What's better is that there are now removeable papers so that if you end up deciding you don't like it, or you're renting, or you just want to redecorate, you can. The most important thing to keep in mind about wallpaper though? You don't just have to use it in large rooms like your grandparents did. Let's take a look at 7 ways you can bring wallpaper into your home. 

Make A Small Space Larger

So you've got a small powder room downstairs that's really just for guests. Maybe it's tucked under the stairs, and has a slanted ceiling. It's hard to bring light and color to a space like that, but wallpaper and a mirror can help. Bring in a bold design on the upper half of the room, or even along one wall and the slanted ceiling, and a mirror. Together the two of them will open up the space making it feel much larger. 
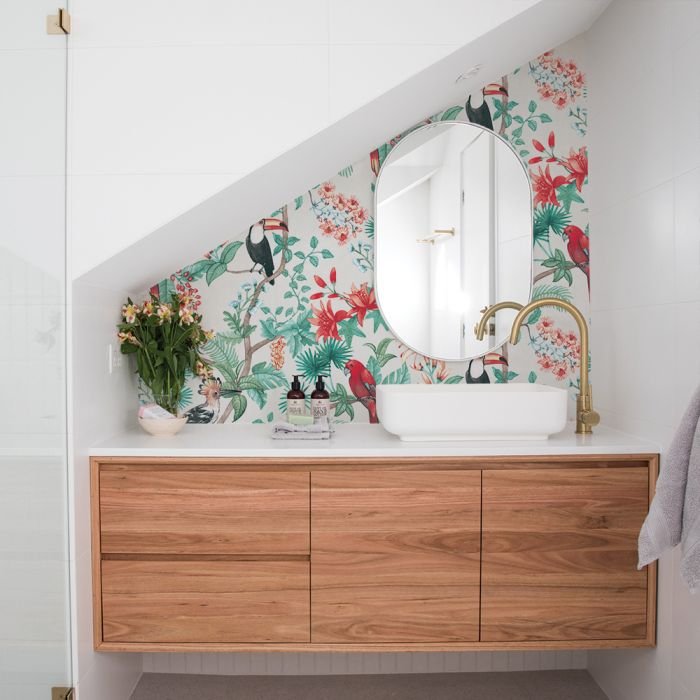
This oversized pattern makes the room feel much larger.

Image from Tempaper

Although we don’t get why this works, you can’t help but admit that it does. This oversized pattern makes the room feel much larger.


Paper The Ceiling

Image from Tempaper

The pattern in this one echoes the shape of the light fixture, but you don’t have to do it that way.

You were probably looking at us like we were crazy in the last one, right? Wallpaper the ceiling? It's actually a great thing for any room, not just smaller ones. If you're looking for something to bring in a pop of color and texture to a room, but you don't want it on one of the walls, the ceiling is a great way to add that in. Whether your room is large or small, you can make use of wallpaper to add some much-needed movement to a room. 

Light It Up! 

Not keen on the ceiling idea? How are you at crafts? You can use wallpaper to make your own origami lamp, to paper the outside of an old lampshade, or as a hidden touch on the inside on a shade. Any one of these would take no more than a day, and all of them add a pop of color to your home in an unexpected and very custom way. 


Use Small Patterns On Large Spaces

What if you've already got an amazing living room? You want to bring in some color but you don't want to take away from the rug or the wall art that you searched all over for. No worries! This is when you grab a coordinating pattern that's small in size. Using something that repeats the shapes in the room means that the paper will highlight those features instead of battling them. By keeping the pattern small, it fades into the background, just subtly reinforcing it, rather being an obvious and in-your-face attention grabber. 

a Small pattern of flowers on a green background, fades into the background allowing the curves of the room to be more prominent

Image from Tempaper

A small pattern of flowers on a green background, fades into the background allowing the curves of the room to be more prominent


DIY Wall Art

None of these working for you? What about some wall art? If you've got some wallpaper that you love, but you can't choose where to put it, one way to use it is as wall art, instead. This works best with a large pattern, but you can do it with anything, depending on how creative you can get. Start by figuring out how the pattern looks best. Is it a single panel that can fit on one long canvas? Would it be better if it was on multiple canvases? What about broken up on several smaller frames?  There's a bunch of different ways you can use wallpaper as art. We love taking one long panel, painting it and framing it. If you want an indepth tutorial, check out this example from Thrifty Decor Chick for a step-by-step guide. (We started to write our own for the examples above and realized that would be an entire post on its own!) 

Large wallpaper pattern framed for a DIY look

Image from Tempaper

Framing your wallpaper like this allows you to have the best of both worlds, a gorgeous pattern that doubles as artwork.

Example of a small pattern that could be cut apart for a gallery wall

Image from Tempaper

Or you could cut apart this panel, and frame the different peonies to look like a gallery wall.


Create Some Custom Trays For Your Home 

What about something entirely unique? You want wallpaper, but you don't want to spend a weekend covering the walls. You don't want to choose just one pattern either.  Alright then, what about making some custom trays? A good tray can be used anywhere in the home, whether it's on the dining table for corralling your napkins and seasonings for the meal, in the entryway for mail, or for when you're making up a quick meal for a day in bed.  So grab (or make) a tray of your own, and then decoupage a bit of wallpaper on the bottom of the tray, both the inside and underside. This way you can be constantly rotating out color in your home, without having to commit to any one pattern for long. We suggest using sample pieces for a project like this. 

Light Up Your Stairs

Images from Tempaper

Look at that amazing pattern! Those colors look amazing and they echo what you see in the pillows to the right.

What about the stairs? You go up and down your stairs so many times per day, why not bring some color in? In one day, or at most a weekend, you can bring in some color to your stairs and give that whole area some new life. Whether you choose a large pattern or a small one, it'll be entirely unique. We do recommend using removable wallpaper here though, both in case you get tired in the future and also so that when you need to inevitably replace a piece, you'll be able to do it much more easily. 

What do you think? Are you excited to dress up your home a bit? Are you going to start looking for sneaky ways to add additional color and design? Let us know over at our Facebook page, we'd love to hear (and see) what you get up to! 

What about those of you who aren't though? You wound up here not for decorating advice, but because you needed help with your appliances. Don't worry, we've got you covered. At Appliance Rescue Service, whether you're in Dallas or McKinney, Plano, or Allen, we've got your best interest at heart. We'll work on any of your major appliances, and work with you to make sure you know what happened to cause the current issue. If that sounds more like what you need, give us a call at ((214) 599-0055) or go to our contact page to set up an appointment that works with your schedule. We're here to keep your home running smoothly. 


Clearing Out Clutter

How to take all the clutter down.

Table of Contents

Groups

Labels

Give It A Home 

Cunning Storage Solutions

How many times a month do you end up looking around your house and wondering where all of this clutter came from? For us, it's about once a week. Especially after the last two years of living in quarantine, it's a bit much! It's time to start cleaning and busting that clutter. We've got three 'general' tips that can and should be applied everywhere in your home. Then we'll take a look at different areas of your home where you can sneakily hide things that no one will suspect. Let's get started and get clutter busting. 

Group Like With Like

Technically speaking, this is all grouped together.

Photo by Dimitry Anikin from Pexels

When it comes to keeping things organized, you want to group like with like. Books with books, dishes with dishes, pop tarts with pop tarts. (We can't be the only ones whose children insist on having every flavor.) This root concept is really simple, and the great news is that it doesn't have to make sense to anyone but you and your household. (We're adding that caveat because getting kids to use a system they don't understand is surprisingly difficult.) Having everything together means that when you want something, it's easier to find it. So long as it's with other things "like it" you'll know where you need to go. 

So, think about how you sort things. Do you have games, books, and out-of-season sweaters all together on one shelving unit? Could you separate them out so that your clothes go elsewhere, leaving the books and games together as 'entertainment' and the sweaters go with other clothes? This is just us though. 

Labels

This one can be intimidating to start, but once you're going, it's easy to maintain. We'll break it down with you to give you some ideas of how you can use labels to make your life easier. Once it's complete you're under self-applied pressure to keep everything on forward momentum to maintain the system. We'll also point out that labels don't have to be just boring black letters on a white strip of paper. You can get very creative with how you want your labels to look dependant on where you're using them. 

  -Kitchen

In the kitchen, you might consider labeling which shelf is for what inside of your refrigerator. Think about all of those pictures you seem in home decor magazines with the perfectly organized fridges. 

- Pantry

Yup, your pantry can be labeled too. Start by sorting things out (there's that 'like with like' concept again.) Then group it together. Some things to consider might be labelling surplus flour, sugar, types of beans etc. Or if you keep a lot of canned goods, you might attach a  note that the newest cans should go at the back.  This one really is only limited by how in depth you want to go. (Your Blogger is dreaming about the day she has a pantry large enough to warrant this.) 

- Laundry

When you have a large family, or a large closet, you almost always end up with different types of detergent for different purposes. Why not label them? 

- Living room

Yup, you can label your living room too. Break down your DVD collection between "kid friendly" vs " Not" for when you have family over. Or you could seaparate out the different games into different cabinets. 

- Bathroom

Does your SO have towels that are only theirs? Or maybe you have a set of towels that you want to keep for when guests come, and keep your kids from using? Label where you keep them. You could also apply a sorting and labeling system to the underside of your sink, keeping things from getting lost or shoved in haphazardly. 

-Bedrooms 

Whether it's your space or your child's space, labels can be very useful. We advise talking about a system before you implement it into your kids room though, this way they know what you're expecting. 

Not only means you know exactly what you’re looking at, they also make it easier to find what you’re looking for. Begone clutter!

Give It A Home

That last point leads right into another key organizing concept. Remember how we were talking about having your books and your sweaters together? Take a look at that same idea, and takes a closer look at why you're putting things in certain places. Do you always put on your comfy sweater while you're reading? Or maybe you come in the front door and go straight for your mugs to pour yourself a cup of tea, and you end up with your keys and mail on the counter. These are 'homes' that we unintentionally create for things. 

Instead of unintentionally doing it. try to do it intentionally. If you know you're going to go straight for the tea, consider putting a mail sorter and a basket underneath. This way when you come in, you can sort your mail, have a spot for your keys, AND still stick to your routine. 


For this concept you want to look at what routines you already have that you're willing to change and those that you're not. If you have other areas that you have clutter collecting that you're /not/ happy with, you need to start by understanding /why/ it keeps landing there before you can change it. Would putting a hamper in the bathroom save you from socks all over the floor? What about putting a tray for drinks in the fridge to keep from losing them behind leftovers? Or putting out of season clothing in clear bins so that you can know what you have in between seasons? So grab a pen and paper and check out where you have clutter piles and why they might be there. 

This beautiful pantry from Good Housekeeping is our dream. Look at how organized everything is!

Cunning Storage Solutions

How many places can we find to store things? The answer? Many. SO many. 

Mind the Gap! 

There are two options here, depending on how you're looking at things. A gap that exists already, say around furniture, behind door or above things. Or you might be looking at floorboards and the bottoms of cabinets. 

Do your cabinets go all the way down to the floor, or is there a gap where they rise about 3 inches? There are kits that can turn that into storage. It's great for stashing cutting boards, cookie sheets and cooling racks, as well as any strangely shaped plates you might not want to keep in the 'normal' cabinets.

You can also make use of the space between your cabinets and appliances, unless you're already reveling in a smooth, no-gap kitchen. If you're not though, consider having a custom built, pull out cabinet.


Watch it Stud! 

Behind your bathroom mirror is a great place to turn into a storage area. Some of us already have pop out cabinets, but many of you prefer the look of a flat mirror. Fortunately, you can carve out a space in between the studs and turn that into a set of shelves to get things off of your counters. 

Or you might take a look a full length mirror or piece of art that you have elsewhere in your home and do the same thing elsewhere. 


Doors Go Both Ways

 Look at your doors. Can you hang an organizer on the back of them? Whether you're creating an organizer (thank you Command Strips) or you have one already picked out from Crate & Barrel, doors are a great spot to store things and keep them off the floor.  


Use Space Wisely

We mentioned it before, but putting extra organization into cabinets is very useful. Whether that's stackable boxes or open sided bins, there's all sorts of ways to maximize the space within your cabinets that you might not have thought of. The same concept can be applied to drawers. The most common idea is using a silverware tray so that all of your silverware is sorted "like to like." (There it is again!) 

Avoid this! Put our tips to good use, and bust that clutter!

Photo by Andrea Piacquadio from Pexels

Are you starting to look at your home a bit differently? What about the open spaces versus the piles of clutter? Let us know over on our Facebook page, we'd love to hear from you. :) 

If you're here not because you need to declutter but because your appliances have gone on the fritz, we can help! Head on over to our contact page and we'll work with you to set up a time that works for you or you can call us at ((214) 599-0055 )! 


Additional Reading

Getting Your Home Clean, Month By Month

Making Cleaning More Fun

10 Crazy Dupes For Household Cleaning Supplies

Organizing Your Fridge For Efficiency And Safety

Decluttering The Kitchen

The Five Most Common Types Of Clutterbugs


Buffalo Bread

 Spicy, sweet and delicious bread to get you through the day. 

Spicy, sweet and delicious bread to get you through the day. 


I Don't Care, Take Me To The Recipe! 


Pre-made meals, freezer meals, meal planning, they're all great ways to try and make lunch easier on us. Lunch is supposed to be a midday meal that gives you enough energy to get through the day without burning you out or leaving you so full you're tired and want a nap.  For many of us though, we don't look in the fridge in the morning and think "oh! I'll take this, I'll feel great after eating it." Instead, we're standing there thinking "what do I have so I can grab it and go?"  Then you end up eating whatever, which could be anything from a salad you had last night, to a giant serving of pasta or rice (1.) Which can be great if you're working out in the afternoon or doing an active job, but for those of us working in an office, not so much. Fortunately, there are ways to make a VERY simple food ahead of time, have it taste amazing and have energy for the rest of the day. What is this sorcery? Chickpeas. 

No! Wait, don't run away on us. It sounds weird, but if you like cornbread, you're going to love this recipe. Chickpeas actually blend into the background so all you taste is the cornbread and buffalo sauce, but you get all the benefits of the protein, iron and fiber of the chickpeas. Win-Win! 


 Ingredients

1 box Jiffy corn muffin mix (8.5 oz) 

1 cup cooked chickpeas  

2 stalks celery 

1 egg

1/3 cup milk

1/4 cup Buffalo sauce (any brand and spice level is up to you.) 


Tools: Mixing bowl, fork, spoon, knife, cutting board, measuring cup(s), aluminum foil, loaf pan, food processor 


As always, begin by washing your hands and then your produce. You don't need to use soap or a veggie wash, just 30 seconds under cold water will do just fine for your veggies.  After you've done that, set them to the side and preheat your oven to 400*F. 

Rough chop your celery. Smaller pieces are better, as we'll want this to mix in well, but they don't need to be uniform. Because your celery will be a bit stringy, rocking the knife as you chop may help some. We don't suggest using a 'chopper' tool, as they don't stand up to celery well. 

At this point you've got a choice to make, you can either grab a can of chickpeas or you can make them from dried. Whether you use canned or cook them yourself, make sure to thoroughly drain them before you use them. Set aside the aquafaba (or bean water) as you can use it for other recipes. 

Measure out your chickpeasa and add them to the food processor. 

Then scrape your chopped celery into the food processor and give it two or three quick pulses.  

Pulse until you have a chunky paste. 

Once your celery and chickpeas have been mixed together, set them aside. 

Turn your attention to the box to the corn muffin mix. Empty it into your mixing bowl and use a fork to break up the biggest clumps. No need to break out the sieve at this point. A few are fine - your batter will be a little lumpy no matter what you do- but definitely give it some attention before adding any of your wet ingredients to avoid overmixing. 

After you've broken up the worst of the clumps, add an egg and 1/3 of a cup of milk. Stir only until barely combined. 

Add your chickpea and chopped celery mixture and pour your measured buffalo sauce over the top. 

Again, stir only enough to make sure everything is thoroughly combined, and you've blended all the sauce in (we want to avoid hot spots after all.) 

Line your loaf pan with aluminum foil - please do NOT skip this step, the loaf will crumble without it- or sub in a muffin tin and paper muffin cups if you prefer. 

Transfer the batter from your mixing bowl to the foil- lined pan with a spoon and smooth the top. You can also give the pan a few taps against the counter to get rid of any air bubbles, that's up to you. 

If you're using a loaf pan, you'll want to bake your bread for 35-45 minutes, checking at 5 minute intervals after the 35 minute mark with a toothpick. 

If you're using a muffin pan, you'll want to bake them for 15-20 minutes, again using a toothpick inserted into the center most muffin to test for doneness. 

Allow it to cool before using the foil to lift it out of the pan.  

Bend back the foil and cut with a sharp knife. Serve with ranch or bleu cheese dressing if desired. 

If you choose to take slices of the bread for lunch, we suggest toasting it in a toaster oven for 2 minutes a side first to reheat it and then to add some crispness to the top. 


An unexpected, but important warning. Do Not eat too much of this at once. 1-2 slices is the most your body is going to be able to handle, no matter how delicious this is. Not because of the spice, but because of the amount of fiber in the chickpeas. You can actually make yourself rather ill if you eat too much. So, instead of packing 3 or 4 slices of this delicious bread, we advise adding a salad or something like a stir fry to the side. You could even go really Southern and add collard greens to the side if you feel the urge. 


Let us know over on Facebook how yours turned out! If you made it with mild sauce (go you for savoring flavor!), or if you made it so hot Scoville is shocked by your tolerance, let us know! 

If your oven died while you were attempting to make this week's recipe, one, we're sorry. We swear it's not a result of the spice. Two, we can help! If you give us a call at ((214) 599-0055) or head on over to our contact page, you can set up a service call that works with your schedule. We service all major appliances, not just ovens though. So if your dishwasher is giving you hell, or your refrigerator is being stubborn, we're ready to help. 


Why You Should Handwash Your Clothes

And How To Do It Right

Table of Contents

Why To Hand Wash Your Clothes

How To Hand Wash Your Clothes

What do you do when your favorite sweater says "hand wash only" in big capital letters? Or that gorgeous vest your grandfather gave you can't go through the washing machine? Well, you have to figure out how to wash it by hand and how to be careful about it. Fortunately, it's not as complicated as media makes it seem. 

Why You Should Hand Wash Your Clothes

So, let's take a look at a few situations of why you should hand wash your clothing. There's plenty of different reasons that affect all of us, even if it's once in a blue moon. 

-if they're handmade or knitted 

Even if something is very well assembled, they can be delicate. They also need to be washed carefully so that they maintain their shape, rather than getting beaten up by your machines. 

- If they're delicate

Some examples here might be lace, pieces with embroidery or pieces that are old. For example, if you have a blanket that's been passed down through your family through several generations.  

- If it's got sequins or beaded pieces 

Pieces with sequins and beads are so delicate. Not only do you need to flip them inside out in order to wash and hang them, but if you want to keep a piece for several years, you'll want to wash it by hand. This ensures that the threads fixing the sequins and beads to the clothing are kept safe and secure. 

-If it's marked "dry clean only" 

  While this isn't always the case, there are many times when you can handwash these items as well as taking them to the cleaners. The reason "dry clean only" is used is that either the fabric mill or the designers are saying "we're not taking responsibility if it gets damaged by you." 

-If you're travelling and need something fixed quickly 

- If you don't have a functioning washing machine, due to mechanical failure or blackout 

Let's face it, this is the most likely to happen to any of us. You might have a time when your washer breaks down in the middle of the week, and even your most trusted handyman is booked through to next week. Or if there's a blackout in the middle of summer and you need clothes for tomorrow. It happens. 


How To Hand Wash Your Clothes

By now you're probably demanding to know "alright then, if it's so important, how do I do this? Shouldn't it just be the same as washing my hands?" To which we say, ehhh, not quite. 

Start by making filling up your sink or a basin with cool to warm water, depending on the garment in question and whether or not it's color fast. You also don't want it to be ice cold or else your hands are going to start hurting rather quickly.  

Don't go adding your detergent or clothes just yet. You want to do a color test on some of the hidden spots of the garment in question. Some spots you might try are the seams of the garment, the armpits, or behind the knees. 

Now add your detergent of choice to the water and give it a quick stir to get the detergent to dissolve. Gently lower your garment into the mix, submerging it fully. Now using your hands, squeeze the suds through the fabric, like you're kneading the fabric gently. Lay it out on the bottom of the basin, and let it sit for five to ten minutes. Once that time is up, flip it over, knead the fabric again and flatten it out, allowing it to sit for the same amount of time.  

Once the time is up, remove the garment from the sink and drain the wash water.  Fill it again with cool water and lay your item in it and swish to rinse.  Squeeze out excess water, but not like you're wringing out a washcloth. This is supposed to be a gentle process. Roll the garment in a towel to move to the next step. Bring your garment to a table or a mesh rack and lay out a dry towel. Blocking the garment back into shape, lay it out until dry. Then flip it over and let the back dry, replacing the towel if needed. 

Is it time consuming? Yeah. Is it worth it to preserve delicate lingerie, sweaters and handmade clothes? Yep. Like we pointed out up above, if you end up without power at any point, being able to handwash your clothes is a useful skill to have. What do you think? Do you do this for any of your clothes? Tell us in the comments below or over on our Facebook page. 

If you're looking up this article because your washing machine has given up the ghost, we can help! Whether you live in McKinney or Plano, Dallas or Coppel, we can help bring it back to life. More importantly, we can get your home running smoothly again. Just give us a call at ((214) 599-0055) or reach out to us on our contact page and we'll get back with you shortly to schedule an appointment that works for you. At Appliance Rescue Service, we won't stop until you're satisfied. 


Additional Reading


5 Laundry Hacks To Make Laundry Easier

How Do They Do Laundry In Space

Are You Making These 5 Common Laundry Mistakes?

8 Ways To Whiten Your Clothes When You Don’t Have Bleach

How and Why You Should Clean Your Washing Machine

No, Really, Your Washing Machine Needs This.


No, Really, Your Washing Machine Needs This.


Table of Contents:

Why You Should Clean Your Washing Machine

How To Clean Your Washing Machine

It's a common myth that your washing machine cleans itself as it cleans your clothes. Unfortunately, it is just that. A myth. As your washing machine gets everything else clean, it can build up dirt, detergent, and hard water residue. So, how do you fix that, and what happens if you don't? 

Why You Should Clean Your Washing Machine (Ie what happens if you don't.) 

Sure it makes sense. If you're constantly washing things in it, the washing machine should be kept clean. Buuut that's sadly not how it works, at least not any more than your towels always being clean because you use them to dry yourself off when you're clean. With every wash cycle, your washing machine rinses away dirt, grime, and detergent.  That dirt has to go somewhere, right? If you don't clean your washing machine regularly all of that grime can build up inside the machine, as well as mildew. Yup, mildew. 

Have you ever opened your washer after several days only to have it smell wet and rank? A smell that's somewhere between long rotted leaves and a wet dog. That's caused by leaving your front-loading machine closed in between washes. The tight seal on the door means that the drum can't dry out completely, so mildew and mold can begin to grow inside the drum.  (And no, just running a new wash won't wash away the mold, sadly. A front-loading machine doesn't fill up all the way in comparison to a top-loading machine.) 

Built up mildew on the agitator, the soap dish, the top of the drum and the bleach dish

The ick on the agitator is mildew, the top of the drum is dirt, and at the chlorine tray is just floating debris.
Photo Courtesy of Practically Functional

How To Clean Your Washing Machine 

Fortunately, there are easy ways to solve the problems in both of these cases. 

If you're looking to remove the moldy smell, all you need to do is do an empty cycle of your machine, with an extra rinse, using a half cup of bleach and no detergent. This will kill any mildew inside of the drum and sterilize the entire thing. 

If you're trying to get rid of dirt, detergent residue, and hard water, on the other hand, you're going to need to go a bit more in-depth.  

- Start by grabbing anything you can that's easily removable. Take that to your sink, grab an old toothbrush, some white vinegar, and some dishsoap. Mix up a quick solution and allow the parts to soak in it while you go back to your washer. 

- Use a cloth, the toothbrush, and the vinegar to scrub all of the crevices inside the machine. Throw on a podcast or an audiobook while you're doing this, it'll make life easier. 

- If your front-loading machine has a rubber gasket, make sure you get that cleaned too, but use a clean cloth instead of the toothbrush. You don't want to accidentally damage it, or pull it away from its seal. 

Dirt and mildew built up in the gasket of the front loading washer

-Many machines will have a trap that's meant to catch debris, hair, pet fur and other things. Consult your manual, or the manufacturer's website to find out where it is for your model.  Once you've found it, empty it, soak it in white vinegar and then gently scrub with a toothbrush to get it clean again. 

-Once you've done all of that, rinse the small parts with clean, cool water, dry them off and replace them into the machine. Next, pour four cups of white vinegar into your washer's tub while it's empty.  Run that on the longest and hottest wash cycle, without adding anything to it. No detergent, no clothing, nada. Once the cycle is finished running, take a soft sponge (so one without a rough side to it) and clean the inside of the washer. Then run another cycle with just water to remove any of the leftover vinegar. 

Once you've gotten your washing machine clean for the first time, make sure to get yourself into the habit of doing it once a month. After the first time it's much easier, and you won't have to do as much work. Like many of the other home tips we offer, these types of preventative maintenance are best done on a regular schedule so that you don't end up having to rush to fix a major problem. 

Thank you for coming to hang out with us this week! What is the strangest thing you've ever had happen with your washing machine? Tel us in the comments below, or over on our Facebook page. As always, we'd love to hear from you. 


If your washing machine has gone past the point of "it just needs a good scrubbing" it might be time to call in a professional. Fortunately, we can help. Whether you live in Allen, Copeland, or Dallas, Appliance Rescue Service has you covered. Just head over to our contact page or give us a call at ((214) 599-0055) to set up an appointment time that works for you.