From Summer to Fall: Thai Curry Sweet Potatoes You’ll Love

A flavorful twist on a fall classic that will keep you coming back for more.

Even as the summer sun lingers, our taste buds are leaping ahead to the cozy comforts of fall.It’s still August, but we’re craving fall foods already. We want warm, cozy dishes and sweater weather already! With that in mind, we came up with this recipe for sweet, savory and subtly spicy sweet potatoes.  These have a lot of wiggle room to make them your own, that is sure to become a family favorite. 

Ingredients:

1 1/2 pounds sweet potatoes

2 tablespoons butter

3 tablespoons Thai red curry paste

1 cup coconut milk

+/- 1 tablespoon light brown sugar

Sea salt to taste

Tools:

Peeler

Knife 

Cutting board

Stock pot

Colander

Potato masher

Measuring cups and spoons

Square baking dish

Spoon

As always, please wash the produce! You don't need dirt in your dinner. We're going to peel these anyway, but dirt on the outer surface can still transfer during the peeling process.

Grab the vegetable peeler and peel the sweet potatoes. Move them to the cutting board and rough chop them. Make sure you're using a very sharp knife and keeping your hands clear, as fresh sweet potatoes are dense and can be difficult to cut.

Transfer them to the stock pot and add enough water to cover. Put the pot on the burner, crank it up to medium-high, and let the water come up to boil. Cook your sweet potatoes until they're soft enough to mash.

Keep in mind that the smaller you cut your sweet potatoes, the quicker they'll cook. We had fairly large pieces that took about 15 minutes at full boil to soften. Yours may be ready in 10 minutes, or take 20 or more. The simplest option is to just test a piece each time you stir, and cut the heat when you can cut through the piece with the edge of the spoon.

Once the sweet potatoes are soft, use a colander and drain out the water. Return them to the pot and take the potato masher to them. You can mash them until they're creamy or leave them lumpy, whatever you prefer. In this case, we mashed them a little longer than we usually would and got to a very-small-lumps kind of consistency. 

Before the sweet potatoes lose too much of their retained heat, toss in those two tablespoons of butter and mash the butter into the sweet potato. Measure in your Thai red curry paste and stir it in very thoroughly. The red curry paste has a bit of a kick; you may end up with a hot spot in your sweet potato if you don't ensure a complete mix.

Once the curry paste is mixed, pour in the coconut milk and stir until you have one uniform consistency.

Transfer everything into the square baking dish - there's no need to grease the dish in this case - and level it with the back of the spoon. 

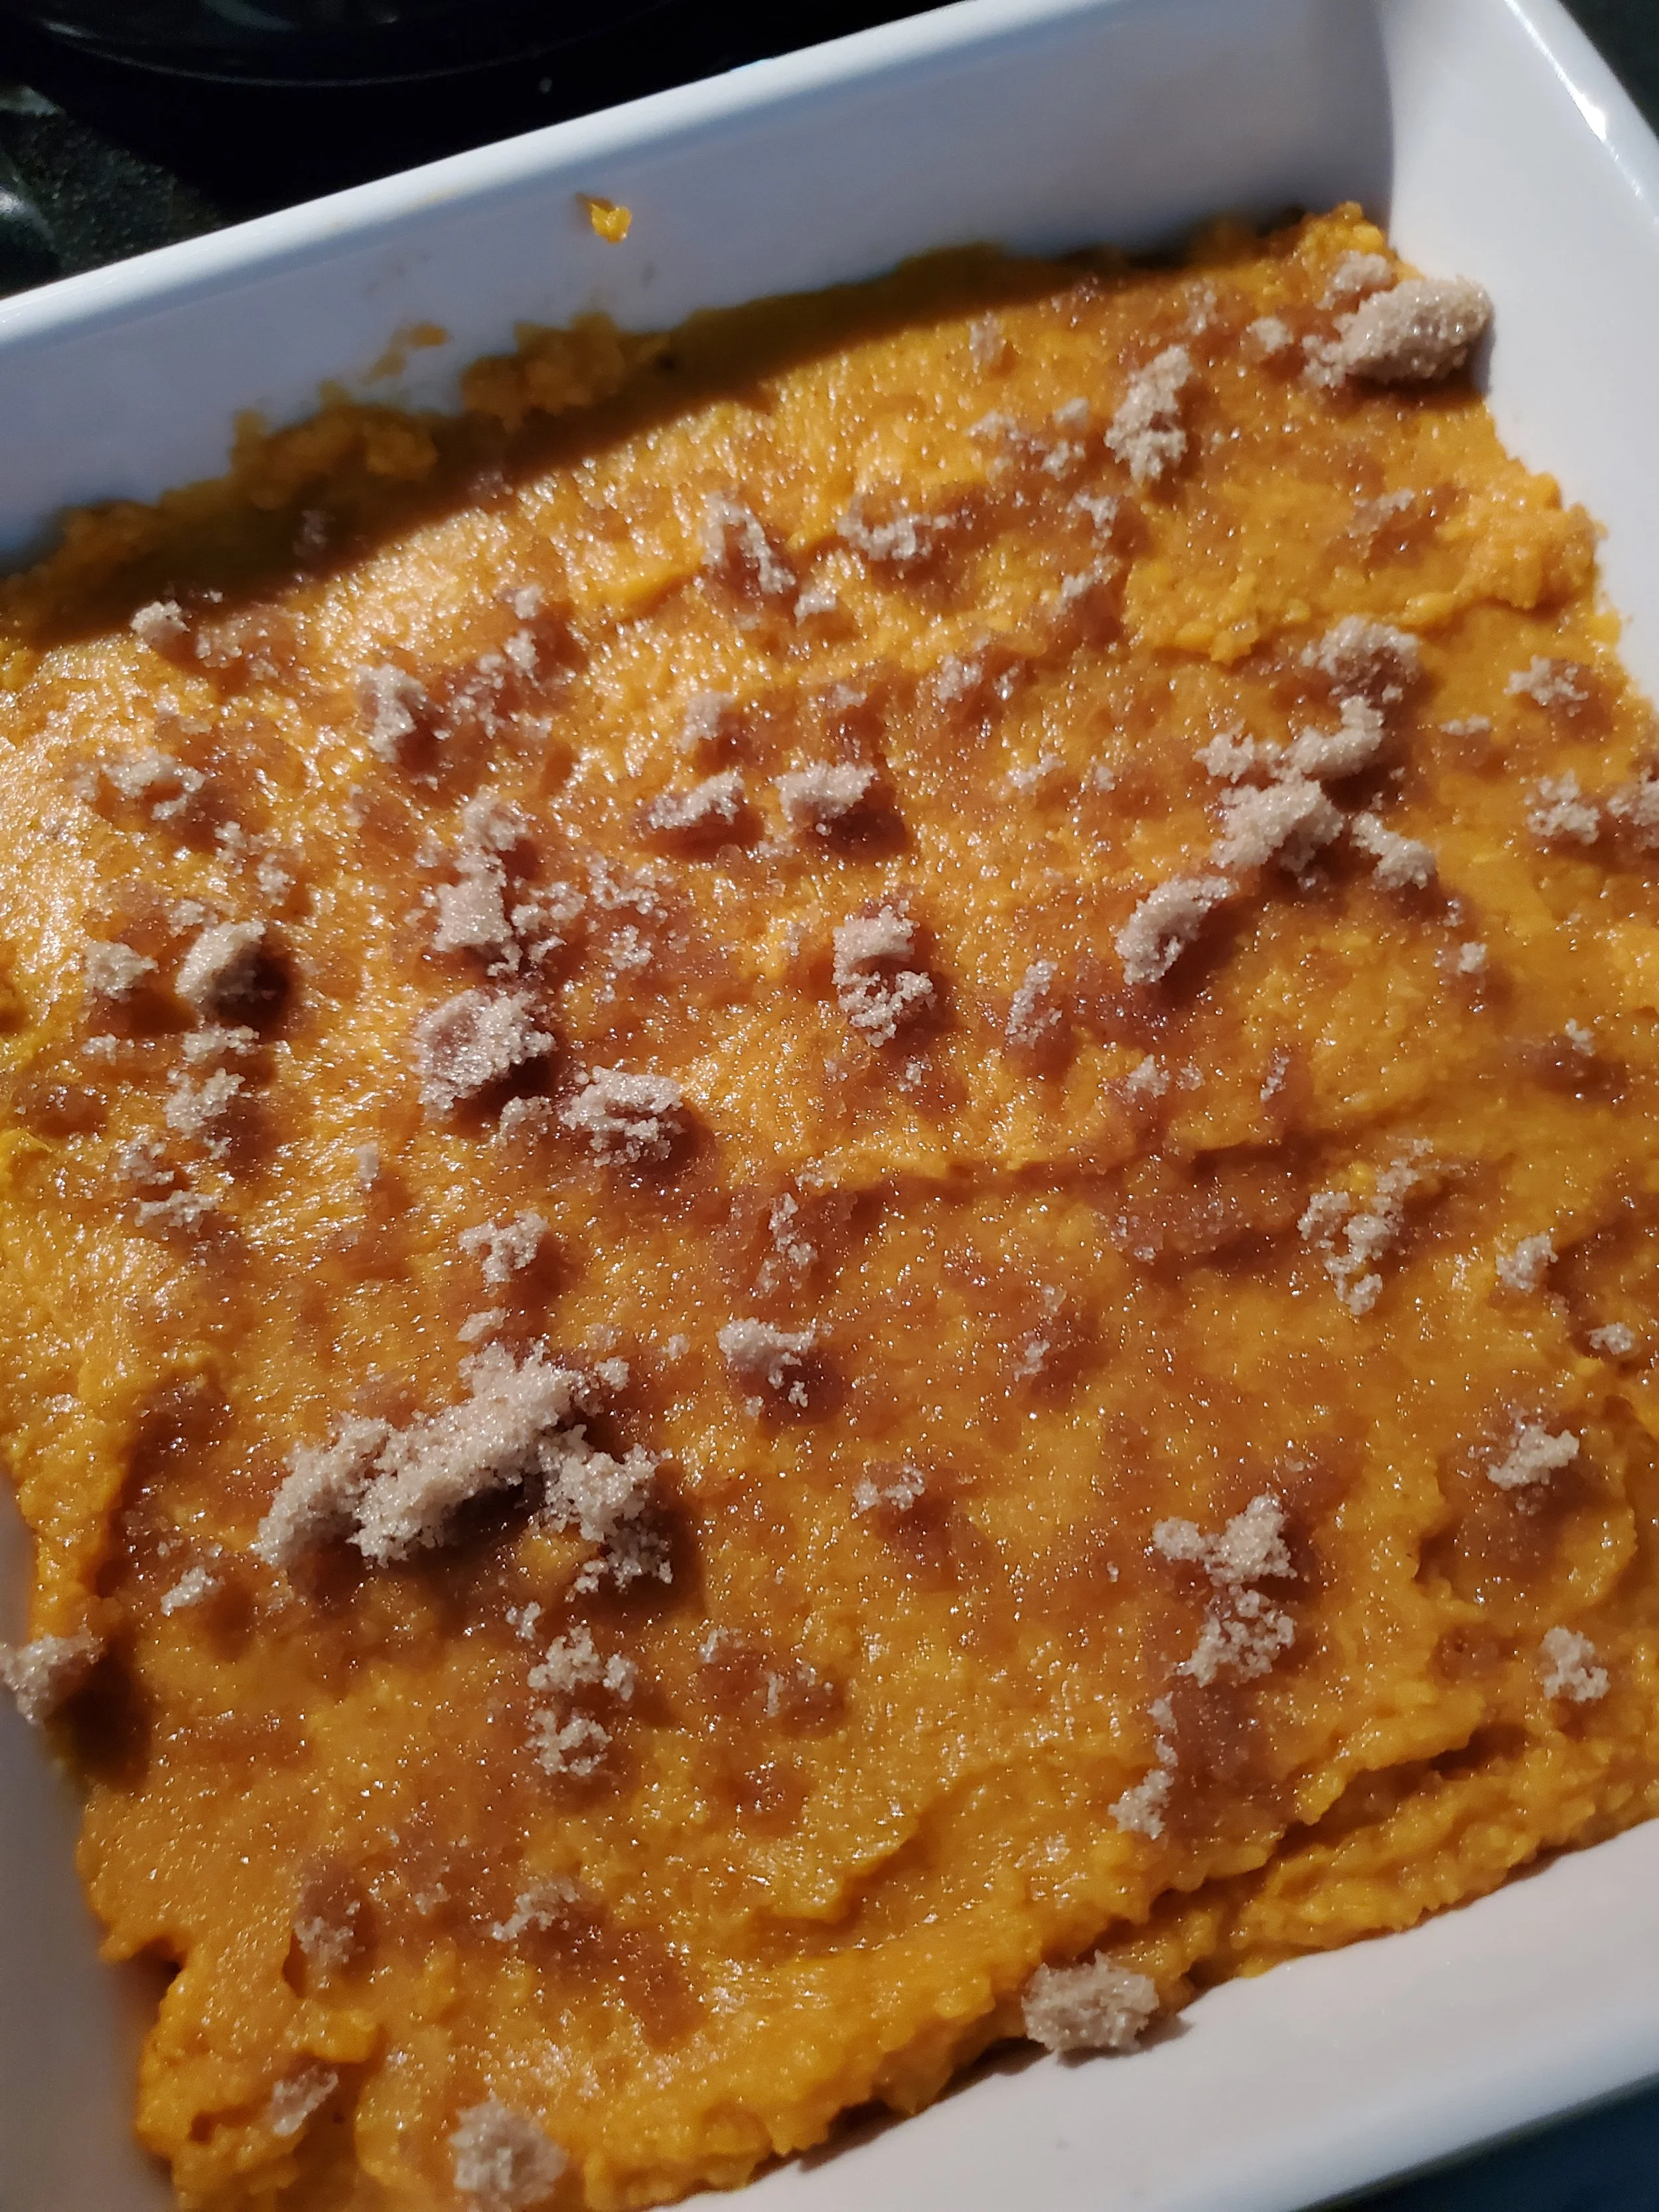
After smoothing it out to a level surface and making sure to get it right up to the edges of the dish, measure your brown sugar and sprinkle it lightly over the top of the sweet potato mix. Adjust the amount down if you want a savory dish, or add a little extra if you're so inclined. Add a little sea salt at this stage if you'd like.

Turn on the broiler and set the baking dish close to the heating element. Broil at 450 degrees for 15 minutes.

After the 15 minutes are up, the dusting of sugar across the top should have caramelized. If it hasn't, feel free to keep it on broil a little while longer, but be careful not to scorch it. No toasted marshmallows in this dish.

When the sugar is fully caramelized to your liking, carefully remove the baking dish from the oven and set it to cool; don't try to serve any until it's had at least a few minutes' rest. You'll end up with some runny, sad sweet potatoes if you don't allow them to steam and settle.

And there you have it! A delightful twist on classic mashed sweet potatoes, infused with the bold flavors of Thai red curry and the richness of coconut milk. Whether you're serving it as a standout side dish or the main event, this recipe is sure to impress with its unique blend of sweetness and spice.

If you're looking to keep your kitchen running smoothly, don't forget that our team at Appliance Rescue Service is here to help with all your appliance repair needs. From ovens to refrigerators, we make sure everything's working like a charm so you can keep creating delicious dishes just like this one. Bon appétit!


Website

Call (214) 599-0055


Additional Reading

Punchy Potato & Cheddar Rolls  

Sausage Bread to Get You Rolling 

Sweet Veggie Tropical Curry


Signs Your Appliances Are Overheating—and How to Handle It

Simple steps to protect your home and appliances from overheating damage.

Appliances are the backbone of a modern home, working tirelessly to keep our lives running smoothly. But what happens when they start overheating? It might seem like a minor inconvenience at first—an extra-warm dryer load or food that browns too quickly in the oven. Yet, these small signs can indicate much larger problems brewing beneath the surface. Left unchecked, overheating can lead to serious malfunctions, costly repairs, and even potential safety hazards.

Understanding the early warning signs of overheating is crucial for maintaining the health of your appliances. By catching the problem early, you can avoid unexpected breakdowns and extend the lifespan of your household staples. In this guide, we’ll walk through common scenarios where overheating becomes a concern, showing you what might happen if you don’t address the issue—and how taking preventative steps can lead to a better outcome for your home.


Before: A Warm Back and Buzzing Noises

Picture a typical summer day in Texas. You reach for your fridge to get a cold drink and realize that the sides are feeling warmer than they should. You brush it off, thinking it's Texas. What else is new? However, you notice over the next few days that there are other things going on, and the heat hasn't diminished. Your milk is spoiling faster, and the food at the front of your fridge isn't as cold as it should be. You notice a persistent buzzing whenever you come into the kitchen. Then your energy bill arrives, and it's much higher than it should be, even though you're taking active steps to reduce your energy usage.

These are the classic signs of an overheating refrigerator. They all indicate that your fridge's compressor is working overtime and struggling to maintain temperature. If left unchecked, this can lead to a breakdown of the appliance.


After: Cool and Quiet


Now, let's see what that scenario can look like when you take action. Noticing the signs, you unplug your refrigerator and grab a broom to clean off the condenser coils. The coils being covered in dust prevented your fridge from cooling itself. While you're back there, you decide to check the fan and find that debris was obstructing it, also keeping it from cooling. Finally you check out the air filter and notice it was just as dusty and was choked because the refrigerator didn't have ventilation space.

After plugging your fridge back in, the buzzing noise vanished! Even better, the sides of the fridge are cool to the touch, and your next electric bill has gone back to normal. Congrats, you have successfully prevented a major appliance failure.


Before: Microwave Shuts Down Unexpectedly

Picture this: you're heating up some lunch in your microwave. Halfway through, the microwave suddenly shuts off. You try to press various buttons and power it back on, but it doesn't respond. You notice that the kitchen is warm but surely that's just because it's summer. You know that there had been a faint of buzzing before it shut off, but you thought that might have just been the tray getting stuck. It does that sometimes. It's annoying because all you want is to eat your lunch and go back about your day.

Having your microwave shut down suddenly like this suggests that the microwave has overheated. That shutdown is actually an automatic safety feature that kicks in when your microwave gets too hot. There are a lot of different reasons that can cause this, from faulty components to block ventilation to running the microwave for too long. And if you had your microwave for several years, wear and tear take a toll, making overheating much more likely.


After: Smooth
Operation and Safe Heating

What happens if you take steps to prevent this though? After the microwave cools down you check around the sides of the microwave and notice that it's partially blocked by other appliances on your counter. You clear the space around it to ensure it has proper air flow next to you grab the vinegar and clean the microwave thoroughly paying extra attention to the vents to get rid of all the dust. Then you make a mental note, or if you're like us a sticky note, to not run the microwave for extended periods of time without breaks.

Making these adjustments and having taken the time to let it cool down, your microwave starts working again. And you avoid further unexpected shutdowns because I can breathe better too. Plus you've extended the lifespan of your microwave by keeping up with a little maintenance.


Before: Dishwasher Overheats and Fails to Clean Properly

You start your wash cycle and continue going about your nightly routine. You hear strange sounds coming from your kitchen. You put it off until the next morning when you notice it's not cleaning the dishes as thoroughly as it should. In fact it hasn't been for a few weeks. It also seems to have been running very hot at times steam has been billowing out and when you open after it finishes some of the dishes have been scalding hot. Eventually a warning light or an error code pops up. And still your dishes are coming out dirty and you don't know why.

These are all signs that something has gone wrong with your dishwasher and it's overheating. The most common cause for this is a malfunctioning heating element which might have shorted out. This can raise the water temperatures beyond normal levels. Another possibility is that the thermostat that limits The heat is no longer working. Which means your dishwasher can't tell how hot the water has become. Alternately if the thermostat is malfunctioning or positioned wrong, it might not shut off the heating element which then causes the appliance to overheat.

After: Efficient Cleaning with Proper Temperature Regulation

What happens though when you work to address these issues? All three of those issues will typically require a professional to get involved. You can do it yourself, but it is fiddly work, and often difficult to get to. However you go about it, you've fixed your dishwasher. You noticed that the appliances running smoothly, the the steam has stopped billowing out, and the noises have stopped. You can now go back to loading your dishwasher without worrying about burning your hands or dishes not coming out clean.


Before: Clothes and Dryer Overheating


It's the start of your weekend and you are determined to get things done. You started drawing cycle for the laundry you're doing and keep on grooving. And then when it finishes you come over and yank your hand back because you realize that the exterior is too hot to touch. You wait a few minutes and open it up and find out your clothes are also unusually hot. This isn't right and you start to worry. Even more concerning there is a strange smell in the air. These are signs that your dryer is very probably overheating. It's frustrating and worrisome because you are on a roll and now you need to figure out what to do about this.

Several different issues can cause overheating. The most common culprit is a reduction of the airflow

through your dryer. Unfortunately, that can also be caused by several different sources. This can be due to a blockage in the internal duct or a kink in the transition hose that links your dryer to the wall. You could also have a blockage in that transition hose. Another problem that can cause overheating is excessive lint buildup either inside of the dryer or the exhaust outlet. Finally the exhaust outlet could also be not opening fully. And if it's not blocked airflow it could be a faulty heating element, a defective cycling thermostat a broken or missing felt seal, or an obstructed blower wheel. These are all mechanical elements that could be causing a problem.

After: Efficient and Safe Drying

What happens though when you've addressed those issues? You start by inspecting your vent system and find that there was a kink in the transition hose as well as a tiny sock. Is that what happens to all of them? Maybe. You also had excessive lint buildup in the vent. You clear that out and straighten the hose making sure that the air flow is now unrestricted. Next you check the exhaust outlet on your roof and that's fine it's opening completely without issue. You also check out the various mechanical parts, relying on our Good Friend YouTube to see what you're looking for. 


With these changes in place your dryer goes back to normal. The air flow moves smoothly through your dryer and it stops overheating the sides and your clothes. You can now get back on the roll and enjoy the rest of your weekend, without worrying about your clothes catching fire.


Before: Overheated Oven and Undercooked Meals

It's a Sunday and you are excitedly trying out a new recipe for cookies is that you've been looking forward to all week. The recipe calls for them to come out soft and golden brown. However when you open up your oven you find their a dark brown, dry and crumbly. You start wondering whether it is you and did you follow the recipe correctly? But then you think that it happened last night too with the chicken you made, it was tough but also cooked unevenly. You also noticed that the oven is unusually hot even for summer. This could be a sign that your oven is overheating, which leads to poorly cooked food and safety concerns.

There are several issues that could cause your oven to overheat. You might have a broken temperature sensor that's not accurately measuring the internal temperature. A faulty thermostat can also fail to regulate the temperature properly. Damaged heating elements or a loose thermostat knob can also contribute to the problem. Additionally a blocked vent, a faulty cooling fan, or a malfunctioning selector switch can all interfere with airflow and temperature regulation


After: Perfectly Baked and Well-Maintained Oven

Some of these issues you can fix on your own. Let's tackle those first. You start by cleaning your oven thoroughly, removing any food residue and grease that could block any of the vents. Be it on top on the sides or inside, you scrub everything. While you're at it you look at your ovens manual to find and clean the cooling fan. You also look over the heating elements by hand to see if you can find any obvious damage. 


 For the rest of it, though, you need a professional who knows what they're looking for. Especially if you're dealing with a gas oven. So you call them and they look at your broken temperature sensor and thermostat to ensure that it's working properly. If there was any damage to your heating elements they go and replace those. They also check out the loose thermostat knob making sure it's placed securely, and repairing the selector switch if it was needed.


With these fixes, your oven goes back to working properly for you. Your cookie recipe comes out perfectly golden, and your dinner that night is not a dry husk. Taking care of your oven and addressing any issues swiftly ensures safe and delicious cooking every time you turn it on.


Keeping your appliances in check can make all the difference in ensuring they run efficiently and safely for years to come. Whether it's preventing an overheated dryer or tackling a malfunctioning oven thermostat, the right steps can turn potential disasters into minor inconveniences. But sometimes, despite your best efforts, professional intervention is necessary. That’s where Appliance Rescue Service comes in.

Our team of expert technicians is ready to step in when things get complicated. From diagnosing tricky overheating issues to providing long-term maintenance solutions, we’re here to help you keep your home running smoothly. If any of your appliances show signs of overheating, don’t wait—give Appliance Rescue Service a call. We’ll make sure your appliances are back in top shape, so you can focus on the things that matter most.


Website

Call: ((214) 599-0055)


Additional Reading

Wondering How to Clean Your Appliances Sustainably? Eco-Friendly Methods Unveiled

Don't Let Your Dryer Become a Fire Hazard

The Labyrinth of Limescale


Bright Ideas: The Dos and Don'ts of Smart Lighting in Your Home

Get the Most Out of Your  Smart Lighting with These Expert Tips

Lighting in our homes is undergoing a thrilling transformation, all thanks to the integration of smart technology, like smart bulbs. These advancements not only bring numerous benefits to the home but also open up a world of possibilities. Here’s a comprehensive guide on the dos and don'ts of smart lighting, to help you make the most of this exciting technology.


Dos


Do Check Compatibility

Before you purchase smart bulbs, ensure they are compatible with your current light fixtures and home automation systems. Not all smart bulbs work with all setups, so doing your homework can save you from potential headaches. As an example, just think about the differences between Alexa and Google Home, and trying to get them to work together. 


Do Consider Lumens Instead of Watts

Courtesy of Cloudlynx

Traditional bulbs are measured in watts, but smart bulbs are measured in lumens. Lumens indicate brightness rather than power draw, like watts. Be sure to check the lumen output to get the right brightness level for your space.


Do Set Up Routines and Timers 

Smart lights come with the ability to establish timers and routines. Yet many people forget this not long after they get them, and lose out on some of the best features.  Take advantage of these in your own home to customize your lighting, save energy and create moods for various events. You can also use them to enhance your security by giving the appearance that someone is home. 


Do Focus on Color and Warmth

Your smart bulbs offer a full-color spectrum, and it’s lots of fun to play with different color set ups. However, when you’re looking to give your home a new look, make sure and pay attention to the warmth of your light as well. Warm lights like yellows or soft whites help make your home feel cozy and comfortable, while cooler blues help you  stay alert. Additionally, you have to consider how different tones of light can give you a headache.


Do Track Your Energy Usage 

Courtesy of Haus Automation

There are many smart bulbs that allow you to monitor the energy output that they are using. This can make your life easier when it comes to finding spaces where you can cut consumption and lower your electric bills. 


Do Prepare Your Network

Smart bulbs are hooked directly into your Wi-fi network all the time. Before you bring them into your home, make sure that your network can handle the additional load of the bulbs you’re getting. If not, consider upgrading to a mesh network. A mesh network is a Wi-Fi system that uses multiple access points to spread the signal evenly throughout your home, ensuring a stable connection for your smart bulbs.


Don'ts

Don't Neglect Proper Installation

Like any piece of technology there are ‘right’ ways to use it and ‘incorrect’  ways to use it. One of the most common issues people run into is not researching the proper installation methods before purchasing. Doing this can lead to the bulb overheating, or the fancy bulb you bought…dying long before it should have. One key tip to avoid is recessed fixtures that don’t allow head to dissipate from the bulb. 


Don't Overlook the Learning Curve 

Smart bulbs are indeed smart, with a plethora of features that everyone is eager to explore. However, it's important to remember that there is a learning curve. Take the time to familiarize yourself with them before you start using them, so you can dive right into the fun stuff. Most importantly, be patient with yourself as you learn-you've got this. 


Don't Use Dimmer Switches

Smart bulbs are controlled from the app. In addition to being able to chose your color and timer settings, you can also change how bright your lights are. From the app. Let’s say that again, from the app. Many people love dimmer switches prior to converting to smart bulbs, and after. The problem is that using a dimmer switch with a smart bulb can damage that smart bulb.  Using them with traditional dimmer switches can cause flickering and reduce bulb performance.

Don't Ignore Security Concerns 

Smart bulbs are part of the Internet of Things. Just like we’ve talked about with smart appliances, smart bulbs are gaps in your internet security. Before you connect them into your network, make sure that you use strong passwords and enable two-factor authentication. Also make sure that you keep up with upgrades to your network and the smart bulbs 


Don't Ignore Connectivity Issues 

Are there any spots in your home that your network is less than ideal? Or where it goes out entirely? Prior to getting smart-bulbs you need to fix that. Smart bulbs require a stable Wi-fi system. If your network goes down due to those lovely Texas power surges,, you can lose control of your lights. Plan ahead of time to avoid losing your lights out of the blue. 


Don't Buy on Promises 

Just like any other new piece of technology, companies often make promises that don’t always come to fruition. Instead of buying based on future promises, make your smart bulb purchase based on what they can already offer your home. This cautious approach will ensure you make informed decisions about your smart lighting technology. 


Don't Forget to Manually Reset When Needed 

Courtesy of Gerd Altman

Just like any other piece of technology, sometimes, smart bulbs will bug out. When in doubt, don’t assume that the bulb is broken, try a manual reset following the manufacturers’ instructions to get things back in order. 


Smart lighting technology can offer incredible efficiency and convenience for your home. However, it also comes with its own challenges. Follow our dos and don’ts to make the most of your new technology and avoid the most common pitfalls. 


At Appliance Rescue Service, we're all about sharing helpful tips for managing your home. Just a friendly reminder that connecting lots of devices, like those cool new smart bulbs, to your Wi-Fi can affect how well your smart appliances work. While we can't sort out your internet issues, we're definitely here to help fix any problems with your appliances. Our goal is to keep your home running smoothly, so please reach out if you need expert appliance repair and maintenance. We're always happy to help!


Additional Reading

Kickstarter in the Kitchen


The Planned Obsolescence Debate


Strawberry Lemonade Pie: A Refreshing Summer Treat

A perfect blend of tangy lemon and sweet strawberry in a creamy, dreamy pie.

Summer always brings to mind the refreshing taste of lemonade, but sometimes plain lemon can get a little monotonous. That’s why we love adding a twist with flavors like strawberry, cranberry, or mint to keep things exciting. This delightful dessert takes the beloved strawberry lemonade and transforms it into a delicious pie. Perfect for using up those extra egg yolks from other recipes, this treat combines the tangy zest of lemon with the sweet charm of strawberries, all nestled in a convenient pre-made graham cracker crust. Let’s dive into this colorful and flavorful creation that’s sure to brighten up any summer day.


Ingredients

6 ounces cream cheese, softened

3/4 cup heavy whipping cream

4 tablespoons strawberry syrup

1/4 cup sugar

8 egg yolks

1/4 cup lemon juice

1/2 teaspoon kosher salt

One pre-made graham cracker pie shell


Tools:

Measuring cups and spoons

Mixing bowl 

Hand mixer 

Spoon

Summer always makes us think of lemonade, but /just/ lemon gets a little dull after a while. We enjoy jazzed up lemonades, with add ins like strawberry, cranberry, or mint to break the monotony. Here's a dessert that takes all the fun color and flavor of strawberry lemonade and plates it.


We understand that this recipe uses a LOT of egg yolk. It was designed that way, as we frequently need just egg white for a recipe and hate to discard perfectly good food. For example, any time we make a white cake, we wind up looking at anywhere from three to 12 egg yolks sitting in a dish on the counter. We definitely made some white cakes this week.


If you aren't already staring at a bowl full of yolk and trying to find a way to use it all up, you can consider upping the amount of cream cheese and/or heavy whipping cream by a tablespoon for each egg yolk you substitute out, but don't attempt this recipe with any fewer than four yolks as it won't firm up. You'll be left with a soupy mess (not unlike a poorly done pecan pie in the fall).


We cheated and used a pre-made pie crust here, but you can feel free to make your own if that's more your speed. Just be sure to let it cool before attempting to pour in your filling.


Preheat the oven to 350 before you get going with the filling.


Begin by measuring your cream cheese into the mixing bowl. We broke ours up a little so the mixer wouldn't struggle quite so much with it. Use the mixer on low to whip the softened cream cheese.


Alternatively, you could save the softening time and a bit of effort by just buying a tub of whipped cream cheese spread at the grocery store; we won't tell anyone. If you use whipped cream cheese spread, add an extra two tablespoons. The whipped stuff at the store has an absolute ton of air, and won't measure the same ounce for ounce.


Once the cream cheese is ready, dump in the egg yolk and mix the cheese and egg together on low until mostly incorporated.


Measure your heavy cream, sugar, lemon juice and strawberry syrup into the mixture, sprinkle in a pinch of kosher salt, and use a spoon to scrape down the edges of the mixing bowl. Sometimes chunks of the cream cheese escape up the sides and hide there, so don't skip the scraping step.


Give it all an easy stir and then set the spoon aside. Crank the mixer up to high and whip together the contents of the mixing bowl. Keep the mixer well below the rim of the bowl, because lifting it will get splatter absolutely everywhere - the filling is very thin at this stage.


It's ready to go to the pie shell when it's one consistent shade of light pink and very bubbly/aerated.


Pour immediately into the prepared graham cracker crust and bake for at least 20 minutes, possibly up to 30 minutes - however long it takes to get the center soft set and edges of the crust lightly browned.


Remove it from the oven, set it out to cool for a while, and transfer it to the fridge when it's about to room temperature. Keep it refrigerated until ready to serve, at least two hours but ideally overnight. Serve with whipped cream and strawberry syrup if desired.

And there you have it, a delightful strawberry lemonade pie that brings the refreshing flavors of summer right to your table. This dessert is perfect for picnics, family gatherings, or simply as a sweet treat to enjoy on a warm day. The combination of tart lemon and sweet strawberry in a creamy filling is sure to be a hit with everyone. Plus, it’s a great way to use up those extra egg yolks from your baking adventures. Whether you’re impressing guests or treating yourself, this pie is a surefire winner.

Remember, a smoothly running kitchen is key to creating delicious dishes like this one. If you ever encounter issues with your appliances, don’t hesitate to call our team at Appliance Rescue Service. Our technicians are always ready to help, ensuring your kitchen stays in top shape for all your culinary creations. Enjoy your pie and happy baking!

Website

Call: ( (214) 599-0055) 


Additional Reading


Chocolate Pecan Cake for a Special Date

Chocolate Raspberry Thumbprints

Berry Bliss: A Delectable Mixed-Berry Clafouti Recipe


The Hidden Costs of Delaying Appliance Repairs

Don’t Let Minor Problems Turn Into Major Expenses

Life gets busy, and it’s easy to ignore that dripping washer or the lint-filled dryer vent. But did you know that postponing appliance repairs can cost you more than just time? From increased energy bills to potential health hazards, the risks of delaying maintenance are greater than you might think. Discover the hidden costs of procrastination and learn how Appliance Rescue Service can save you from future headaches.


While you’re debating, keep in mind that the longer you hold off, the more these four areas are going to go up.

 The cost to your appliance. 

The cost to your home. 

The cost to your bank account. 

And the cost to your comfort.

It sounds strange, but holding off is not helping you. Let’s take a look at each of them to find out why.  


Holding off on repairing your appliances naturally has an effect on said appliances. Let’s start by thinking about your dryer. You notice that the dryer’s exhaust duct is full of lint. However, having someone come out and clean out the lint is going to take time and money you’d rather put towards something else. 


As you wait, the lint continues to build up in the duct, it’s going to start coming out of the vent as well. It’s building up in the nooks and crannies of the dryer itself because it’s slowly running out of places to go.  All of that lint is also going to restrict the dryer’s ability to breathe, which means it’s going to be eating more energy, increasing your power bill. What’s more is that the longer that goes on, the longer it struggles, the logner it takes to dry your clothes. Which means you have to run it even longer, to get it to finish the job, and those two combined means that the lifespan of your dryer is ticking down as the various parts are struggling. 


Of course, holding off on maintenance and repairs like this also means that if anything major happens, like the dryer breaking or catching fire, you run the risk of having no warranty. Most appliance warranties include a clause that exempts them if the problem is proven to be due to the owner putting off repairs. 


Holding off on repairs or maintenance can also pose health risks, though. Let’s step away from the dryer for a moment and take a look at your washer. This time, it’s not as obvious as lint buildup. Maybe it’s just a hose on the back that’s leaking. You keep thinking, as many of us do, “oh, I’ll get to it this weekend.” Except then something else comes up or you’re just not feeling up to it. No big deal; it’s just a small drip; it only happens when you do laundry. It’s fine, right?


Except that drip can easily lead to much larger impacts. As we know you’re aware, water can lead to major damage on your home. A small puddle is easy to slip and get hurt on, be it child, pet, or adult. Then you have to consider how constantly is the water actually dripping? Is it just a drop here and there? Or is it enough that it could be causing damage to your floors? You also have to consider that as water sits, you might have mold building up in dark corners around and the washer. These are now issues that can grow on their own, and you still have to find the time to get the washer fixed. 


Next, let’s text a look at the cost to your bank account. You’re doing this to save money right? So why would it cost your bank account? 


Well, there’s two reasons, both linking back to one of our earlier issues. 

The first is the unplanned emergency repairs. As the problems with an appliance get bigger, they can become very expensive. What might have been a 30$ part and a 20-minute visit, could easily transform into multiple parts needing to be replaced and taking several hours to repair. You also have to consider the cost of the spreading problems we mentioned in the last section. As more areas of your home are affected, the chance that something that can’t be put off happening grows. It could be damage to your floors, mold, or the entire appliance dies. These issues then go from “I can get it fixed later” to “I need this fixed right now, if not yesterday.”

Our second issue is the cost to your home’s resale value. Some people choose to leave their appliances with their homes for whatever reason when they move, it certainly does increase the value. What if it’s damaged though? Or not working properly? A good prospective buyer will note that and the price they’re willing to pay will come down. Additionally, if a delayed repair has done any damage to your home? That price goes down even further. After all, no one wants to buy a house only to have to replace a molded wall panel or have wiring redone because their oven had faulty wiring. 


Finally, and most importantly in our opinion, is the cost to YOU.  When you put off maintenance, it won’t typically bother you, until you start to realize there are issues. You’re choosing how to spend your time and energy. (And that’s a good thing!) But when you start putting off actual repairs like we talked about with the washer? That’s when it starts to weigh on you. At first, you probably won’t think about it much. It just sits in the back of your mind, and every now and then, you’ll think about how you need to take a look at it.


That starts to lead to stress, though. And the more you put it off, the more you notice that problems are piling up, the more stress it adds to you. Then, as problems begin to grow, either with the appliance in question or the problems that crop up as it fails, they start to disrupt your life. Now, instead of going about your morning routine, you have to add in additional tasks, like checking on the washer or making sure the refrigerator didn’t accidentally freeze the food you needed for dinner. That leeches into your time at home, both working on the things that matter and your relaxation time. If something goes suddenly wrong, it’s entirely possible you’ll have to miss work in order to clean up the mess and try to get hold of an emergency repair. All of this of course adds on more stress to your heavy load. 


You can also have issues with culinary compromises, such as if your stove isn’t working or your freezer has gone out. You might only be able to bake instead of cooking on the stove (which means your house is hotter during Texas’ already gross summer heat.) Or you can only keep fresh foods on hand rather than being able to work from frozen. This adds on additional costs of time, energy and money as you have to do grocery shopping more often. 


Don’t let these issues pile up. Call Appliance Rescue Service today and let our skilled technicians take care of your repairs. Save yourself the hassle, stress, and extra costs by acting now. Your appliances—and your peace of mind—will thank you.


Website: https://appliance-rescue-service.com/contact-us


Call: (214) 599-0055

Additional Reading

Don't Let Your Dryer Become a Fire Hazard

 Household Hauntings: The Frightening Reality of Appliance Neglect

Kitchen Hazards Unveiled