19 Essentials to Setting up a Gorgeous Guest Room

Tricks For Making Your Guest Room Luxurious For The Holidays

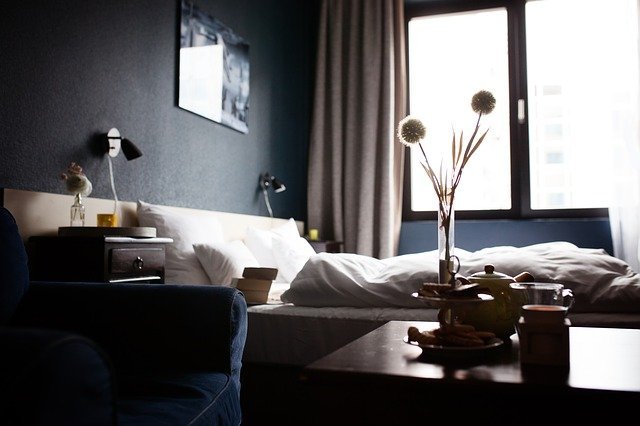
Whether you have someone staying for a single night or over the entire holiday season, a well kept guest room is a must. Making the guest room a place to relax sets up the excellent experience you want for your guests.  Here is a good checklist for how to set up that room.


Having a well laid out  and carefully considered guest room can often help make your guests feel more welcome in your home, and can make their stay just a little more comfortable. It helps them to focus on the things that they came over for, spending time with you! So, here are some good ways to help change your dusty old spare room into a place fit for any guest.


Let’s start off with sanitization items. Between the new COVID variant and the general germs that tend to go around during the winter, it’s a good idea to have some of these handy, especially for a guest who’s away from home.

  • Extra masks, in case your guests forgot to bring any. Unused disposable masks or new reusable masks will work for this one.

  • Hand sanitizer. It’s always useful to have a bit of this on hand in case it’s needed.

  • Tissues & paper towels. These are items that you would rarely think about until you need them, and having them close by will massively improve your guests’ experience.


Next up, the bathroom. You want to make sure it is well stocked, not only with the essentials, but maybe with some things that your guests would need but could easily be forgotten.

  • Extra towels. Always good to have a spare towel just in case, and one already being there will put many guests at ease.

  • Extra toiletries. Extra toilet paper, hand soap, and even an unopened pack of toothbrushes will help a lot, and will never be a problem to have handy.

  • Ibuprofen, antacids, alcohol wipes, and band-aids. Always good to have common first aid items close at hand, and these more common items are always a good addition.


A luggage rack in the closet will help a lot, especially if your guests have packed for several days. It will generally make life easier when it comes time to pack up before they go.


Now, for some of the basic life items that are always good to have in the room.

  • An Iron and ironing board. These are especially useful if you’ve got a guest who brings their sunday best with them, in case they need to press out a couple wrinkles.

  • An alarm clock. A small digital clock will do, but you can go for a more traditional mechanical design if it will fit the room better. 

  • Bottled water. A useful thing to have on hand, especially if your guests are among the many people who prefer to drink some type of filtered water over straight tap water.

  • A spare USB charger/charger cube. Try to include multiple if your guests have multiple devices. Most stores carry multipurpose cables for charging several different devices, you may consider one of these.

  • A sleeping mask and ear plugs. Occasionally, you may have guests who are used to a very dark and quiet sleeping environment, and having a sleeping mask and some ear plugs on hand will make their stay a little more comfortable.

  • A small heater and a small humidifier. These will be very useful for adjusting the environment of the room to your guests’ liking, helping them enjoy the stay just a little bit more.

  • A note with any important info, such as the wifi password. It goes a long way to have these important bits of info written down, that way they’ve got a quick reference at hand for any important things about the house.


The final step in preparing the room is going to be to get the bed ready for your guests. Here’s a good formula to follow for it:

  • Start with the mattress. Strip everything off, and if it’s been a while since it’s been used, go ahead and flip the mattress and spray it with lysol to freshen it up a little bit.

  • Next, do the sheets. Go for something with a high degree of breathability, such as linen or cotton.

  • The next layer should be a comforter or duvet of some sort as your “main” blanket.

  • Put on two to four pillows, and we suggest using either cotton or silk pillowcases to add a bit of a luxe feeling.

  • Next, fold a couple spare blankets and maybe add a couple spare pillows at the foot of the bed, in case the guests need them.


And there we are! We hope that this helps you set up a very comfortable space for your guests, and makes their stay at your home just that little bit better. If you have further tips for making the most of your visiting guests, let us know over on Facebook, we’d love to hear from you!


If on the other hand you wound up here because some of your kitchen appliances are acting up, or your dryer refuses to cooperate when trying to set up that guest room, stop off on our appointment page. We’ll get your home back to tip top shape no matter what’s going on.


A luxurious bedroom with a window, reading lamps, a tea set and a chair. Meant to be a relaxing place for the holidays.

Croque-Monsieur au Bleu (Or Very Fancy Grilled Cheese)

Fancy Pants Sandwiches to Keep You Running

I don't care! Take me to the Recipe!

When you're preparing for the holidays, you need a solid lunch to keep you going, this week's recipe provides just that. With a delicious grilled cheese that's dressed up enough that it'll leave you full, but not so over the top you're going to run out of steam just cooking it.

Sometimes you try a recipe the first time and it turns out fantastic. Sometimes you try it out as written and it ends up going horribly wrong. That's what happened with this week's recipe of "Very Fancy Grilled Cheese and Fancy Gravy" as our Tiniest Kitchen helper dubbed it. (If you want to be fancy though, you'll just call it a Croque-Monsieur au Bleu.

Initially, the recipe called for half of a sweet onion, only 1 slice of thinly sliced ham per sandwich, and only 1 cup of milk for the sauce. This... this ended very badly. Between the original recipe plus the poor choice of a black-coated nonstick pan, we ended up with a very dead set of sandwiches. (we'll share how to save those down at the bottom. *) So, we reworked the recipe and came up with this beauty to share with all of you. 

Ingredients: 

Sandwich

2 ounces blue cheese

2 ounces mozzarella

1/4 sweet onion minced

8 slices sourdough bread

8 slices of ham 

2 tsp Dijon mustard

coarsely ground black pepper, to taste

2 Tbsp unsalted butter, melted

2 Tbsp extra virgin olive oil 

Sauce

4 Tbsp unsalted butter

4 Tbsp all purpose flour

2 cups milk 

2 Tbsp Dijon mustard

grated nutmeg

cayenne pepper

salt

coarsely ground black pepper


Start off by coarsely grating your blue cheese and mozzarella using the largest size of your box grater, mix them together by tossing them lightly. Set that back in the fridge to chill while you work. 

Line the broiler tray with aluminum foil. Preheat your ovent o 300*F. 

Make your sandwiches first, as the sauce shouldn't be made too far ahead, it'll become too thick if left to wait. 

Take your cheese mixture and remove roughly 4 tablespoons from the bowl. Set that into a smaller bowl and set it aside for later. Now add the onion to the original mixture and toss a second time. 

Lightly toast your bread in the toaster. Lay ham slices on four slices of bread that have been lightly smeared with mustard. Pack the cheese mixture into a 1/2 cup measuring cup and then invert it onto a slice of ham, pressing down with your fingers to compress the cheese. Coarseley grind lack pepper over the top of the cheese. Repeat the process with the remaining slices. Top each with a slice of bread and press down gently to compact again. 

Using a pastry brush, pain the top slice of each sandwich with butter. (You want to be a little heavy handed with this.) Warm your olive oil in a skillet on low heat. (and whatever you do DO NOT use a dark coated nonstick pan. Just back away from it and go to the store to get a different skillet. A dark pan will  burn your bread. Ask us how we know.) Cook 2 sandwiches at a time on medium0low heat. Press down firmly with a spatula and brown for about 2-3 minutes or until the bread is crisp. Flip over the sandwiches, paint the top slice of bread with butter, and brown until the bottom slice is crisp and the cheese is starting to melt.


Place each sandwich as you make it in the oven on the baking sheet to keep warm. When all 4 sandwiches are in the oven, turn off the heat and preheat the broiler. 

Lay the sandwiches on the broiler pan, top each with the Mustard Cream Sauce and 1 Tbsp of the reserved cheese mix. Pop them under the broiler for 3-5 minutes or until bubbly and golden. Serve immediately with a fork and knife. 

Making the Mustard Cream Sauce

in the saucepan, melt the butter, add the flour and whisk well. Slowly whisk in 1 cup of milk and cook until thickened and bubbly. Whick in mustard, nutmeg, cayenne, salt and pepper. Take a taste and add more spices or milk as needed.  You don't want the sauce to be too thick with this, so add the second cup of milk as needed to keep it at a 'sauce' consistency rather than 'gravy.' 

Let's say you've gone through all of this and you ended up with a murdered sandwhich anyway. Maybe you ignored us and used a black pan anyway. Maybe you put the heat too high. Maybe you thought "I LOVE onions and I don't want to use that little."  Or maybe you got called away to save your neighbor's cat up a tree. Whatever, your sandwich is blackened and it's too full of onion. It can still be fixed. Start off by pulling apart your sadwich and setting the ham to the side. Now apply a little melted butter to your pan and set it at the lowest possible heat. Put one slice of bread in it at a time, onion & cheese mixture on the pan. You want the cheese to become gooey and the onions to be translucent.  Now cover the pan and grab a second one. you're going to fry up an egg. However you and yours prefer your eggs to be fried, do that. (Personally, we think over medium goes very well with this.) Once your egg is done, put the sandwich back together, except this time you're not going to make a 'sandwich' out of it. Instead of having everything together in the middle, you want it to be cheese mix, bread, cheese mix, bread. This way you have a solid surface to put your egg on top of. Finally, take your sauce and drizzle that over the top. Yes, it sounds weird, we know, but it tastes amazing.  The tang of the mustard and the cayenne plus the gooey mixture of cheese, egg and onion? It's an amazing lunch. 

Oh, and if you wanted you could put your ham back in there somewhere too. 

What about you? What are some of your worst kitchen mishaps? Let us know over on our Facebook page or in the comments below. We'd love to hear from you.

Christmas Shopping for Your Favorite Chef

When You Just Aren’t Sure What to Get Them

Everyone is hustling and bustling, trying to find gifts that say 'I love you', 'you matter to me' or even 'I really love the food you make, even if we're just coworkers.' We're right with you.  Trying to figure out what the buy or make for people is complicated! So we've put together a list of potential gifts for the special chefs in your life. 

 Starting off with something every chef needs, a good set of knives. If you've ever listened to your chef-y friends talk then you know that with a proper knife there's almost nothing you can't do. On the other hand, if you're stuck with a poor quality knife, you're constantly having to sharpen it before you ever start to work.  This Wakoli 3 piece Damascus steel knife set is a fantastic gift for the favorite chef in your life. It comes with a 9-inch Santoku knife, a 7-inch Santoku and then a 5-inch paring knife.  If you want something that serves as both very pretty and a will be used for decades to come, this is a good bet. 

Price: $120

Next up we've got something that hits both 'cute' and 'useful' marks on your list. A set of Matryoshka dolls that serve as measuring cups. The dolls are made of white pressed plastic, and stack together when not in use. They range from 1 cup at the largest and each doll 'half' steps down by 1/4 cup. Absolutely adorable, easily stored and they can flavor to your kitchen. These might be perfect for a young nice or nephew who is just getting started in the kitchen or someone who loves cute things, but also practicality. 

Price: $13 

Think about the nonstick pans that you love. Now think about all the times when you're in the middle of cooking and you accidentally grab a metal spatula instead of a silicone one. By adding a few more tools to your kitchen and keeping them closer to the stove, you can fix that.  This set comes with 2 spoons, 2 spatulas, 1 jar 'spatula' and a brush for sauces, glazes etc.  It's also available in several different color options, and comes with a steel core so that it'll be more durable than some of the other silicone tools you can buy. 

Price: $20 


If your favorite chef is a lover of different spices, this can be a great gift. A stainless steel spice tower with solid glass jars, to make it easy to look at the different spices, as well as being clearly labeled.  This spice tower spins in place and easily holds of 20 jars of their favorite spices. The company also offers a 5 year spice renewal program. You can purchase the tower and register it with them and for 5 years you get free spices, all you have to do is pay shipping. It's two gifts in one, unlimited spices and a place to store them.  

Price: $50 


Following hard on the heels of our last gift, this one is a bit.. different. It's a label maker. For those of us that love cooking and baking you can end up with all sorts of unlabeled jars. You have friends that give you jars of spices from around the world, you experiment with different combinations, and sometimes labels just fall off. Then you're left staring at a jar going "I know I put some nutmeg in here, and I can taste a little anise, but what the heck is that third one?" Enter the label maker. Now it's easy to label your jars and you're not going to mix up your poultry seasoning with your baking spices. (Yep, we've done it. That's what happens when you don't sniff an unlabeled jar and just toss it into the pot instead.) 

Price: $35 


For the coffee loving chef in your life, you might consider this gift. An easy-to-use grinder that can handle enough beans for 12 cups of coffee at once. The center chamber is removeable to make for easy cleanup and pouring. You can also use it for spices if you prefer to grind your own before use.  And at this asking price, you could even go so far as to buy 3. One for you, one for coffee and one for spices! 


Price: $17

Sometimes you don't want to fight with finding the 'right' spot on your stove for your frying pan. You want to turn it on and get cooking. You also don't want to deal with food sticking to the pan and becoming scorched. Both of these problems are solved by the BELLA Electric Ceramic Skillet. It's able to heat smoothly and consistently in a way that your stove usually doesn't and keep food from sticking to it. You can use it to saute, fry, roast and steam, all without having to argue for space on your stove. Using the skillet also means that you can use it for a main dish while you use your stove to cook sides of your meal. Alternatively, this could be used if you're in a tiny home without much of a kitchen. 

Price: 35


If you're looking to find out what all of the fuss is over air fryers, this might be a good place to start. Not only can you use it for everything from frozen foods to donuts (fresh donuts! At home!) but you can also try it out for a wide variety of different recipes from everyone's favorite food & craft site, Pinterest. While this is a  slightly more expensive model, it's well worth it when you can cook 6qts of food in one go rather than having to do batch after batch. 

Price:  $120

What's worse than having to wait for your kettle to boil so you can wait to brew tea? Having to wait for that perfect cup of tea for whatever the day has thrown at you? Nothing. Nothing is the answer we're looking for.  Fortunately, this electric kettle from Mueller can help. Able to hold 1.8 liters or a little over 7 cups, it's perfect. It boils quickly, auto shuts off, and has 'boil-dry' protection. (Tell us you haven't accidentally turned the stove on without checking if there was water in the kettle at least once. No? We didn't think so. We get it though.) Best of all, there's no frustrating cord to fight with. The kettle sits on a plate that heats the water inside it, and can be removed and carried wherever you need once it's come to a boil. We'll take two. 

Price: $35 


For those of us that are coffee drinkers, whether that's solely coffee or in addition to tea, we've got a lovely French press maker. Made of borosilicate glass just like the electric kettle, the Cafe Du Chateau press also comes with a 4 level filter to ensure that you're only getting coffee in your cup.  Capable of brewing 34 oz of delicious coffee at a time, the French press is something that many coffee lovers swear by.  Plus, if, somehow, there's an issue with your press? Cafe Du Chateau will replace it. 

Price: $25


IF YOU WANNA SHRED MEAT LIKE THE WILD ANIMAL WITHIN, you should look at getting these lovely claw-shaped meat shredders. Great for making pulled pork LIKE A BEAST or just adding a bit of fun and ease to the cooking process, these will surely find a home within any barbecue master's kitchen. We love them because you can shred the meat more easily than trying to do many tiny shreds using a pair of forks. 

Price: $12 

If you want to have a nice, melted cheese to put on your food after it is cooked, rather than melting on during the cooking process, this is an excellent option for you. Offering a small pan that will accommodate 2 standard cheese slices side-by-side, this will allow for you to get your cheese to just the right consistency before putting it on your food.  And if you don't want to just use a slice of cheese? You want to mix your cheeses together? You can go for that too. Just make a small mound of the mixed cheeses and let them melt together. 


Price:  $10  

If you're still looking for Christmas gifts, we suggest booking an appointment for your loved one to have one of our technicians go over all of their appliances. Showing you love them by taking care of their favorite space, is a great way to show that you pay attention, and it will also make it so that any problems that might be there can be caught before they cause major trouble for the favorite chef in your life.  To set up an appointment you can call us at ((214) 599-0055) or go to our website to set up an appointment


Cheddar and Hard Cider Soup with Fried Shallots

Something to warm you up from your nose to your toes

What do you do when you’re tired of turkey and you need a fast, easy meal that’s still going to fill you up? Easy, you grab a few kitchen staples and make this soup. We’ve got a warm delicious soup that’ll keep you warm all day long, without overheating your kitchen. 

Ingredients: 

4 Tbsp Unsalted Butter

2 yellow onions, chopped 

1 celery rib, chopped

1 Yukon Gold potato, peeled and chopped 

  If you can't find any Yukon Golds at your grocery store an alternative would be Red Bliss potatoes, as these are the closest to the flavor of the Yukons for this recipe. 

2 cloves garlic, minced

2 Tbsp all purpose flour

2 1/2 cups chicken broth

2 1/2 cups hard apple cider

1 cup half-and-half

2 bay leaves

2 thyme sprigs

2 Tbsp applejack or Calvados brandy

3/4 lb English Cheddar cheese, shredded

salt 

fresh ground black pepper

Fried Shallots  (click here to skip to the recipe) 

Tools Needed: Cutting board, chef's knife,  two large pots, a blender, a cheese grater and a straining spoon. 

Yukon golden potatoes. Sadly they aren’t available by your blogger.


- In a large pot, melt 3 Tbsp of butter over medium-high heat. Add the onions, celery, potato and garlic and stir. Reduce the heat to low, cover and cook, stirring occasionally until the vegetables are softened, about 12 minutes. 

Sprinkle the flour over the vegetables and cook, stirring constantly, tumbling the vegetables around the pot so all sides are heated, until the flour is incorporated. 

While still stirring constantly, gradually add the broth, cider and half-and-half to the pot. Raise the heat back up to medium-high, add the bay leaves and thyme and bring the pot to a boil.  

-Turn your heat down to low and simmer for roughly ten minutes, to allow the flavors time to blend.   Make sure to leave the pot uncovered during this time period. 

Delicious Red Bliss potatoes.

-Remove the bay leaves and thyme sprigs from the soup and discard them. Remove the soup from the heat and let cool slightly, you want it still warm, but not piping hot. 

-Working in batches, puree the soup  in a blender. Pour the puree into a clean pot. Stir in the applejack. Off the heat, while whisking constantly, gradually add the cheese one handful at a time. Continue whisking until all the cheese is melted. Place over medium-low heat, stir in 1 tsp of salt and pepper to taste, and cook gently, stirring often, until heated through, about 10 minutes. 

Taste and adjust the seasoning.  

Serve, garnished with the fried shallots. 

We know we tossed a red onion into the picture. It rolled its way into the shot


Fried Shallots 

Ingredients: 

Fresh shallots, thinly sliced 

Oil - Peanut, canola  or sunflower works well 

A shallow pot for frying.


-In order to make your own fried shallots for this recipe, start off by slicing them thin, but not paper thin. Roughly .2 cm is a good size. 

Soak your shallots in salt water after you slice them, for ten minutes or so. Then remove them and pat them dry so that the oil doesn't splash when you add them. 

Take a pot and bring oil to heat. You want to be able to flick water at the surface and have it hiss but not boil. We advise a soybean oil for this. 

Now drop in your shallots a few at a time and fry them until they're crisp and golden.  

Alternatively, if you're not interested in making your own you should be able to find fried shallots in your nearest Asian grocery store. 

It's really easy and you might find all sorts of things that you can pair with them once you've given it a chance. 


There you go a soup to warm you up as the weather cools down and it's easy enough to make after work, so long as you have the fried shallots ready ahead of time. 

If you enjoyed the recipe, let us know! If you made some changes to it, let us know that too over on our Facebook page.


From our home to yours, we hope you have a good week. 


When and How to Winterize Your Home’s Pipes

And Why You Should Bother, Even in Texas


It’s not quite winter yet, although many of us are dreaming of it. That does mean that it’s the perfect time to winterize your pipes if you haven’t already though. We’re taking a look this week at what that means (because your blogger didn’t know prior to this week), why you should bother, and what that looks like. Let’s dig in. 


What does winterizing pipes mean? 

Winterizing your pipes means going through the steps of getting them ready for winter and freezing temperatures. Whether the temperatures are that low just overnight or for long weeks at a time, your pipes, and home, need to be protected.  Fortunately there are plenty of things that you can do to achieve just that. 


Why should you winterize your pipes in Texas?

Let’s start by reminding everyone of last February. 2 weeks of ice and snow, power outages and all of us going “But this is Texas!” 

Aside from the curveballs that Mother Nature likes to throw at us, there are still reasons to winterize your pipes. It might only get below freezing at night, but a few hours of that is still enough to cause damage.  While the worst case scenario is that you have your pipes burst and your home floods, there are other things that can happen. You can have cracks begin to form in the pipes that are going to seep during the summer into your foundation. 

We will say that while it’s necessary to winter your outdoor pipes, you can be more choosy about which of your indoor pipes to do the same to. 

Image by Tim Pierce on Flickr of a broken and frozen water pipe. This is what happens when you don’t winterize your pipes! :D


When is the best time to winterize your pipes?

The best time to winterize your pipes is before the first hard freeze. So… now would be a good time. Or maybe this weekend after you’ve slept off your Thanksgiving nap. Alternatively, you can push it out till the weather is staying in the 50-55*F range during the day. 


How do you winterize your pipes?

When it comes to winterizing your pipes, there are two ways you can go about it.  You can winterize your pipes for a long vacancy (say if you’re going away on a trip for Christmas) or for several months. Alternatively, you can do a ‘general’ winterizing for your home if you plan on staying in town all winter. 


If you’re going out of town for a Long Vacancy

Start by shutting off the main water valve, all water pumps and water heaters. You might question that last one, but think about leaving a pot on the stove with no water in it. The same thing can happen to your water heater. 

Now open all of your drain valves and taps. Start by making a list and check it as you go through the house. Make sure to check it twice in true Christmas spirit and check off each valve and tap as you go through the house. 

Go through all of the pipes and using an air compressor, blow out any remaining water. You know how if you turn off a hose during the summer it will still have some water in the pipe until it either evaporates or you hang the hose up? Same concept here, except its winter, so the evaporation is going to take a long time and you can’t hang up the pipes for your house. Better to blow them out rather than risk them having water freeze in the bends. 

Next, go to the drain valve for your hot water tank. Check to see if that is a floor valve or if it hooks to another pipe. If it is a floor valve you’ll need to run a hose from the valve to say your nearest sink, this way it doesn’t empty onto the floor. Now open it up and drain it completely.
Go ahead and empty all the water from the holding tank next. This is especially important if it’s a holding tank with a rubber diaphragm.
For extra safety, you might consider adding a small amount of antifreeze to the jet pump case.
Going back through the house, flush all of your toilets. You want to try and empty as much of the water from both the tanks and the bowls as possible. You won’t be able to get everything out, but you should be able to get the majority emptied. 


And you’re done with the inside of your home! Cross off your list, but make sure to hold on to it for when you get back so that you can reverse everything. 


Now let’s go outside.


Once again your going to start by shutting off the water supply valve. If new water can’t flow through, all you have to worry about is what’s left in the system.  Now disconnect any hoses or sprinklers and store them away for the winter. We like using racks in the garage for storing our hoses.
Once you’re back outside, turn all of the outdoor faucets on full and let them run. You want to keep them running until there is barely a trickle coming out, if anything. Now turn them all off and make sure to firmly close the valve.
As a final tip you might consider purchasing an insulated faucet cover. They look like a cow bell for the most part and use a string to stay firmly attached to the faucet and house.  Congrats! You’ve winterized the outside of your home as well! 


Some last general tips. 

Consider the insulation of your home. We’ve talked about the importance of it when you’re trying to keep your home cool, but it’s just as important for trying to keep your home warm. See if there are any crawl spaces over or under your home and if you can fill them or just better insulate them to keep cold air out. 

Take a look at your laundry room. Because they need to drain water out many laundry rooms are on the outside of the home, typically attached to our garages. They’re particularly vulnerable in these areas. Even just putting a door sock on the garage door can be a help in keeping the cold air from getting in. 

If you can, try to keep the heat on. The warmer the house is, the less likely it is that you’ll need to worry about the cold fingers of winter freezing your home’s plumbing. 


So that’s the process of winterizing your pipes. How much did you know before? Have you done it previously or is this your first year? Are you laughing that our blogger didn’t know how to winterize her home? Let us know over on our Facebook page and tell us if we missed anything! 


If you wound up here because your washer is damaged, we can help! All you need to do is call us at ((214) 599-0055) or reach out on our contact page. We at Appliance Rescue Service are here to help keep your home running smoothly.