Comfort Food: Smoked Sausage and Egg Noodles

Easy to Prepare, Delicious to Eat

If you're looking for a delicious and comforting meal that's both easy to prepare and satisfying, this smoked sausage and egg noodle dish with creamy spinach sauce is the perfect choice. Using convenient ingredients like frozen chopped spinach and pre-cooked smoked sausage, this recipe cuts down on prep time without sacrificing flavor. With a rich, creamy sauce infused with garlic, basil, and a touch of sweet-hot mustard, this dish is sure to become a family favorite. Follow along as we guide you through each step to create this hearty and flavorful meal.


Ingredients:

14 oz package smoked sausage

1 pound package egg noodles

1/2 cup chopped white onion

1 package frozen chopped spinach

3/4 cup heavy whipping cream 

1 1/2 cup chicken broth

3 tablespoons butter

3 tablespoons white cooking wine 

2 tablespoon dried basil

2 tablespoon minced garlic

3-5 tablespoons sweet-hot mustard 

Tools:

Heavy bottomed skillet

Stock pot

Colanders

Knife

Cutting board

Spatula

Tongs

Measuring cups and spoons

In this recipe, we cheated and used pre-washed, frozen produce - so we'll spare you the ever present 'wash your produce!' routine this time. Just this once.

Flip the bag of frozen spinach into the microwave and zap it according to package directions.

Fill a stock pot with plenty of water and put it on the stove to heat up to boiling.

While it heats, cut your smoked sausage up however you prefer it. We did mostly big pieces but also a few thin rounds (the ends and the deepest part of the curve in the rope sausage didn't look like much chunked, and so became slices instead).

If you have to dice an onion, 1. we're very sorry for the onion tears, and 2. now is the ideal time to do so. Sensitive eyes here, so we do recommend sticking the onion in the freezer for a little while beforehand, or just using pre-diced frozen onion.

That spinach should be about done on its trip through the microwave. Allow it to cool enough to handle, then tear the bag open and dump it into a colander to let the excess moisture drain out.

Heat your skillet, dry, over medium heat. After it's had a chance to warm up, add your sausage and try to get a nice sear going. The sausage will render out some fat to facilitate this sear. Use tongs or a spatula to flip as needed. Try not to overcook! The sausage comes already cooked, and heating it too long will dry it out.

When the sausage has a nice layer of searing, remove it from the pan and put it back on the cutting board or into a bowl. Don't kill the heat under the pan - just drop in your butter and let it bubble up. Drag a flexible spatula across the bottom of the pan to scrape up the good stuff left by the sausage.

Between the leftover fat from the sausage and the heat of the pan, the butter at the edges of the pan should brown right up. Add your diced onion into the butter and allow it to fry for about two minutes.

The pot of water should be boiling now, so go ahead and throw the egg noodles in. Set your timer and cook them according to package directions.

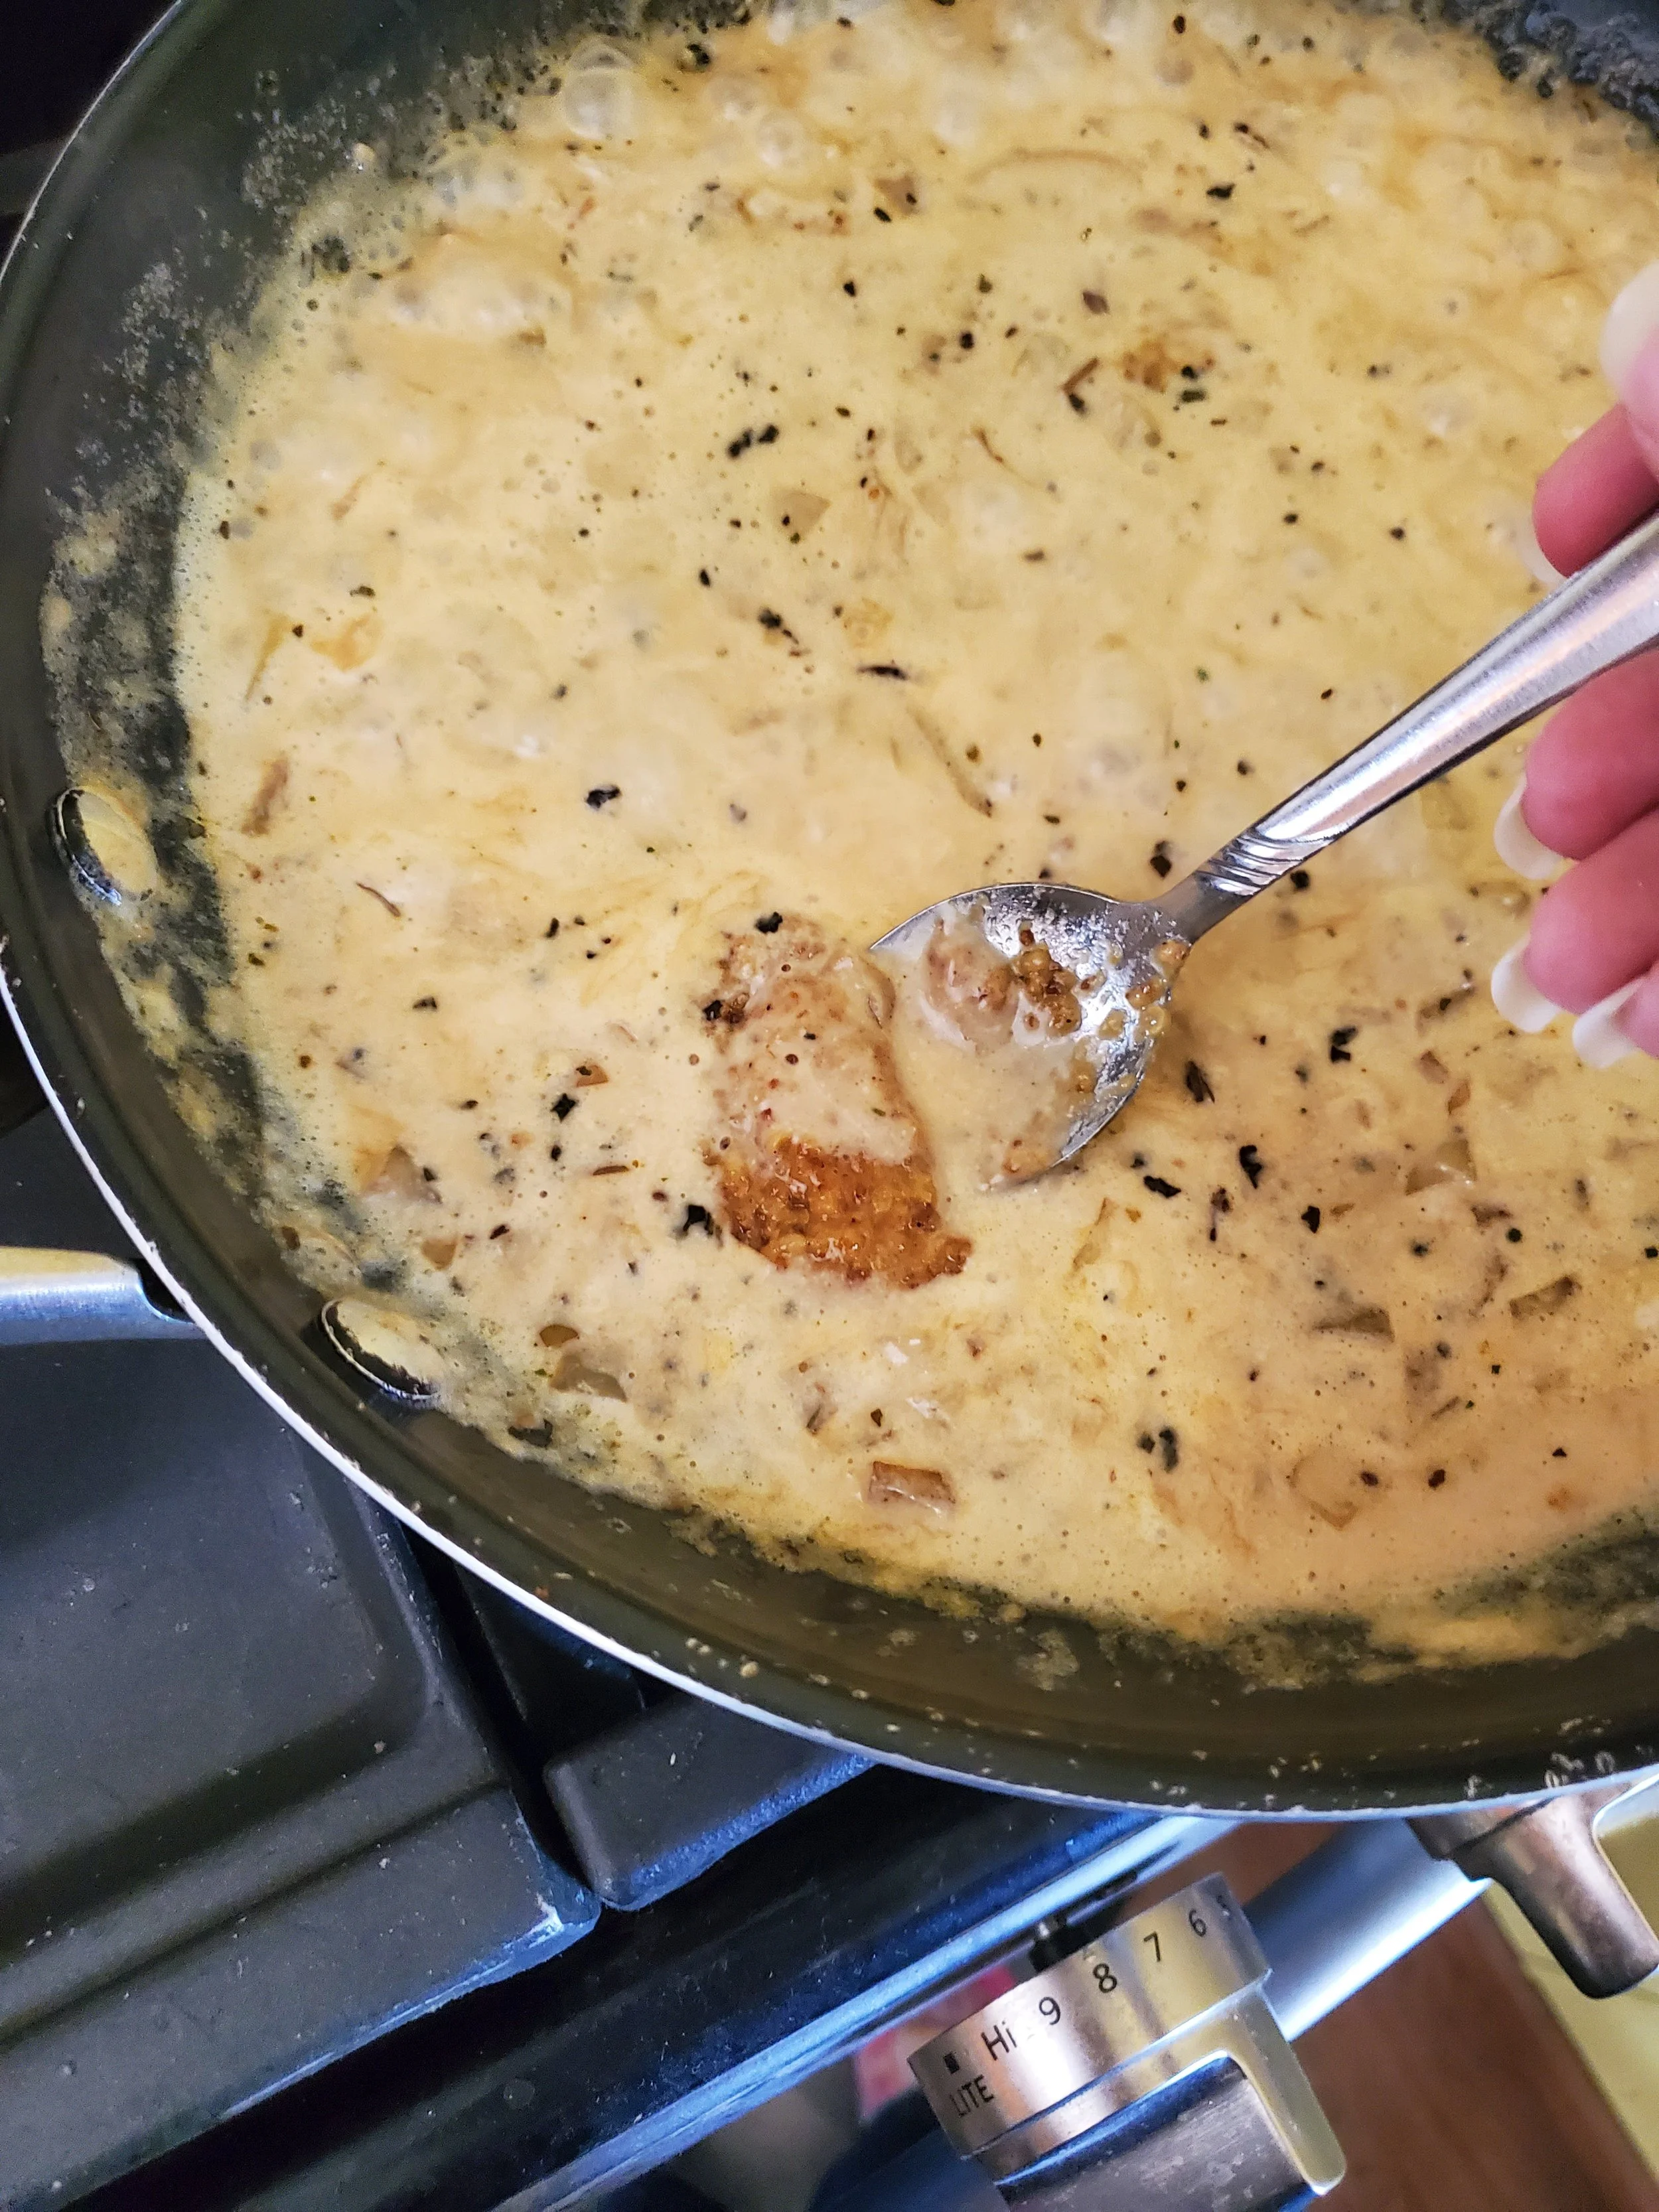
Add the white wine to the onions and let everything cook a minute more for the wine to reduce before adding the basil and garlic. We pushed the onion to one side to show the garlic and dumped the basil on top of the onion for contrast, but that was just a photo choice and totally not a necessary step. 

Add in your heavy whipping cream and your chicken broth and stir to combine. The mustard, even if you only use a little of it, needs plenty of heat to blend properly with the rest of the sauce, so don't add it right away. Because the cream is likely still quite cold, it's more effective to let this come back up to a simmer before adding the mustard. Again, stir plenty to make sure no one gets all mustard in their bite. Unless your family really, really likes mustard - in which case, do what makes you happy.

The egg noodles are likely about done cooking, so drain them in a second colander and pour them back into the pot. Placing a lid or a plate on top of the pot will keep them warm until it's time to serve them.

Ordinarily we would add the spinach to the sauce around this point, but picky eaters were present. To avoid the dinner drama, the spinach ended up on the side. If you'd like to add the spinach to the sauce, we recommend pressing it well in the colander first. Spinach, especially frozen, chopped spinach, holds onto a lot of water, and it lends the sauce a funky green tint if you skip the pressing step.

When the sauce is well combined, add the sausage back in and turn it a few times to ensure it's coated in sauce. Serve over the egg noodles.


Thank you for joining us in making this delightful smoked sausage and egg noodle recipe. We love how it combines ease and flavor, making it perfect for busy families and cozy dinners alike. As always, feel free to customize it to suit your taste buds and family's preferences. We believe that the best meals are those shared with loved ones, and we hope this dish adds a touch of joy and warmth to your gatherings. And remember, if your kitchen appliances need a little TLC to keep your culinary adventures running smoothly, don't hesitate to call Appliance Rescue Service. Happy eating, and remember—every great meal starts with a little love and a lot of heart!


Take Care Of Your Appliances Today

Call Us: (214) 599-0055


Additional Reading

Spice Up Dessert: Walnut Cayenne Tahini Cake 

Impress Your Guests with This Easy-to-Make Apple Pecan French Toast Bake

Fast and Flavorful Tuna Toast

Limewash Magic: Bringing Old-World Charm to Modern Homes

Exploring the Origins of Limewash: From Ancient Techniques to Contemporary Appeal

If you open a home magazine, many will show off walls with a light, textured watercolor look to them. If you're like us and immediately HAD to know what it was and how to get it, you're in luck. This week, we're diving into the world of limewash—exploring its rich history, the unique qualities that set it apart, and how you can use it to transform your own home. Whether you’re aiming for a rustic, old-world charm or a sleek, modern finish, limewash offers a versatile and eco-friendly solution that’s gaining popularity among homeowners and designers alike. Let's discover the magic of limewash and how it can elevate the beauty of your living spaces.


What is Limewash?

Limewash is a wall finish similar to but different from paint in many ways. Rather than being plastic-based, limewash is made of limestone that has been crushed and burned before being mixed with water and pigments. If you were to open up a can of limewash, it looks more similar to putty than paint as we're used to it. When it goes on your walls and has dried, it looks chalky but has a soft feel. It also doesn't have a shiny look but instead is very matte.

This mixture was originally used as a way to both protect and lighten the look of stone and timber. These days limewash is very much associated with an old-world look that you would find in Europe or South America.

Where does it come from?

Limewash has been used for centuries to protect buildings from the elements while making them even more beautiful. It offered a unique finish that would hold up for at least a decade and was environmentally friendly in both its creation and its use.

Courtesy of Lowes

Limewash can be seen to have been used as far back as Egypt, Greece and Rome. It was a wash that allowed buildings to be protected from wind and rain while still allowing them to breathe. Additionally, limewash is anti-bacterial and acts as an insecticide against both woodworms and death-watch beetles. It also has fireproofing qualities, a fact which was written into law after a disastrous fire in England in 1212. At that point, all buildings along the Thames be they made of wood or stone, had to be limewashed.

As time passed limewash became as much an aesthetic look as it was a preventative measure. Because of the putty-like texture while still wet, it can be used to create all sorts of textures and effects.

So where do we get limewash?

Courtesy of Lowes

We start by burning limestone in a kiln burning off the carbon dioxide, and leaving something called quick lime. This would then be added to water to create a putty. After that the putty has to be aged in order for everything to combine together properly. It's only after this aging process that it can be thinned out again with water in order to create the soft almost watercolor look on your walls.

In older methods, limewash is only available in white, which is natural for limestone, or in shades of gray, taupe, and brown which is where the natural pigments come in. These days, it is possible to achieve blues, greens and even yellows and pinks. Keep in mind though that the process is difficult and it is currently difficult to find these colors.

Unlike most barrier paints in the modern age, limewash sinks into the surface that it's painted on and becomes part of the material. The exception to this is newer cement pours and gypsum plaster. Both of these are non-porous and the limewash can't sink into the material.

Why does it help today?

Courtesy of Lowes

As we mentioned in the last section, limewash has had many benefits throughout its long history. And with modern technology, we found even more. Limewash is a rare material that can be used both inside and out of the home, without danger to children or pets after it has safely dried. It also has a high pH level which means it's hypoallergenic. It resists odor, moisture, and fungus, in addition to the insects mentioned above.

It is easily removable for the first 5 days after being applied, which means that if you don't like it, you can take it off or change it. On the other hand, once it has dried, if it's been done properly, it typically won't flake, peel, or chip.

How to Use It

If you've decided that you like the look and you want to start painting, you'll need to gather up your tools. You'll need a primer as most drywall is not immediately ready to accept limewash. You'll also need a block brush and a brush that is at least 6 in wide. You'll also want a collection of rags for smoothing out or washing down the sections, a bucket to hold all of your rags, and a bucket of clean water. As always, a dropcloth will be invaluable. You can apply the limewash in three ways: a horizontal stroke, a vertical stroke, or what professionals call a cloud stroke. We think the cloud stroke gives the softest look.

Wet down your walls and apply the limewash in patches. Once you have it fully coated, use one of your rags to ‘wash’ the walls down, spreading the limewash. As you come against different patches, you can use the rags or your brushes to feather and blend sections.

Due to its flexibility, limewash can be used in any room of your home. Whether it's adding warmth in the living room, creating a quiet and serene bedroom, or making your kitchen even more cozy, there isn't a room where limewash won't fit in.

Are there alternatives?

Although we have been utterly swayed, if you find that limewash isn’t for you, there are alternatives. Roman clay is one of them and is similar in its application, by using a putty knife. It gives a smooth finish, that can be used to create the look of stone, marble or stucco, depending on your preference. Silicate paints work in the same way as a limewash, in that they soak into the substrate. These are also breathable and allow water vapor to exit the walls, similar to how limewash works.

Where to get it

Explore these trusted suppliers to find your perfect shade:

Are you inspired to try limewash in your home? Share your projects with us on our Facebook page—we love hearing from our readers!


 While we can't help with painting your kitchen, we can help with keeping your kitchen running. If you're doing a kitchen redo because your dishwasher flooded, we can help. Or if your oven sent up sparks, Appliance Rescue  Service are the people to call. We work with you to set a time and date that fits your schedule and your needs. We’ll send our best technicians to diagnose the problems and get your home running smoothly again. You can reach us by giving us a call at ((214) 599-0055), or by going to our website and starting a conversation.


Why Mice Invade Your Home and How to Stop Them

Protecting Your Home and Appliances from Mouse Damage

Imagine waking up in the middle of the night to the sound of scurrying feet. You turn on the light, only to catch a glimpse of a tiny, furry invader darting behind your appliances. Mice can be more than just a nuisance; they can cause significant damage to your home and appliances. So, how do these pesky rodents find their way inside? What draws them in, and most importantly, how can you get rid of them for good? In this guide, we’ll delve into the sneaky ways mice infiltrate your home, where they like to hide, why they’re attracted to your space, and effective strategies to evict them once and for all.


Where Do Mice Enter Your Home?

Answer our first question, is in short, anywhere there's a hole. Mice can compress their bodies down to get through anything that is the size of a dime or larger. So this means holes and cracks in walls, floors, and foundations. They can also come in through gaps in your windows, or through drainage pipes. They have even been known to get in via entry holes around gas lines or electric lines that haven't been sealed properly. The worst case scenario in our opinion is when they get in from climbing up a tree and onto your roof. Because that is much harder for you as the homeowner to spot.


Common Hiding Spots: Where Mice Nest Indoors

Most of the time, mice come into your home during fall and winter. Sometimes though such as if you have a nice piece of land with lots of growing things, they'll start coming in as early as late spring when they have found plenty to eat and now they need places to nest and have all of their horrible little children. 


Once a colony enters your home and finds it safe, they aren't going back outside. They will raid anything and everything they can get their teeth into as food or bedding. This can of course lead to horrifying numbers of mice inside your home without you even being aware of it.


So where do you look? Where can you observe to try and confirm whether or not you have my spot yourself? 

Behind anything large such as kitchen cabinets, appliances, furniture that's not used all the time. These are great places to hide a mouse line, the past that they'll scurry along while moving from place to place. In addicts, basements, and crawl spaces are great places for nests when they're dry and warm. And so are around closets and fireplaces. 


Why Mice Invade Your House

Courtesy of domeckopol

You might have noticed right now that my son are much like you or I. They come looking for three things food, and a cozy place to sleep. 


Food left on counters or on the floor is a draw for mice. Whether this is in open containers, or cardboard boxes, or pet kibble bags, if it is left out you can bet that mice will be interested.  


Courtesy of Roland Kuck

Another reason mice come in is because unintentionally, you've left away in. This might be holes in your foundation or siding, all of the beautiful plants that are pressed up tight to the side of your house. Holes in Windows, or the frame of your doors, or in your attic. All of these are options that given half a chance they will take because inside your house there is a significantly smaller chance of them running into an owl or snake or just a particularly large and aggressive rat.

 
Effective Strategies to Get Rid of Mice

Now that we know where they're coming from, and why they're in your house, let's tackle the real question. How do you get rid of them? 


 The good news is that you can get rid of them. The bad news is that it's not easy. The problem is that there are so many mouse repellents and deterrence on the market not to mention myths perpetuated online, that it's hard to say what will and won't work without a lot of testing. 


Let's start off by tackling the things that won't work, and then we'll move into what should give you some hope.


DIY Methods That Don’t Work

Does soap keep mice away? 

No. As lovely as Irish springs soap May smell it's not going to kill the mice. Now a core ingredient in many soaps is animal fat and if they were to eat a large quantity of that the mice would die. The problem is that unless they are starving, mice won't eat enough of it to die. They will stop once they start feeling ill and they certainly aren't going to take it back to feed their colony in the extent that it would get rid of all of them.

 chow down on enough soap to be harmed.


Does bleach repel mice?

Does it repel mice? Yes, just like you, the strong smell of bleach is not pleasant for mice. And if you could somehow guarantee that the mouse would consume it, it wouldn in fact kill it. The problem is that the amount of bleach that you have to leave out it would be harmful to you and any children or pets within your home. So while this one would work, we don't advise as the risks outweigh the benefits.


What color do mice hate?

We are rather confused as to why this idea came about. Mice are colorblind, so it doesn't matter what color you paint your baseboards, it won't stop them. 


Does peppermint oil repel mice?

Peppermint oils and sprays are lovely if you want to make your home smell nice. Even at strong concentrations, they won't linger long enough to deter rodents.


Do mothballs keep mice away?

Mothballs are for moths, as they contain naphthalene. In large concentrations this can repel mice, but the amount needed a) hasn't been tested and b) would reach a level that would make your home inhospitable to you long before it made the rodents leave.  


If you’re trying to prevent rats or mice from entering your home or trying to get rid of a current rodent infestation, there are lots of suggestions for DIY and home remedies. However, many of these DIY rodent control treatments aren’t based on factual evidence.


Natural Mouse Repellents: What Really Works?

There are a variety of scents that mice hate, and can be useful for keeping mice out of your home. 

Some smells that mice hate include:

Pepper

Cinnamon

Citrus

Vinegar

While the list above contains some of the most effective scents that mice hate, there are many other scents that may also work. If you're looking for an at-home way to deter mice, you can try using one of these scents. Keep in mind that these may work for repelling mice before they get into your home, but there is no sign that they will help after you already have an infestation.


Do dryer sheets repel mice and keep them away?

Dryer sheets are like the list of strong scents. They provide a temporary deterrent, but they're only going to keep rodents from coming in, they won't drive them out. 


Setting Traps and Bait: Best Practices

If you want to catch and actually remove mice from your home, traps and bait are a place to start. Many professionals suggest setting traps and bait stations as a sort of ‘diagnostic’ throughout the year. This will let you know that they are finding a way in.  You can use any variety of traps you want, from catch-and-release traps to glue traps to bait stations. We will advise against poison traps indoors or out as indoors can be dangerous if you have children or pets and also lead to the mice dying inside the walls of your home, and outdoors can poison far more than just the mice you intend. 


Sealing Entry Points to Keep Mice Out

As we mentioned further up, mice and rats can compress their bodies to fit through a hole no larger than a dime. This means that it’s ridiculously easy for them to find entry points into your home through walls, your roof, even crawl spaces underneath. These tiny holes can be easy to miss, and require going over your home with a fine-toothed comb. Once you find them though, covering them over is relatively easy. Wire mesh or steel wool are good for covering the hole, and then you cover that with caulking or cement. (Don’t use expanding foam though, as they can and will chew through it.)  You will also want to carefully go over doors and windows, for any cracks and fill those as well. 


Landscaping Tips: Trim Shrubs and Bushes to Deter Mice

While lovely thick bushes and flowers are amazing to look at and add character to your home, they’re also a mouse’s best friend. They act as a protective pathway into your home, and cover from predators. You don’t need to get rid of them though, just keep them properly trimmed. 


Dealing with a mouse infestation can be a daunting task, but with the right knowledge and strategies, you can reclaim your home from these unwelcome guests. Remember, sealing entry points, maintaining a clean environment, and using effective traps are key steps to keeping mice at bay. While Appliance Rescue Service doesn't handle mouse removal, we understand the frustration and damage these pests can cause. If your appliances have suffered from a mouse invasion, don’t worry—we’re here to repair and restore them to perfect working order. Reach out to Appliance Rescue Service for all your appliance repair needs and let us help you get your home back to normal.

Website

Call: (214) 599-0055


Additional Reading

Household Hauntings: The Frightening Reality of Appliance Neglect

The Labyrinth of Limescale

Bugs of Summer: Fleas, Lice, Ticks and Bed Bugs

Hearty Chicken and Broccoli Bake for Chilly Nights

A Family-Friendly Recipe for Quiet Evenings

Sometimes, the best meals come from a little improvisation. This chicken and broccoli bake, reminiscent of a heartier chicken and dumpling soup, is designed for those unexpected chilly nights when grilling just isn’t feasible. With a creamy sauce, tender chicken, and a topping of bubbly cheese, this dish is both comforting and delicious. It's a great way to use up ingredients you already have on hand while creating a satisfying meal the whole family will love. Join us as we transform a few simple ingredients into a cozy, fork-friendly dinner perfect for any night of the week.


Ingredients:

3 chicken thighs, boneless and skinless

1/4 cup shredded carrots

12 oz bag frozen broccoli cuts

1 can cream of chicken soup

+/- 1 1/2 cups milk

1/3 cup shredded cheese

1 can crescent rolls

1 teaspoon garlic powder

1/2 teaspoon onion powder

salt and black pepper, to taste

olive oil


Tools:

Large lidded skillet

baking dish

spoon

knife

cutting board

grater (if not using pre-shredded carrots and cheese)

measuring cups and spoons

plate

tongs

In short: this is basically chicken and dumpling soup, but heartier, and designed to be eaten with a fork. It makes a better cold weather meal than warm, but sometimes there's just no getting around the weather outside to fire up the grill, and some changes must be made.

We intended to make some grilled chicken, but the wind was high, we were under an "extreme fire danger" red flag warning, and it was unseasonably cold with little warning anyway. So we chose to pivot, use up some odds and ends from the fridge, and save some of that chicken we'd defrosted for another day.

If you're not starting with ready to eat produce, please give it a quick wash before you really get rolling.

In the event you're using fresh produce that needs prep work, prep it before the chicken. Even though we intend to cook it all, this simple rule of thumb for preventing cross-contamination is a good one to follow constantly. 

Once you have your veggies ready, cut the chicken thighs into one inch chunks. Heat a little olive oil in the skillet and add the chicken. Season with salt, pepper, garlic and onion powder and stir to coat. Cook covered for a few minutes, stirring frequently, until the chicken is done.

Pop the can of crescent rolls and lay out the triangles on a plate while you wait for the chicken to cook through, then preheat the oven to 375.

Once the chicken is done, hold it in place with the tongs and drain off the excess oil (or put it through a colander if you're more comfortable with that; we just find it easier to wash tongs than a colander). Add the condensed soup and the milk to the pan and stir. Use less milk if you want the sauce/filling to be thicker. The condensed soup is gloopy and will just kind of squish around the pan until it gets warm enough to melt, so be aware you'll likely be stirring for a minute or two.

After the soup and milk have combined and the only chunks left are the chicken pieces, add the shredded carrots and mix them in. Allow everything to simmer uncovered for two minutes before cutting the heat.

Grease the inside of the baking dish you'll be using and grab a triangle of dough. Lay the triangle into the pan with the base in the pan and the pointed top poking out. Using a spoon, transfer a scoop of the chicken soup mixture to the base of the triangle. Roll the triangle so that you have the chicken in the middle and the point ends up near or at the bottom, held in place by the weight of the dough and filling.

Repeat with the rest of the dough, leaving a little space between each roll so that they'll have some room to expand while they bake.

Dump the broccoli on top and sort of spread it out so each part of the pan dhas some florets, then pour the remaining soup in the pan over the top of everything as a sauce.

Cover it lightly in a layer of cheese before baking for 20 minutes. If you'd like the cheese to develop the bubbly, crispy-edged texture, turn the heat up for the last five minutes of the cooking time (this works much better with cheese you've shredded at home than with the pre-shredded stuff covered in anti-caking agents).

Serve with a salad for extra veggie points!


We hope you enjoy this comforting chicken and broccoli bake, perfect for those unexpected cold nights when grilling isn't an option. With its creamy sauce and savory flavors, it’s sure to become a favorite in your household. Remember, cooking is all about creativity and making the most of what you have. If you ever find your kitchen appliances in need of some TLC, don't hesitate to call Appliance Rescue Service. They're here to ensure your culinary adventures continue smoothly. Happy cooking, and enjoy every warm and delicious bite with your loved ones!

Take Care Of Your Appliances Today

Call Us: (214) 599-0055


Additional Reading

Easy No-Cook Not Quite a Cannoli 

Spicy Lemon Pepper Shrimp

Pepperoni & Canadian Bacon Stromboli 


Lost in Translation: Why No Two Appliances Use the Same Symbols

How the Lack of Standardization Makes Everyday Appliances a Challenge

In the age of user-friendly technology, one would expect household appliances to be intuitive and straightforward. Yet, a simple glance at the control panel of a microwave or washing machine reveals a mess of icons that can baffle even the most tech-savvy among us. How did we end up with such a confusing array of symbols? And why does it seem like there’s no universal standard to guide us? Worse still, why are the symbols on your appliances completely different from the ones your old appliance had? 


How Did These Concepts Develop?

Icons are meant to save space and convey information quickly. Their use has spread due to their ability to transcend language barriers, especially in diverse linguistic regions like Europe. Icons are used everywhere in and out of the home.  From your phone, to your oven, to your HVAC system, to your local grocery store icons are used to direct the viewer quickly. However, this seemingly efficient solution has turned into a user experience nightmare for many. There are too many icons, and no consistency between them, leading to us getting our symbols mixed up or forgetting them outright. 


The Microwave Dilemma

Confusing microwave control panel with various symbols and buttons, highlighting the lack of standardization in appliance icons

Courtesy of Panasonic

Microwaves are a prime example of non-standardization in appliances. Each brand seems to have its own unique set of symbols and functions, leading to widespread confusion. In theory, a microwave should be easy to use – set the time, press start. In reality, users often find themselves guessing which button does what, with features like "express cook" complicating the interface. You end up spending as much time guessing what different buttons do as you do getting to eat. This lack of consistency is a significant pain point for consumers who expect simplicity in everyday appliances.


Washers and Dryers: A Symbolic Free-for-All

Washer and dryer control panels with numerous icons and settings, illustrating the complexity and lack of uniformity in laundry appliances.

Courtesy of LG

Washers and dryers, on the other hand, are another story. They present a complicated mix of symbols and settings unique to each major brand. Whether you're dealing with a Whirlpool, LG, Bosch, or Samsung appliance, deciphering the control panel can feel like navigating a complex puzzle. From cycle options to temperature settings, each washer and dryer comes with its own array of icons, leaving many users scratching their heads in confusion. Despite the availability of online resources and user manuals, understanding these symbols often requires trial and error, leading to wasted time and frustration for consumers.


Ovens: A Rare Case of Standardization

Courtesy of Whirlpool

In contrast, ovens tend to follow a more standardized set of symbols. While the icons can still be obscure, once you learn them, you can navigate most ovens with ease. This standardization helps ensure better cooking and baking results across different brands and models. The consistency in oven symbols is a relief in the otherwise chaotic world of appliance icons. 


The European Perspective: A Different Set of Challenges

European appliances add another layer of confusion. The symbols used are markedly different and often even more baffling for those accustomed to American appliances. This difference is partly due to Europe's linguistic diversity, which makes the use of icons over text a necessity. However, the result is a set of controls that can seem almost inscrutable to both Europeans and Americans alike. Many symbols are so stripped down that you can only guess at their original meaning. Does the two squiggly lines mean heat? Or does it mean microwave?  We have no idea, and we doubt anyone other than the manufacturer does either. 


Why Are Icons So Hard to Understand?

The development of icons is rooted in the desire to save space and create a sleek, modern design. However, research shows that people struggle to remember the meaning of many icons, particularly abstract ones. Icons need to be intuitive, and when they’re not, they can hinder rather than help usability. Adding text labels to icons can significantly improve user understanding, but this practice is not as widespread as it should be. There’s also a hard balance to strike between when to use text versus icons, because text needs to be at a size large enough to be read by all. 

After unraveling the mystery of appliance symbols, if you find yourself still struggling with your microwave, oven, washer, or dryer, don't hesitate to reach out to us at Appliance Rescue Service. Our team of experts is here to help diagnose and fix any issues with your major appliances, ensuring your household runs smoothly. Contact us today for reliable and efficient service! We’ll work with you to set up a time and date that works for your schedule to send one of our technicians to get your home running smoothly again. 

Website

Call (214) 599-0055


Additional Reading 

Appliance Deep Dive Round Up 

Kickstarter in the Kitchen

Why Is My Refrigerator Making Weird Noises!?