Gross Truths About Appliance Filters (and How to Clean Them Right)

Learn when to clean and when to replace filters in your home’s most-used appliances.

When it comes to keeping your home running smoothly, the little things make a big difference—and few things are littler than your appliance filters. They sit quietly inside your fridge, dishwasher, dryer, microwave, and even your HVAC system, working day after day to keep your air cleaner, your water fresher, and your appliances safe from strain.

But here’s the catch: filters only do their job if you take care of them. Cleaning and replacing them on schedule is one of the simplest ways to extend the life of your appliances, save energy, and avoid bigger repairs down the road. The good news? With just a few minutes of attention, you can keep your home’s filters in great shape.


Refrigerator – Water Filter

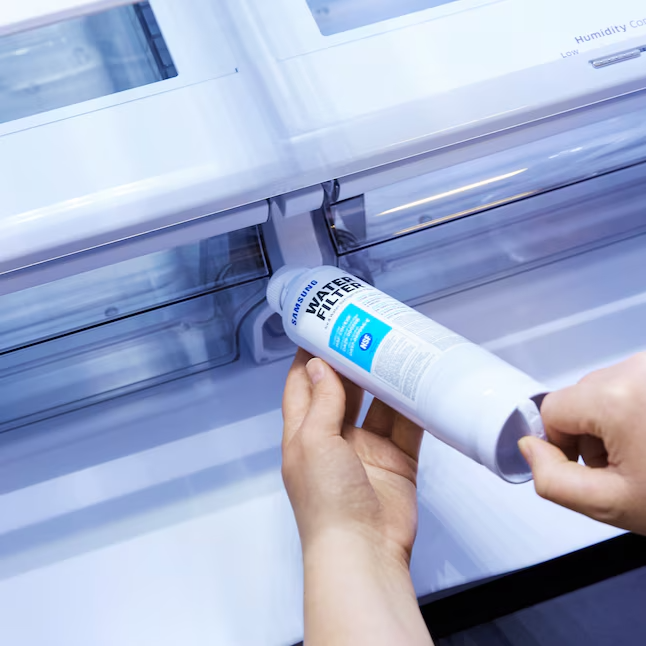
Your refrigerator’s water filter works hard behind the scenes to make sure every glass of water and ice cube is clean, fresh, and safe to drink. When it’s neglected, the results show up quickly in taste, smell, and even how well the dispenser works.

So, how do you take care of it?

  • Locate the filter (commonly in a grille at the base, inside an upper corner, or behind a panel).

  • Shut off the water if your model requires it.

  • Twist or release the old filter and pull it out.

  • Insert the new filter, making sure it locks in place.

  • Run and discard 2–3 gallons of water through the dispenser to flush out air and activate the filter.

  • Reset the filter indicator light if your fridge has one.


-courtesy-of-Lowes

Cleaning Frequency: Replace every 6 months, or every 3–4 months for heavy use, larger households, or poor water quality.
Signs to Watch For: Cloudy water, slower dispenser flow, smaller or misshapen ice, odd taste or smell, strange noises, or a filter indicator light.
What Happens if I Don’t? You may end up drinking contaminated water, dealing with mold and bacteria buildup, or facing a clogged dispenser or ice maker.

Refrigerator – Air Filter

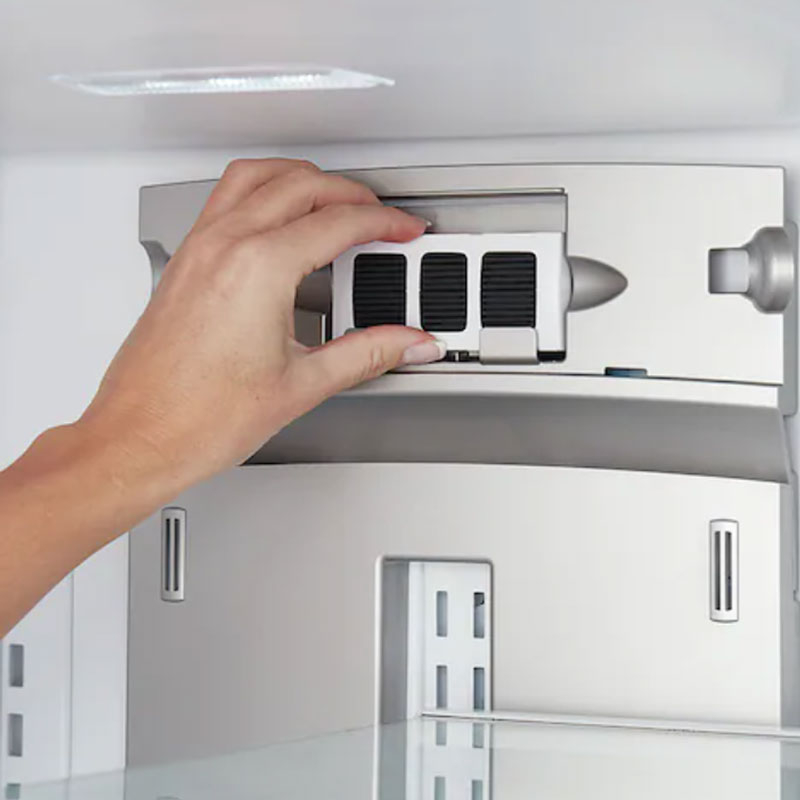
The air filter inside your fridge helps control odors, slow down bacteria growth, and keep food fresher for longer. A clean air filter means your fridge smells pleasant and your groceries last as they should.

So, how do you take care of it?

  • Locate the filter (typically near the back wall or ceiling inside the fridge).

  • Remove the cover and the old filter.

  • Insert the new filter into the holder.

  • Reattach the cover and reset the filter indicator if your fridge has one.

Courtesy-of-Frigidaire

Cleaning Frequency: Replace every 6 months, or up to 12 months in lower-use households.
Signs to Watch For: Lingering odors, food spoiling faster than usual, or a filter alert light.
What Happens if I Don’t? Odors linger, bacteria spreads, food spoils more quickly, and you may notice a stale or musty smell in your fridge even after cleaning.


Dishwasher Filter

Your dishwasher’s filter is what stands between you and gritty, dirty dishes. It traps leftover food scraps and keeps the drain from clogging. Clean it regularly, and your dishes come out sparkling. Neglect it, and you’ll start to smell the difference.

So, how do you take care of it?

  • Remove the bottom rack to reach the filter, usually found under the spray arms.

  • Twist and lift the filter out (some models have multiple pieces).

  • Rinse under hot water to remove debris.

  • Use a sponge or small brush with mild soap for stubborn grime.

  • Reinstall the filter securely, then replace the rack.


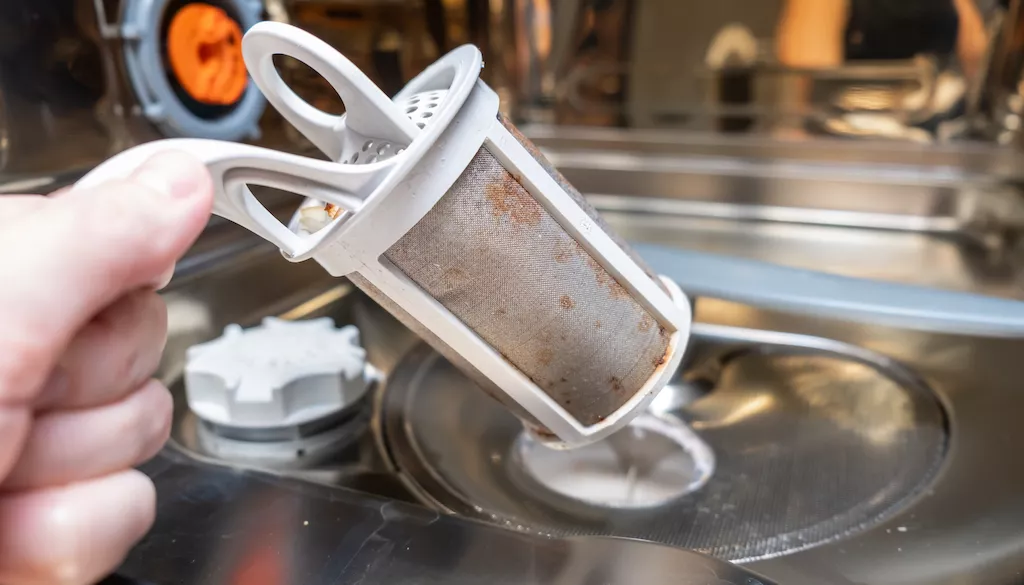
Courtesy-of-Thumbtack

Cleaning Frequency: Clean every 1–4 weeks depending on usage. Manufacturers often recommend every 2–3 months. Some models have indicators after about 50 wash cycles.
Signs to Watch For: Gritty dishes, foul odor, drainage issues, or visible debris in the filter.
What Happens if I Don’t? Food debris builds up, leaving dishes dirty and smelly. Clogs can cause water backup, drainage issues, and even damage to the pump.


Microwave Filters – Grease & Charcoal

Over-the-range microwaves have two filters: grease filters that trap cooking residue, and charcoal filters that absorb odors. Keeping them clean means better ventilation and a fresher kitchen.

Grease Filter – How to Clean:

  • Unplug the microwave.

  • Slide or unclip the filter from the underside.

  • Soak in hot, soapy water (add a little baking soda for heavy grease).

  • Scrub gently with a dish brush, rinse thoroughly, and air-dry.

  • Reinstall when fully dry.


Charcoal Filter – How to Replace:

  • Unplug the microwave.

  • Remove the vent panel screws.

  • Take out the old charcoal filter.

  • Insert the new one in the correct position.

  • Reattach the panel and screws.


Cleaning Frequency: Grease filters should be cleaned monthly (or every 1–3 months with lighter cooking). Charcoal filters must be replaced every 6 months.
Signs to Watch For: Lingering smoke, persistent kitchen odors, or reduced vent performance.
What Happens if I Don’t? Odors and smoke linger, grease builds up, efficiency drops, and overheating becomes a risk.


Clothes Dryer – Lint Filter

Every load of laundry leaves behind lint, and your dryer filter’s job is to catch it. Clean it after each use, and your clothes will dry faster and safer.

So, how do you take care of it?

  • Pull out the lint filter and remove lint by hand after each load.

  • Once a month, scrub the filter with a brush in warm, soapy water.

  • Rinse thoroughly and let dry completely before replacing.

Cleaning Frequency: After every load for lint removal, and once a month for a deeper wash.
Signs to Watch For: Longer drying times, overheating, burning smell, or visible lint buildup in the vent.
What Happens if I Don’t? Expect slower drying, higher energy bills, damage to the dryer, and a serious fire risk from lint buildup.


HVAC / Air Conditioner

Your HVAC system is a home necessity when it comes to living in Texas, and that means taking care of it is too. Cleaning out the filters on it fights on two fronts: preventing excess strain on the system and keeping the air clean inside your home. In case you didn’t know, your HVAC system keeps the air clean by trapping dust, pollen, and other contaminants.

So, how do you take care of it?

  • Turn off the power to the unit.

  • Find the filter and inspect it for damage (there may be more than one—your manual will tell you).

  • Vacuum the filter with a soft brush attachment to remove loose debris.

  • For a deeper clean, soak it in hot water and white vinegar for 1 hour.

  • Rinse with clean water and let dry fully.

  • Replace the filter, ensuring it’s positioned correctly for airflow.


Cleaning Frequency: Reusable filters should be cleaned once a month and replaced every six. Disposable filters should be replaced every 1–3 months.
Signs to Watch For: Reduced airflow, increased dust in the home, or visible dirt on the filter.
What Happens if I Don’t? You’ll deal with higher energy bills, dirtier air inside your home, reduced airflow, and possible breakdowns in the system.


Filter care may not be glamorous, but it’s one of the smartest habits a homeowner can keep. Staying on top of these small maintenance tasks gives you cleaner air, safer water, fresher food, and peace of mind that your appliances are working their best.

And when the job calls for more than a filter swap—whether it’s a repair, replacement, or expert advice—ARS is here to help. Our team is dedicated to keeping your home comfortable and your appliances running smoothly, so you can focus on what matters most.


Website

Call: (214) 599-0055


Additional Reading

4 Steps To A Clean Range Hood 

Why Is My Oven Smelling So Strange? 

Don't Overlook Your Ice Maker: The Benefits of Regular Cleaning

Reset Your Kitchen Zones: A Smarter Way to Organize for Fall

Transform your kitchen into an organized, efficient, and stress-free space 

For years, homeowners were told to follow the “work triangle” when designing their kitchens: place the refrigerator, stove, and sink in a neat three-point setup, and everything else would fall into place. While that idea made sense in smaller, one-cook kitchens, today’s busy households need something more flexible. Enter the concept of kitchen zones—a modern approach that organizes your kitchen by function instead of rigid geometry.


At its core, zone planning is about grouping related activities and storing the tools for those tasks in the same area. Instead of running across the room every time you need a cutting board or mixing bowl, you set up your space so those items live where you’ll actually use them. The result? A kitchen that feels intuitive, runs more smoothly, and supports how you really cook, clean, and gather. Even better, zones can be customized to suit your lifestyle—whether that means a dedicated baking station, a coffee corner, or a family drop zone for backpacks and mail.


Here’s how to put the concept into practice in your own home.


From Triangles to Zones

The old “work triangle” rule still has its place in some smaller kitchens, where the distance between fridge, stove, and sink needs to be kept tight. Ideally, each side of the triangle should be 4 to 9 feet, with a total perimeter of 13 to 26 feet. But for larger kitchens—or households where more than one person is cooking—this setup falls short. That’s where zones come in.

Instead of focusing on appliances, the zone method maps your kitchen by function. Ideally, you'll have five functiona areas, storage, prep, cooking, cleaning and serving. Think of it like a workflow chart for your kitchen, keeping everything in arm's reach.


The Five Core Kitchen Zones

While every kitchen is unique, most will benefit from these five essential areas:


1. Food Storage 

This zone covers the refrigerator, freezer, and pantry—the heart of your ingredients. Place your fridge and pantry close together so you don’t have to zig-zag when unloading groceries or pulling out dinner supplies. Clear bins or labeled containers make it easier to keep track of what you have on hand (and avoid the dreaded three-bottle collection of soy sauce). Store everyday items at eye level and save the high or low shelves for things you use less often.


2. Dishes & Utensils 

Plates, glasses, mixing bowls, and cookware belong here. Everyday dishes are easiest to store near the sink or dishwasher so unloading becomes a one-step job. Pots and pans living close to the stove makes the most sense. A great option here is deep drawers, and if not that, pull-out drawers so you don't have to wrestle with lids. Lazy Susans, partitions and drawer dividers can all help to corral everything.


3. Cleaning & Waste

Your kitchen needs a central spot for washing up and disposing of waste. This is the sink, dishwasher, recycling bins and garbage. If possible, tucking a trash pull-out near the prep zone so scraps can go straight into the trash.  Cleaning supplies can go into a cabinet or under the sink, making it easy to clean up at the end of the night. Try to leave at least two feet of counter space on one side of the sink for stacking dirty dishes, with another 18 inches on the other side for drying or staging.


4. Preparation

This is where the magic happens—chopping, mixing, seasoning, and assembling. Ideally, your prep zone sits between the sink and the stove, so rinsed produce can move easily into the cutting area, then on to the pan. Stock this zone with knives, cutting boards, mixing bowls, and frequently used utensils. Good task lighting here makes all the difference—nobody wants to dice onions in the shadows.


5. Cooking

The stove, oven, microwave, and their surrounding surfaces make up this zone. To keep things running smoothly, keep oils, spices, pots, and utensils within arm’s reach. Leave at least a foot of counter space on either side of the stove for landing spots—places to set down hot pans or transfer food safely. And don’t forget proper ventilation: a good range hood improves air quality and keeps lingering smells at bay.

Courtesy of Rudy and Peter Skitterians

Optional Zones for Real Life

Once you have the basics down, you can layer in extras that suit your household:

Baking Zone: Store your stand mixer, rolling pins, and baking sheets together near the oven or pantry.

Coffee or Bar Zone: Create a mini café with your coffee maker, mugs, and supplies—or a bar area with glassware and mixers.

Drop Zone: A countertop or cabinet for keys, mail, laptops, or kids’ homework—because the kitchen inevitably doubles as the family hub.
Serving Zone: Keep platters, serving utensils, and glassware near the dining area for quick table setting.

Lunch Prep Zone: Corral reusable containers, sandwich bags, and water bottles to make mornings easier.

Specialty Storage: Seasonal platters, cake stands, and holiday dishware can live in upper cabinets or even outside the kitchen until needed.


Smart Layout Considerations

Even the best zones fall flat if the layout doesn’t support them. A few tips:

Place the refrigerator near an entrance so unloading groceries is less of a marathon.

Keep the sink relatively central, with the stove and fridge nearby.

Always allow counter “landing space” next to big appliances—12 to 24 inches is ideal.

In small kitchens, combine zones (prep and cleanup, for instance). In large kitchens, consider extras like a double island or a second prep sink.

Use vertical space—tall cabinets, wall hooks, or pot racks free up counters without sacrificing storage.


A well-zoned kitchen doesn’t just look organized—it feels better to use. Grouping items by task keeps you from running laps around the room, while clear landing spots make cooking and cleanup faster and safer. And because zones can be customized, they’ll work in any size kitchen, whether you’re living in a city apartment or a sprawling family home.

Think of it this way: the old work triangle gave you a map; zones give you a system that adapts to how you actually live.


Courtesy of Csaba Nagy

If you’re planning a kitchen refresh, organizing into zones is one of the simplest ways to make your space work harder for you. And if your appliances aren’t keeping up with your new system—whether it’s a fridge that’s running warm or a dishwasher that can’t keep up—our team at Appliance Rescue Service is here to help. From repairs to expert advice, we’ll make sure your kitchen runs as smoothly as it looks.

Website

Call: (214) 599-0055


Additional Reading


Unlocking Home Harmony: The Role and Benefits of Professional Organizers

Kitchen Safety 101: Protecting Your Little Ones at Home

Places to Avoid: The Paw Version! 


The Hidden Gunk Lurking in Your Appliances — And How to Get Rid of It

Your appliances could be harboring more than just dirt — learn how to protect your home.

We all like to think of certain appliances as “self-cleaning.” The fridge keeps things cold, the dishwasher uses soap and hot water, and the washing machine swirls away dirt. But the truth is, some of the grimiest spots in your home might be inside the very machines you rely on to keep things fresh.


Moisture, warmth, and leftover bits of food or detergent create a perfect welcome mat for bacteria, mold, and even fungi — and once they settle in, they can be harder to get rid of than you might expect. The good news? A few small habits, and a bit of regular maintenance, can make all the difference.


Kitchen – Dishwashers


Your dishwasher has a shocking secret, that doesn’t actually make sense. Out of all of the places in your home, your dishwasher is the most likely to harbor fungi. While many places in your home can provide an unwanted ground for bacteria, fungi isn’t one that many of us think of. The problem comes in on the rubber seals, the water drains and the sprinklers. Now, to be clear, fungi doesn’t always mean mushrooms. It can also mean molds. 

Fungi and bacteria are opportunistic pathogens meaning that healthy people aren’t going to be bothered much by them. Someone who is immunocompromised though, could find them much more problematic.   The problem is that they form biofilms which are not only difficult to remove, they’re also capable of surviving detergent, heat and variable pH levels. 


Some of the factors that increase the likelihood of microbial growth are the age of the appliance, how often you use it compared to how often you clean it, whether you have hard water, and whether you use rinse aid or not.    The age of the appliance, how often you clean it and whether or not you have hard water, are all pretty straightforward.
The one that surprised us were studies by the National Library of Medicine,  showing that using rinse aid actually makes it possible for a wider variety of fungi to flourish. It doesn’t mean it doesn't kill them at all, or that you should stop using a rinse aid. 


There are a few things you can do to clean and maintain your dishwasher though. Start by grabbing your calendar and scheduling in how often you want to remove and clean the filter. This is one we just don’t think about, and it’s much easier to schedule it, rather than trying to keep it at the top of your head, given everything else in life. Next up, add cleaning the interior and descaling to your monthly chore lists.  For that it’s making sure that you are using a mild cleaner and a soft brush. You’ll also want to descale by just using a hot cycle and a cup of white vinegar to dissolve any build up. Once every six months or so, take a look at your spray arms to clean the nozzles with either a toothpick or a toothbrush. 


Kitchen – Refrigerators

Your refrigerator might seem like the safest place for your food, but it can be hiding some very unpleasant surprises. Even though it’s designed to keep things cold, that doesn’t mean it’s free from bacteria or fungi. Moisture, food residue, and time can create the perfect hiding places for mold and bacteria — especially in spots you don’t think about often, like the vegetable crisper drawers, the rubber door gaskets, or even the water and ice dispenser.

The real trouble comes when mold spores find a damp place to settle in. Around gaskets, along water lines, or anywhere condensation collects, they can start to grow colonies. For most people, that might just mean something smells off or looks unsightly. But for someone with mold allergies or a weakened immune system, that can be a real health risk. And if any food in the fridge goes bad and starts to mold, it doesn’t just stay in its container — those spores can spread to other surfaces.

A few everyday habits can make the problem worse. Overfilling your fridge reduces airflow and traps moisture, making it harder for the cold to do its job. Placing warm food inside creates a pocket of heat that bacteria love. And leaky door seals? They let warm air in, which can raise the temperature and make everything inside more vulnerable.

If you already see signs of mold or slime, you’ll want to act quickly. Start by tossing any spoiled food and wiping down affected surfaces with gentle dish soap, white vinegar, or baking soda. For mold on gaskets, use warm soapy water or a bleach-based cleaner, rinse thoroughly, and dry the area before applying a thin layer of petroleum jelly to keep the seal from cracking. If your fridge has a water or ice dispenser, flush the line with vinegar for 30 minutes, rinse well, replace the filter, and discard the first batches of ice or water.

Keeping it clean is easier if you make it routine. A deep clean every three to four months works for most fridges, but if yours has a water or ice dispenser, aim for every two months instead. Keep the temperature between 35–38°F, don’t overfill, and wipe up spills as soon as they happen. Rotating food so the oldest gets used first will also help prevent spoilage before it starts.


Laundry – Washing Machines

It’s easy to think of your washing machine as one of the cleanest places in your home — after all, its whole purpose is to wash things. But the same warm, damp environment that helps clean your clothes can also be the perfect breeding ground for bacteria and fungi. These microbes love to settle into rubber seals, gaskets, detergent compartments, and even the internal plumbing, where they form a sticky layer called biofilm.

Biofilms aren’t just unpleasant — they’re stubborn. Once they form, they’re tough to remove and can shelter harmful microorganisms from detergents, hot water, and even bleach. While healthy people might not notice much more than a musty smell, anyone with a weakened immune system could be at risk for infections.

So, how do they get started? Constant moisture from frequent use, combined with leftover detergent, dirt, and lint, provides plenty of nutrients. Low-temperature washes — while great for energy savings — also let heat-tolerant fungi and bacteria survive and multiply.

If you start to notice buildup or odor, it’s time for a targeted clean. Remove and wash the detergent drawer, seals, and filters using hot water and a mild cleaner. If mold is visible, a diluted bleach solution (about 10%) can help. Run an empty hot wash cycle with vinegar or a washing machine cleaner to break down any biofilm lurking inside.

Prevention is all about keeping things dry and hot when they need to be. After each load, leave the door and detergent drawer open to air dry, and wipe down the seals so moisture doesn’t linger. Running a high-temperature “maintenance” cycle every so often will also help keep microbes in check.


Keeping your appliances clean isn’t about making them look nice — it’s about keeping them safe, efficient, and able to do their jobs well. A little routine maintenance goes a long way in stopping mold, bacteria, and other unwelcome guests from setting up camp in places you’d never think to look.
With just a few minutes here and there — and a regular schedule for deeper cleanings — you can keep your dishwasher, refrigerator, and washing machine fresh, functional, and ready to serve you for years to come. Think of it as caring for the quiet workhorses of your home, so they can keep taking care of you.

Need a deeper clean or a repair you can trust? Appliance Rescue Service is here to help. From expert inspections to professional cleaning and repairs, our team makes sure your appliances are running safely and efficiently — so you can spend less time worrying about hidden gunk and more time enjoying your home. Call Appliance Rescue Service today and let us take care of the dirty work for you.

Courtesy of Andreas

Back-to-School Cleaning: How to Prep Your House for Fall

Before the backpacks pile up, give your home the reset it needs—starting with air filters, fridges, and family routines.

As the final days of summer fade, August quietly offers something most people overlook: a golden window to reset the home before school-year routines take over. Unlike the frenzy of July vacations or the packed schedule of September, August sits in a sweet spot—a time when the house is (hopefully) calmer, and routines are ripe for a thoughtful refresh. Whether it's deep-cleaning forgotten appliances or setting up smarter systems for school success, an August reset is one of the most powerful things you can do for your home.

Why August Matters

Summer leaves its mark on every corner of the house. From the buildup of dust and allergens to overused appliances and cluttered pantries, it's easy for the home to slip into disarray. Add in Miami-style humidity or heavy AC usage, and you're looking at dust circulation, stale air, and stressed-out appliances. Resetting your space in August helps prevent the backslide into chaos once the school year kicks off.

But there’s another compelling reason: appliance technicians and home service providers often have more availability in August. Beat the September rush by handling your tune-ups and deep cleans now—your future self (and your dishwasher) will thank you.

Start With the Air You Breathe

Air quality plays a quiet but critical role in how we feel at home. As we prepare to spend more time indoors, this is the moment to swap out HVAC filters, dust vents and fans, and clean purifier units if you have them. In homes with allergy sufferers, an August reset can ease the transition into fall by removing dust mites, mold spores, and other irritants.

Pro tip: Even opening windows for cross-ventilation during early morning or late evening hours can help flush out stale air and reduce indoor pollutants.

Quick Appliance Wins With Big Payoffs

Before routines shift and time disappears, take advantage of August's relative calm to give your appliances a little love:

  • Refrigerator coils and shelves: Pull the fridge out, vacuum the coils, and wipe down shelves. This improves efficiency and keeps food fresher.

  • Washer gaskets and detergent drawers: Clean away detergent residue and check for trapped moisture to prevent mold and odors.

  • Dishwasher filters: Rinse or scrub them clean so you don't start the school year with underperforming wash cycles.

  • Microwave and oven vents: Degrease these now, before school lunch reheating becomes a daily routine.

  • Dryer lint traps and vents: A deeper clean here helps prevent fire hazards and keeps laundry day moving.

Each of these small tasks helps extend the life of your appliances and ensures they’re working at peak performance—critical when you're packing lunches, washing uniforms, and microwaving leftovers on repeat.

Refresh the Kitchen Command Center

Your kitchen is about to get busier. Start by organizing the refrigerator and pantry: toss expired goods, wipe shelves, and group snacks or lunch items together. Designate a section for school-day essentials like reusable containers, napkins, and water bottles.

Now’s the time to set up a lunch-packing station. Use a drawer or small bin to corral bento boxes, thermoses, and prep tools. Prepping even small components the night before (like snacks or fruit) can turn hectic mornings into manageable ones.

Organize Smartly for the School Year

The shift from summer to school isn’t just about schedules—it's a shift in how the whole house functions. Designating drop zones for backpacks, lunchboxes, and sports gear helps contain daily clutter and makes mornings smoother. Even simple additions like hooks or labeled bins can work wonders.

Involve the kids: Let them choose their own drawer or shelf to manage, and assign age-appropriate chores tied to their school responsibilities. If they clean up after snack time or help reset the kitchen at night, it builds habits that benefit everyone.

Also consider how homework will happen. If you don’t have a dedicated space, turn part of a dining table or kitchen counter into a clutter-free homework zone. Clear away distractions, and stock it with supplies so no one has to go hunting for pencils at 8 p.m.

Don’t Skip the Laundry Zone

School season means more laundry: sports gear, uniforms, extra outfit changes. Take time in August to clean your washer and dryer thoroughly—including gaskets, detergent dispensers, and lint screens. If it’s safe, pull the units out and clean behind and beneath them. This is also the moment to reorganize shelves or cabinets in your laundry area for quicker access to stain removers or dryer sheets.

If space allows, add a folding station or simply clear off an area for sorting clean clothes. Streamlining laundry now can help prevent pileups later.

Schedule That Service Call Now

Need a professional tune-up or a deep clean you can’t tackle solo? August is the month to book it. Once the school year starts, everyone’s calendars tighten—including home service pros. Whether it’s a full duct cleaning, a carpet refresh, or a technician visit for your washer or AC, getting it scheduled now ensures your home is running smoothly before it matters most.

Make the Most of the Reset

Even just a few intentional updates can make a major difference in how your home functions once life speeds up again. The key is to tackle what matters most to your household: cleaner air, more efficient appliances, a more functional kitchen, or a smoother morning routine.

Think of your August home reset as laying the groundwork for a healthier, calmer school year—one where the fridge is clean, the laundry isn’t backing up, and everyone knows exactly where their backpack goes.

Because once that first school bell rings, it’s game on.

Website

Call:(214) 599-0055


Cleaning Confessions: The Myths Social Media Won’t Stop Spreading

The top 10 cleaning myths that get likes online—and cost you in real life.

Cleaning TikTok is the new HGTV—except instead of qualified professionals, you’ve got someone in pajamas pouring six cleaners into a toilet while narrating in a soothing voice. It's satisfying to watch. Sometimes it's even helpful. But most of the time? It's a fast track to ruined appliances, wrecked finishes, and chemical reactions your lungs did not sign up for.

Let’s break down 10 of the most popular viral cleaning myths—and why they’re more dangerous than helpful. Bonus: you’ll get the truth from actual experts (not just someone with good lighting and a pot lid).


1. Product Overload = Peak Clean? Not Even Close.

The Trend: TikTok’s #ProductOverload tag shows creators dumping entire bottles of cleaner into sinks, bathtubs, and toilets. It’s like a chemical ASMR video—and it gets millions of views.

The Truth: You know what too much product leaves behind? A sticky, filmy mess. “Using too much cleaning product can leave residue or build-up on your household surfaces, which in turn can attract more dirt,” explains Carylanne Brown, senior Grove guide at Grove Collaborative.

More product doesn’t mean more clean. It just means more mess (and possibly, more damage).


2. The Bleach + Vinegar Combo: Toxic, Not Clever

Courtesy of Anna

The Trend: Combine bleach with vinegar and get an “ultra-disinfecting” cleaner. Boom. Insta-ready.

The Truth: Please don’t. Mixing these two creates chlorine gas, which is extremely dangerous. You’ll go from “sparkling clean” to “call Poison Control” real fast.


3. Baking Soda + Vinegar: Not the Dynamic Duo You Think

The Trend: Dump baking soda and vinegar into your sink or toilet and watch the volcano fizz. So satisfying, right?

The Truth: It’s fun, sure—but not effective. The fizzing reaction neutralizes both ingredients, leaving you with salty water and zero cleaning power. “The chemical reaction is largely cosmetic,” says basically every chemist, ever.


4. Bleach-Soaked Toilet Paper on Grout = Cracked Tile

Courtesy of Brett Hondow

The Trend: Drench paper towels in bleach, line them up along grimy grout, and wait overnight.

The Truth: You’ll get some whitening… and possibly crumbling grout, damaged tile, or a hefty repair bill. Bleach is far too harsh for most porous surfaces. Skip the science fair.


5. Bleach + Dish Soap in the Drain: What Could Go Wrong?

The Trend: TikTokers pour bleach and dish soap into drains for a “deep clean.” Spoiler: it’s chaos in a cup.

The Truth: Some dish soaps contain ammonia. Mixed with bleach, that can produce chloramine gas, another respiratory hazard. Your lungs would rather you didn’t.


6. Magic Erasers on Leather and Car Interiors? Hard Pass.

The Trend: Scrub your leather seats or vinyl panels with a Mr. Clean Magic Eraser for a fresh-car finish.

The Truth: Magic Erasers are micro-abrasive. They can strip finishes, scratch surfaces, and cause discoloration. Great for walls. Not for your ride.


7. Mopping the Walls with Detergent Pods

Courtesy of Michal Jarmoluk

The Trend: Boil a detergent pod, dunk a mop head, and swipe your walls for that "hotel clean" look.

The Truth: Just… why? This can damage paint, oversaturate drywall, and leave behind residue that attracts even more grime. Use a damp cloth and mild soap instead. Or better yet, read your paint can, as not all paints are even meant to be washed.


8. The Tide Pod Couch Scrubber

The Trend: Wrap a microfiber towel around a pot lid, dunk it in Tide and hot water, and “shave” your upholstery with it.

The Truth: This one looks effective— but, those tide pods are meant to be diluted with gallons and gallons of water. Not a single pot. So, that means that the chemicals in the detergent aren’t getting properly washed out of your couch. Between that and the potential to damage your skin if not diluted properly, just skip this one.  If you wouldn’t wash your sofa with a garden hose, don’t do this either.


9. Ice Cubes in the Garbage Disposal (with Baking Soda + Vinegar)

Courtesy of Sebastian Nikiel

The Trend: Dump ice, baking soda, and vinegar down the disposal to sharpen blades and clean it out.

The Truth: Ice doesn’t sharpen blades—it can jam or crack them. And again with the baking soda and vinegar combo—it’s mostly for show. Stick with a cleaner designed for disposals and rinse with hot water.


10. Self-Cleaning Appliances Take Care of Themselves

The Trend: “It has a self-cleaning button. That means I never have to touch it again!”

(Insert sad appliance noises here.)

The Truth: Dishwashers, ovens, washing machines—even vacuums—need regular manual cleaning. Filters, vents, seals, and gaskets don’t magically clean themselves. Appliances need regular maintenance to perform properly, as we often point out.


It’s tempting to trust the viral cleaning videos—fast, flashy, and seemingly effective. But a little bit of bleach foam and a camera angle doesn’t equal a clean, healthy home. Use the right products, in the right quantities, and clean the way your appliance manuals (and lungs) would prefer.

And if you’re not sure what’s safe for your fridge coils, oven vents, or washer drum? That’s what we’re here for.


If you're in the Frisco–Dallas–Allen area, Appliance Rescue Service is just a call away. We’ll keep your machines humming, your home sparkling, and your lungs chemical-free.

Website 

Call: (214) 599-0055


Additional Reading
Spring Home Maintenance Checklist

The Do’s and Don’ts of Cleaning Stainless Steel Appliances

Common Appliance Issues That Could Ruin Your Holiday – And How to Prevent Them