Bringing Color To Your Kitchen

 How and Why You Should Bring Colored Appliances Into Your Kitchen 


We’ve been stuck in our homes for so long that we’re getting bored. We can't speak for anyone else, but we want colorful appliances! We're sick of stainless steel and matte black. It's been the defacto for the last two decades and we want something new. We’ve had neutral kitchens and a lack of color in our homes for several years now. It’s time to bring back color.  After the year we’ve all been through, we’ve come to realize that every element of our homes should speak to us. The colors we bring into them are no different. Yes, you can paint the walls or the cabinets, but why stop there? Shouldn’t your kitchen be just as much an expression of you as the rest of your home? 


 We know, change can be intimidating. There are lots of ways to do it though and they can range from purchasing new appliances in the color of your choice, to fixing panels to them, to getting a custom vinyl wrap. Let’s take a look at some colors that have been popular for this year, and are expected for next year first though. 


What Colors Are Popping Up

One of the few bright spots of many of us staying at home this year is that we ended up rediscovering our love of color. The 2020 colors as predicted by Pantone and other top color companies were ochre, magenta, creams (in all shades), navy blue and dusty teal. We definitely saw these make a comeback this year,  and we hope they're going to  stick around for several years to come. 


Going into 2021 colors are expected to pop even more as people get bored of being home. We're expecting jewel tones, aquamarine and neons. We can't say what the world is going to look like next year, but we can say it will certainly be colorful, and hopefully that will include your kitchen.  One of the companies we’re going to talk about, Blue Star, has already gotten on board with the aquamarines. 

Woman in Kitchen and Blue Star oven in Aquamarine


If you’re starting to warm up to the idea of a color in your kitchen, your next question is going to be ‘how do I get them?’  You’ve got three choices. You can purchase them from a company, and hope that they offer a color you like. Many do offer custom colors, but that still takes time to get it just right. You can put panels over the appliance, but then it’s not exactly the appliance that’s colored, it’s the walls around it. We like this one if you want your kitchen to have a very organized and contained feel.  Or you can go with a custom vinyl wrap, which while it does mean finding someone that’s willing to do it, means you can get really crazy in color, patterns, anything your heart desires. 


Companies With Color 

If you want to purchase from a company, we have a selection of them.
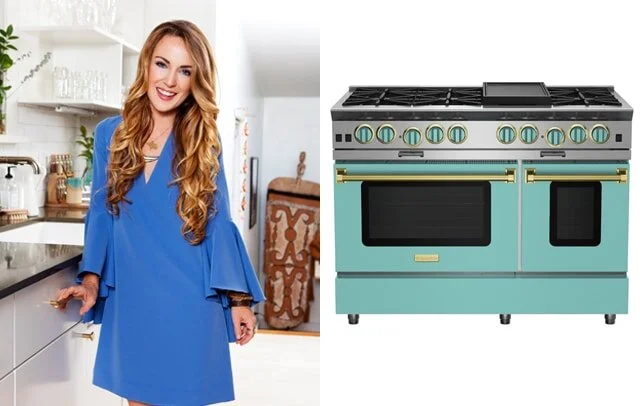
You have Blue Star, with their focus on professional quality cooking. We love their suite for 2021. They let you customize how your stovetop is going to be laid out, colors and finishes, the colors of the knobs, handles and details as well as how your doors are laid out. You can craft your ideal kitchen suite and know that it is entirely your own. 

Blue Star Full Kitchen with double oven, microwave and vent hood


Admittedly American Range is more focused on restaurant level cooking gear, but they do offer a residential line for those of you that swear by them. They come in a wide range of colors, both matte and gloss finishes. The one draw back with your oven is that they only paint the doors and the kick plates. The control panel has to remain stainless. 


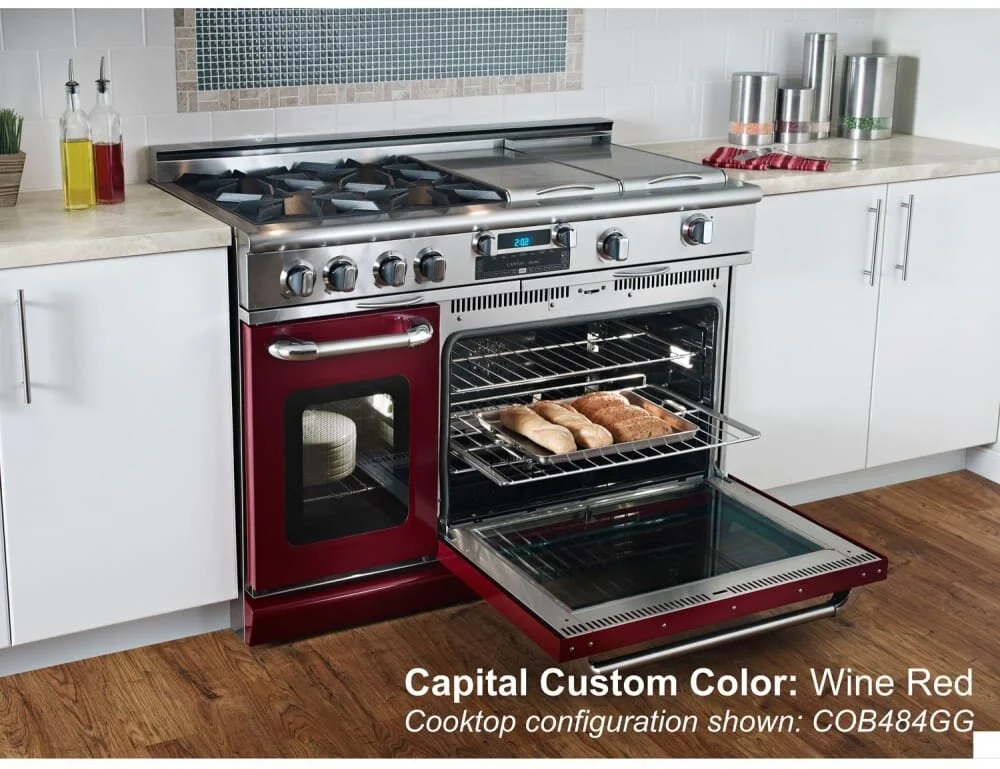
Unlike the previous two brands, Capital has both preset models and configurations, with a selection of colors that they have on hand, as well as offering custom color and configuration options. They focus on luxury residential appliances, but the only one they offer custom colors on is your range. 

Capital dual oven range in wine


Dacor is much like Capital. They too focus on providing luxury kitchen appliances, but they only offer color options for your range  


Out of all of the brands we’ve looked at, Ilve is, to us at least, the most detailed and luxurious. However, since  they only make ranges,  they still aren’t a perfect fit if you’re wanting all of your appliances to be a single color. 

Ilve Oven with burnished brown and bright copper accents


The problem with buying colored appliances is that even if you want to keep the same color in 8-12 years when you replace it, you might not be able to. Many brands will only keep colors for so long as they’re producing sales, especially if it's a full suite. 


Paintable, Replaceable Panels

What if you have a brand you already love and you don't want to replace it? Then you might want to consider installing panels. You can do that on your own, or you can have someone else apply them. The upside is that you can paint those as many times as you want. You can make the panels match your existing cabinetry and have a very sleek look. The downside is that if you love the shape of your appliances, or don't like everything being square and cabinet-like, this might not be for you. 


Go Wild With Decals 

Or you can use custom vinyl decals . Elise  of A Beautiful Mess figured out that you can get vinyl decals of your preferred color installed, if you’re willing to look around. She ended up going to a custom vinyl shop, which usually does cars, buses and the like. They were more than willing to help her out though and even installed the wrap professionally. As Elise points out “I’ve worked with big surfaces of vinyl before, and it’s very tricky to avoid wrinkles completely. I valued the polished look more than saving a bit more $ in this instance.” The vinyl is removable, easy to clean and heat resistant up to 900* F. All of which mean it’s great for any of your appliances in your kitchen. Just think, you could change it out every other year if that’s what you’re up for. Or add additional decals for different holidays throughout the year. We love this idea the most because it makes your appliances a full extension of you and what you want them to be. 


We’re thinking that custom vinyl wraps are going to become very popular soon, once people realize just how versatile they are. What about you? How are you going to color your kitchen? Are you going to go with a company like Blue Star? Or do you like how panels look in the kitchen? Or do you want to do something insane and personal  with a vinyl wrap? Let us know in the comments below or over on our Facebook page. We’d love to hear from you. In the event that you end up having issues with one of your appliances in the meantime, we’re only a phone call or click away. 


Disclaimer: The images used herein belong to their respective companies.


It’s Back Again, The Self-Cleaning Oven

This time, it’s got a partner in crime! 


Thanksgiving is just around the corner and we're already swamped from the nightmare that is 2020. There's meals to plan, family to either pick up or travel to and somehow you're supposed to clean the house too? We're right there with you. One thing we can say though, no matter how tempting, don't use the 'self-clean' function on your oven. 


Shocked woman opening her oven where there is a fire and smoke

Let's start off by looking at how it works. Technically speaking, a self-cleaning oven is a misnomer. It's not actually cleaning itself. Instead it super heats the bits of leftover food and whatnot inside of your oven to make it easier to remove. It's not even meant to replace a cleaning routine.


When we're talking about a self-cleaning mode we are discussing two different possibilities. You have your high heat models and then you have steam models


Light It Up! 

A high heat model starts by locking the oven door. This is important because the next step is to raise the internal temperature between 900 to 1,000° F. The cycle lasts between 2 and 6 hours. The door unlocks only after the oven has cooled completely. So why do people choose this method? Most people think that the high heat model is going to reduce the food and any other debris like tinfoil down to ash. It actually doesn't. It might end up blackening the waste, and it does help with removing it from the walls of the oven where it can get caked on, but it doesn't reduce it down to ash. 


It's Getting Steamy In Here 

The steam-based cycle on the other hand requires putting approximately one cup of distilled water into the bottom of your oven. Typically there's a special reservoir. The door stays unlocked for the entire cycle because the temperature is only being raised to 250° F.  The grime is softened and loosened by the steam, allowing you to wipe it out much more easily. This cycle lasts between 30 minutes to an hour.


The Downsides 


Fumes 

During their cleaning cycle both types of ovens emit foul smells, burning odors, fume and can even release potentially harmful byproducts such as carbon monoxide. The North Texas Poison Center even suggests that you leave your house while you have the high heat models running because they can produce a volume of fumes that is toxic. According to them "  Although Teflon ...  when it is heated to 600 degrees F, breathing the fumes can cause chills, fever, profuse sweating, cough, flu-like symptoms and chest tightness." 


Costs Add Up Quick! 

Another downside to the high heat model is that the excessive heat built up within the oven can short out fuses or burn out your heating elements. Yes we can replace them for you, or if you're handy with appliances and electronics, you can purchase the parts and do it on your own. The problem is that those pieces add up quickly. Not to mention when you're wanting to host Thanksgiving dinner in the same week, if not the next day as one patron recounted, there's not enough time to get it fixed before your oven. 


How Much Does It Use? 

One final issue with these two options, to us at least, is that the high heat version, which is what the majority of our customers have, will cost you the equivalent amount of entire months worth of oven usage. For just one cycle of self-cleaning it typically takes 8 kW hours. The steam clean option is slightly better with only taking three kilowatt hours worth of power. But that still roughly 1/3 of your monthly usage.


Instead what we suggest is doing the process by hand. Cleaning your oven yourself, or having someone clean it for you won't damage any of the internal components or burnout your heating element. All you need is white vinegar, baking soda, and water. Make sure that you avoid anything abrasive though, as they can damage the coating of your oven, causing chips and scratches. Those chips and scratches can then make it far more likely that they will get in your food, or through your exhaust fan, out into the air you're breathing. 


If you're wanting to avoid all that, here's how to clean your oven. 

-Start by removing the racks. They might need to be cleaned too, but for the time being you can put them into the kitchen sink, or your bathtub. (We advise putting down an old towel to prevent it from scratching the finish.) 

-From there, grab a rag, wet it down and wipe down all of the surfaces of the oven. Pay attention to where the built up crud is and take note. 

-Grab a mixing cup and some baking soda. Pour one half cup of baking soda into the cup and add water a few drops at a time. Keep going until you have a thick paste. 

-Take the paste and apply it thickly over every surface in the oven. You want a solid coat, without any of the enamel underneath showing through. Let that sit overnight. 

-Once the requisite six to eight hours have passed, lay out a mat or some newspapers under your oven door and grab a sponge. Moisten the sponge slightly and wipe out as much of the baking soda as you can. You're going to have to rinse out the sponge several times, as you keep wiping until no more paste is in the oven. If your oven still seems dirty, go ahead and repeat the process, being sure to let it sit overnight again. 

Burned and blackened oven interior with the heating element destroyed.


We hope we've answered some of your questions about self-cleaning ovens! If you have questions, comments or concerns, please let us know in the comments below or over on our Facebook. If your oven, or any of your other major appliances, are giving you trouble, feel free to call or come over to our website to book an appointment. We want to help keep your home running smoothly! 


The Frightful Feast Continues

Halloween Themed Meals


Last week we made you a promise: real food ideas for dinner, but with enough of a Halloween twist to distract the kids from the impending sugar rush (at least momentarily).


This post brings you three entrees full of creepy, spooky, tasty Halloween goodness.


We do use shaped molds in one recipe. If you opt to use that recipe, be sure to get metal or heat-resistant silicon molds so you'll be able to put them in the oven. They're available at your local Target or Wal-Mart for between two and twelve dollars, as store brand or name brand. Wilton makes the best, in our opinion - the cutest for sure, but also the most expensive.


If you don't want to spend the extra time or money on shaped molds, we've provided a couple of "handy" alternatives at the end.

Fried hotdogs and pickled peppers for a Halloween treat in a frying pan.
 

Fried Worms and Stranglevine Sandwiches


Ingredients

1 package hot dogs or Polish sausages

1 jar mild pickled pepper rings or slices

1 Tablespoon olive oil

8 slices wheat bread

Ketchup, mustard, relish, etc., to taste


Tools:

Frying pan, cutting board


Step One:

Cut your hot dogs or sausages into quarters. Sometimes we feel quarters are a bit too broad and cut them into eighths, which cook quicker anyway.


Step Two:

Drain the vinegar from your pepper rings and rinse them off so the pickled taste isn't quite so strong.


Step Three:

Put your bread into the toaster. Crispy slices hold up much better; you may wish to toast them a little longer than your usual setting.


Step Four:

Heat the olive oil in your frying pan and toss in the sausage and peppers to sear.


Step Five:

Scoop a generous helping of "worms and vines" onto your toast, and garnish with your favorite condiments before serving.

 
Meatloaf shaped like a brain for a Halloween meal.


Brain Loaf

Ingredients

2 lbs fine ground turkey or ground beef ( it’s up to you)

1/2 cup chopped, steamed cauliflower (cooled)

2 eggs

1/2 cup breadcrumbs

1/4 cup minced onion

1 Tablespoon garlic powder

Salt and pepper to taste


BBQ sauce or ketchup for decorating


Tools:

Two small aluminum mixing bowls (the rounder the better), large mixing bowl, baking sheet


Step One:

Preheat your oven to 375. While it's heating, mix your turkey - we like to use Honeysuckle White brand Italian seasoned turkey link sausage, but remove the casing - with your cauliflower, egg, breadcrumbs and spices in a large mixing bowl.


Step Two:

Grease your two small aluminum mixing bowls lightly with nonstick spray, butter or oil - whatever you have on hand. Fill them to about 3/4 full with your turkey mixture.


Step Three:

Place your two mixing bowls onto a baking sheet and slide it into the oven. Bake for 45 minutes to an hour. Test with a meat thermometer if you're not sure whether or not they're cooked through.


Step Four:

Loosen around the edges with a butter knife and turn the bowls upside down onto the dish you'll be serving from.


Step Five:

Use your ketchup or BBQ sauce to draw squiggles on your "brain" before cutting to serve.

 
Meatloaf shaped like skull and crossbones on a bed of shredded and sauteed veggies.


Pirate Bones in Seaweed


This is the recipe where those shaped molds come into play! Skulls and crossbones are ideal for what we've called it here, but feel free to make up your own fun name to go with jack o'lantern, brain, bat or ghost shaped molds, or whatever else you can find. Get creative! And don't forget to poll the kids if you have them around - they often have brilliant ideas.


Ingredients:


Pirate Bones:

[Use the same recipe from "Brain Loaf" to make your skull and crossbones meatballs]


Seaweed:

2 yellow squash

2 zucchini

2 carrots

2 Tablespoons butter


Tools:

Shaped silicon mold(s), vegetable peeler or spiralizer, baking sheet, large skillet or pan


Step One:

Preheat your oven to 375. Load your silicon mold(s) full of the meatloaf mixture from the previous recipe. Fill the hollows to the top, and make sure to squish the mixture down into the little details. Having two or more molds is optional, but having more streamlines the process (and you'll only have to get your hands dirty once like that).


Step Two:

Place your silicon mold(s) onto the baking sheet. Bake for 25 minutes, or until the visible edges of the meat mixture have browned.


Step Three:

Heat the butter in your skillet or pan on low.


Step Four:

While your meatballs are baking, use a spiralizer or a vegetable peeler to either spiral cut or shave thin slices of your vegetables into the melted butter.


Step Five:

Once all the vegetables have been sliced into the pan, turn the heat up and saute them lightly. Season to taste (we like garlic or lemon-pepper seasoning) and arrange into a nest on each plate.


Step Six:

Pop your shaped meatballs out of the molds and divide them up between the dishes of vegetables. Sauce is optional.


Hand Steak and Veggies


Here's the alternate idea we promised you, in the event you weren't interested in the shaped meatballs from the last recipe.


Utilize the meatloaf recipe once more and arrange it into a large hand shape on a baking sheet or in the bottom of a large skillet, and either bake or pan fry until done.


For a slightly less messy option, you could step over to the grocery store and pick up a ham steak or two. Trim up the edges and then cut short lines in from one side to make wide "fingers," and then pan sear.


Serve with your favorite sides, and enjoy your simple, spooky meal!


Happy Halloween!


What did you think? Are you as eager to get into the kitchen as we were?  We hope you’ll let us know over on our Facebook page, we’d love to hear your thoughts on Halloween traditions and food. In the event that one of your appliances has given up the ghost, or is just being ghoulish, you can always call or visit our website to make an appointment


Three Top Ovens For 2020

KitchenAid / Maytag / Samsung Convection Ovens Compared 

Prices / Features / How Well Do They Stack Up?


As fall is here many of us are thinking of cooking and baking and creating memories with our loved ones. The commonality with these things is your oven. Some of us have a fantastic relationship with our oven. Some of us don't. This week we are looking at the top three electric wall ovens for those of you who are looking to start a new relationship. Will be taking a look at KitchenAid, Maytag, and Samsung. All three are convection ovens. If you want to brush up on what that means you can check out our post here.


Along with the price and features for each oven we also had a set of parameters that they were rated on. The expected reliability or how often are you going to be calling your favorite repair people to come and fix something. Baking because you need to know how well it can handle Grandma's favorite cookies.  Broiling, how well does it handle cooking burgers, roasts and the like.  And how much does the company say it can hold versus how much it actually can, also known as oven capacity. We rated these on a system of five stars, based on how well they handle the various tests. 


KitchenAid KOSE500ESS 


The kitchen aid oven Is our first contender. It's called the Even Heat True Convection oven and offers up consistent heating for even cooking. 

  • With a bow tie design for the convection element to ensure "no more burnt edges or undercooked center" . 

  • The KitchenAid has a 5 cubic foot capacity. 

  • It offers satin glide rollout extension rack and a system that KitchenAid claims takes the guest work out of convection cooking. 

  • It also comes with a temperature probe to allow the accurate measurement of internal temperatures without having to open the oven. Personally we like that option. You don't have to risk ruining something just in order to check the temperature. 

  • It also offers flexible design elements to allow it to match the height of your existing cabinets. 

The KitchenAid scored only a three for predicted reliability. Unfortunately KitchenAid does have a history of numerous issues. It makes up for it in the other three categories however. In baking, when testing both cakes and cookies on two different racks, it rated four out of five. They weren’t perfect, but very close. Broiling we had to give it a five. When broiling on high heat the KitchenAid did amazingly. Oven capacity also scored a five. You’re getting exactly what they say you are which for a price of $,2499, that’s not a bad thing.

KitchenAid convection oven in stainless steel with three racks.


Maytag MEW9530FZ


Our second contender is the Maytag

  • It is 30 in wide and 5 cubic feet, the same as the KitchenAid. 

  • It offers true convection with a single fan and a third element.

  • It also offers the FIT system to ensure that it matches the height of your counters. 

  • A key feature for this oven is the precision cooking. This combines precise preheat, precise bake, and precise broil. 

  • It has a heavy duty rollout rack to ensure long lasting easy to use oven racks. 

  • It also has a variable setting for broiling.

While the Maytag doesn’t have as many features as the other two on our list, what it does offer, it does well. It’s priced at $1730, which is less than either of the other two. It landed solidly at a four in predicted reliability, baking, and broiling, with a five for oven capacity. This model of the Maytag is a fantastic purchase if you are looking for a solid new oven that won’t break the bank. 

Maytag convection oven, the best price on the list in stainless steel wit a simple interface.


Samsung NV51K777OSG


Our final contender is the Samsung. Unlike our previous opinions on the Samsung refrigerators your blogger is very enamored with this oven. 

  • The Samsung is 5.1 cubic feet in comparison to the previous two ovens. It might not seem like much but who knows that extra bit could be exactly what you need if you do a lot of cooking of poultry or large meats. We don't judge. 

  • The Samsung offers a Flex Duo system. This enables you to cook two different dishes at two different temperatures at the same time. They manage this with a removal divider and dual temperature controls. 

  • They also unlike the others offer a steam cook option with a compartment for water and a system to evenly disperse it. 

  • It comes with two convection fans. 

  • The knobs are illuminated when the oven is on which means no more asking “Is it on did I preheat the oven or do I just think I did.” 

  • It does come with a companion asked and Wi-Fi connectivity which you know we're not too keen on. However the companion app does allow you to preheat the oven from anywhere, turn it off if you're not at home, or check and adjust the temperature if you're doing something else. 

  • The one point of similarity to the other ovens is that it offers a heavy duty gliding rack which allows you to pull it out to almost full extension while it has something still on it.

  •  And last but not least it has pre-programmed a recipe guide to help you and learning to use your convection oven to its fullest extent. 

Rounding out our list, the Samsung is… a little weird when it comes to our ratings. It got three fours and one five, but it didn’t end up with the same spread as the Maytag before it. Instead, the fours are for predicted reliability, baking and the oven capacity of all things. The five is actually for how well the Samsung handles broiling. So, although the features list it as 5.1 cubic feet, we didn’t agree. If you can overlook that bit of fudgery, we think the Samsung is well worth its price of $2790. 

Samsung Flex Duo convection oven in graphite black with two knobs, the most expensive on our list but also the most versatile.


So if you're looking to get a new oven which one appeals the most to you? We'd love to get your thoughts over on our Facebook page. In the event that your current oven or one of your other major appliances is giving you trouble feel free to reach out. We'll help you figure out what's wrong and how to fix it. We're always here whether you want to make an appointment via phone or our website, if you need some maintenance tips or to figure out why your oven won't turn on. 

The Meal Opens On a Fright

Halloween Themed Appetizers  To Terrorize Your Guests


It is officially that time of year.


Many families love Christmas the most, and they put maximum effort into Christmas foods, decorations, films, music and traditions. We're not saying we dislike Christmas, or even that we don't put in that kind of effort, but... It's too early for that. Ignore the department stores.


In this house, Christmas is very closely rivaled by Halloween. We plan Halloween costumes several months in advance. We have Halloween traditions that we trot out every year, and specific decorations that have to make an appearance somewhere around the house, and movies we just have to see. And yes, we do have favorite Halloween recipes. We'd like to share some with you.


This post will only have appetizers. We'll be back again next weekend with some real food that comes with a Halloween twist. The point is, the recipes will be there for you when you'll need them - right about the time the kids are so obsessed with candy that the idea of meat or vegetables hasn't occurred to them for the last 48 hours.


These recipes are pretty simple. Feel free to get the kids involved! Extra hands can make this a lot easier.


Appetizers:


Mummy Fingers and Spider Guac


Ingredients:

1 bag pretzel rods

1 can pizza or crescent dough


1 container chunky avocado or 3 whole ripe avocados

1 small tub sour cream

1 jar salsa (purchased or homemade)

1 packet guacamole seasoning (or make your own)


Tools:

Baking sheet(s), cutting board, sharp knife, shallow dish (preferably a round one; pie dishes work great), sandwich bag, toothpick(s)


Step One:

Have a little helper break your pretzel rods down to finger size (halves or thirds work well). Remember - this is an exercise where imperfect is perfect, so don't worry about them being even.


Step Two:

Unroll your dough onto a cutting board while the oven preheats according to package directions. Use a sharp knife to cut the dough into long, thin strips.


Step Three:

Wrap the dough around the pretzel rods as "mummy bandages" and bake according to package directions. (Brush with melted butter if you want some extra flavor, although we felt it didn't need it with the salty pretzels.)


Step Four:

While your "Mummy Fingers" are in the oven, mash your avocados (or just open up your purchased container of avocado) and mix in your seasoning.


Step Five:

Pour your salsa out into a shallow round dish, and spoon your guacamole over top of it. Make sure to put a thick, even layer of guacamole and smooth it out - it will be your blank canvas soon.


Step Six:

Drop a few spoonfuls of sour cream into a sandwich bag and seal it up. Poke a hole through a bottom corner with a toothpick. Test the width of your line on a paper towel if you're not sure about it - but start small. You can always widen it later, but if you start with too wide a line, you'll need a new sandwich bag.


Step Seven:

Use the sour cream to draw your web! Squeeze a circle of sour cream out on top of your guacamole just inside the rim of the dish. Draw a slightly smaller circle inside that one. Repeat the circles, smaller and smaller but not touching, until you reach the center of the dish. Use a toothpick to draw straight lines from the center to the outside of the guacamole, which will stretch and distort your sour cream circles into a web. We like to start with four lines and then split the distance between them to make eight even divisions. If you're so inclined, you could even toss some food coloring in with the leftover sour cream in the bag and draw a sour cream spider in a contrasting color.


Step Eight:

Remove your mummy fingers from the oven and enjoy with your spider guacamole!


Mummy Fingers and Spider Guacamole. (Pretzel Rods wrapped with crescent dough and guacamole made into a spiders web)

Pumpkin Guts Dip


Disclaimer: No pumpkins were harmed in the making of this recipe.


Ingredients:

1 brick cream cheese

1/2 cup shredded sharp cheddar (preferably orange)

1/2 cup shredded mozzarella

1/3 cup Buffalo sauce (or more if you'd like)

3-5 Tablespoons heavy cream or ranch dressing

1/3 cup garbanzo beans, pureed

1 carrot, finely shredded

1 can chunk chicken breast, drained (optional)

Celery sticks ("pumpkin stems") for dipping


Tools: Fine grater, sauce pan, serving dish, platter


Step One:

Toss all of your cheeses into a shallow sauce pan and turn the heat on low. Cover with a lid and allow the cream cheese to melt, stirring every few minutes.


Step Two:

As your cheeses melt, pour in your Buffalo sauce and cream or dressing. Stir well to incorporate.


Step Three:

Add your pureed beans and stir. Grate your carrot directly into your sauce pan, stirring occasionally to prevent mounds of carrot lumping up in the middle of the pan. If you're also using chicken, now is the time to add it. After stirring everything well, cover the pan and increase the heat to medium-low.


Step Four:

Cook over medium-low heat until bubbly. While it's cooking, wash and chop your celery and arrange it on a platter.


Step Five:

Have your little helpers, if present, taste test. Add more cream or dressing or cheese if it's too spicy or too thick, and add more Buffalo sauce or a dash of Tabasco if it's too mild.


Step Six:

Pour into a serving dish, add it to your platter of "stems" and dig in!

Pumpkin Guts Dip made from chickpeas and layered with chicken.


What did you think? Are you as eager to get into the kitchen as we were? We hope you’ll let us know over on our Facebook page, we’d love to hear your thoughts on Halloween traditions and food. In the event that one of your appliances has given up the ghost, or is just being ghoulish, you can always call or visit our website to make an appointment