Three Top Ovens For 2020

KitchenAid / Maytag / Samsung Convection Ovens Compared 

Prices / Features / How Well Do They Stack Up?


As fall is here many of us are thinking of cooking and baking and creating memories with our loved ones. The commonality with these things is your oven. Some of us have a fantastic relationship with our oven. Some of us don't. This week we are looking at the top three electric wall ovens for those of you who are looking to start a new relationship. Will be taking a look at KitchenAid, Maytag, and Samsung. All three are convection ovens. If you want to brush up on what that means you can check out our post here.


Along with the price and features for each oven we also had a set of parameters that they were rated on. The expected reliability or how often are you going to be calling your favorite repair people to come and fix something. Baking because you need to know how well it can handle Grandma's favorite cookies.  Broiling, how well does it handle cooking burgers, roasts and the like.  And how much does the company say it can hold versus how much it actually can, also known as oven capacity. We rated these on a system of five stars, based on how well they handle the various tests. 


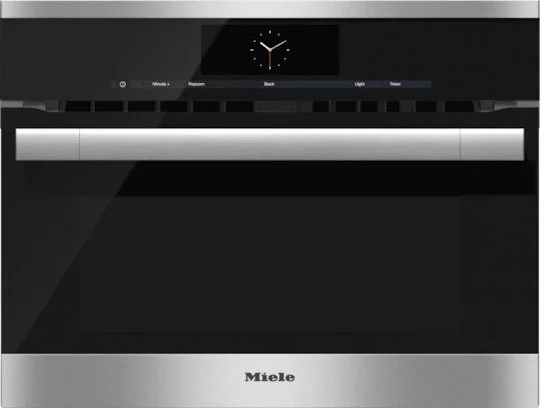
KitchenAid KOSE500ESS 


The kitchen aid oven Is our first contender. It's called the Even Heat True Convection oven and offers up consistent heating for even cooking. 

  • With a bow tie design for the convection element to ensure "no more burnt edges or undercooked center" . 

  • The KitchenAid has a 5 cubic foot capacity. 

  • It offers satin glide rollout extension rack and a system that KitchenAid claims takes the guest work out of convection cooking. 

  • It also comes with a temperature probe to allow the accurate measurement of internal temperatures without having to open the oven. Personally we like that option. You don't have to risk ruining something just in order to check the temperature. 

  • It also offers flexible design elements to allow it to match the height of your existing cabinets. 

The KitchenAid scored only a three for predicted reliability. Unfortunately KitchenAid does have a history of numerous issues. It makes up for it in the other three categories however. In baking, when testing both cakes and cookies on two different racks, it rated four out of five. They weren’t perfect, but very close. Broiling we had to give it a five. When broiling on high heat the KitchenAid did amazingly. Oven capacity also scored a five. You’re getting exactly what they say you are which for a price of $,2499, that’s not a bad thing.

KitchenAid convection oven in stainless steel with three racks.


Maytag MEW9530FZ


Our second contender is the Maytag

  • It is 30 in wide and 5 cubic feet, the same as the KitchenAid. 

  • It offers true convection with a single fan and a third element.

  • It also offers the FIT system to ensure that it matches the height of your counters. 

  • A key feature for this oven is the precision cooking. This combines precise preheat, precise bake, and precise broil. 

  • It has a heavy duty rollout rack to ensure long lasting easy to use oven racks. 

  • It also has a variable setting for broiling.

While the Maytag doesn’t have as many features as the other two on our list, what it does offer, it does well. It’s priced at $1730, which is less than either of the other two. It landed solidly at a four in predicted reliability, baking, and broiling, with a five for oven capacity. This model of the Maytag is a fantastic purchase if you are looking for a solid new oven that won’t break the bank. 

Maytag convection oven, the best price on the list in stainless steel wit a simple interface.


Samsung NV51K777OSG


Our final contender is the Samsung. Unlike our previous opinions on the Samsung refrigerators your blogger is very enamored with this oven. 

  • The Samsung is 5.1 cubic feet in comparison to the previous two ovens. It might not seem like much but who knows that extra bit could be exactly what you need if you do a lot of cooking of poultry or large meats. We don't judge. 

  • The Samsung offers a Flex Duo system. This enables you to cook two different dishes at two different temperatures at the same time. They manage this with a removal divider and dual temperature controls. 

  • They also unlike the others offer a steam cook option with a compartment for water and a system to evenly disperse it. 

  • It comes with two convection fans. 

  • The knobs are illuminated when the oven is on which means no more asking “Is it on did I preheat the oven or do I just think I did.” 

  • It does come with a companion asked and Wi-Fi connectivity which you know we're not too keen on. However the companion app does allow you to preheat the oven from anywhere, turn it off if you're not at home, or check and adjust the temperature if you're doing something else. 

  • The one point of similarity to the other ovens is that it offers a heavy duty gliding rack which allows you to pull it out to almost full extension while it has something still on it.

  •  And last but not least it has pre-programmed a recipe guide to help you and learning to use your convection oven to its fullest extent. 

Rounding out our list, the Samsung is… a little weird when it comes to our ratings. It got three fours and one five, but it didn’t end up with the same spread as the Maytag before it. Instead, the fours are for predicted reliability, baking and the oven capacity of all things. The five is actually for how well the Samsung handles broiling. So, although the features list it as 5.1 cubic feet, we didn’t agree. If you can overlook that bit of fudgery, we think the Samsung is well worth its price of $2790. 

Samsung Flex Duo convection oven in graphite black with two knobs, the most expensive on our list but also the most versatile.


So if you're looking to get a new oven which one appeals the most to you? We'd love to get your thoughts over on our Facebook page. In the event that your current oven or one of your other major appliances is giving you trouble feel free to reach out. We'll help you figure out what's wrong and how to fix it. We're always here whether you want to make an appointment via phone or our website, if you need some maintenance tips or to figure out why your oven won't turn on. 

The Meal Opens On a Fright

Halloween Themed Appetizers  To Terrorize Your Guests


It is officially that time of year.


Many families love Christmas the most, and they put maximum effort into Christmas foods, decorations, films, music and traditions. We're not saying we dislike Christmas, or even that we don't put in that kind of effort, but... It's too early for that. Ignore the department stores.


In this house, Christmas is very closely rivaled by Halloween. We plan Halloween costumes several months in advance. We have Halloween traditions that we trot out every year, and specific decorations that have to make an appearance somewhere around the house, and movies we just have to see. And yes, we do have favorite Halloween recipes. We'd like to share some with you.


This post will only have appetizers. We'll be back again next weekend with some real food that comes with a Halloween twist. The point is, the recipes will be there for you when you'll need them - right about the time the kids are so obsessed with candy that the idea of meat or vegetables hasn't occurred to them for the last 48 hours.


These recipes are pretty simple. Feel free to get the kids involved! Extra hands can make this a lot easier.


Appetizers:


Mummy Fingers and Spider Guac


Ingredients:

1 bag pretzel rods

1 can pizza or crescent dough


1 container chunky avocado or 3 whole ripe avocados

1 small tub sour cream

1 jar salsa (purchased or homemade)

1 packet guacamole seasoning (or make your own)


Tools:

Baking sheet(s), cutting board, sharp knife, shallow dish (preferably a round one; pie dishes work great), sandwich bag, toothpick(s)


Step One:

Have a little helper break your pretzel rods down to finger size (halves or thirds work well). Remember - this is an exercise where imperfect is perfect, so don't worry about them being even.


Step Two:

Unroll your dough onto a cutting board while the oven preheats according to package directions. Use a sharp knife to cut the dough into long, thin strips.


Step Three:

Wrap the dough around the pretzel rods as "mummy bandages" and bake according to package directions. (Brush with melted butter if you want some extra flavor, although we felt it didn't need it with the salty pretzels.)


Step Four:

While your "Mummy Fingers" are in the oven, mash your avocados (or just open up your purchased container of avocado) and mix in your seasoning.


Step Five:

Pour your salsa out into a shallow round dish, and spoon your guacamole over top of it. Make sure to put a thick, even layer of guacamole and smooth it out - it will be your blank canvas soon.


Step Six:

Drop a few spoonfuls of sour cream into a sandwich bag and seal it up. Poke a hole through a bottom corner with a toothpick. Test the width of your line on a paper towel if you're not sure about it - but start small. You can always widen it later, but if you start with too wide a line, you'll need a new sandwich bag.


Step Seven:

Use the sour cream to draw your web! Squeeze a circle of sour cream out on top of your guacamole just inside the rim of the dish. Draw a slightly smaller circle inside that one. Repeat the circles, smaller and smaller but not touching, until you reach the center of the dish. Use a toothpick to draw straight lines from the center to the outside of the guacamole, which will stretch and distort your sour cream circles into a web. We like to start with four lines and then split the distance between them to make eight even divisions. If you're so inclined, you could even toss some food coloring in with the leftover sour cream in the bag and draw a sour cream spider in a contrasting color.


Step Eight:

Remove your mummy fingers from the oven and enjoy with your spider guacamole!


Mummy Fingers and Spider Guacamole. (Pretzel Rods wrapped with crescent dough and guacamole made into a spiders web)

Pumpkin Guts Dip


Disclaimer: No pumpkins were harmed in the making of this recipe.


Ingredients:

1 brick cream cheese

1/2 cup shredded sharp cheddar (preferably orange)

1/2 cup shredded mozzarella

1/3 cup Buffalo sauce (or more if you'd like)

3-5 Tablespoons heavy cream or ranch dressing

1/3 cup garbanzo beans, pureed

1 carrot, finely shredded

1 can chunk chicken breast, drained (optional)

Celery sticks ("pumpkin stems") for dipping


Tools: Fine grater, sauce pan, serving dish, platter


Step One:

Toss all of your cheeses into a shallow sauce pan and turn the heat on low. Cover with a lid and allow the cream cheese to melt, stirring every few minutes.


Step Two:

As your cheeses melt, pour in your Buffalo sauce and cream or dressing. Stir well to incorporate.


Step Three:

Add your pureed beans and stir. Grate your carrot directly into your sauce pan, stirring occasionally to prevent mounds of carrot lumping up in the middle of the pan. If you're also using chicken, now is the time to add it. After stirring everything well, cover the pan and increase the heat to medium-low.


Step Four:

Cook over medium-low heat until bubbly. While it's cooking, wash and chop your celery and arrange it on a platter.


Step Five:

Have your little helpers, if present, taste test. Add more cream or dressing or cheese if it's too spicy or too thick, and add more Buffalo sauce or a dash of Tabasco if it's too mild.


Step Six:

Pour into a serving dish, add it to your platter of "stems" and dig in!

Pumpkin Guts Dip made from chickpeas and layered with chicken.


What did you think? Are you as eager to get into the kitchen as we were? We hope you’ll let us know over on our Facebook page, we’d love to hear your thoughts on Halloween traditions and food. In the event that one of your appliances has given up the ghost, or is just being ghoulish, you can always call or visit our website to make an appointment


Fire Dangers : What Are You Looking For?

Electrical Fires and How You Can Work To Prevent Them


Did you know that electrical fires are one of the top causes of the over 24,000 fires reported every year? October is Fire Safety and Awareness Month and we at Appliance Rescue Services wanted to do our part to keep you and your families safe. We'll dig in by talking about what are some of the most common causes, how to prevent them, and gear you should have in your home.


Fires: The Facts

Out of the 24,000 plus fires every year, Texas is one of the three leading the nation in fire deaths according to the US Fire Administration. The other two are California and New York. We will point out that these are fires caused from within the home rather than outside sources such as wildfires. Appliances are the number four cause of electrical fires within the home. 


Some of the top causes for electrical fires are wiring, overheating, and improper use of power cords. 


The wiring is the one that is the most clear cut. If cords are frayed,, exposed, or otherwise damaged the possibility of sparking and causing fires is a logical possibility. Some examples are inside of an appliance such as your oven or your dryer,or inside of an outlet that hasn't been properly grounded. 


When it comes to our homes, every year we add more electrical items. Naturally they require more power but we don't always have the number of outlets that we need for our new toys. So instead we might hook extension cord into extension cord and overheat the wiring by drawing too much power through it all. That can cause the internal wires to melt and allow the outer casing to deteriorate which can then cause fires.

 
Woman in front of electrical fire afraid and freaking out


Fires: Prevention

So how do you go about preventing these? For the first one, going over cables regularly is a good idea. You should also have your appliances checked out, in addition to the outlets that they hook into. 


It's also a good idea to clean out your dryer every 6 months to get rid of all the built-up lint. (Note that we're not talking about the lint-catch there. We're talking about the outtake duct. Your lint-catch should be cleaned out after every load.) 


Another thing to keep an eye on is if lights start to flicker. This could mean that the wiring from the switch to the light is damaged in some way. If your outlets have an odd smell when running you might look into how they're doing.  As for not having enough outlets; we suggest either having an electrician install new ones or carefully moving items around the room to make best use of the outlets you do have. Hooking extension cord into extension cord is never a good idea. 

 
Power cord stuck into powercord stuck into power-cord.
Power cord on fire with cables melted, frayed and otherwise damaged.


Fires: The Gear

Now that we've covered the scary stuff, and the boring stuff, let's get into how to deal with fires. 

In this case the old adage a good offense is the best defense holds true. Your best bet when it comes to fires is to have tools and systems in place well before a fire ever breaks out.


When it comes to a fire it's not just the smoke and heat that are an issue but also carbon monoxide.

Installing dual sensors for both carbon monoxide and smoke is a first and basic step. You should test the batteries monthly and replace them yearly to ensure they stay in working order. The great thing about modern dual sensors is that many of them will be part of a system that you can have send information either to your local fire department or to your home monitor system.


You should also consider a home fire sprinkler system spread throughout your house. 

They can extinguish a fire if it's a small one . They can prevent it from spreading to other areas of the home. And most importantly they can decrease the chance that smoke and deadly gases will reach your family. 


If you're like many of our clients in the Frisco and McKinney areas then you probably have a two-story home. Every bedroom should be equipped with a fire escape ladder. This way in the event of a fire on the first floor you still have a way to get out. The good news is that these are collapsible and easily put away.


Having a fire blanket or two such as in your kitchen or in your garage is a good idea. These are useful for minor fires such as in the kitchen. they can also be wrapped around someone if their clothes have caught on fire.


Fire extinguishers are also something to have scattered throughout your home. You can get training from either your local fire department or a manufacturer. They'll walk you through both the PASS system as well as a few tips for before you use one.

P- pull the pin

A- aim at the base of the fire

S -squeeze the handle slowly and evenly

S- sweep from side to side


Some basic tips:

  Ensure that it's properly charged. This should be something you check once a month along with testing your smoke and carbon monoxide detectors.

Make sure that your back is to an exit before using, you want to make sure that you can get out.

Make sure that everyone either is leaving or has left the house before using the fire extinguisher.


Even with all of this we know that we plan to start a fire in our backyards as the nights get cooler. Fire and electricity  are  like many things we've discussed, a tool to make our lives easier. So as we turn up the heat as temperatures get cooler, remember the boundaries of these tools. Keep your home and family safe and be aware of the way you use electricity. 

If you have any tips that you think we missed or tools that you'd like to recommend for fighting a fire please let us know over on our Facebook. And if you think that there might be an issue with one of your appliances you can always call us or go to our website to set up a maintenance appointment.


What you want to know about speed ovens

The best of both worlds or too good to be true?


How often do you rush home after work fighting to try and figure out something that you can make that won't take all of your remaining free time and is still healthy? How often does that end up being a meal you toss into the microwave and choke down because it's been turned to mush, cardboard, or rubber? Would you believe us if we said that there was a way to cook without spending hours or eating cardboard afterwards? Today, we're talking about speed ovens. A speed oven is a relatively new type of appliance in the realm of cooking. What are they really, are they worth the hype, and how much would you be spending if you decided to put one in your kitchen.


What is a Speed Oven? 

Let's start off with what they are. Speed ovens combine a convection oven, a microwave, and if you choose, a grill element. They're supposed to be able to reduce the amount of time it takes to cook with a conventional oven, while also avoiding dehydration of food like a standard microwave. They take very little if any time to preheat, which is a drawback of most standard ovens.They often come with a variety of different pre-programmed modes or recipes to make things even easier.


A typical program for example would be baking. Most of us bake even if it is just around the holidays or special occasions. Something that would typically take you say an hour to bake in a normal oven would take roughly half the time using a speed oven. (Depending of course on the model.) This would be something wherein you would have 90% convection and 10% microwave. This innovative combination of different methods of cooking allows the speed oven to shorten the amount of time it takes to make your food. Some people swear by them, some people hate them. We think it's best to keep your manual nearby so that you can learn the different modes and cooking methods and make the best of this nifty appliance. 


Most of them are built and modeled after wall ovens. While some do come with the option to be freestanding, the larger majority of them are meant to be built into your existing cabinetry.


Who makes them? 

The three top speed ovens currently in the field in our opinion at least are made by Miele, Wolf, and Thermador. 


Miele H6700BM Built In Stainless Steel 24” ContourLine

1.52 Cu Ft

M Touch Intuitive Controls

19 Operating Modes

Rapid Preheat

Roast Probe

Over 100 MasterChef Menu Options

Comfort Swivel Handle

Clean Touch Steel

Stainless Steel 


Price: $ 3899


We think this model is best if you regularly host small dinner parties or cook just for your family. This is great for those of us that could use a hand in learning to make more of our ovens

The Miele ContourLine Speed oven, flush in the wall, with a silver handle, and  touch screen panel


Wolf SPO30CM/B/TH 30” Built In Speed

Dual Convection

10 Cooking Modes

All in One Oven Versatility

Astounding Capacity 1.6 Cu Ft 

Stylish 

Quick Start Controls

Gourmet Mode

Convection Mode

Quartz Broil Element

Keep Warm Mode

3.5 Watt LED Light 


Approximately $ 2580


The Wolf model is something we think best fits the hostess. You're regularly hosting large dinner parties or called on to bring baked goods for PTA meetings and your kids bake sales etc. You know your way around the kitchen and you need an oven that can keep up with you and your demanding life.

The Wolf Built In Speed Oven, flush in the wall of a matte grey kitchen.


Thermador MC30WP  30” Professional Series

1.6 Cu Ft

10 Microwave Power Levels

36 Cook Smart Auto Programs

2 Knobs

Kitchen Timer

Panel Lock

Touch Screen

Standard or Flush Install 


Rounding out our list is the Thermador. We include this one for the professional chef or Baker. You know what you're doing and how to do it and you need a tool that won't flinch at the amount of cooking you plan to do. The Thermador is built for professionals designed by professionals and is just what you're looking for.

The Thermador Speed Oven, with dual knobs  a touch panel and silver design.


So do you have any experience working with a speed oven? Do you think you would benefit from adding any of these to your kitchen? Let us know in the comments down below or over on our Facebook. We would love to hear from you. Although we hope that you've chosen a model that won't give you any issues.


 In the event that you have a speed oven and it's giving you trouble, we do service them. You can always reach out to us via our website or you can call ((214) 599-0055 ) and set up an appointment. We are here to keep  your home in tip top shape.


*Disclaimer: All images belong to their respective companies.

Wool Felted Dryer Balls - Are They Worth the Hype?

 They might be worth more than you expected.


Looking at that title you're probably wondering what are felted wool dryer balls and are we not talking about the stuff that gets caught in your lint trap? Nope!  We are talking today about the benefits both real and imaginary for dryer balls that you can make yourself.


 You've probably seen the commercial version of these in your local big box store or a DIY option on Pinterest. Felted wool dryer balls therefore are balls of wool; either wool yarn, unspun wool, wool batting, an upcycled wool sweater, that's been squished and fused together into roughly the size of a baseball. What matters here is that it is 100% wool without any acrylic or man-made materials in it. The reason for this is because the natural wool fiber has scales that, when wet,  will mesh and knit themselves together. Which is what you want in order to make a solid ball.  


On to what you really want to know about: what are they supposed to do?

On TV you'll probably have seen dryer balls touted as everything from alternatives to dryer sheets reducing your electricity bill by half lasting for years, the list goes on. What we can tell you is that there are many benefits to using wool dryer balls. They are not as extreme as you may see online or on TV but they certainly are benefits.

  • They are a viable alternative to dryer sheets that you can make on your own.

  • They don't leave any residue on your clothes or towels.

  • They reduce static cling.

  • Provided you use the recommended six balls for a load, they do reduce the amount of time and therefore energy needed to dry your laundry. They can also be used with auto-sensing dryers. 

  • All-wool dryer balls don't release plastic or rubber chemicals when heated as tennis balls and the commercial plastic variants do.

  • They soak up some of the moisture in your laundry and redistribute it evenly throughout the dryer to allow for a more even drying process. 

  • A well-made dryer ball will last roughly 5 years. You can tell that it's time to make or buy a new one when it has begun to pill or pull apart slightly.

Wool Dryer Balls.jpg


Those aren't just the benefits that are claimed but ones that we can say actually are legit. The reasons most people run into issues with using dryer balls, be they wool, plastic or tennis balls, is because they only use two or three in a load rather than six as is suggested. Using six dryer balls you are able to reduce your drying time by roughly 20% although this might not be the same for all dryers. We have to admit we can only test so many.


The next question many people ask is, “do they damage your dryer?” There is currently only one instance that we have found where they may injure your dryer. There are some older dryers whose inner drum is coated with paint. Those, when hit repeatedly by the dryer balls, will have the paint begin to chip and flake off. Given that that is meant to be a protective coating as well as appealing we don't advise using them in that case. For those of you with a stainless steel drum however we have yet to find any damage that is consistent with just using wool dryer balls.


Going into this we also wondered if they were a fire hazard. Due to the wet felting method that these particular wool balls are made with they do not shed as much as you might think. You do still need to empty out your lint trap and clean out your exhaust duct regularly, but a wool dryer ball isn't going to add to these things in any measurable amount. There is one trend though that we have to warn against, the use of essential oils. The scents that are used on dryer sheets are specially formulated so that they will not catch fire. Those are also the ones that are going to add residue into your towels and clothing though so it's a toss-up. The essential oils that you can purchase in the store and many people suggest adding to your dryer balls to make your clothes smell nice are not the same. These can and will ignite if left in a dryer long enough or if you've oversaturated the wool ball. So as October is fire safety month please do not use essential oils on your wool dryer balls. If you want to make your clothes and linen smell nice you might consider sachets or something similar to place in your cupboards.


The process for making your own wool dryer ball is more simple than you might think. Gather whatever material you're using and form it into a ball. Pack it tightly and then slide it into an old stocking, tie a knot tightly on either side. Then you wash the ball usually with another load of laundry on hot water and a cold rinse. You can run it through the dryer afterward if the ball feels dense enough. Otherwise, you can continue to wash on hot and then rinse on cold until it reaches that point. Since we haven't made these ourselves we're going to link you to another page that explains it in more depth.


So, those are the benefits of felted wool dryer balls. Did you learn anything new? Are you considering using them with your own dryer? Let us know in the comments below or over on our Facebook page. Don't forget if you're having any issues with your dryer or any of your other large appliances feel free to call or set up an appointment using our page. We want to keep your home running in tip-top shape. 

WD3.jpg