Painting New Spaces

Walls don’t need all the color!


Have you ever thought of painting all of your home? Not just the walls, but everything. The whole idea about a home is that it’s meant to reflect you. So why should you limit that to the walls? Who is to say that it has to be one solid color either? There are so many other areas that can be painted, even if it’s just adding small details that add to how your home looks and feels. Floors, ceilings, stairs, what’s stopping you from trying one of them? Here’s a few other places you could add a splash of color to to change the mood. 


Make Your Ceiling Stand Out

Surprisingly most people will paint their ceilings white and leave it at that. If they’re really daring, might continue the color of the room across the ceiling and that’s it. 

But… why? 

It used to be that you would paint your walls white and then paint the ceilings in different colors or designs, or even whole murals. This not only showed your wealth, but it meant that eyes were drawn upwards, and it gave a room a much brighter feel by leaving the walls painted white.

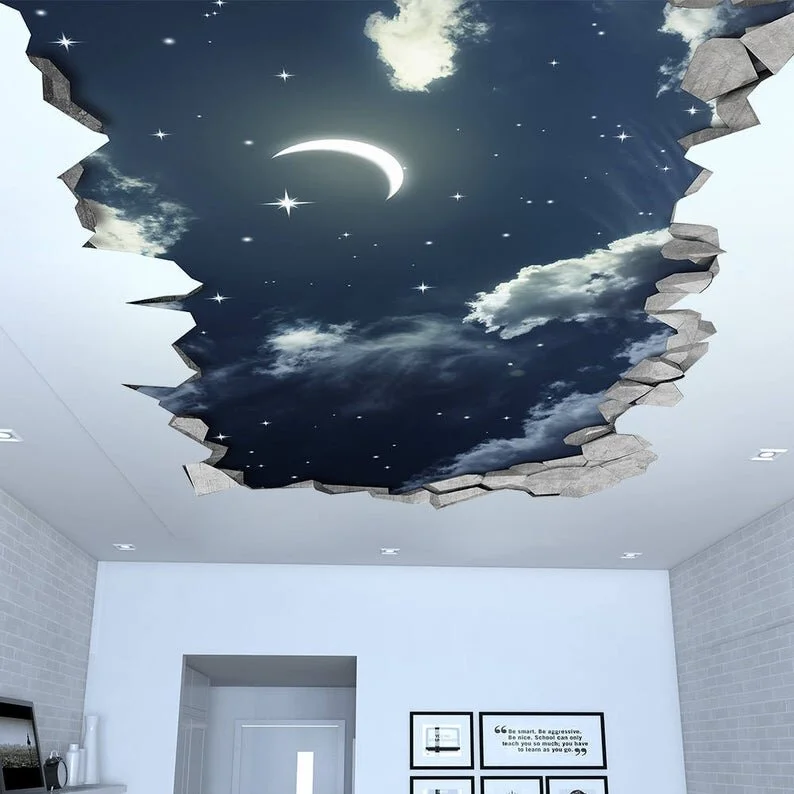
-You could paint patterns of stars, clouds or waves across your ceiling, using stencils or freehand, to bring either interest or peace to a room. 

-Consider using either a contrasting or complimentary color to bring attention to it, without making it overbearing. 


The Floor is Lava! 

Ok perhaps not, but depending on what you have as a floor material in a child’s room, it could be very entertaining  to paint their floor as a multitude of games and have an area rug that covers it 90% of the time. 

-Alternatively  no one said the paint in question had to be permanent. That opens up all sorts of possibilities  from encouraging messages to wild patterns that you’re testing out, workouts or game areas. The only limit here is what you’re willing to come up with. 


Paint the Walls Red! 

Or green, or purple or whatever the Pantone color of the year is. We didn’t say we were only talking about new places right? You’re right. We’ve been painting our walls for eons. What if we told you there’s a way to paint your home whatever color you wanted, even if you’re renting? More interested? There is now paintable, removable wallpaper. Yep, it takes more time than painting straight off, but the exchange is worth it. You can do so much more! 

  • Test one color at a time in a room to find which one you like, without having ugly watches on the wall. Just paint a strip and hang it. 

  • Change your walls every season! Are you the type to go all out, moving furniture and changing out slipcovers with every season? Why not give your walls the same amount of love? 

  • What about for a party? You could easily put up some paper and paint it specifically for the party, or have the attendees write messages all over the wall, depending on what it is. 

  • Paint your apartment that bold red you want, and don’t lose your security deposit over it! 


Step It Up

Yup. You knew this one was coming right? Whether you paint the tread or the riser,both are great spots to bring something new. 

-You can paint patterns going up the stairs, on the tread. 

-Paw prints, encouraging messages, family memories. They’ve all been done. 

-You can use the riser to paint a picture that only shows if you’re looking up the stair way.  If your walls are full of pictures already, this is a viable space! 

Stairs with stary night landscape.jpg

-Or you could reference things that matter to you or your family, like favorite books, sports, games, history etc. 

This is a seriously underutilized part of the home when it comes to painting! (Check out some of these great examples that we found though!) 


You could even get fancy and mix and match ideas, like putting the removable wallpaper on the stair risers so that you can change them out over time. 


So, are you looking at things in your home differently? Wondering how you could add color to your world? Let us know either in the comments below or on our Facebook.  We want to see where you’re adding color to your life. 


Don’t forget that if your appliances are acting up, or you’d like to schedule a maintenance check, you can do that by calling us or creating an appointment. We want to work with you and all of our customers in the Plano area to keep your home running smoothly. 

How to Work with An Interior Designer : Kitchen Redesign Part 4

Or, how to find the right person for redoing your kitchen that isn’t you.

If you’re looking to redo your kitchen, but don’t want to do it yourself, who do you call? An interior designer! Welcome to our final post in our kitchen redesign series. As promised we are looking at the following questions: 


What is the difference between a renovator and an interior designer? 

What do they want you to know? 

How do you make the relationship a happy one? 

At what point can you say “I don’t like it” and how do you do it? 

Can you ask them to do the upstairs bedroom while they’re at it? 

How do you say thank you after the job is done? 


What is the difference between a renovator, an interior decorator and an interior designer? 

A renovator is someone who will follow the design you give them, exactly as you give it to them, but you have to provide resources, plans, and make sure that everything is on spec and to your plans. 

An interior decorator is someone who makes improvements to how things look, but not to the structure of a space.  They typically work alone. 

An interior designer is a licensed professional who can manage projects that involve construction and architecture. They’ll oversee the project and all subcontractors, keep things running on a timeline, as well as making suggestions for designs that you hadn’t considered. 

Magazine cut outs, fabric samples, color possibilities


What do they want you to know? 

A quick run down of the 6 biggest things interior designers wished we all knew before working with them. 

Even if we don’t live in the same city, we can probably still work together. 

It’s not easy! We have to go through an in-depth and rigorous education and training process like any other pro. 

We can use all sorts of tech on the cutting edge to help you see what your new space will look like. 

It doesn’t matter whether you want a single room or the entire home redone, we can do it. 

We can make sure your project conforms to building codes and safety standards. 

We typically can’t share our pricing and product sources with you. 


How do you make the relationship a happy one? 

Before you pick a  designer, interview several of them. Somewhere around 5-6 is a good idea. You want to find someone not only that you get on with, but also who fits your budget and has a style that meshes with yours. 

Ask questions. Ask all the questions you have. They can’t answer them if you don’t ask them. 

Once you have decided on the designer you want to work with, start as you mean to go on. This is someone who is going to be in your home for months. You’re going to become very well acquainted with them. Be friendly, be open and don’t forget to speak up. 

- If you don’t like something, tell them. It’s best to say this at the beginning of the process when you’re choosing materials and putting together a list of ideas and plans, but you need to say it. Remember, you’re the one that has to live with any choices made. 

- Make sure you have a budget and are fully prepared to spend all of it. 

- Present a united front. If you have housemates, you need to all agree on what the space is going to look like. 

- Have realistic expectations.  Miracles can be done, but there are limits. 

- Show off what you like and what you don’t. Explain why. The emotions, thoughts and experiences you attach to shapes, colors and textures go a long way towards how you will interact with a space. Magazines, Pinterest boards, swatches of color, all of these work.  Your designer needs to know both sides of what you like and don’t so that they can do their best by you and not bring in an element you despise. Which brings us to.. 

Two women chatting next to a window

At what point can you say “I don’t like it” and how do you do it? 

The best time to do this is in the beginning, during the planning phase as we said. However, if something has come up during the process that your discussions missed, or you didn’t think of, don’t be afraid to say it. Be polite, be firm, and keep to the point. Whether it’s a motif, a color, the pairing between materials, whatever. Your designer isn’t a mind reader and they won’t know unless you tell them. 


Can you ask them to do the upstairs bedroom while they’re at it? 

The answer here is going to depend entirely on the designer in question. 

You’ll want to approach it has you have everything else to this point, politely and with curiosity, honestly expressing how much you’re enjoying working with them. Provided you mean after the current project is done, you might get a few different answers. 

  • “No? You contracted me for this project and I’m booked for a while afterwards.” 

  • “I’d love to, let’s get it in writing though.” 

And here you’d have to go back through the discussion and selection process that you did at the beginning. 

  • “Let’s see how we both feel after the job is done.” 


How do you say thank you after the job is done? 

While the most common way is to just say ‘thank you’ , there is something better. Tell your friends! Heck, tell your enemies if you have any. The more you brag and show off your newly redesigned kitchen, the more you help their reputation. The better their reputation, the more clients they’ll get. Trust us, they’ll be just as happy as you are at that point. 


Thank you for joining us for this post and for this series! We hope that we’ve been able to answer the questions you’ve had about remodeling your kitchen. If you have further questions, feel free to pose them to us in the comments below or over on our Facebook page. 

And if you have any issues with your appliances, please let us know. You can call or set up an appointment over on our page. We want to help keep your home running smooth.

All of Your Laundry Questions Answered

Or At Least As Many As We’ve Been Asked

Laundry is like the internet, both necessary and a total time suck. With many contradictory instructions for how to get what you want out of it. This week we’re answering some of the most common laundry questions in hopes of cutting down the time you spend doing it. 


1. Is distilled white vinegar as useful as the internet thinks? 

When it comes to laundry, it is indeed that useful. While it won’t fix every problem, it can be used to 

  • Soften clothing

  • Reduce body odor

  • Clean your washing machine between loads (really, a half cup in where you’d normally run your detergent and it helps get rid of that funk!) 

2. I feel like my colors are getting dingy since switching to a High Efficiency machine. What gives? 

HE machines bounce the clothing around in the wash instead of submerging them the way traditional machines do. That leads to additional wear and tear, and greater potential for dye transfer. Pretreating your clothes with color safe bleach will help them stay vibrant, and get even cleaner as well. 

3. Does a High Efficiency washer have to use HE detergent? Or can I use what I have? 

HE washers are designed to use less water. What that means is that if you use standard detergent it could take as much as 5 rinse cycles to get all of the suds and residue out of your clothes. 

If you don’t have any choice, you have to get your clothes clean today, consider using less than a quarter of the amount of detergent you would have before. 

4. Do I have to sort my clothes? 

Simply? Yes. 

If you throw it all in together you end up frying shirts and lingerie just to get your jeans and towels dry. Not to mention you’re dealing with  transferring dyes, lint build up, piling, and snags or holes. 

An easy solution is to keep a hamper that has one section for whites, one for lights, one for darks and one for dry clean only. 

When it’s time to do laundry, sort by fabric types and your clothes end up not only looking nicer, but lasting longer as well. 

5. How much can I cram into my dryer before I cause damage? 

If you’re using the word ‘cram’ odds are you’re already doing damage. 

Overloading is one of the biggest reasons dryers break. The dryers belts or pulleys are strained and then the motor overheats. 

Fortunately, it’s easy to avoid this outcome. If you’re dealing with lighter fabrics,  you can get away with filling the dryer ⅔ of the way. If it’s towels, jeans or bedding though, you shouldn’t fill it past ½ way. Stick to these two amounts and your dryer will thank you. 

6. I shrank my favorite shirt! Can I fix it? 

If you dried it, it’s possible, but much more difficult. 

If you caught the shrinkage when you pulled it out of the wash, maybe. 

-Cotton is very forgiving, as is polyester. These can be both be gently stretched out and laid flat to dry.

-If it’s wool… we suggest you go shopping? 

7. I have multiple pets and the fur is always in my washing machine. What can I do? 

Get a lint roller. Not only will it remove pet hair before you wash, but using it will keep that hair out of the washer drum or the drain pumps. 

8. Can I hand wash clothes labeled dry clean only? 

In short? No. 

The manufacturers test their clothing during the deign process to see which method of washing holds up best and keeps the clothing lasting as long as possible. 

There are kits for the dryer like Dryel which will help freshen clothes, eliminate odors and even get rid of light stains and wrinkles. However things like velvet, leather and silk, even some nylons, polyester or spandex, don’t hold up very well in the wash and should  be handled with care. 

9. My T-shirts are being destroyed by sweat stains. How do I stop looking like I don’t care? 

Start by pre-treating the shirt in the areas where you know your  sweat collects., You’ll want to do this every time you wash them, even if you can’t see a stain. 

If the stains are in a white shirt, soak the shirt in boiling hot water in a dish pan to loosen up the stains. Then use a mixture of hydrogen peroxide, water and baking soda, rubbing the fabric together to get it worked into the fabric.  Rinse and toss it into the wash with color safe bleach. 

10. My white linens keep ending up dingy. What am I getting wrong? 

With time and repeated use, whites become dingy from missed stains, dye transfer and redeposited dirt. 

Try these tips to fix it. 

-Always separate your lines by color, whites, lights, darks. Each gets their own load. 

-Don’t overload the machine. 

- If the fabric is packed too tight the dirt will just get moved around instead of washed down the drain. 

-Use hot water instead of cold to more easily remove dirt and body oils. 

- Skip dryer sheets and instead dry on low heat so that any remaining dirt isn’t baked yellow. 

In short, it’s always better to ask questions when it comes to laundry, rather than having to replace your wardrobe or linens. We hope we were able to shed some light on your questions and if not, feel free to ask in the comments or on our Facebook. If your washer, dryer or any of your other appliances are acting up, feel free to call and set up an appointment. Or you can go to our appointment page and use that to set one up. 

We hope to see you again next week. 

Building Your Outdoor Kitchen: What You Need to Know Beforehand

Have you ever thought about building an outdoor kitchen? It’s summer and that means home improvement stores are pushing patio furniture and grills, and everything else that goes into it. So the idea is there. “What would it be like to have an outdoor kitchen?” and “how would I even get one started?” Every year we ask these same questions, and this year, we decided to bite the bullet. While not a complete list by any means (since every home and person is different) our list does cover many of the things that you need to consider when planning for an outdoor kitchen. 


Finding the Right Spot

That’s a trick question actually. There is no ‘right’ spot, nor is there a “perfect spot’.  

No, really. Take that idea and chuck it. No matter where you place an outdoor kitchen there will be reasons to love it and reasons to hate it. There isn’t a defined set of parameters that are going to make a spot ‘perfect.’ What you can decide on though is ‘perfect for you and your needs.’ 


Ask yourself, do you want it close to your house, or farther away?  There are benefits and drawbacks to both. 

-If you’re going to keep it close to the house: 

-It’s great because it’s easy to run water, electricity and gas. And extending a roof isn’t difficult. You can even get away with not having a sink if you place it near your indoor kitchen. 

However, 

- Make sure it’s on a northern wall to reduce exposure to the sun for you and your appliances. 

- Consider the location of doors and windows in relation to the area  so your house doesn’t become known for its smoked meats and furniture. 


If you want to build well away from your house consider: 

The benefits here include more space to spread out, the heat and smells from cooking won’t be as strong inside your house, and you’ve added an entire room to your floor plan. However, there are a few things that you’ll have to do ‘in exchange’. 

  • Building a roof to protect appliances (and you) from the sun

  • Including plenty of storage so you don’t have to run all over for tools, utensils etc. 

  • How you’ll run water and electricity to it. Running back and forth to wash your hands is a pain. 


Talk to an expert 

Even if you intend to build it yourself, an expert consultation can be a big help. 

Experts can help with things like 

Building codes

How close to your property line can you build? 

Even if your local code says you can build right up to the edge of your property, maybe don’t? Consider the noise, privacy and smoke issues from your neighbor’s side of the line. 

What do you need for fire safety? 

While not a comprehensive list, when it comes to fire

-  Keep the grill or stove at least 10’ from combustible materials and your house. 

Always have a fire extinguisher, a bucket of water and a bucket of sand in a specific cabinet in the event of a fire. And know when to use each. 

What types of permits need to be filed? 

Consider lighting and ventilation

Lighting - Make sure that your work surface and the surrounding paths leading to the kitchen are adequately lit. Given how easy it is to get hold of small solar powered lights this is very easy to set up, and ensures a safe work environment. 

Ventilation- No one wants to hangout in or near a smoky kitchen, so make sure that the grill is either at the edge of the space or install a ventilation system. 


Can you afford it? 

According to Angieslist, an outdoor kitchen can cost between 5k to 15k, depending on how many of the indoor comforts you want (Although if you want to get really elaborate, we have seen some that have gone as high as 75k.) 


  • How often will you use it? 

Really consider this one. Do you want it just for one major event a year? Or will you use it most weekends throughout the summer? Or do you really love cooking and plan to use it as often as possible? These answers are going to affect where and how you spend your money. 


  • What features do you want? 

Just like when we went through how to remodel your indoor kitchen, you need a list. You have the basics: 

Water supply

Direct gas line for the grill 

Fridge or mini fridge for drinks

What about seating? Fans? A trash drawer? Outdoor safe cabinets and counters? 


  • How much maintenance do you want to do? The materials you choose for your outdoor kitchen will directly affect how much you spend cleaning and repairing as time goes by. 


  • ROI

For some homeowners they look not just at ‘can I afford it and enjoy it now,” but “will it make my home sell better in the future?’ 


Given that most of our clients live in Texas we can firmly say Yes. According to Quicken Loans, houses in the south see a 100 - 200%  ROI on their outdoor kitchens. The reasons for this are many, but here are a few

-The weather is suitable for year round use

- If you use weather safe woods it will last for decades

- It gives a versatility for living indoors and out which is a growing trend, alongside outdoor bedrooms and living rooms. 


When you’ve looked at all of that, how does it add up for you? Do you think you’ll save up for another year and put in a lavish outdoor kitchen next year to boost the value of your house? Or are you dying to get started grilling now and you’re willing to add to it bit by bit? Let us know in the comments below or over on our Facebook page. 


And remember, if any of your appliances are giving you a hard time, you can always call or set up an appointment on our website. We want to keep your home running in tip top shape. 


Outdoor Kitchens: 7 Reasons You Want One Today

Every year we hear people talking about why they should get an outdoor kitchen, but so few people do. They talk and talk, but they never seem to decide to take the plunge, even though they're so useful!  We've put together 7 reasons you absolutely should put 'get an outdoor kitchen' on your to-do list for the summer. 


It will cut down your utility bills  

 This is a big one for many of us. If you've been with us for a while, you've seen that we like to help you save money when we can. An outdoor kitchen is a great way to do it, that not many people consider. 

Think about it,  if you're spending more time outside, your AC doesn't have to be cranked to max to keep your house cool. 

To really make the most of this you can install an awning, fan, or lots of green plants in your outdoor kitchen. All of these will help bring the temperature down on a hot Texas day.  If you can manage all three, say with an awning, a mobile fan, and then screens of green plants, you'll have created a small oasis for yourself. We all know that summers in Texas are unbearable, so why have everyone crammed into one or two rooms when you want to be together if you can spread out instead? 


They're great for entertaining

An outdoor kitchen is the perfect spot for entertaining. People can move around, talk with the cook, get drinks, and wander all without having to move from room to room. Where the food is, people gather and we love to socialize when we do. An outdoor kitchen doesn't have to be just a grill though, you can make it an entire oasis by bringing out lighting, furniture, patio heaters and more. What you can create in your outdoor kitchen is only limited by your imagination. 


An outdoor kitchen increases your home's value.

An outdoor kitchen is an investment in your home, and by comparison to most other outdoor projects, sees the most return on that investment.  

Additionally, most outdoor kitchen appliances and grills are stainless steel. They are easy to clean and built to withstand tough outdoor conditions, and the trend to be timeless (at least so far.) All of these add up to a long term investment that isn't going to go out of style or appear 'dated' if you decide to sell your home. 


Credit for the images goes to Country Living and Max Kim Bee


 Cooking becomes so much easier

- Most outdoor kitchens include everything you have inside, with an ice maker,  refrigerator,  side burners, and most importantly, the counter space. This means that you don't have to prep inside and move it outside, forgetting things you need and having to make multiple trips. Instead, everything you need is right there and you can get on with what you want to make. 

-When you cook inside, certain smells tend to linger. They'll seep into the walls and you'll be dealing with them for days, even if your vent hood is going full blast while you're cooking. Fish and deep-frying are two well-known culprits. With an outdoor kitchen, that's not the case. The air isn't restricted the same way it is inside, so the smells won't linger for any longer than it takes to clean the area. 

-No matter how hot things get, neither smoke nor heat will linger. This means that you're not overheating while cooking, or trying to air out the kitchen while also worrying about the food cooking properly. 


It gives you more room to spread out

Why build on an entirely new room with walls and a roof if you have a patio? As we said above with one or two tweaks you can make it into a small oasis, a kitchen, and a space to entertain guests on all sorts of occasions. Once you bring in the furniture you can expand the uses for it even further. With an awning or a solid roof added, you can even use it during rainy days. 


 Foods you cook are Healthier and Tastier

When you're cooking on the grill your foods, be they meat, vegetable or grain, tend to retain more of their flavor. They are also having the fat drip out of them, instead of sitting in it were it to be cooked in a  pan, which means that the end product is healthier too! 


You save money on eating out

When you have a  private dining area where you can enjoy the breeze, delicious healthy food, and the company of friends and family, without having to deal with other people's friends and family, why would you dine out? Every time you use your outdoor kitchen, you're keeping money in your wallet and building memories and bonds built around food. 


So, have we changed your mind? Are you considering turning your neglected patio into an outdoor kitchen? Let us know over at our Facebook page or in the comments. Even if you completely disagree, tell us that too! 


Whether you have an outdoor kitchen or not, we can still help with your appliances. All you need to do is place a call at ((214) 599-0055) or go to our website to set up an appointment and we'd be happy to help.  All of our clients matter to us, from Dallas to McKinney, and want to help keep your homes running.