It’s That 70s Decor!

It’s Come Back For Round Two, And We’re Not Surprised

Have you looked around the stores lately and thought “wow, I remember seeing some of these trends in the 70s!” Or maybe you’re wondering why so many people on Facebook & Instagram are proclaiming their love for the color mustard yellow suddenly. Decor, like fashion, goes in cycles. For the last one hundred years we’ve gone back and forth between very organic and inorganic fashions. From the hard angles of Art Deco vs the curves of Art Nouveau, and black and white of the Jet Age to the earthy tones of the 70s. The cycle repeats over and over, and after a year of white kitchens and living rooms, people are CRAVING color and texture. This week we’re taking a look at some of the decor trends from the 70s that have come back, and ones we hope stay firmly in the past.


Things That Have Come Back

These are the things that have come back that we're actually really excited to see again.

Retro Colors 

After last year being All White everything we are so excited to see color this vibrant and Rich back in our lives! Yes, a lot of these colors are earthy tones, but that doesn't mean you can't have them bright and welcoming. If you don't want to have the whole room dominated by hunter green, don't! Use that for the accent colors. Paint just one wall. Paint the molding and trim around the room. Or do like we've done for ages: keep the room a neutral shade and just use pillows, throws, and similar objects to bring in the colors you want.


Macrame

Did you learn how to make friendship bracelets as a kid? Macrame is the same thing. Lots and lots of knots. The great thing is that you can use it to add texture, and have it match colors already in your home, or use it to bring in entirely new colors. It can also be used to make all sorts of things, from clothes to furniture. 


Velvet

Soft and luxurious, velvet is back! Couches, pillows, chairs and curtains, we love seeing velvet around the home. Velvet is all about giving yourself somewhere soft to rest at the end of the day. 


Animal Prints

Animal prints have always been fashionable, but during the 70s you saw them everywhere and mixed together in all ways possible. This time around, don’t be afraid to mix and max prints with different patterns or colors than what you might have seen in the past. And you can even get them cruelty free! 


Fringe and Shag Rugs

Continuing on with the idea of comfort, imagine a thick, rich carpet under your bare feet. You sink into it, and it’s cloudlike underfoot. Shag rugs never really went out of style, so much as they were relegated to teens rooms. Now, we’re realizing just how comfy they are in the rest of the home. Fringes just add to the benefit of having a rug by adding texture to a room and extending the space of a rug further. 


Hanging Chairs

Remember when we said you could make your own furniture out of macrame? This is part of what we meant. While it’s not the only way to get a hanging chair, it is certainly a fun one. Hanging chairs give a room a sense of playfulness and motion that most furniture doesn’t have, and we love it. We’re happy to see hanging chairs making their way back inside the home, no longer relegated solely to the front porch. 


All the Rattan

Rattan, much like macrame, gives a room a very airy look. In the 70s it was explored as an alternative in color and cost to the heavier, darker woods of the previous eras. Made of willow or cane, even with a very dense weave, it has a very light feeling to it. You can use it for anything from shelving to chairs, tables to headboards. There are also a wide array of patterns that rattan can be worked into to give different looks.  


Terrazzo
Ahh terrazzo, what can we say about this strange material? It’s a composite mixture, made of chips of marble, glass, or quartz, when you want the sparkle, but not necessarily the cost. Less garish than metal fleck paint, and far more affordable for home decor. It can be bright and colorful, mixing many materials together, or you might have it in monotones. While it used to be that you would only see it as countertops and flooring, now it’s being used for all sorts of things again. 


Wallpaper

Big bold wallpapers are back, graphic patterns that capture the attention. This time though, we advise only doing one wall, and ensuring that you frame it with molding that matches the rest of the room. This way the wallpaper holds sway in the room, but it won’t dominate the way wallpaper did in the past. 


Things That We Hope Won’t Come Back 

That brings us to the trends we hope we don’t see come back. We admit, this is only our opinions on the matter, but we hope you’ll be able to see our reasoning. 


Fake Wood Paneling

Just. No. Out of all of the options for how to decorate your walls, please don’t do this. Not only does it make a room look dark and heavy, but the wood grain is an insult against proper design. This type of decoration only belongs on the front of an Atari console, not on the walls. We highly suggest shiplap instead. 


Floating Stairs

This one we dislike primarily as a safety measure. Even with the best of intentions and care, we’ve seen many people fall off these stairs, and no one wants that.


Floral Sofas

While we love the graphic patterns of our wallpapers, and even florals, there’s something to be said about floral sofas from the 70s. They were huge and overdone, no matter what you did about them.  And let’s not even go into the colors of the fabrics themselves. 


Colonial Furniture

Remember how we talked about wood paneling making a room seem too dark? Colonial furniture didn’t help. This heavy, turned wood was a staple in many homes, but it never seemed to quite fit in.  


Fondue Pots 

Especially in a Post-Covid society. Need we say more? 


Those are the things we’re excited to see again and a few we hope don’t make their way back. What about you? Do you agree with some that we don’t? Do you have tips for how to use some of the ones we showcased? Let us know in the comments below or over on our Facebook page, as always, we love to hear from you! 


If, on the other hand, you’re here to talk shop because your oven has popped, we can still help!

Reach out to us via our website or phone ((214) 599-0055) and we can figure it out. Wherever you live in Garland or the surrounding area, we are here to help. 


Build Your Own Barbecue Sauce

15 Minutes and you’ve got a customized sauce that can’t be beat. 


Everyone appears to be getting ready for Memorial Day. In case you've forgotten (like we always seem to), it's the end of this month. And now that anyone over the age of 16 can get vaccinated, you might even be able to set up a backyard get-together with some of the people you've only been able to see on Zoom or at a distance all year.


barbecue sign in neon

Good news! Even if you have forgotten the holiday, and you've been putting zero forethought into a party, we're here to help you make it look like you're totally on the ball with this one. You're ready for this party and you didn't even know it. Go you.


We're about to throw a fistful of things in a pan and make something awesome: homemade BBQ sauce. It's not like all that store-bought stuff that's too sweet and full of things you can't pronounce. This one will be a new "family secret" recipe that's the envy of the neighborhood block party a couple years from now.


And here's the kicker. It'll only take about 15 minutes of your time.


You're going to need less than a dozen ingredients - unless you change it to your own taste - and chances are they're all already in your kitchen or pantry.


 Ingredients:


30 ounces of tomato sauce

3 Tablespoons honey (or maple syrup, agave, corn syrup - whatever you have handy or like best; we had fantastic results with raspberry syrup)

2 Tablespoons molasses

1 Tablespoon Worcestershire sauce

1 Tablespoon hot sauce (again, choose what you like best - we like Tabasco or Sriracha)

1 teaspoon apple cider vinegar

1 1/2 teaspoon ground mustard

1 teaspoon onion powder

1 teaspoon garlic powder

1 teaspoon ground cayenne pepper

1/2 teaspoon salt

1/2 teaspoon black pepper


Tools:

Measuring cups and spoons, saucepan with a lid, whisk, storage container or bottle, can opener (if using canned sauce)


Open up your tomato sauce and pour it into the saucepan. (How often do we really use a specific pot for its intended purpose? This is notable!) Light the burner and bring it up to medium-high. You might want to cover it if it's heating quickly, as tomato sauce likes to make a splatter-y mess.


Measure in your other liquid ingredients: the Worcestershire sauce, vinegar, the honey/syrup, molasses and any hot sauce you might want to use. It helps to do the stickiest one last and to spray the measuring cup with non-stick spray before you start measuring. Alternatively, you can just scrape the measuring cup clean with a regular spoon and throw them both into hot water as soon as you're done. Whichever way you like, just make sure not to let the molasses and honey or syrup dry in place. It's awfully irritating to try cleaning them once they've become a congealed lump, and they like to stick to the sponge or brush as they come off the cup.


Once all your liquid (semi-liquid? Molasses can be tricky) ingredients are in the pan, give everything a good stir with that whisk you only use once in a while. Put the lid back on the pan if you chose to use one.


We know the dry ingredients don't sound like you're using enough of them. Trust us, you are. The flavors will meld together as the sauce heats. And you can always add more of an individual spice later if you really feel you need to - but remember, the only way to lessen the amount of a spice in a sauce is to make more sauce! So unless you really need half a gallon of BBQ sauce (maybe you do, we're not sure here - you could be planning a really BIG outdoor party), just start small.


Scoop up your little teaspoons and half teaspoons and tablespoons of spices and add them to the pan. If you're a big fan of making things blend easier, you could even sift them into the pan rather than lump them in - but we feel like the heat, the moisture and the whisk will take care of any clumps for you over the next few minutes. The only thing that routinely gives us trouble is the mustard.


After everything is in the pan, give it a good stir with the whisk. Put the lid back on (unless you're not using one - daredevil) and lower the heat down to medium-low. Allow everything to simmer together for about eight minutes. To prevent scorching, stir it often, and make sure to scrape the sides.


At the eight minute mark, turn off the heat and remove the lid. Give it a few minutes to cool before you attempt taste testing or moving it to any kind of plastic container. Unfortunately, your sauce will probably not be the envy of the neighborhood if it's full of melty plastic bits.


Should your sauce not be spicy enough, add some more hot sauce - or if you're super adventurous, puree a hot pepper or two and stir that in. If it's lacking a zesty, tangy note, add a little orange extract or a squirt of lemon juice. If you'd rather it be sweeter, add a bit more of your honey/syrup or stir in some superfine sugar.


Make sure you keep a note of whatever you did to make the recipe your own! And enjoy your holiday.


And that’s that! Let us know if you opt to make this in the comments below or over on our Facebook page. We’d love to hear about the different spices you add to make it your own. 


So long as your grill is fine, you’re good to go after this point, but what if it’s your stove that’s on the fritz? If that’s the case, you can give us a call  at ((214) 599-0055) or head over to our website. Wherever you live in Carrollton and the surrounding areas, we’ve got you covered. Appliance Rescue Service is here to help and here to keep your home, and your home appliances, running smoothly. 

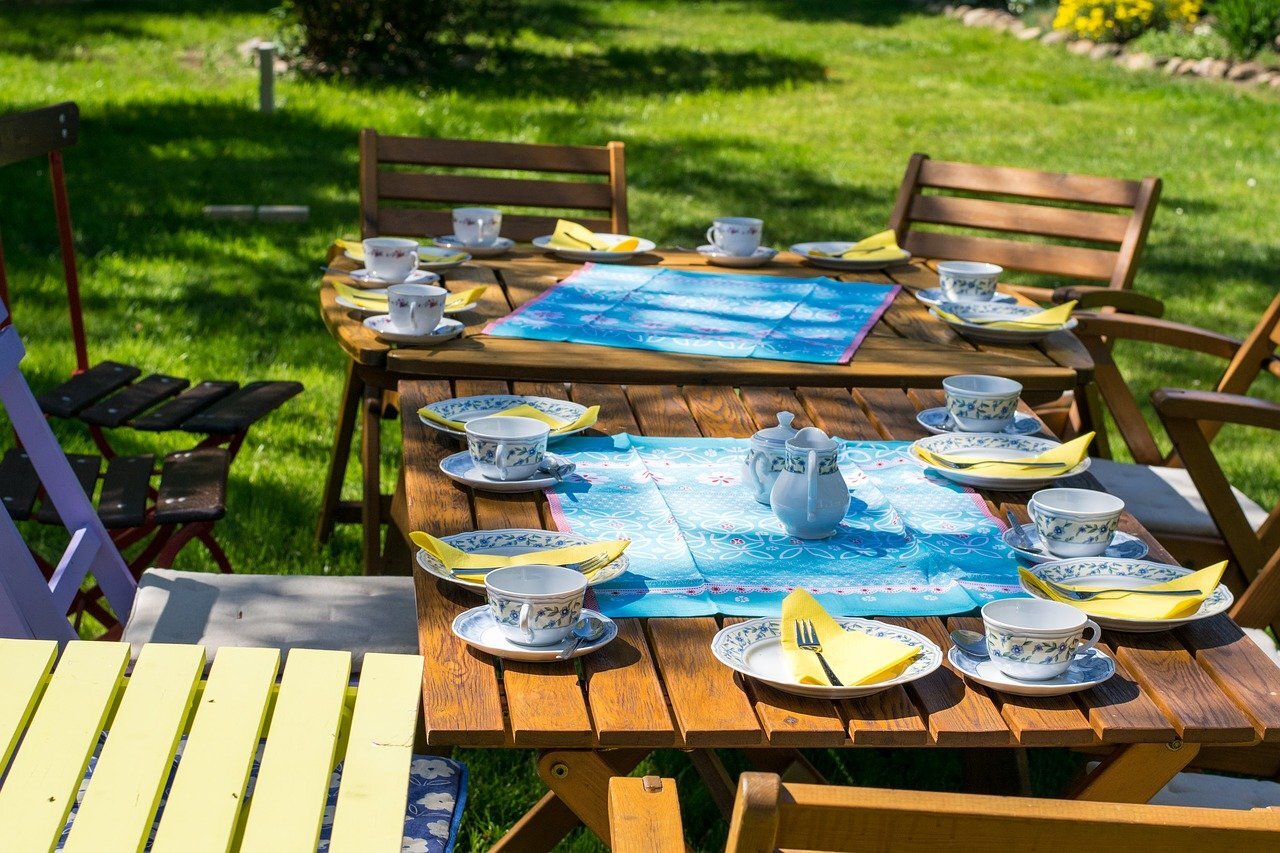
party in the yard, tables set and ready for the barbecue


Why You Should Worry About Cleaning Your Gutters

And How to Do It Right the First Time

This past week has had a lot of rain for Plano and the surrounding areas. We’re not sick of it quite yet, but our homes might be. All of that water comes with lots of leaves and twigs hitting our roofs and being washed into the gutters. Which was fine. Up until it started leaking in your poor blogger’s kitchen. We learned a fair bit about our gutters this week and what they do for our homes. We’re sharing with you so you can avoid the same fate of having your kitchen flooded, at least if it’s due to clogged gutters. 


Possible Damage

So what does it really matter? As long as some of the water is coming out of the gutters and downspouts you're all good, right? Not quite. There is a lot of damage that can be done from your gutters being clogged or otherwise not functioning properly.

Roof Damage

If your gutters are clogged the water can end up pooling and sitting on your roof. There the water is going to get under your shingles and your roof can end up rotting, cracking, and leaking. All of those damaged areas are going to continue growing and becoming worse with each new rain.


Increased Chance of Ice Dams

When we talked about water pooling on the roof and in the gutters themselves, we didn't talk about winter. During the cold months, like this past February, that water will turn into ice dams. Large heavy chunks of ice that can rip the gutters off your roof, if you're lucky. If you're not lucky they can begin damaging your roof, depending on the size of the pool to begin with.


Foundation Damage

If a storm happens during winter sitting water can begin to cause expansions and cracks in your foundation as it freezes and melts. As the water pools and sits on the ground, it leaches into the concrete of your foundation.


Basement Flooding

Heading inside to your basement, if you're lucky enough to have one in Texas, water is still a problem. Once water starts getting into your basement it opens up all sorts of problems. It can leak in through your foundation or through the void spaces between walls.  That water can spread and result in gas leaks or electrical shocks.


Fire Hazard

When water spreads through your basement, or the walls in your house, it can end up coming in contact with wires. If there is a fuse as part of the system, then you’ll be dealing with a short circuit and a blown fuse. If however there isn’t a fuse, the water can heat up to the point of causing an electrical fire.  


Shifts and Cracks in Driveway & Sidewalk 

Just like with your foundation, water can pool on top of or under your driveway and sidewalk. With time the ground underneath can be eroded. Or the water can freeze, causing shifts and cracks.

Ruined Landscaping

You spend a lot of time and money making your yard look the way you want. A blocked gutter or downspout, is going to cut new channels through the ground following the path of least resistance. This means you'll end up with plants that are getting too much water, plants that have had their beds destroyed, and all sorts of pests moving in.

All of these are problems that can, do, and have happened to people all over the Plano area.


Signs To Look For

Now you know why you should care. The question is what are you looking for? To inspect your gutters, we advise waiting until a few days after it's rained. This way if you decide to start cleaning that same day you aren't going to be dealing with wet heavy debris. That’s not always possible though as sometimes it’s a storm happening that brings the problem to your attention. 


Visible overflow during heavy rains

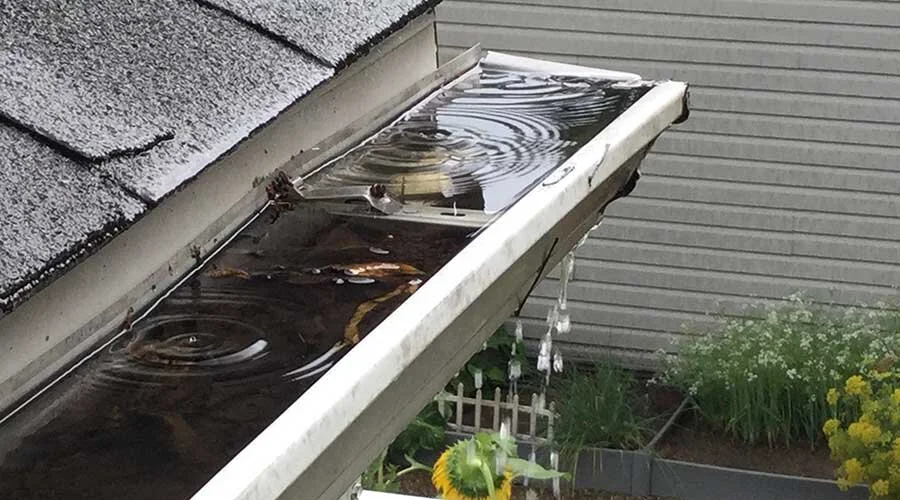
clogged gutter overflowing with rain

clogged gutter overflowing with rain

Of course if you are in the middle of a rain storm while reading this, you might look outside and see visible overflow from your roof. This is more than just a few drops here and there from hitting the edge of the gutters and dripping down. This is having a curtain of water at the edge of your gutters because the water isn't being diverted.


Unexplained water in basement

During or after a storm you might find unexpected pools of water in your basement. This means that the water is seeping in through your foundation either through pre-existing cracks or ones that have been created.

Water inside the home

You might also have water on your first or second floors. This would be where you have water coming down from the gutters and running right down the siding of your home. You're siding isn't meant to withstand constant rain running against it. The water gets under the siding and into the void between the walls and begins to eat away at your drywall.


Paint damage or rust

On  a sunny day start by looking at the inside and outside of the gutters by eye. Look for spots where the paint is damaged or there's bare metal that has rusted. The paint on your gutters is formulated to be water resistant. If it's chipping or has rusted, it means there is, or has been, water sitting for an extended period of time.


Pools of water and mold

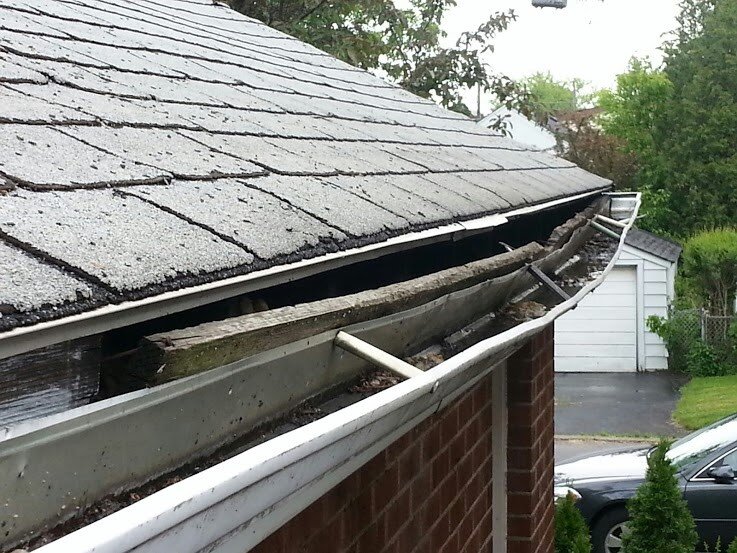
Gutter with mold, rust and pulling away from the roof

Gutter with mold, rust and pulling away from the roof

One of the most obvious things you'll see is going to be areas where water has pooled in the gutters and is still there even after things have been dry for a day or so. Or you might see mold buildup even if it's been dry for several weeks, you know that water has been standing in that area.


Sagging or collapsing gutters

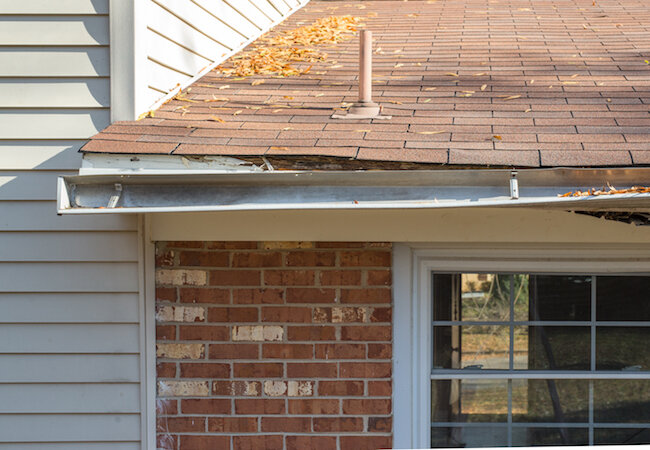
Sagging-Gutter pulling away from the roof and tipping over.

Sagging-Gutter pulling away from the roof and tipping over.

Spots where the gutters are pulling away from the fascia boards or flat out collapsing are glaring signs that something is wrong. The fascia boards are the wooden supports that the gutters attach to on your roof. if the gutters are pulling away at those it means water has begun to eat away at them and they can no longer sustain the weight of the clogged up gutters.


How To Clean Your Gutters

You've decided that you want to clean your gutters and prevent all of this mess? Great! We'll  walk you through the process and if at the end of it you decide it's too much, that's fine we advocate hiring a professional.


Avoid doing it right after rain

Much like looking for the signs of gutter damage, if at all possible you want to clean your gutters after it's been dry for several days. It's much easier to remove leaves and twigs and whatever else has clogged them when it's dry rather than when it's heavy and wet and compacted.


At least twice a year

Ideally you want to clean your gutters twice a year. Once in spring to get them ready for the heavy spring and summer rains. And once in fall to clean up the damage from those rains. The exception to this is if you have pine trees close to your house at any point. Since pine trees shed throughout the year you should look at cleaning your gutters every 3 months.


Spread a tarp under the ladder to protect your lawn and also to catch all of the gunk 

This one is pretty self-explanatory. If you lay out the tarp ahead of time, he'll catch everything rather than having to clean it up afterwards when you're already tired.


Practice ladder safety

If you're not comfortable going up on a ladder, please don't. Hire a professional or even have a family member that is comfortable with ladders. Otherwise, the basic rules of ladder safety apply. Make sure you have it fully open and on level ground.


Use two pairs of gloves. One rubber and one working pair.

The idea here is that the rubber pair will keep your hands and arms from getting wet or terribly dirty while the working pair keeps you from getting cut up.


Begin cleaning debris near the downspout and work backwards

A trowel is a handy addition for leaning out your gutters.

A trowel is a handy addition for leaning out your gutters.

Now that we've covered safety matters let's tackle the gutters. Start at the downspout and work your way backwards a long till the end points. You can use a trowel, your hands, or a gutter scoop if you happen to have one. You want to get out anything that doesn't belong. Sticks leaves random ribbons bits of stray balloons, and whatever else the wind might have brought you.


Remove and clean downspout strainer

Once you have the gutters clean, go back and clean out the downspout strainer.


Testing Time

Now it's time for your first test. Starting at the end turn on your hose with a spray nozzle and use that to rinse out any dirt, aiming for the downspout. Make sure not to be spraying up under your shingles or else you'll be adding to the problems.

Cleaning the Downspout

Hopefully your water will flow towards the downspout and out without any obstruction. If however you see that the amount of water coming out of the downspout is not the same as what you're putting out with the hose you need to move on to cleaning that out.


Start at the bottom and feed your hose up into the downspout turn on the hose on full power. Hopefully this will dislodge anything that's in there. If not you can grab a plumber's snake and attack it from the top. After each cycle of hoes and snake, try flushing the system again. Eventually this process will break up whatever is in your downspout allowing it to flush out.

Inventive Methods

These are a few ways people have found to clean their gutters that are at least interesting, if not necessarily recommended by us. 

A leaf blower with a narrow nozzle attachment

A wet/dry vac 

A Power washer 


Gutters serve an important purpose for our homes. They help keep our grooves from breaking down under the weight of water. Why not take a few minutes on a sunny day to make sure that they're in working order.


If you have any horror stories from cleaning, repairing, or maybe not doing that for your gutters let us hear them over on our Facebook page or in the comments down below. 


If it's the inside of your home that's giving you trouble, maybe one of your kitchen appliances, or your dryer, give us a call. Even when we cover other areas of the home, we're still the best appliance rescue service in the Plano area. We want to keep your appliances in tip top shape. You can get hold of us by phone at ((214) 599-0055) or on our website.


How‌ ‌Did‌ ‌We‌ ‌Get‌ ‌This‌ ‌Far‌ ‌Behind?‌

How The Appliance Shortage Got Here, And Where We Go Next


With vaccines being rolled out every day and mask restrictions being relaxed, many people think things are going back to normal. However, the appliance industry is showing that the effects of COVID-19 are going to  be felt for far longer than people anticipate. There is a massive appliance shortage not just here in Texas, but across the country.  So, how did it start, where is it going, and what can you do about it? 

Man frustrated and in despair with his inability to find a new appliance


Realistically, this shortage started almost right away in March of 2020 when we were beginning mass shutdowns across the country. It began in China where factories had to close for 6-8 weeks, which meant there was no stainless steel in production.  From there, the manufacturing plants for appliances in China, Mexico and the U.S. were either closed or had restrictions on how many people were allowed in. This meant that not only were the appliances delayed now, but so were the parts for those appliances. 


There were also businesses closing left and right, as  well as layoffs that swept the nation. So, people aren’t going to be shopping as much thanks to quarantine and shelter in place orders. With both of these factors going into play many of the manufacturers thought it was reasonable to scale back production. Stores felt the same and so they reduced their orders. 


Now let’s zoom in a bit, and take a look at the average person. As we were told to shelter in place, we needed ways to keep busy. So we looked around our homes and decided we wanted to bake sourdough bread. Or learn how to make new and exciting meals (that normally we’d get from takeout...) Some of us decided if we couldn’t go on vacation, we’d renovate our kitchens instead. Or others just had the bad luck of having their appliances break with all of the extra use from the family being home all day every day. 


All of this combined together meant a lot of time in our kitchens and the need for more appliances, or new appliances, or repairing our appliances. 


Then there’s a second angle to supply increase, the housing market. Even as COVID-19 happened, people were looking at buying new homes thanks to the Federal Reserve putting interest rates at 0%.  New homes were also still being built, and those come standard with a full appliance set of a microwave, dishwasher, oven, refrigerator and washer and dryer. So all of those homes still needed their slated appliances. 


All of this came together to create our current situation. Appliance backlogs of six months or more for specific brands and models. And let’s not even talk about being able to get the color you want.  


Several manufacturers are quoted as saying that they are ‘ramping up production’ or ‘being resourceful to meet demands.’ That isn’t showing in the market just yet though. Despite encouraging messages from Whirlpool, Electrolux and LG, we still have backorders of at least 6 months. 


So what to do? How do you, our loyal readers and clients, deal with this not six months from now, but right now? We know you have appliances that are still breaking, or ones you’re hoping to replace.  For the latter, we advise being flexible. Place an order as early as you can.  Know that the size you need is more important than specifics of the brand and model. If you can find a fridge that fits what you need and isn’t a sacrifice  on price, jump on it. 


If on the other hand your appliance has broken, we appreciate your patience. We are still working as hard as we can to take care of our clients throughout Dallas and the surrounding area. Know however that the manufacturing companies are backed up on parts as they are on the full appliances, with those full appliances taking precedence. Unfortunately for all of us, companies are focusing on the greatest profit margin they can attain right now, which means their higher tier models.  We understand your frustrations, and we hate it just as much. 


However! There are things you can do, other than just being the patient people we know and care about. 

Keep things clean and spaced properly. We’ve got several articles talking about how to make sure your fridge, freezer and dryer can breathe properly. 

If you aren’t sure, don’t put something through your dishwasher, washer or dryer. 

 Take preventative measures. If you think something is off with one of your appliances, give us a call. We do maintenance calls, and right now “an ounce of prevention is worth a pound of cure” for you, your time and your wallet.  


So while we aren’t sure about when things will change for the better, we can tell you that we will be here. We’re here to keep your homes running, whether you live in Coppell or Garland, Dallas or McKinney, we at Appliance Rescue Service are here for you. 


If you need to set a maintenance appointment, or something in your kitchen has broken, give us a call. You can reach us at ((214) 599-0055), our website, or via our Facebook page. 

We can only hope that our stores and showrooms will one day go back to showing appliances this way and having sales like this.

We can only hope that our stores and showrooms will one day go back to showing appliances this way and having sales like this.


Set It and Forget It Rice Dinner

Stuffed Full Of Flavors And Textures


Time for a set it and forget it dinner! We've done a bunch of "easy" dinners in a row, but the common denominator with all of them is that they require you to be present and, well, actively cooking them. This one breaks that mold. All you do with this one is dump it into the slow cooker (or instant pot, if you'd rather), give it a stir, and allow it to cook. The end. It's that simple. As long as you plug the thing in and turn it on, you'll come home to dinner. And if you use one of those fancy crock pot liners, you won't even have a pot to wash!


Ingredients:


2 links smoked turkey sausage (we like Oscar Meyer brand)

1 tablespoon butter (salted or unsalted; your choice - can substitute margarine)

2 cups brown rice

4 1/4 cups water

1 can kidney beans, drained

1/2 yellow onion

1 celery stalk

1 bag frozen peas and carrots

1 tablespoon dried parsley

1 teaspoon minced garlic

1 teaspoon crushed red pepper

1 teaspoon dry mustard powder (please do not substitute seeds)

1/2 teaspoon paprika

1/2 teaspoon fennel (optional; very strong stuff, and occasionally difficult to find)

salt and pepper, to taste


Tools:

Crock pot, crock pot liner (optional), knife, cutting board, colander (fine mesh), measuring cups and spoons.


red Crockpot.jpg

Start by chopping your onion, celery and turkey sausage. Don't worry yourself too much about the idea of mixing meats and veggies at this step - the turkey sausage is precooked, so you have no cross contamination worries here.


We like to have big chunks of onion for this recipe, tiny crescents of celery and thin rounds of sausage. The variation in shape, size and texture helps make up for the fact the rest of this meal will be, for the most part, quite soft.


If you choose to use a crock pot liner, now is a good time to place it. Be sure to follow the package directions so it doesn't melt in and ruin your dinner! We love the liners because of the time savings on cleaning, but we will acknowledge it's an extra, technically unnecessary expense.


Drain your kidney beans through the colander and rinse them thoroughly. We don't want that canned taste transferring to the rest of the food (but we're using canned anyway, because we also don't want the time and effort of cooking from dry).


Once the beans are drained, pour them into the crock pot. You may need to readjust the liner a little after this step, assuming you've used one.


Measure out your rice and give it a quick rinse in the colander you just emptied. Just like veggies, make sure you wash off your rice! People often seem to skip this step, but any produce not marked "washed and ready to eat" technically deserves this extra attention. You may need to use a spoon (or your fingers, no judgement as long as they're clean) to get the rice back out of the colander and into the crock pot - expect this step to take a moment or two.


Now that you have your rice and beans in the pot, start adding your vegetables and the turkey sausage. It doesn't really matter what order you do them in, since we're going to give this all a good stir soon - but we prefer to get the frozen peas and carrots into the pot first because they're more likely to bounce. Somehow, peas in particular always seem bouncier when they're cold.


After all of the meats and veggies have joined the starch party already in the bottom of the crock pot, measure out your water and add it in. Make sure you don't rush here and measure inaccurately. Too little water means crunchy rice, and too much water will lead to a porridge-like substance that only smells like food.


Now it's time for you to add the spices. If you come across anything in the list of spices you don't like, feel free to substitute. This recipe is flexible and very forgiving. Assuming you use the suggested spices, toss them in the pot and give everything a good stir. Make sure the chunks of dry mustard, in particular, have dissolved (too much mustard in a bite can really put you off the rest of the meal). Now add in that chunk of butter, cover everything over, and set the crock pot on low for about eight hours.


After your workday is over, you'll come home to a hot meal with minimal effort. And even if you didn't use a crock pot liner, you'll have next to no dishes! 


Let us know in the comments below or over on our Facebook if you decide to give this a try! We’d love to hear how it goes and anything you add to it. 


If on the other hand your stove is giving you trouble and that’s the reason you need a set it and forget it meal, we can still help. Give us a call at ((214) 599-0055)  or visit our appointment page.


Chicken Jambalaya.jpg