Easy Ways To Hide Your Appliances

Do you ever get tired of your appliances or appliances in general? What about other necessary fixtures around your house? The way they look, or the fact that they never seem to change? We know we do, and we know that some of our clients do as well. This week we’re taking a look at different ways you can change the look of your appliances and how they fit into your kitchen. 


There are three different ways so far that we’ve found to change your appliances.


Exchange It

The first method is the most straight forward. You can get rid of the appliances you have and exchange them for alternate models that will fit with what you already have. This might involve buying specially built appliances. However, you won’t have to worry about messing up the decor you’ve spent time building your dream kitchen. So while not the most cost-effective, this one can be the easiest. 

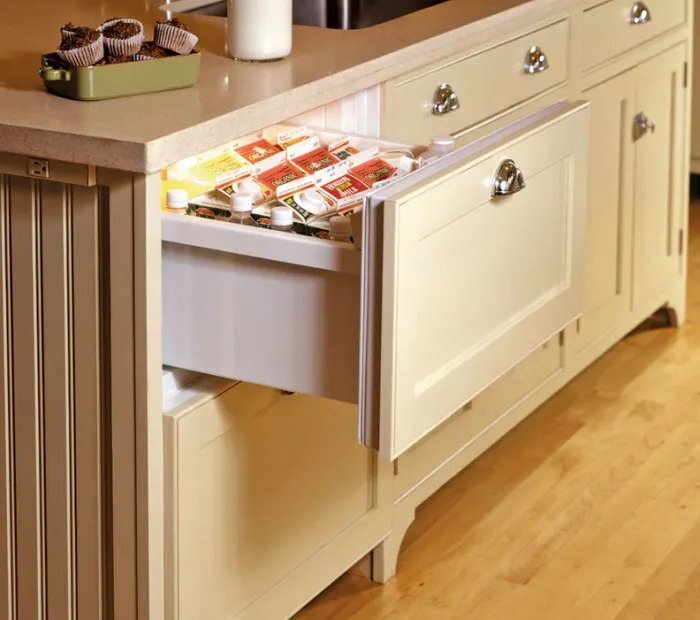
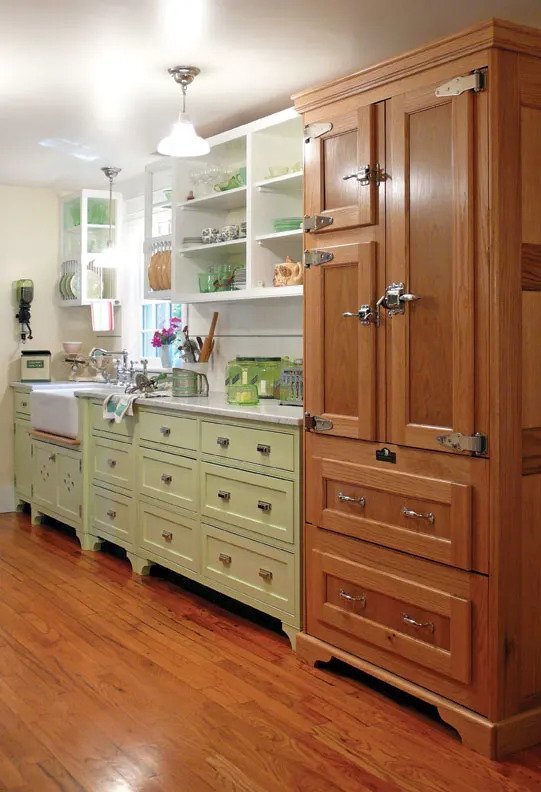
  • Some companies offer refrigerated drawers rather than a full fridge, which is what is going on here. It looks fantastic, and you can keep everything close to hand. We think it would work best if you have a larger kitchen, though, or perhaps a hanging rack for your pots and pans? 

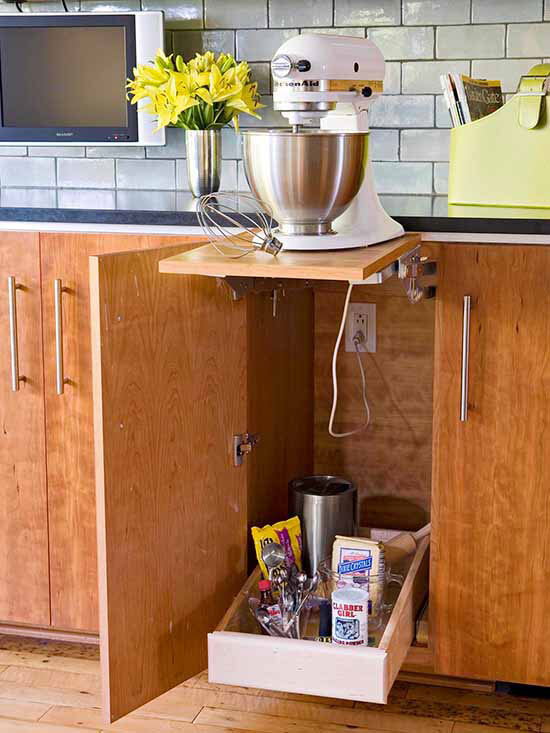
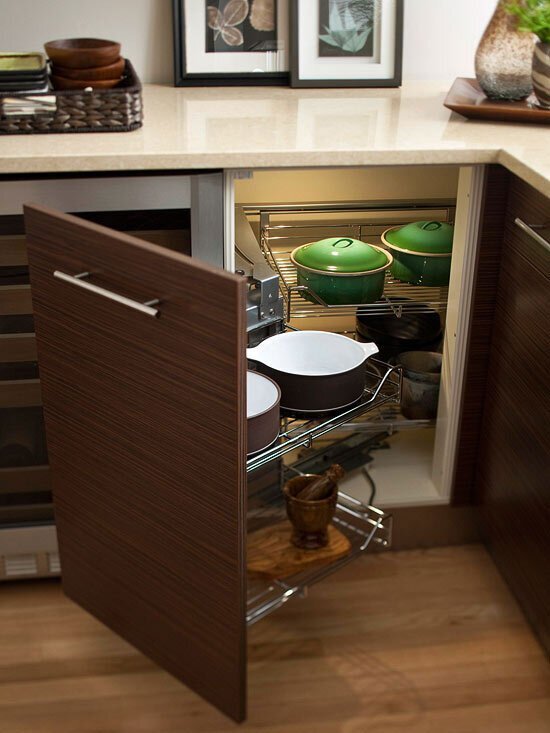
  • This one is definitely custom. Not only are you working with what you already have around you, but you’re building a shelf that will pop out only when you need it. It can also still be used for storing baked goods.  

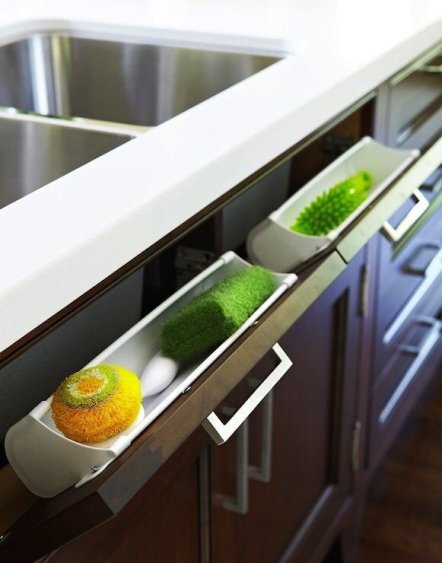
  • What are the panels under your sink for? Can anyone honestly think of a reason, other than decoration? These tiny drawers solve that issue by giving you somewhere to store your sponges that are easy to clean and hide away when you’re done. 

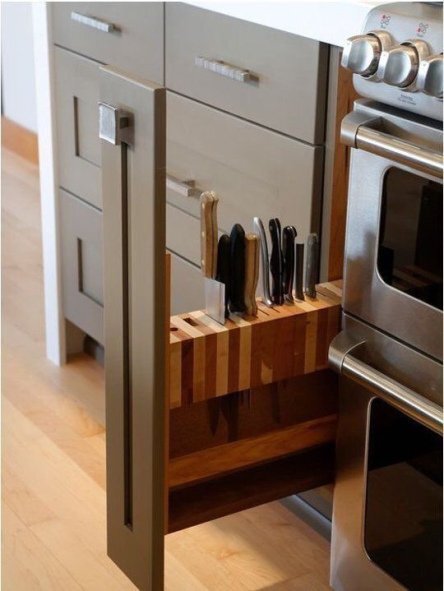
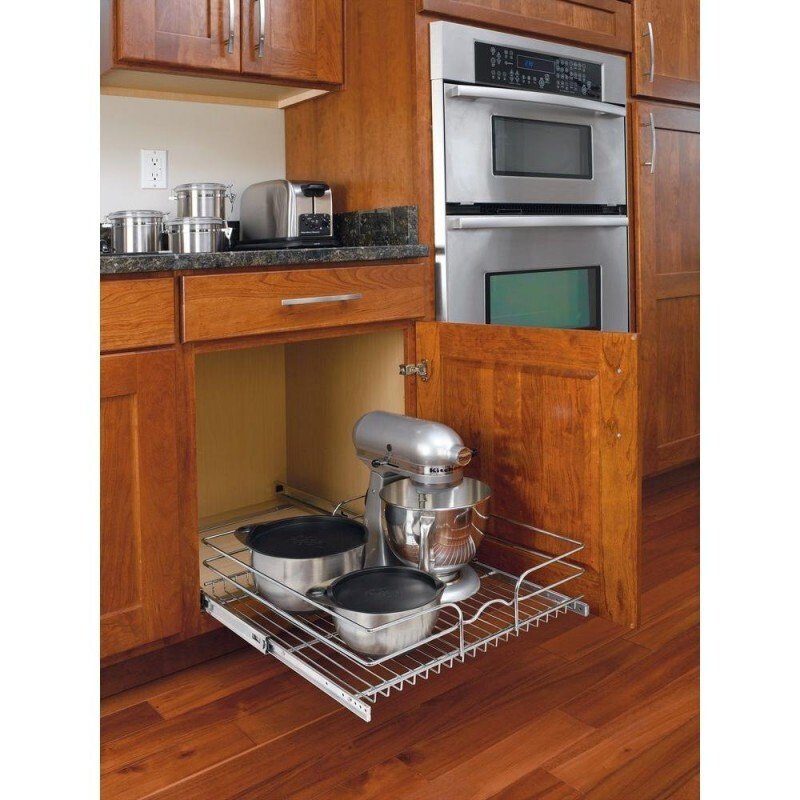
  • We cannot tell you the number of times we’ve smacked our elbows on the knife block, or a hand or a plate. You get the picture. By creating a small sliding drawer at the end of your countertop, you add more storage space to your counter, and you don’t have to worry about smacking the knife block.


Work Around It

The second method is to have custom cabinetry (or something similar) that is built around the appliance. Depending on how handy you are with tools, you can either do this yourself or have someone else build them for you. These aim to blend the appliance into what you already have, making it, so they don’t stand out. Again, cost is a factor, though, because you’re working to build around or with what you have.

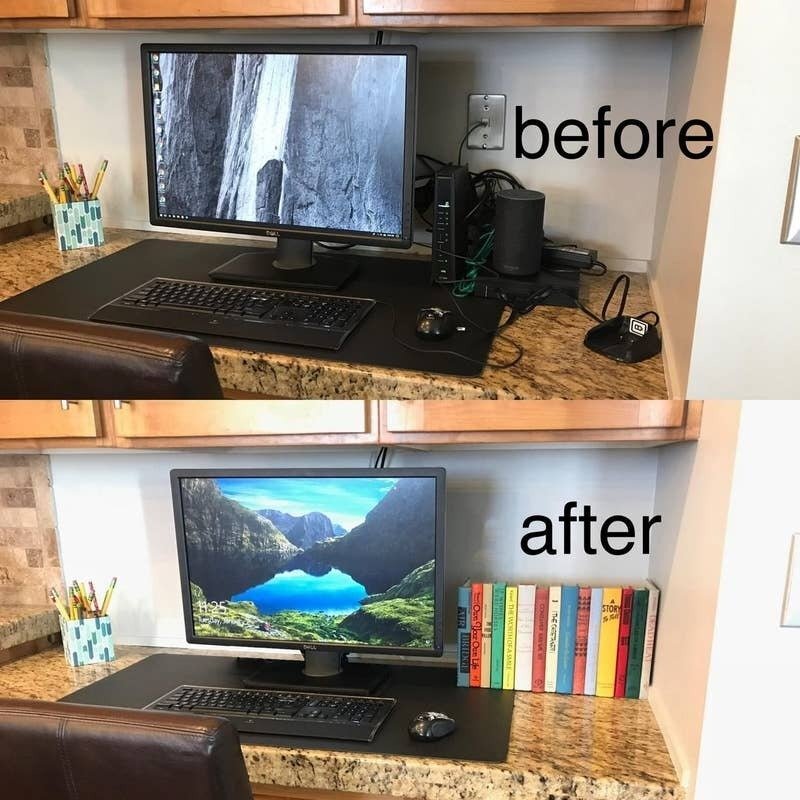
  • Do routers count as appliances? We’re not sure given how everything is connected to the internet these days, but we can all agree that they are undoubtedly ugly. Why should you have to look at them then? Cover them up by making them look like something else, like this row of books, for example. 

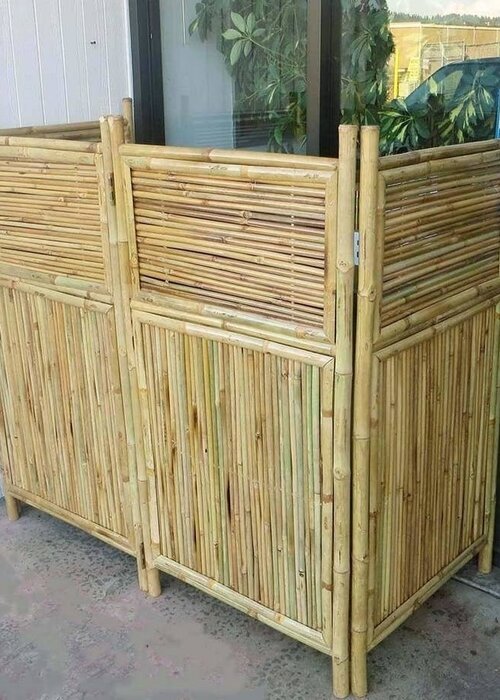
  • Bamboo screens are one option; you can also use other types of screens, such as fully wooden ones or fabric ones to hide things, such as washers, dryers, radiators, etc.

  • This company will create a drop-down section within your counter where the appliances hide until they’re needed. Definitely a custom piece. 

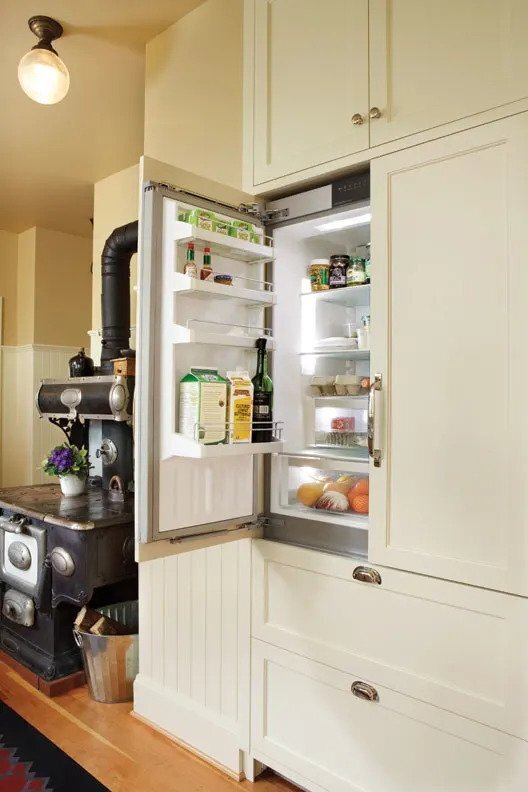
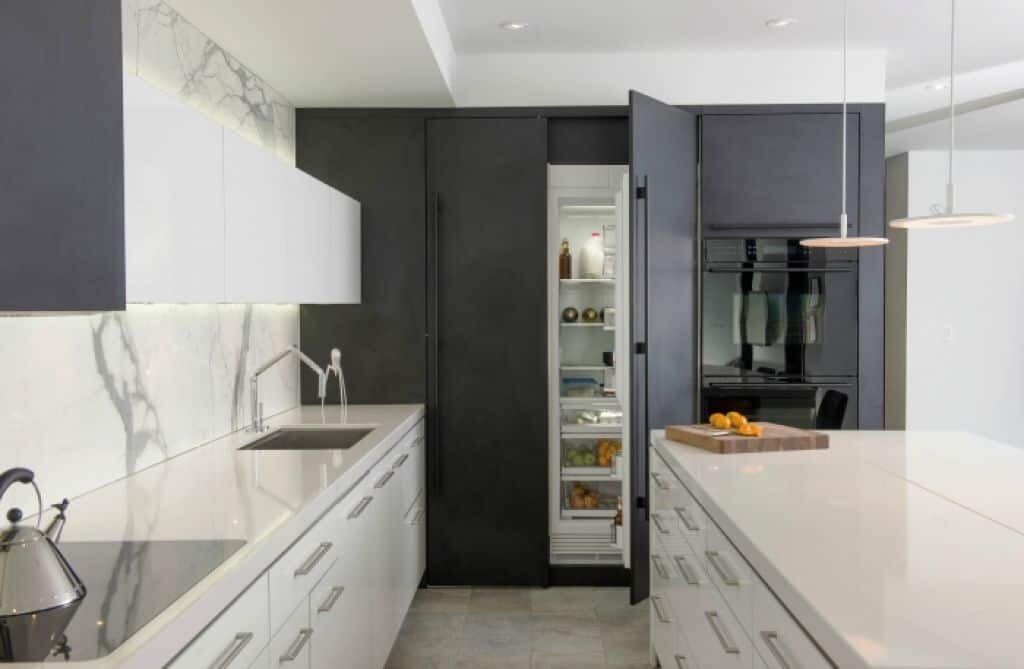
  • Built-in refrigerator that perfectly matches the surrounding cabinetry. If you look closely, you can see how it’s been affixed to the refrigerator doors without having to alter the fridge itself in any fashion. 

  • This one is a little bit of using what you already have and a bit of custom cabinetry to leave your kitchen clutter-free when you aren’t using them. 

  • This refrigerator has been cleverly disguised to look like an icebox. This one definitely can be done, but it’s going to take a bit of ingenuity to make it work. 

  • All three of these are the same basic concept. Taking a cabinet you already have and adding something to it so that it serves the purpose of keeping your appliances out of the way, while still easily accessible. Each one is slightly different, but that goes to show how versatile this idea can be. 

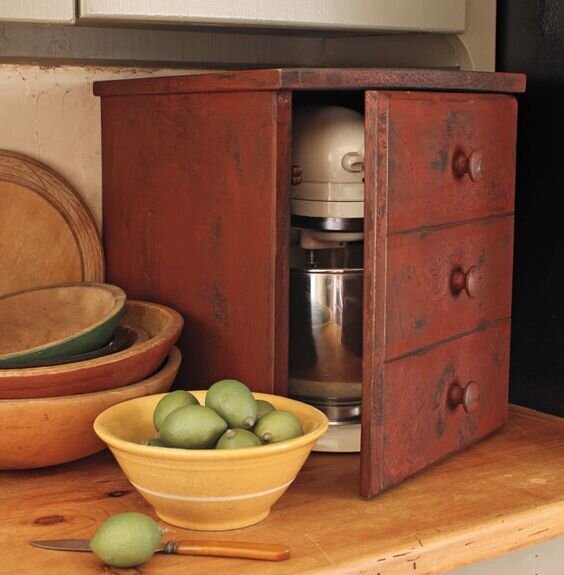
  • Adorable tiny custom box for your mixer? Check. 

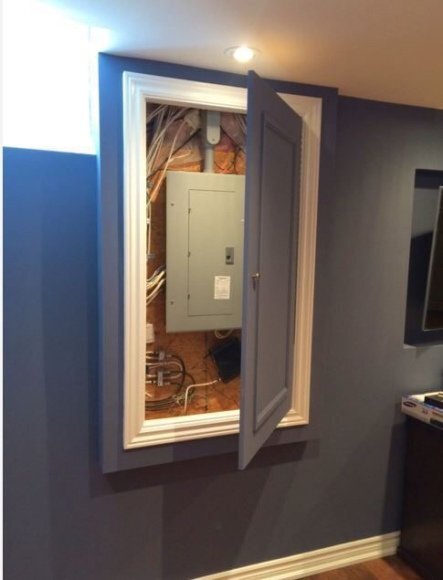
  • Can we all agree that breaker boxes are atrocious? What are you supposed to do if it’s inside your home in a critical room, though? Or if you’re looking to refurbish your garage into a new room?  Build a custom box around it and make it not stand out. 

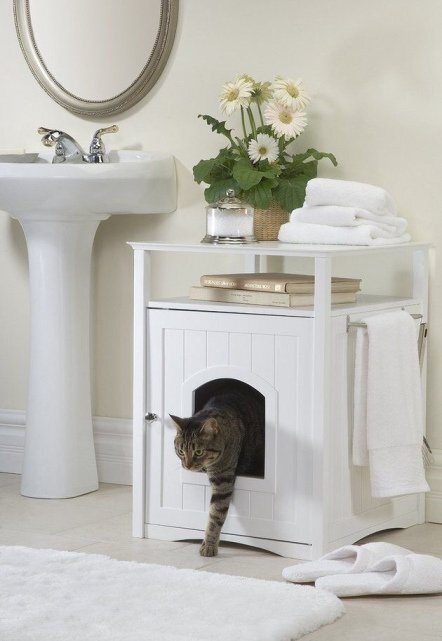
  • Continuing on with creating custom cabinets, why not hide your cat’s litter box? Give them somewhere quiet to go to the bathroom, as well as keeping you from having to smell it all the time.

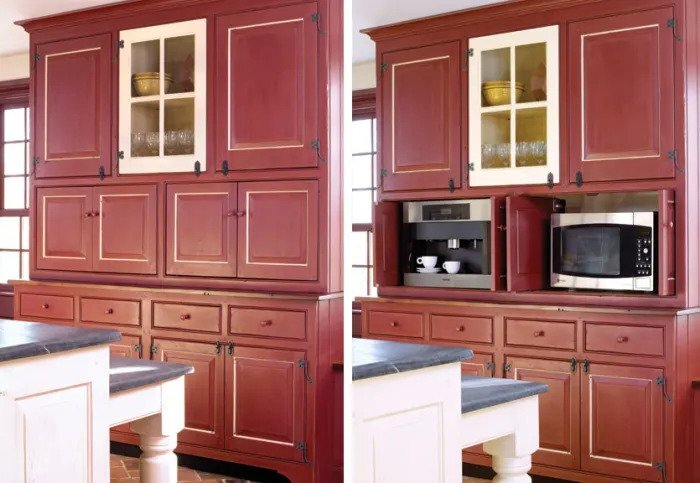
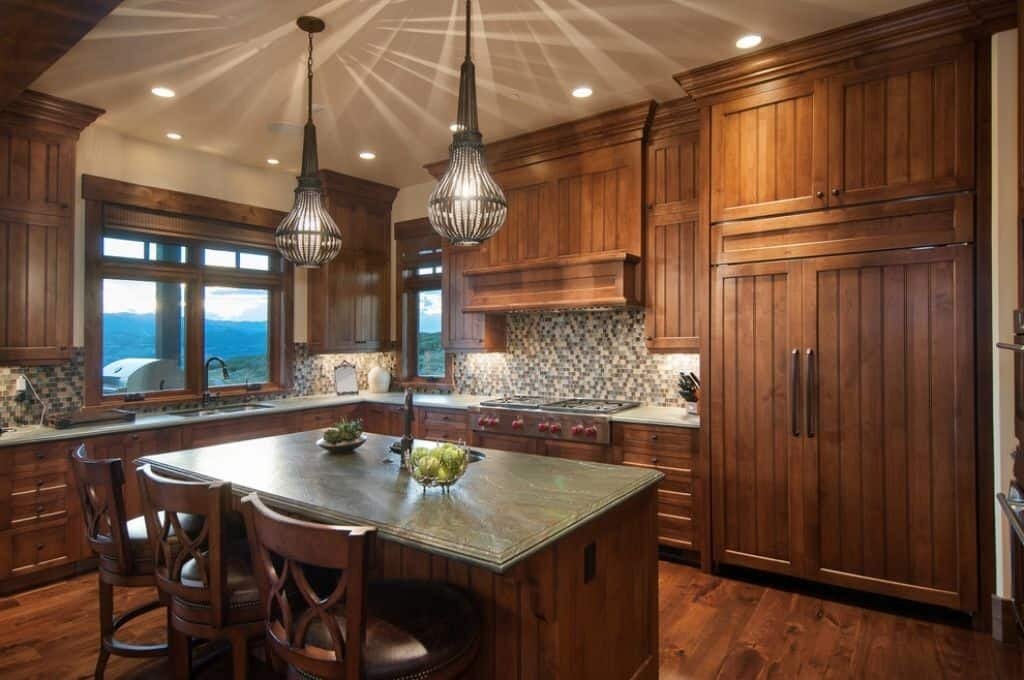
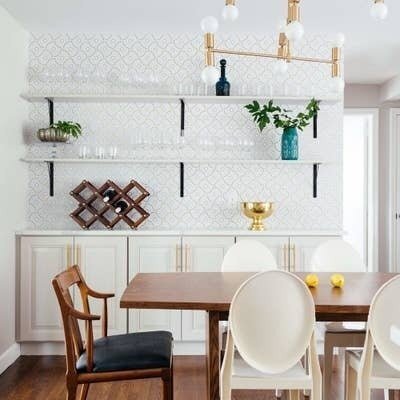
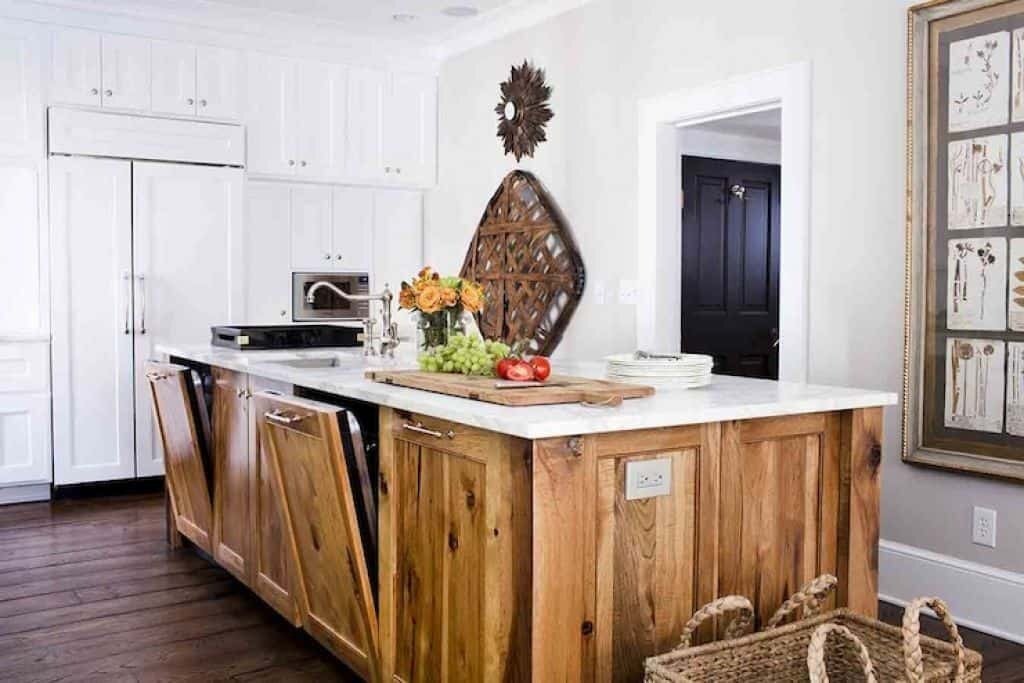
  • Other than the stove, do you see any appliances in this shot? This is all custom cabinetry built around the fridge, dishwasher, and any others that the owner has. Even the oven appears to have been covered over. 


Cover It

The third method is for those of us who aren’t /quite/ in love with our kitchen or need a change of pace. Maybe you’re like me, and committing to just one way of looking isn’t your thing? Or you want to test out a change before you make it more permanent? Try some of these alterations and see how they work for you! 

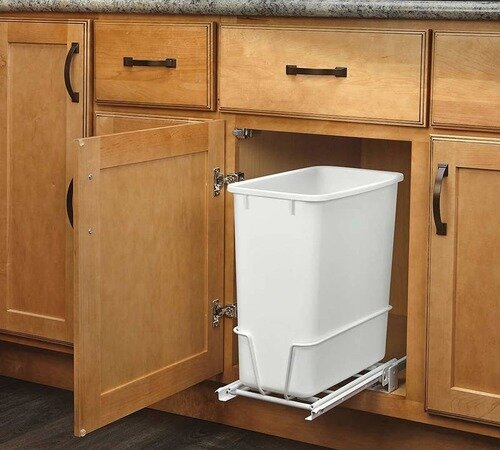
  • While this one isn’t exactly changing the outside appearance of what you have, it is hiding it away within what you already have, i.e., one of your cabinets. Having a trash can that stays out of the way? Provided it’s on heavy-duty rollers, yes, please. 

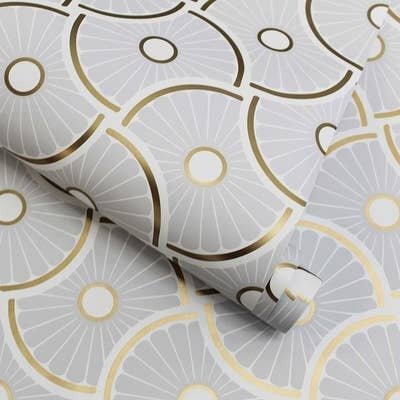
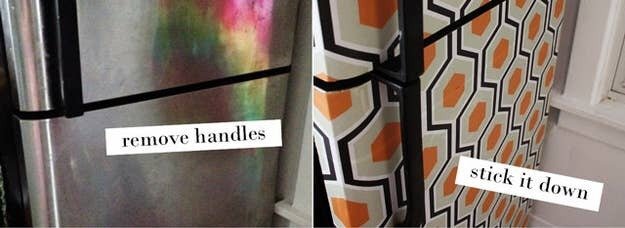
  • This is the perfect way to update your home, whether you own it or rent. This particular version is moisture and steam resistant, too, which means it’s excellent for your kitchen or bathroom. 

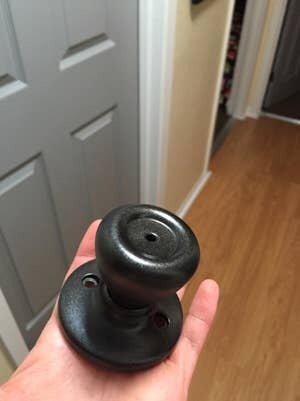
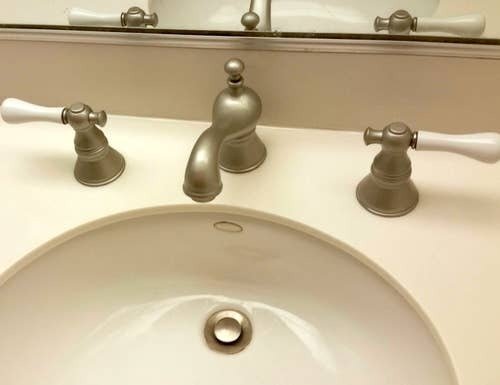
  • This one doesn’t just have to be done with doorknobs or faucets. You could also do this with the hardware for cabinets, or the handles on your appliances. 

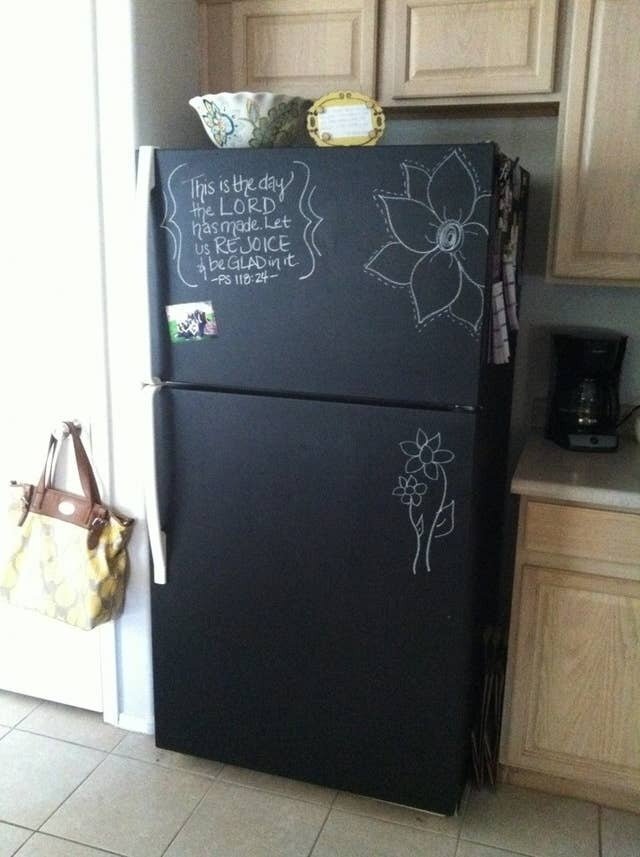
  • Granite paint kits are fantastic. However, they can also be easily damaged if you don’t seal them right or choose the wrong one. Make sure that you do your research beforehand so that your hard work will last for years to come. 

  • This kitchen is an excellent example of creating a panel that sticks to the front of an appliance, in this case, the dishwasher, as well as reusing a space to make something new. 

  • Both of these continue on the trend of creating a panel that covers the appliance to blend in, without needing a custom cabinet around it. 

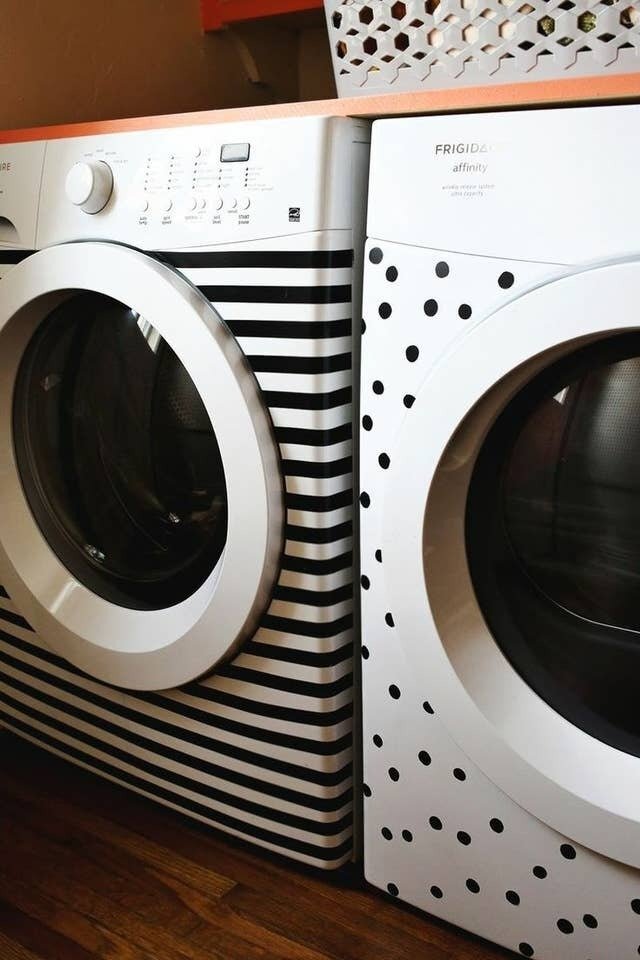
  • All of these are using different materials to go and give your appliances a makeover. Whether it’s electrical tape, paint or cling film, you can get all sorts of ideas by looking on the internet. 

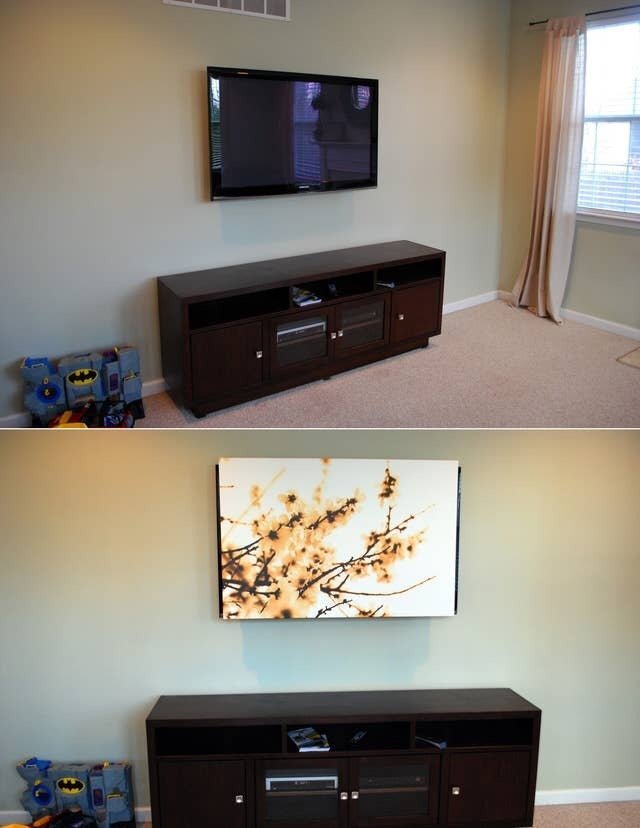
  • When it’s not in use, why have your tv just sitting there? Why not hide it and have a beautiful piece of artwork instead? 

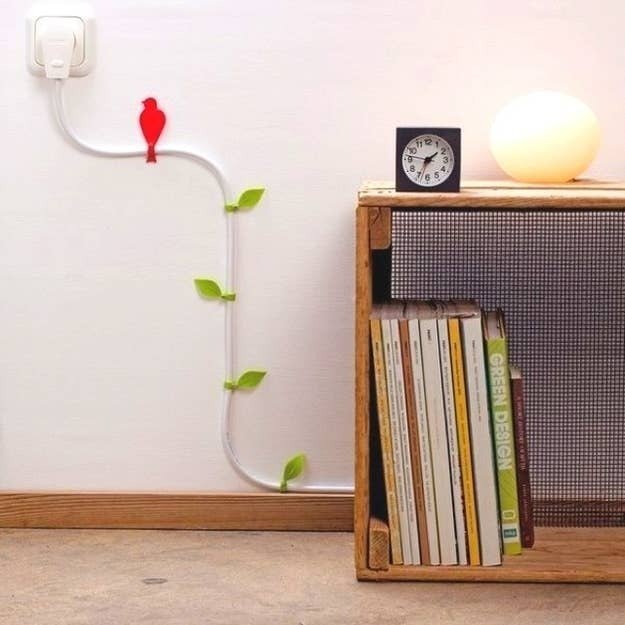
  • Cords are a fact of life with electronics. But who says they have to be ugly? You can use cord wraps like these, or get inventive and use painters tape to create your own designs. 

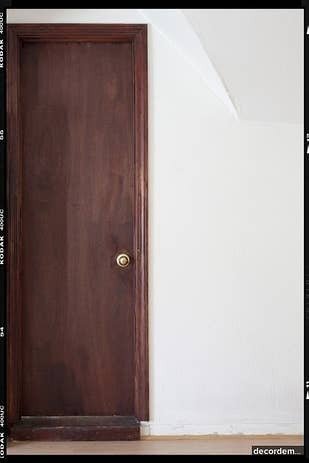
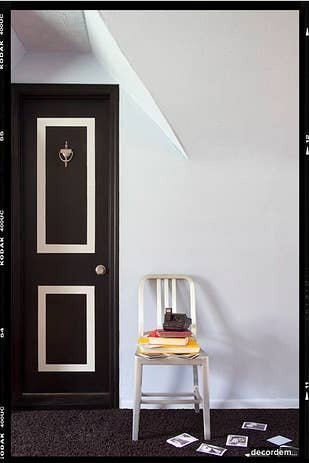
  • Plain doors are the worst in this blogger’s opinion. They need depth! Fortunately, it’s surprisingly easy to do that with just a bit of paint and masking tape. 


Thanks for joining us this week!  If you have other ways to disguise an appliance or update their look, let us know in the comments below or over at our Facebook page. 

A Valentine's Treat- Butterscotch Pretzel Pie

With  Valentine’s Day coming up we thought we’d go a slightly different route to the normal “chocolate everywhere!” Not that we don’t love chocolate, but it’s nice to have variety in the kitchen, right? This week we’re putting together a butterscotch pretzel pie. You can make this as a surprise for someone or you can make it with them for a sweet way to spend time together. 

 
Baking supplies and tools
 

Ingredients 

Crust

¾ cup pretzel crumbs

¾ cup graham cracker crumbs 

2 Tbsp granulated sugar

6 Tbsp (or ¾ stick) butter, melted


For the crust, you can alter amounts of pretzel to graham cracker crumbs if you want the crust sweeter or saltier. 

Filling 

¾ cup packed dark brown sugar

¼ cup cornstarch

Pinch of salt

3 large egg yolks- room temperature

2 cups of whole milk

2 Tbsp cold butter, cut into small chunks

2 tsp vanilla extract

Topping

1 cup cold heavy cream

3 Tbsp granulated sugar 

Chocolate shavings 


Instructions

Preheat the oven to 350


Making the Crust:

In a medium bowl combine the pretzel crumbs, graham cracker crumbs, granulated sugar, and melted butter until they form an evenly moist, crumbly mix. Press the mixture evenly onto first the bottom and then up the sides of a 9-inch pie plate. Starting with the bottom is to make sure there aren’t any air pockets later. Bake until the crust is fragrant and firm, 8-10 minutes. Set aside to cool, although not in the fridge,  or things will get soggy. 


Making the Filling: 

In a medium bowl, whisk together the brown sugar, cornstarch, and salt. Add the egg yolks and ½ the cup of milk, whisking thoroughly to combine. 

In a large saucepan, bring the remaining 1 ½ cups milk to a boil over medium-high heat. Remove the pan from the heat. Whisking constantly, very slowly add the hot milk into the egg mixture. It should be a thin ribbon while you’re pouring. Keep whisking constantly so that you don’t scramble the eggs.  

Pour the entire mixture back into the pan. 

Cook over medium heat, stirring constantly until the mixture comes to a boil and thickens, roughly 3-5 minutes. Remove from the heat and whisk in the butter and vanilla until smooth. 

Pour the filling into the cooled pie crust and smooth the surface with a small spatula. Cover the surface entirely with plastic wrap to prevent a skin from forming. Make sure the plastic wrap is right up against the filling. 


Place the pie in the fridge until thoroughly cooled and set, at least 2 hours. 


Just before serving, make the topping.: In the bowl of an electric mixer fitted with the whisk attachment or using a handheld mixer, whip the cream and granulated sugar at medium-high sped to form soft peaks. 

Spread the whipped cream over the pie, shave chocolate over the pie and serve. Be prepared for people to be coming after you for the recipe afterwards, this pie is sweet, delicious and absolutely amazing. 


Tips 

When it comes to making crumbs, your best bet is to get two gallon size ziplock bags. The first one will almost certainly get torn apart by the salt and the sharp edges of the pretzels, while the second will keep the crumbs from getting all over your counter.  Pour in two cups of pretzels and mash with a rolling pin, or with a mallet. 


If you’re short on time, you can get away with using a premade graham cracker crust, but it won’t taste quite the same. Because of how sweet the filling is, the salt from the pretzels balances things out. What you can do though to add that is a sprinkling of sea salt over the topping before you add the whipped cream. 


When it comes to brown sugar, you need to work in stages. Fill the measuring cup you’re using and then scrape it off with a knife to level it. Now use your fingers or the back of a spoon to pack down the sugar. You should have roughly half of what you started with. Repeat until you have the amount you need. 


When you’re adding in the milk to the egg mixture you’re tempering the eggs. If you ensure that your eggs are at warm temperature before you start working with them, it will help to prevent them from scrambling when you add in the milk.  If you want to learn more about tempering you can check out here.   You can watch the full episode, or start at 2:17 to learn just about tempering. 


Let us know how your recipe turns out, we’d love to hear from you over on our Facebook page. 


And if you’re looking to learn more about how we can help you with your appliances, please let us know


Adapted From: Paula Deen’s Southern Cooking Bible. 

Tovala Smart Oven: The Strangest Oven We've Ever Seen

Working with appliances and having a wide customer base,  we see all sorts of things. We often get calls to work on appliances we might never have heard of before. Some of them are nifty, such as a Northstar Keg Fridge, or a 3 in 1 Breakfast Master. Others have been downright strange.  The Tovala Smart Oven trends towards the ‘strange’ as far as we’re concerned. One of our team members brought the Tovala to our attention and we knew we had to take a look at it. 

Tovala started off as a meal delivery service. They would send you meals, you would scan them using the scanner on their oven and you would get perfectly cooked meals. Perfect! No more guessing and hoping that your settings were the same as the ones that the company used to develop the food. Then with their latest version of the oven, they have made it so that you can scan  ‘hundreds of brand name grocery products—like Eggo® Waffles and Pop-Tarts®!’ At least in theory, this can save you a lot of time. Much like with their own meals, they are taking the guesswork out of things so that you can focus on what you want to get done. Their app will even tell you when your meal is done cooking. If you’re a bit old-school though and prefer not to use the scanner, you can still use the Tovala toaster oven. It has more traditional functions such as baking, reheating, and steaming. 

It sounds like a nifty idea! Hundreds of products and all you have to do is scan them to get them cooked to perfection. But, who’s idea of perfection is it? When it comes to food, the ‘perfect’ amount of cooking is up for debate. Just look at the way some people take their steaks after all. 

Now, that is everything that Tovala claims your toaster oven will do. What they don’t talk about is what they’re going to do with your information. Many ‘smart’ devices including smart assistants such as Google and Alexa don’t tell you what they do with your data. You have to go hunting in several different places in order to find out.  Our question then is does Tovala keep your information for when you cooked that chicken at  2 am? What about when you had a rough day and stress baked seven batches of cookies? Even after looking over their page, Tovala isn’t clear about this. 

Their website only says that you have to use their app to connect the oven to your wifi or use any of the advanced features of the oven.  If you want to cook something from their hundreds of recipes? They know about it. If you want to scan in your box of Pop-Tarts, or one of their premade meals, they know it. Companies such as Google have been brought to the court of public opinion on the fact that they use your data to select ads for you. Many people aren’t happy about that. How would you feel about having more ads in your Tovala app for particular foods or suggestions for certain medications based on the foods that you’re eating? The possibilities are there, and sadly, Tovala isn’t telling us what they’re doing. 

A second issue is the matter of hooking the oven into your WiFi. As you may remember from our post about the Samsung smart fridges, hooking appliances up to your WiFi can be a security risk.  If Tovala chooses to stop updating the features and security measures on their ovens, it can be an opening into your home or office’s network.  


What you probably shouldn’t use it for :

Some of the things you probably shouldn’t be using a Tovala for, based on what it is: 

Cooking a large chicken or other piece of meat. - You can only get so large before different areas are cooking at different speeds.

Trying to cook a cheesecake. - This is just personal preference, but the fact that the Tovala is capable of ‘steaming’ foods leaves me a little leary. I’ll use it for fish after an experiment or two, but I’m not putting my cheesecakes in there. 

Melting plastics- There are all sorts of crafts that you can do using a toaster oven. Given the various features of this one, and that once it’s been used for plastics, you shouldn’t use it for foods again, I wouldn’t do this. 


Thank you for joining us this week! If you’re having issues with a major appliance, let us know, we’d be happy to help you get it back into shape. If on the other hand, you have a strange appliance that you want us to take a look at, post it in the comments below or over at our Facebook page. We love the chance to hear what you’re thinking about and the strange appliances you’ve encountered.

Why You Should Schedule Regular Appliance Checks

Looking at that title, you’re asking yourself, `why in the world do my appliances need to be checked?’ 

Right? 

Think about it this way, you schedule regular maintenance for your lawn, your car, your computers, even for yourself and your family, after a fashion. Why are your appliances any different? 

Take your car, for example. By getting it checked and tuned up regularly, you find problems before they start. If there are any problems, say that persistent whining when you’re going down the highway, the mechanic can fix them before they bloom into something truly hazardous, like your transmission freezing up. 


Your appliances need the same regular checking both in order to prevent problems and to keep small issues from growing into large ones. We’ve had some clients spend thousands of dollars on a new range only to have it die within a year because they didn’t get a problem with the interface checked out. A different client had to replace all of their wood flooring because they didn’t have a pipe fully connected for their washer, something a check would have noticed and fixed. A third client had to completely replace their custom bar when their ice machine broke down due to sediment build-up. The common thread here is that all of them had small problems that resulted in LARGE damages, all that could have been prevented.  


On the other hand, these customers are now some of our most prominent advocates. They’ve seen what can happen when you don’t take care of your appliances and are quick to point out the dangers to others. Like clockwork, every six months, we go out to their homes to give them the full check on everything, just to be safe. Because of that, they haven’t had any problems with their appliances that we didn’t catch. 


So now that we’ve covered the why let’s get into the how


How does Appliance Rescue Service handle a maintenance check


  • The process starts when you call or go online to schedule an appointment. You decide whether you want us to take a look at all of your appliances, or if you want us to take care of just one or two. 


    •  As an example, ice machines and refrigerators are the two we service most often, due to the build-up of sediments and dust in or on various parts. Ice machines should be serviced at a minimum every six months, preferably every four if you use it daily. Refrigerators are best on a six-month check-up due to the condenser coils, but you can get away with yearly. Your other appliances should be checked on a yearly basis.

  • You pick a date and time that works for you, and we put you into our schedule. 


  • The day comes, and we dispatch one of our service technicians. They’ll confirm with you what you wanted them to check, and then offer you a quote for the work, before they dig in. 


  • They’ll then start to look over your appliances, in the case of a full maintenance check, this means all of them. Refrigerators, freezers, dishwashers, ovens, washing machines, dryers, microwaves, ice machines, all of them. 

  • As they go over each appliance, they’ll let you know how things are looking and if they find anything. You can stay with them as they go or go about your day as you usually would. 


  • Once they’ve looked over everything, seals, wires, water lines, and all, they’ll talk with you about what problems they’ve found, if any. If they have, they’ll lay out what the issues are, and what the estimates would be for fixing them. They’ll also let you know if you’re better off replacing the appliance entirely. 


  • After everything has been gone over and estimates have been discussed, our technician will clean up their tools and be on their way. You’ll know whether everything is working well with your appliances or if you need to schedule for actual repairs. 

    • Because there are few things we don’t handle, we might end up making suggestions to other businesses in the area that we know and have recommended to satisfied clients in the past. An example of this is our friends over at dryerventwizard.com. You can go to their website or give them a call at 214-972-0230. 


  • Most importantly, you’ll have peace of mind knowing that everything is well in hand. 


If you’re ready to take that next step and get peace of mind knowing that your appliances are well cared for, head over to our contact page. You can schedule an appointment right there, knowing we’ll take care of you and your home as if you were our own.

Additional Reading

Freezer Deep-Dive

Appliance Rescue Service Technician

Jambalaya - It's What's For Dinner

Welcome to this week’s recipe post! 

This week we’re cooking up a favorite all over the South, but especially in New Orleans. 


That’s right, we’re discussing jambalaya! This is actually one of my favorite meals, both to cook and to eat. 


This is an excellent recipe to keep in your pocket if you need to feed a lot of people on short notice. It cooks up fast and scales easily. Both of these things make it a great meal for Super Bowl Sunday, 


Ingredients 

3 Tablespoons of butter

¾ pound smoked sausage, cut into ¼ inch slices (andouille is best if you can get it, or make it)

1 large yellow onion, chopped

1 large white onion, chopped

1 large green bell pepper, chopped

1 large red bell pepper, chopped

2 stalks celery, finely chopped

1 can or 14 ½ oz diced tomatoes 

1 pound boneless, skinless chicken thighs, cut into 1 inch pieces

1 ½ cups long-grain white rice 

1 clove of garlic, chopped

1 teaspoon dried thyme

1 teaspoon paprika 

½ teaspoon cayenne pepper (plus extra for seasoning)

2 bay leaves

3 cups chicken broth


Instructions


In a large skillet with a lid, melt the butter over medium heat. Add the sliced sausage and cook till brown on both sides, roughly 5 minutes. Put the sausage in a bowl to the side.  


Add all fresh vegetables and cook until they’re just starting to soften. This should take about 3 minutes. 


Lightly dust the chicken with salt and black pepper on all sides. 


Add the chicken and garlic to the skillet. Cook, stirring continuously until the chicken loses its raw colour, about 3 to 4 minutes. 


Add thyme, paprika, the ½ tsp cayenne pepper, and the bay leaves. Cook until fragrant. ( Should only take 45 seconds) . 


Bring the sausage back to the pan (all of it, along with the juices that have dripped into the bottom.) Add your broth and tomatoes, bring to a boil and taste. If you want to add more kick to it, this is when you add in more cayenne. Make sure only to add a small amount at a time to ensure you don’t overdo it. (I’ve made more than one batch that was deemed ‘too spicy.’) 


Sprinkle your rice evenly around the skillet, making sure not to overcrowd any one section. Doing this makes sure that all of your rice absorbs the liquids and heat evenly. You could, in theory, stir it into the skillet, but there’s still the possibility of overcrowding if you’re not careful. 


Cover the skillet, turn the heat down to low and cook until all the liquid has been absorbed and your rice is tender roughly 15 minutes. Remove skillet from the heat and let stand, covered, for an additional 10 minutes. This gives the rice further time to fluff up, as well as making sure that it absorbs the full complement of spices. 


Remove and discard the bay leaves. 

Serve the meal right from the skillet. 


And there you go! A delicious and filling meal that you can make any time of year. 

Skillet of Jambalaya.jpg


If you’re working with a cast-iron skillet, keep a few things in mind. 

  • It takes time to heat up. Due to how thick the pan is, it’ll take more time for the heat to travel through it and for it to cool down. It might be wise to ‘pre-heat’ the skillet in your oven, say for 10 minutes at 350. Make sure that you put the pan in while the oven is still cool. Take time after you’re done eating for the pan to cool off as well before you start trying to clean it. 

  • When you’re getting ready to clean up, don’t get soap on the pan. Cast iron is fantastic for the kitchen, but it takes a lot of TLC. The wonderful people over at Kitchn have gone in-depth on how to care for a cast-iron skillet. 

  • After it’s clean, make sure to season it again before you put it up. Doing this seals the flavors into the pan and ensures that it brings added flavor to your next dish. 


Dinner time is a breeze when your appliances work correctly. If yours are giving you trouble, give us a call. Appliance Rescue Service makes repairing, maintaining, and replacing your appliances easy. You can book an appointment online or call us today at (214)-599-0055.


What recipes would you like to see next? Do you have any recipes you’d like to share or suggest? Let us know in the comments or over on our Facebook page, we’d love to hear from you! 

Credit for our delicious looking photo this week goes to Edd Prince.