Tornado Prepping Time!

What do you need to know and have to prepare yourself in the event of a tornado?

Table of Contents

Preparing Your Home

Preparing Your Property

Preparing Yourself 

A storm super cell spiraling above a field, with rain to the left.

It’s May and officially tornado season! Although we’re not hoping to run into any, we have to acknowledge the possibility. So, we’re doing what we do best and preparing in advance both our homes, and yours. We’ll look at how to prepare your home, your property, and your family. 

Preparing Your Home 

To start with you want to prepare your home. This should ideally be done long before there is any potential for tornados. So, if you’re reading this and you’re under a tornado watch? That’s not the best time to be doing this. Two weeks ago? That would be the best time. Or this weekend. That works too. Far better late than never. 

Check shutters and doors  - During a storm that can create tornados, you’re dealing with high winds. Your windows and doors are the biggest potential points for debris to make its way into your home, in which case the air outside is going to attempt to make the air inside your home equal to it in pressure. The short answer here is to make sure that your shutters and doors are solid and in good repair. For windows, you might consider getting storm shutters that can withstand high winds and hail. For your doors,  you want to make sure that they have at least three hinges and a door plate secured with 1-inch screws (at minimum.)  

**An important note. There is a myth that leaving your windows open during a storm will prevent your home from suffering damage as it will ‘equalize’ the pressure between the inside an out. This isn’t true. We must stress that doing something like this is going to end with your house being ripped in half. Close your windows and doors tight, make sure they’re covered if you can, and ignore myths like this.**

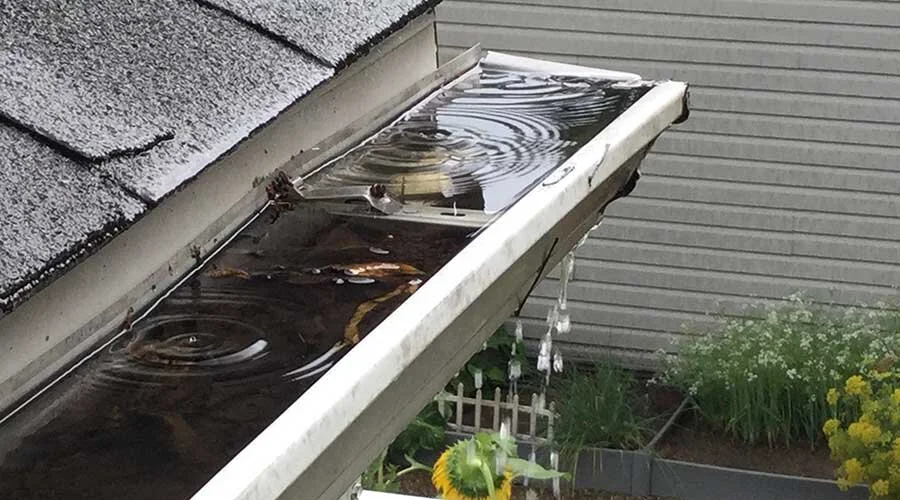
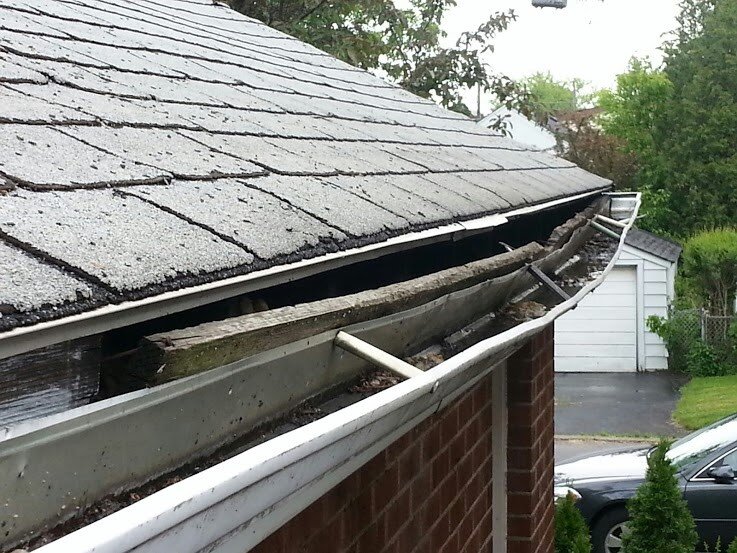
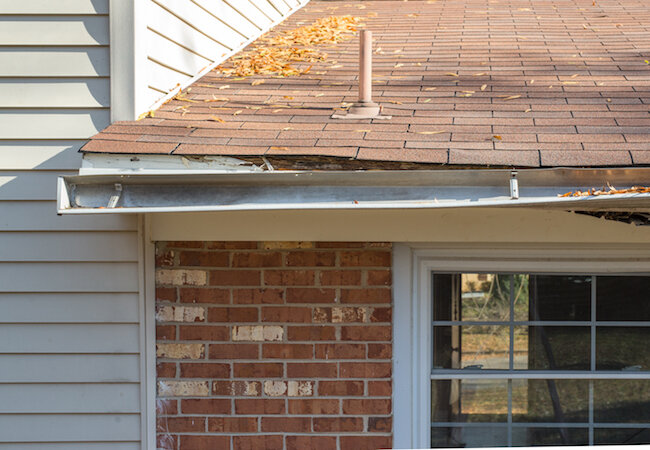
Check gutters - Your gutters are not the end of the world if you lose them during a storm. What is more of a problem is if they come off and go through a window. Is it common? No. Has it happened? Yes. Can you minimize the possibility of it happening by making sure they’re securely attached to your house? Yup. 

Which room is your safest? - Go through your house and figure out which is the most central and best protected. Ideally, your best bet is going to be something that is either below ground (like a basement) or on your first floor. You want to make sure that the room has as few windows as possible. Finally, if possible, your safe room should be at the center of your home, preferably not sharing an external wall. 

Secure tall furniture - Tall furniture getting knocked over is not only a danger to the furniture but also to you or your pets. Better to go around your home and secure everything with L brackets or straps now and avoid it altogether. Bookcases, china cabinets, entertainment centers, make sure everything that can be secured, is. 

Obtain straps for your appliances- This is one that doesn’t have to be done until you’re actually under a tornado watch, but having the straps there and ready to go is what matters. 

Cut materials for windows - This is another one of the “Do it well in advance” things. You’ll want to cut plywood or plexiglass. One thing we don’t suggest is ‘hurricane film’, at least not when used by itself. While the film will help keep your windows from shattering due to debris, it won’t stop the winds from blowing the window right out of the frame. 

When you’ve decided on your material of choice, we’ll suggest that you measure it so that it sets into the frame of the window in question and that you secure it with long screws. Once you’ve drilled the holes, label which side of the material is top, and tape the screws to it. Store all of them together in a cool dry place that’s easily accessible. 

A wall cloud over a city, with lightning striking down

Preparing Your Property

Preparing your property is something that should both be done ‘all the time’ and also once the season starts. 

Thin your trees - Trim dead branches, get rid of any low-hanging branches that are too close to windows or the roof, etc. 

Shape your trees- For this you might need to bring in a professional. The idea though is for the weight of tree being away from your house so that if it falls, it falls away rather than towards your house. 

Reinforce garage and or shed doors- Just like with the doors to your home, you want to make sure that your doors to your garage or shed are solid and reinforced so that they aren’t going to get blown off. The garage door is one of the most common points for debris to come flying through during a storm. 

Make a plan for your outdoor furniture. - Make a list of where everything can be stored that needs to be taken in. Patio furniture, pool items, grills, plants, everything. By having a list of what needs to be moved in the event of a tornado watch, you’re in better condition not to leave anything out accidentally.  

Anchor propane tanks outside- Your propane tanks on the other hand need to stay outside and be securely strapped down. 

Clean up or store away any heavy debris outside- When you get a tornado watch, this is one of the things you need to do. Go around your property and store away anything you can. We’re not talking about the things that are normally outside. Instead this is the wood project you’re in the middle of, or the garden you’re planting, the bricks you’ve just got in for a walkway etc. 


Preparing Yourself 

Last but not least, you need to make sure that you are prepared to wait out a tornado watch or, heaven forbid, a tornado warning. All of these should be done ahead of time, and checked regularly to ensure nothing has gone off. 

Stock your safe room - Back in the first section you identified which room in your home would work best for a safe room. Now you want to make sure that it’s soft, comfortable and that you and your family can stay there for however long you might need to.  In addition to the list suggested here, we advise keeping the room stocked with portable chargers, a generator, cards, books, and other methods of entertainment. One of the worst things is to be in a safe room for an undetermined amount of time, and being nervous or upset. Having things to keep your mind off the situation is always a great help. We also advise a crank charging radio, to ensure that you can keep apprised of the weather. 

Build kits for your car and as grab-and-go options if your saferoom isn’t an option for some reason. -  These kits should include simplified versions of what you keep in your saferoom. 

Include a kit for any pets - Your pets cannot look out for themselves, nor can they pack an emergency kit, so you should consider what they might need and what might keep them calm under the circumstances. 

Make sure to have all of your important documents- Birth records, death records, marriage certificates, deeds to property, proof of insurance, tax paperwork. If someone has asked for it at some point, you want to make sure that you have it in a secure place. You should also include a list of all of the serial numbers for your electronics, just in case you have to leave and people decide to… help themselves while you’re away. Ideally that would be in your saferoom, but it could also be in an easy-to-grab attache or safebox. 

Check your home and auto insurance - This can be done at any point prior to a tornado warning. It’s best though that if you do live in an area that frequently has tornados to consider having this on your policies. 

Did we miss anything? What do you keep in your safe room in case of a tornado? What about your go-bags? Let us know in the comments below or over on our Facebook page. As always, we love to learn from you! 


If you ended up on our blog because your dryer is rattling and not because of a mini cyclone inside of it, you’re still in the right place. You can reach out to us at ((214) 599-0055) or via our contact page to set up an appointment that works for you. We’ll help you find a time when one of our professionals can come and take a look at your major appliances and get them back to running smoothly.  

When and How to Winterize Your Home’s Pipes

And Why You Should Bother, Even in Texas


It’s not quite winter yet, although many of us are dreaming of it. That does mean that it’s the perfect time to winterize your pipes if you haven’t already though. We’re taking a look this week at what that means (because your blogger didn’t know prior to this week), why you should bother, and what that looks like. Let’s dig in. 


What does winterizing pipes mean? 

Winterizing your pipes means going through the steps of getting them ready for winter and freezing temperatures. Whether the temperatures are that low just overnight or for long weeks at a time, your pipes, and home, need to be protected.  Fortunately there are plenty of things that you can do to achieve just that. 


Why should you winterize your pipes in Texas?

Let’s start by reminding everyone of last February. 2 weeks of ice and snow, power outages and all of us going “But this is Texas!” 

Aside from the curveballs that Mother Nature likes to throw at us, there are still reasons to winterize your pipes. It might only get below freezing at night, but a few hours of that is still enough to cause damage.  While the worst case scenario is that you have your pipes burst and your home floods, there are other things that can happen. You can have cracks begin to form in the pipes that are going to seep during the summer into your foundation. 

We will say that while it’s necessary to winter your outdoor pipes, you can be more choosy about which of your indoor pipes to do the same to. 

Image by Tim Pierce on Flickr of a broken and frozen water pipe. This is what happens when you don’t winterize your pipes! :D


When is the best time to winterize your pipes?

The best time to winterize your pipes is before the first hard freeze. So… now would be a good time. Or maybe this weekend after you’ve slept off your Thanksgiving nap. Alternatively, you can push it out till the weather is staying in the 50-55*F range during the day. 


How do you winterize your pipes?

When it comes to winterizing your pipes, there are two ways you can go about it.  You can winterize your pipes for a long vacancy (say if you’re going away on a trip for Christmas) or for several months. Alternatively, you can do a ‘general’ winterizing for your home if you plan on staying in town all winter. 


If you’re going out of town for a Long Vacancy

Start by shutting off the main water valve, all water pumps and water heaters. You might question that last one, but think about leaving a pot on the stove with no water in it. The same thing can happen to your water heater. 

Now open all of your drain valves and taps. Start by making a list and check it as you go through the house. Make sure to check it twice in true Christmas spirit and check off each valve and tap as you go through the house. 

Go through all of the pipes and using an air compressor, blow out any remaining water. You know how if you turn off a hose during the summer it will still have some water in the pipe until it either evaporates or you hang the hose up? Same concept here, except its winter, so the evaporation is going to take a long time and you can’t hang up the pipes for your house. Better to blow them out rather than risk them having water freeze in the bends. 

Next, go to the drain valve for your hot water tank. Check to see if that is a floor valve or if it hooks to another pipe. If it is a floor valve you’ll need to run a hose from the valve to say your nearest sink, this way it doesn’t empty onto the floor. Now open it up and drain it completely.
Go ahead and empty all the water from the holding tank next. This is especially important if it’s a holding tank with a rubber diaphragm.
For extra safety, you might consider adding a small amount of antifreeze to the jet pump case.
Going back through the house, flush all of your toilets. You want to try and empty as much of the water from both the tanks and the bowls as possible. You won’t be able to get everything out, but you should be able to get the majority emptied. 


And you’re done with the inside of your home! Cross off your list, but make sure to hold on to it for when you get back so that you can reverse everything. 


Now let’s go outside.


Once again your going to start by shutting off the water supply valve. If new water can’t flow through, all you have to worry about is what’s left in the system.  Now disconnect any hoses or sprinklers and store them away for the winter. We like using racks in the garage for storing our hoses.
Once you’re back outside, turn all of the outdoor faucets on full and let them run. You want to keep them running until there is barely a trickle coming out, if anything. Now turn them all off and make sure to firmly close the valve.
As a final tip you might consider purchasing an insulated faucet cover. They look like a cow bell for the most part and use a string to stay firmly attached to the faucet and house.  Congrats! You’ve winterized the outside of your home as well! 


Some last general tips. 

Consider the insulation of your home. We’ve talked about the importance of it when you’re trying to keep your home cool, but it’s just as important for trying to keep your home warm. See if there are any crawl spaces over or under your home and if you can fill them or just better insulate them to keep cold air out. 

Take a look at your laundry room. Because they need to drain water out many laundry rooms are on the outside of the home, typically attached to our garages. They’re particularly vulnerable in these areas. Even just putting a door sock on the garage door can be a help in keeping the cold air from getting in. 

If you can, try to keep the heat on. The warmer the house is, the less likely it is that you’ll need to worry about the cold fingers of winter freezing your home’s plumbing. 


So that’s the process of winterizing your pipes. How much did you know before? Have you done it previously or is this your first year? Are you laughing that our blogger didn’t know how to winterize her home? Let us know over on our Facebook page and tell us if we missed anything! 


If you wound up here because your washer is damaged, we can help! All you need to do is call us at ((214) 599-0055) or reach out on our contact page. We at Appliance Rescue Service are here to help keep your home running smoothly. 


Microwaves and Metal, Not the Best Mix


As you can see from those first two videos, we're talking about metal in microwaves this week. 


Last week we  talked all about speed ovens and what we thought were the three best in the industry as of right now in 2021. We ended by pointing out that metal and speed ovens don’t mix any more than it does in your microwave.  The longer we thought about that though we wondered if that was true. Sure, we've seen what happens if you put metal in the microwave. “But is that all the time?” was the question that wouldn't leave us alone.  What we found out surprised us. 


In that first video they put in just a ball of tinfoil. Similar to what you might have if you tossed a baked potato into your microwave. Your blogger has done it more than once after a long night and has had to quickly rescue her microwave. The second.. we admit. That one was more for the sheer variety of metal things they put in there and the chance to learn more. We couldn't help ourselves. 


Table of Contents

Videos

How Microwaves Work & Why Metal Is No Good

What the USDA Says About Metal In Your Microwave


How Microwaves Work & Why Metal Is No Good

Your microwave works thanks to magnetons. That's not entirely accurate, most microwaves work using magnetrons. (We won't say all, because then we'll end up with one that uses something completely different.) A magnetron is  “an electron tube for amplifying or generating microwaves, with the flow of electrons controlled by an external magnetic field.” according to the Free Dictionary. They generate very short, high frequency radio waves using standard AC current. That frequency vibrates at 2.5 ghZ, which is the ideal frequency to be absorbed by fat, water, and sugar. All of the molecules found in your foods for example. By absorbing that energy , the molecules vibrate faster and faster. That speed becomes heat, and your food cooks itself. 


Now, contrary to what most of us thought, microwaves do not cook your food from the inside out. (We were surprised too.) Instead, the radio waves only penetrate about an inch into the food.  The water/fat/sugar molecules contained within the meat and plants are evenly spread throughout what you're heating so the heat spreads out (mostly) evenly.  

So if you wanted to cook something like a thick slab of meat in your microwave (just as an example)  you'd want to do it on low power over a long period of time to ensure it was fully cooked without overdoing the outside. 


The fact that the molecules are what gets heated and not the air in the microwave is why your food doesn't get crispy like it does in an oven. 


Now, inorganic materials like your glass or ceramic dishes don't absorb radio frequencies the same way. So the only heat they absorb is from the food that's sitting on or in them.  Metal though, that's different. Metal can reflect microwave energy.  That's why the inside of every microwave is a very thick metal box. (We'll explain why thickness matters in just a moment.)  This thick metal shield keeps the microwaves focused towards your food, and not leaking out around your kitchen. 


Now, for that same reason, you can safely put a flat metal sheet into your microwave. So long as it's flat, it acts the same as the microwave walls, reflecting the microwaves inwards rather than outwards. 

-You can use this to your advantage! If you cover parts of a meal with a thick piece of smooth foil, you can keep it from overcooking. 


The important thing to note is that the metal needs to be completely flat. Curved or wrinkled pieces of aluminum foil are going to generate lots of sparks. Unlike the thick walls of your microwave, thin, small or pointed pieces will heat until they ignite. SO that crinkled edge of foil that you wrapped around your plate? The thin crinkled edge lets the current run along them arcing against the metal walls. Do this long enough and you're going to have a fire. 


If you're lucky, you can catch it soon enough to save your microwave. If not you might be replacing your microwave, or dealing with a kitchen fire. 


If you do put metal in your microwave, and it starts causing sparks, press the stop/cancel button. You can prevent great amounts of damage. If however you walked away and your microwave is now on fire, reach to where the plug is and unplug it. Or you can also spray it down with a fire extinguisher if the fire has gotten outside of the microwave. 


What the USDA Says About Metal in the Microwave

Now all of that said, the USDA does have some tips if you really want to test this out. (If you do, please know that we're not responsible for what may or may not happen to your microwave.) 

-use only smooth foil. Wrinkled foil gives the current more chance to spark. 

-Cover 1/4 of your food or less with foil. 

- Don't let the foil edges stick out. 

- Which side of the foil faces out doesn't matter. Shiny, dull, it's the same thing in this case. 

- Keep the foil in the middle of the microwave and at least 1" away from the walls. 

- If your model of microwave has a metal rack or turntable, do NOT use foil or metal containers in it and do not let foil touch or be close to the walls, shelving or turntable. 


With all of that together, we think we're just going to stick to the adage of "don't put metal in the microwave." It's much easier and less risky that way. What about you? Are you willing to give it a try? Do you have an old microwave laying around that you can experiment on? Let us know over on our Facebook or in the comments below. Although we're worried about the outcome, we can admit to being curious too.  


If you wound up on this page because you did manage to set your microwave on fire, we're sorry. We've got a post all about speed ovens that might make replacing it easier? Most of them are capable of handling what your microwave could do and more.  Check that out over here. 


Now, if on the other hand, you wound up here because you have one of your major appliances that needs to be fixed, we can help with that too. We service all major appliances and brands, and we want to keep your home running smoothly. You can reach out to us via phone at ((214) 599-0055 ) or you can go over to our appointment page to set up an appointment. At Appliance Rescue Service, we're here for you. 


Note: The first video we showed belongs to RUPhys2012 and the second belongs to The King of Random. We are not claiming to have made them nor are we making money from them. Go show them some thanks for showing off what shouldn’t go into a microwave.

Why The Media Wants You To Be Scared of Your Gas Stove

And Why It Makes NO Sense

Back in February of this year, we talked about not using your gas stove as a source of heat. We pointed that out because it’s not good for your health to have a build up of  gases in enclosed rooms.  Now, scientists are saying gas ovens aren’t safe in the home at all - even when used properly. 


To state it plainly, this article wants you to believe that gas ovens are the key contributor to childhood asthma. The different studies cited as the article’s sources all work together to paint a scary picture. They talk about NO2 and particle pollutants and how the indoor measurements are higher in homes with gas stoves. They lay out the theoretical benefits (at least in terms of cost) of cutting out gas appliances. Then they paint a rosy picture of what things could look like if we switched to all electric ranges, furnaces and water heaters. 


As we’ve said in the past, we don’t choose one type of range over another. Both gas and electric ovens have their benefits and drawbacks. However, there are several things that bother us about this article. 


  • The article consistently says that the homes being looked at are ‘older’ or ‘run down,’ but apparently wants you to believe that advances haven't been made in gas technologies. 


  • They cite that, out of those interviews, only ⅓ of homeowners used their vent hoods. What they don’t consider is that this misuse is human error and not a design error. 


  • The entire article is written in a way to make the reader scared. The words that are in large print are all phrased for the worst possible impact. Yes, they’re the ‘tweetable” lines, but they’re designed to make you stop and read closer because you’re scared. 


  • Yes, switching to electric would cut out whatever particles even a properly used gas oven creates. However, as cited, most of these homes are lower income or older homes. We have to ask: who is going to pay for the supposed upgrade? The cost of cutting out and rewiring to support all-electric ranges, furnaces and water heaters, would be hefty. Despite the ‘rebates’ spoken of in the article, any one who deals in real estate knows that the price would eventually come back to the homeowner - and in the case of rental units, passed down to the renters. Whether it’s through rent hikes “just until the change is paid off,” or through the cost of the electricity to power the new appliances, the cost to the “lower income minorities” the writers want to say they’re worried about would be burdensome. 


  • When numbers or studies are cited, they are all skewed or explained in such a way as to be misleading to the general public. Ask yourself what information the writer may be selectively omitting in favor of making their points. 


We don’t have an issue with gas vs electric ovens or stoves. What we do dislike are scare tactics intended to mislead an audience. This article does present valid concerns, which is why we initially found and read it. What we’re left with, though, is this:
A) When you’re using your gas appliances, please make sure that you’re using them properly. Whether this means having an expert check your lines, doing some simple maintenance, or just turning on your vent hood, please do.
B) Please read critically. There are many sources of information out there, and all of them want your time and attention. Not all of them are going to evenly weigh the facts. 


Where do you think this fight will go from here? Will people be swayed into making the switch to all electric? Will more stringent rules regarding how vent hoods tie into your range be passed? Let us know over on our Facebook page. We’d love to hear from you and what your thoughts on the matter are. 


If after reading this you realize that your gas oven needs a check up, please feel free to call us ((214) 599-0055) or visit our website. Wherever you live in Coppell or the surrounding area, we want to help. 


Why You Should Worry About Cleaning Your Gutters

And How to Do It Right the First Time

This past week has had a lot of rain for Plano and the surrounding areas. We’re not sick of it quite yet, but our homes might be. All of that water comes with lots of leaves and twigs hitting our roofs and being washed into the gutters. Which was fine. Up until it started leaking in your poor blogger’s kitchen. We learned a fair bit about our gutters this week and what they do for our homes. We’re sharing with you so you can avoid the same fate of having your kitchen flooded, at least if it’s due to clogged gutters. 


Possible Damage

So what does it really matter? As long as some of the water is coming out of the gutters and downspouts you're all good, right? Not quite. There is a lot of damage that can be done from your gutters being clogged or otherwise not functioning properly.

Roof Damage

If your gutters are clogged the water can end up pooling and sitting on your roof. There the water is going to get under your shingles and your roof can end up rotting, cracking, and leaking. All of those damaged areas are going to continue growing and becoming worse with each new rain.


Increased Chance of Ice Dams

When we talked about water pooling on the roof and in the gutters themselves, we didn't talk about winter. During the cold months, like this past February, that water will turn into ice dams. Large heavy chunks of ice that can rip the gutters off your roof, if you're lucky. If you're not lucky they can begin damaging your roof, depending on the size of the pool to begin with.


Foundation Damage

If a storm happens during winter sitting water can begin to cause expansions and cracks in your foundation as it freezes and melts. As the water pools and sits on the ground, it leaches into the concrete of your foundation.


Basement Flooding

Heading inside to your basement, if you're lucky enough to have one in Texas, water is still a problem. Once water starts getting into your basement it opens up all sorts of problems. It can leak in through your foundation or through the void spaces between walls.  That water can spread and result in gas leaks or electrical shocks.


Fire Hazard

When water spreads through your basement, or the walls in your house, it can end up coming in contact with wires. If there is a fuse as part of the system, then you’ll be dealing with a short circuit and a blown fuse. If however there isn’t a fuse, the water can heat up to the point of causing an electrical fire.  


Shifts and Cracks in Driveway & Sidewalk 

Just like with your foundation, water can pool on top of or under your driveway and sidewalk. With time the ground underneath can be eroded. Or the water can freeze, causing shifts and cracks.

Ruined Landscaping

You spend a lot of time and money making your yard look the way you want. A blocked gutter or downspout, is going to cut new channels through the ground following the path of least resistance. This means you'll end up with plants that are getting too much water, plants that have had their beds destroyed, and all sorts of pests moving in.

All of these are problems that can, do, and have happened to people all over the Plano area.


Signs To Look For

Now you know why you should care. The question is what are you looking for? To inspect your gutters, we advise waiting until a few days after it's rained. This way if you decide to start cleaning that same day you aren't going to be dealing with wet heavy debris. That’s not always possible though as sometimes it’s a storm happening that brings the problem to your attention. 


Visible overflow during heavy rains

clogged gutter overflowing with rain

clogged gutter overflowing with rain

Of course if you are in the middle of a rain storm while reading this, you might look outside and see visible overflow from your roof. This is more than just a few drops here and there from hitting the edge of the gutters and dripping down. This is having a curtain of water at the edge of your gutters because the water isn't being diverted.


Unexplained water in basement

During or after a storm you might find unexpected pools of water in your basement. This means that the water is seeping in through your foundation either through pre-existing cracks or ones that have been created.

Water inside the home

You might also have water on your first or second floors. This would be where you have water coming down from the gutters and running right down the siding of your home. You're siding isn't meant to withstand constant rain running against it. The water gets under the siding and into the void between the walls and begins to eat away at your drywall.


Paint damage or rust

On  a sunny day start by looking at the inside and outside of the gutters by eye. Look for spots where the paint is damaged or there's bare metal that has rusted. The paint on your gutters is formulated to be water resistant. If it's chipping or has rusted, it means there is, or has been, water sitting for an extended period of time.


Pools of water and mold

Gutter with mold, rust and pulling away from the roof

Gutter with mold, rust and pulling away from the roof

One of the most obvious things you'll see is going to be areas where water has pooled in the gutters and is still there even after things have been dry for a day or so. Or you might see mold buildup even if it's been dry for several weeks, you know that water has been standing in that area.


Sagging or collapsing gutters

Sagging-Gutter pulling away from the roof and tipping over.

Sagging-Gutter pulling away from the roof and tipping over.

Spots where the gutters are pulling away from the fascia boards or flat out collapsing are glaring signs that something is wrong. The fascia boards are the wooden supports that the gutters attach to on your roof. if the gutters are pulling away at those it means water has begun to eat away at them and they can no longer sustain the weight of the clogged up gutters.


How To Clean Your Gutters

You've decided that you want to clean your gutters and prevent all of this mess? Great! We'll  walk you through the process and if at the end of it you decide it's too much, that's fine we advocate hiring a professional.


Avoid doing it right after rain

Much like looking for the signs of gutter damage, if at all possible you want to clean your gutters after it's been dry for several days. It's much easier to remove leaves and twigs and whatever else has clogged them when it's dry rather than when it's heavy and wet and compacted.


At least twice a year

Ideally you want to clean your gutters twice a year. Once in spring to get them ready for the heavy spring and summer rains. And once in fall to clean up the damage from those rains. The exception to this is if you have pine trees close to your house at any point. Since pine trees shed throughout the year you should look at cleaning your gutters every 3 months.


Spread a tarp under the ladder to protect your lawn and also to catch all of the gunk 

This one is pretty self-explanatory. If you lay out the tarp ahead of time, he'll catch everything rather than having to clean it up afterwards when you're already tired.


Practice ladder safety

If you're not comfortable going up on a ladder, please don't. Hire a professional or even have a family member that is comfortable with ladders. Otherwise, the basic rules of ladder safety apply. Make sure you have it fully open and on level ground.


Use two pairs of gloves. One rubber and one working pair.

The idea here is that the rubber pair will keep your hands and arms from getting wet or terribly dirty while the working pair keeps you from getting cut up.


Begin cleaning debris near the downspout and work backwards

A trowel is a handy addition for leaning out your gutters.

A trowel is a handy addition for leaning out your gutters.

Now that we've covered safety matters let's tackle the gutters. Start at the downspout and work your way backwards a long till the end points. You can use a trowel, your hands, or a gutter scoop if you happen to have one. You want to get out anything that doesn't belong. Sticks leaves random ribbons bits of stray balloons, and whatever else the wind might have brought you.


Remove and clean downspout strainer

Once you have the gutters clean, go back and clean out the downspout strainer.


Testing Time

Now it's time for your first test. Starting at the end turn on your hose with a spray nozzle and use that to rinse out any dirt, aiming for the downspout. Make sure not to be spraying up under your shingles or else you'll be adding to the problems.

Cleaning the Downspout

Hopefully your water will flow towards the downspout and out without any obstruction. If however you see that the amount of water coming out of the downspout is not the same as what you're putting out with the hose you need to move on to cleaning that out.


Start at the bottom and feed your hose up into the downspout turn on the hose on full power. Hopefully this will dislodge anything that's in there. If not you can grab a plumber's snake and attack it from the top. After each cycle of hoes and snake, try flushing the system again. Eventually this process will break up whatever is in your downspout allowing it to flush out.

Inventive Methods

These are a few ways people have found to clean their gutters that are at least interesting, if not necessarily recommended by us. 

A leaf blower with a narrow nozzle attachment

A wet/dry vac 

A Power washer 


Gutters serve an important purpose for our homes. They help keep our grooves from breaking down under the weight of water. Why not take a few minutes on a sunny day to make sure that they're in working order.


If you have any horror stories from cleaning, repairing, or maybe not doing that for your gutters let us hear them over on our Facebook page or in the comments down below. 


If it's the inside of your home that's giving you trouble, maybe one of your kitchen appliances, or your dryer, give us a call. Even when we cover other areas of the home, we're still the best appliance rescue service in the Plano area. We want to keep your appliances in tip top shape. You can get hold of us by phone at ((214) 599-0055) or on our website.