5 Kitchen Tools From The Future

What Food Engineers Are Coming Up With Today Can Be In Your Kitchen Tomorrow

Table of Contents:

Fromaggio Smart Cheesemaker

CocoTerra Tabletop Chocolatier

Barsys 2.0 Cocktail Machine

LG Snow White Ice Cream

Mycusini Chocolate 3D printer 


kitchen. We’ve got all sorts of fun food and drink based tools that you might see in your home kitchen over the next few years. From chocolates, to drinks, to ice cream and cheese, we’re taking a look into the future to see what food engineers are coming up with. 


Fromaggio Smart Cheesemaker 

Say you have a dinner coming up, and you want to offer up baked brie and fresh mozzarella to your guests. You’re also thinking about some chevre for a salad that you want to serve. Unfortunately for you, your local shop doesn’t carry any brands that you like. What’s worse, it’s difficult to ship cheese, especially when you’re trying to get it to Texas in the summer. You don’t want to go without the cheese course, so what about making your own? The Fromaggio Smart Cheesemaker connects to an app to create almost any type of cheese you can request. It sits on your table and works away while you go on with your life. You can make everything from chevre to yogurt, and many other cow and goat milk cheeses as well. Some cheeses are even able to be made within an hour. According to Fromaggio, the machine is capable of making up to 2lbs of soft cheese or 1lb of hard cheese in a single cycle, for less than it would cost you at the store. 


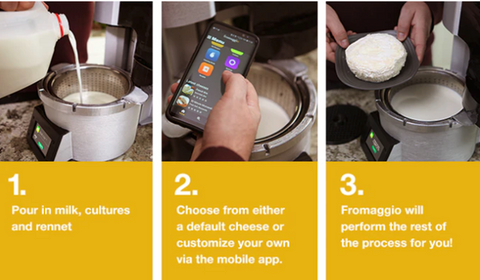
If you’re interested in purchasing your own, Fromaggio is taking pre-orders now, with it estimated to ship in April of 2022. 


CocoTerra Tabletop Chocolatier

Not interested in cheeses? What about chocolates? Then you might be interested in the CocoTerra Tabletop Chocolatier. This wonderful tool handles all of the steps needed to make chocolate using the connected mobile app. Whether you’re looking to make specific shapes, or you want to blend your own chocolates, it’s possible with the CocoTerra. The app has many different recipes available for you to begin to learn how to make chocolates, allowing you to exclude ingredients for those with allergies, or to emphasize flavors. In two hours you can make any type of chocolate you can dream up. What’s better is that although the company does offer ingredients and even decorations, you’re not restricted to shopping through them. You can purchase materials from anywhere to make your chocolates.  Roughly half a pound of chocolate can be made at one time, which with custom chocolates would be a wonderful night’s feast. 

Although we’re note certain when CocoTerra is going to move to mass production, they are offering pre-orders right now hoping to deliver in the Winter of 2022.


Barsys 2.0 Cocktail Machine

It’s been a long day, and all you want is a Negroni. It’s been one of those days. You don’t want to mix it yourself, you really just want it ready for you when you walk in the door. Fortunately, you know that you set up your Barsys Cocktail Machine earlier that day. All you have to do is pull up the Barsys app on your phone and tell it to make it for you when you park in the drive and it will be ready by the time you get inside.
The Barsys is an alternative to having to memorize tons of different recipes, or being uncertain of how much you need of this or that. You can put in up to 5 bottles of liquor and 3 different mixers to create all sorts of drinks in 15 to 30 seconds. 

In the interests of full disclosure, we do have to talk a bit about some of the flaws with the Barsys. According to many different sources the Barsys app is buggy and lags when processing requests. It’s also been said that the machine does leak during the mixing process. While these are problems that might deter you from purchasing right now we would still suggest keeping an eye on the company. 

If you’re interested in purchasing it you can grab it here from Barsys


LG Snow White Ice Cream 

Think about your friend’s Keurig machine. You insert a pod, and out comes coffee. Now imagine if you will that it’s summer, and you can press a button and get ice cream instead. Insert any combination of flavor and ice cream pods into the LG Snow White and get back a dizzying array of ice cream options. Currently, the flavor pods are expected to include a wide range of common ice cream flavors, and the pods for type will feature ordinary soft-serve, alongside more uncommon types such as gelato and custard.  Although we don’t currently have pre-order possibilities or even a launch date, we do know that the testing is going very well and we should see more news as the next year or two goes on. 


Mycusini Chocolate 3D printer 

Rounding out our list, we’re taking a very different look at chocolates in comparison to the CoCoTerra. This offering from Mycusini allows you to build complicated, edible structures in your own kitchen. Want to make that wonderful chocolate peacock you saw in a magazine? You can. 

In contrast to the CoCoTerra, the Mycusini only works with specific types of chocolate, so your ability to use it is limited to the availability of the Mycusini chocolate. The machine does come preloaded with several designs, but they do offer the ability to design and load even more through their Mycusini club. 

There are two different versions of the Mycusini, as of writing. The Mycusini 1.0 features a 105mm by 80mm printing area with a maximum height of 50mm (4.1in by 3.1in, 1.9in height)

The Mycusini 2.0 features a 90mm by 90mm square printing area, and updates the original design by having a more robust, enclosed build, and a larger and more user-friendly touch screen display.

Both of them have the ability to use SD cards to download new designs and templates. 

If you’re interested in getting a Mycusini for your home to experiment with you can get them here, along with supplies, and other accessories. 


The future is full of interesting and surprising possibilities, including the future of your kitchen. Some of these are already available, while others are still in the testing phases and will hopefully come in the near future. All of them are likely to get better with each new iteration. Which kitchen tool of the future are you most excited by? Which one do you think is a bad idea? Let us know over on our Facebook page, we’d love to hear from you. 


If on the other hand, you’re dealing with the very real present where you’ve got issues with your current kitchen appliances, we can help! Give us a call at ((214) 599-0055) or set up an appointment on our webpage and we can help you, no need to wait for the distant future.  At Appliance Rescue Service we’re here to help you, now and in the future. 


Additional Reading: 

Cutting Edge Appliance Concepts of the Future

Top 5 Craziest Smartphone Capable Appliances

9 Kitchen Gadgets You Don’t Need


Comparing 3 Different Leaf Blowers

How do you best deal with the leaf invasion?

With winter just now coming into season, many people are finally getting to rest, not having to rake up piles upon piles of fall leaves. No matter how much fun the piles of leaves are to fall into, they can be a hassle to clean up. Thankfully for those with a variety of trees in their yards, there’s a wide variety of leaf blowers for almost any budget, and a few different types to suit your individual needs.


Generally, there are three types of leaf blower: Plug-in, battery powered, and gas-powered.


Plug-in leaf blowers tend to be the smallest and least powerful options, but are also the most budget friendly by far, with many good options coming in below one hundred dollars in price. That being said, they do come with the issue of cord length limitations. But, for the budget, they’re hard to beat.


Battery powered models are the next step up in size, power, and price, and have free reign to go wherever you do with no worries about cords. Now, don’t worry about spending a fortune on D batteries for these - new models are designed by power tool companies to take the same rechargeable batteries used for things like hand drills!


The final, and largest, type of leaf blower is gas-powered. They tend to weigh the most, but have the absolute most power compared to other models. These are very common options for professional landscapers, but are also a very popular choice for those with larger properties to clean up. Excellent for dealing with large amounts of leaves, but with a hefty price point - not factoring in the cost of gasoline and oil for it. 


An additional consideration is the configuration of your leaf blower. Generally, the most common option is a handheld leaf blower, and for most people, this option will do just fine. However, some very large models come in a backpack configuration, allowing more comfortable shouldering of the weight while offering more power than their handheld counterparts, albeit at a higher price.


First - Plug-in model -

Black & Decker 7 amp 180mph corded leaf blower

Price at time of writing - $30.00

Our first recommendation is a small four and a half pound machine produced by black and decker at a nigh on unbeatable price point for the quality. Pretty serious power for its size and price, this is a great choice for homes that don’t need a large leaf blower to handle things come fall.


WRITER'S CHOICE OPTION

Second - Battery powered model

Greenworks 24V 90/130 MPH Dual Speed Cordless Leaf Blower

Price at time of writing - $80.00

Our next pick is a bit more pricey but comes with quite a bit of extra utility. While it isn’t quite as fast as the corded model, this is a far more mobile option, and best of all comes with a rechargeable battery capable of being used with any other GreenWorks power tools and garden tools! This is an excellent choice for those of you making use of GreenWorks tools, and for those of you with a larger area to go over without necessarily needing something gas-powered to handle things.


Third - Gas-powered model

Husqvarna 125B handheld leaf blower

Price at time of writing - $180.00

The third recommendation we have, for a bit of a larger budget, is one made by a company most well known today for their motorcycles. That being said, the 28cc gasoline engine in this handheld leaf blower delivers excellent power and solid mobility for the size. Overall, a very impressive leaf blower, and an excellent choice for those needing power to handle a very large area. Now, we must warn you - The cost of this option is not just upfront with the leaf blower itself, but also with the cost of gasoline and oil to mix in for its tiny two-stroke engine. That being said, the power can’t be beaten.

Fourth - Backpack leaf blower

Husqvarna 150BT backpack leaf blower

Price at time of writing - $300.00

Our largest and most expensive option on this list, another offering from Husqvarna. Backpack leaf blowers are more common to see in the hands of professional landscaping crews for businesses and people’s homes, but they’re an excellent option for people with massive areas to de-leaf every fall. These provide the absolute most power, but are also the absolute priciest, and for smaller properties, can really be overkill. 

These are the general types of leaf blower, and a few good examples of each. Options range well with price as well as size, to suit whatever needs your home has. Of course, any option works for any size property, but it is never a bad idea to consider your needs versus what options you have. We would love to hear what choice you made, as well as what comments you have on these offerings. Feel free to comment here, or go over to our Facebook page to talk to us about it, and if you notice any problems with your appliances, feel free to give us a call at ((214) 599-0055) or schedule an appointment here on our website!


Stove Deep Dive

All about stoves, how they work and the differences to expect.

Table of Contents

Types

Surfaces

Burners

Ventilation

Features

Additional Reading

When was the last time you had to go looking at a new stove? Do you remember how many different options there were? Not to worry, we’re taking a look at them this week to see what main features exist in stoves and how to find the one that best fits you. Let’s dive in. 

Types


Electric

Let's start off by looking at THE most common type of cooktop you're likely to encounter when looking to purchase a new stovetop, an electric stove. They are the single most popular variety in the United States, and the easiest to find. They're also the easiest to set up, as most kitchens will already have an outlet that's heavy enough to handle the power draw of an electric stove. Due to the popularity they're also fairly inexpensive to pickup which makes them great for someone who is on a budget or is just looking to put their money elsewhere.  They're also typically very easy to clean, no matter whether you get a cooktop with coils or without. 


Since you don't need an 'ignition' as soon as you turn on a burner it will begin to heat. However, because the heat is cumulative rather than immediate, it does take more time than a gas stove to heat up. This also means that it takes longer to cool off by comparison to a gas stove.  Since there isn't an open flame of any sort though, many people prefer an electric stove over a gas one. 


There are some drawbacks to an electric stove though. One is that if your home loses power, you lose your stove as well. The other is that while there are energy efficient stoves, as of right now an electric stove is still going to be a significant chunk of your electric bill. A final, smaller point is that you do have to be careful about what pots and pans you purchase. Make sure to do research ahead of time as some types can scratch, damage or shatter your cooktop if you make the wrong purchase. 


Gas


Next up, let's take a look at gas stovetops.  A gas stovetop has a number of benefits to it, the primary one is how quickly they heat. Due to their instant flames as soon as you turn on a burner you begin to heat the room (and the food you're wanting to cook.) With that visual element, you also have very precise control over the temperature of your burners. Although it's more intuitive than just setting the burner to high, medium or low, you get the upside of being able to see over time how the heat affects your recipes. The speed with which the flame responds also means that you can cool what you're cooking much more quickly by lowering the flame. All of this boils down (ha!) to being less likely to burn your food. 


Another benefit of such quick temperature response is that you can heat up or cool down the pan you're using. So if you've got pets, small children or you're just working in tight spaces, you're less likely to burn yourself thanks to how quickly a gas stove will cool off. This also means that you don't have to worry about a pan getting damaged by the stove OR that a pan is going to damage your stove in some way. 


A gas stove is able to still be used even if your power is out. You'll need to use a match or lighter to get the burner lit, but you'll still be able to cook or boil water if you need to, to heat your home in the event of a winter storm.  Under normal circumstances a small bit of electricity will be used to 'spark' and ignite the burner when you turn it on. 


There are two factors though that you do need to pay attention to when it comes to purchasing a gas stove for your home. If you don't already have a gas stove, you're going to need to have a gas pipeline run. That can be expensive as it's not typically done on construction for new buildings these days. Fortunately the price of having the line run will pay for itself over time when you don't have to worry as much about your electric bill. You also need to make sure that you have some type of ventilation set up. We'll talk about it more down below, but you have two options when it comes to ventilation. An overhead hood and a downdraft extractor. Both are good options, so long as you actually use them. While a gas oven is by and far superior in terms of precise temperature control, it does burn gas, which you don't want to be breathing over an extended period of time. Make sure to always have your fans on while you're using you stove. 


It is possible to have a combination of a gas stove and an electric oven, or vice a versa, although it's not common. You can also choose to have them as separate appliances, setting the stovetop into your counter and the having a single or double oven in your wall.  Both of these are wonderful options if you've got the space for them in your kitchen as they spread out the cooking area in your kitchen and mean you aren't fighting for space when cooking multiple things at once. 


Induction 

If a gas stove isn't fast enough for you,  then you're going to want an induction stove. We'll tell you off the bat that the benefits of these stoves are weighed against their hefty price tag. While the heat from an electric or gas stove is going to transfer across the entirety of the cookstove to some degree, an induction stove doesn't work that way. The stoves are ceramic with different 'zones' built into them. Instead of applying heat to the outside of your pot and the heat transferring to the material inside, the heat is created directly inside your cooking pot. Once you take the pot off the stove, the heat immediately is turned off. The good news here is that the stovetop is never as hot as an electric stove or a gas stove is going to be.  The downside though is that you need to purchase an entirely new set of pots and pans to go along with your new stove. The two work together much like velcro.  A normal pot doesn't have the elements needed for it to work with the stove, and so it won't. The elements within the stove won't 'register' the pan and so it won't turn on. 


You also have to be very careful with an induction stovetop as you can shatter the surface of them if you're not careful in how you put things down. 


Surface

When it comes to the surface of your stovetop, you have two different options, coils or smooth cooktops. 

A coiled cooktop can be either electric or gas. A smooth cooktop is only going to be electric or induction. 

The benefits to going with a coiled cooktop is that they're extremely durable, easy to clean and they will stand up to years of use and abuse. It doesn't matter how hard you scrub your stovetop to get rid of a mess, it's not going to damage the coils.  Your cookware won't either, even if you're dragging out that giant dutch oven that you have. 

A few downsides to keep in mind are that  while they do heat quickly, coils also hold onto that heat for a long time. You will also need to check them periodically (every 4 months or so is pretty good) to make sure that each coil's connection to the power source is still in working condition if you're dealing with an electric stove. If you're dealing with a gas stove you'll want to make sure that the burner is clean and free of debris. 


The other type of cooktop option you have is a smooth cooktop.  People love them for three key reasons. One, they're supremely easy to clean. You don't have to remove anything, unplug anything or get under anything in order to get them shining like new. All you need is the special paste that is designed for the job and you're good to go. Reason number two is that they heat up your pots and pans, without heating your kitchen. If you live in Texas, it makes it that little bit more bearable for cooking during the summer.  Three, you don't need to worry about little hands or paws getting burned because they touched the stove at the wrong time. A fourth one, is how seamlessly they fit into a modern design. They are the latest in cooking technology and we know people love to upgrade to the latest and greatest. 


A few downsides do come with working with a smooth cooktop though. As we said, you do have to be careful about which cookware you use. You're also going to have to be aware of how you move that cookware though. Or any groceries or anything else that you move around in your kitchen. The surface of a smooth cooktop, whether electric or induction is going to be fragile. They can be easily scratched by 'sliding' pots and pans over them. Even worse is how easily they can be shattered by putting something heavy on top of them without paying attetion to how you set it down. 


So, which type of surface do you think you want? 

Burners

Number of burners

You can get your stove in a variety of different number of burners, 2, 4, 5, or 6.  How large you want it to be is going to dictate how many things you can cook on it at once. Take into consideration a few things when you're shopping .

-How often do you end up saying "I need more space?" 

-How often do you use all of the burners on your current stove? Not just at once, but the different sizes? 

-Do you have the space in your kitchen for a larger stovetop that it would need if you got one with more burners? 

-Would getting a second smaller stovetop in addition to your current one benefit you, rather than getting one large one? 


All of these are ways to look at what type of stovetop you might consider getting next as the number of burners you have will directly impact the size and placement of your new stove.   We will say that getting a stove that has five burners in electric is very difficult but getting one that is 6 burners and electric is possible. 


Automatic reignite

A useful feature that you might want to look into is automatic re-ignition if you're looking to get a gas stove. Occasionally with a gas stove the flame might go out on a burner, or on multiple burners without you noticing. This can throw off cooking times and temperatures if too much time passes. With this feature that's not a concern as the stove will automatically re-ignite after it senses that a burner has gone out. 


Continuous grates

If you want to make your gas stovetop more professional looking, you might consider getting continuous grates for your stove. Instead of having a single grate over one burner, you combine two f them together into one long, smooth line. Yes, they're heavier, but the make the stove look more appealing and 'finished' according to many homeowners. 


Stove top griddles

On the other hand, if you're looking at your stove and wondering why you need pots and pans, a griddle might be more your thing. These can be added to either a gas stove or an electric, but as of yet it's not happening on an induction. These heat more smoothly and evenly than a griddle that you just lay on top of preexisting burners. Great for making every meal of the day without needing to use mutliple dishes. Eggs, bacon and sausage? Check. Grilled cheese sandwich? Check. Sausage with peppers and mushrooms? Check.  There's a huge amount of  food that you can make on a griddle. 

Ventilation

A downdraft stove with vents both at the back of the stove and in a strip along the center

We mentioned earlier that you need a ventilation system with a gas stove, and many people choose to have them with electric and induction stoves too, just in case you burn something. One option is a downdraft cooktop. This option, instead of having a fan or range hood, has a small vent built into the cooktop. It's built into the back of the cooktop or in between the burners to suck steam and smoke away. This also gives you back the space over your stovetop to be used for lighting or additional storage. 

A slim rangehood over a stove and oven with additional lighting

Or, if you prefer going with a traditional range hood, that's also an option. You can choose what it looks like and whether it's a centerpiece of the kitchen, or if it blends into the walls.  

Regardless of which one you choose,  the important point, even if you have an induction stovetop, is to have a way to pull the steam and smoke safely out of your kitchen so that you can breathe and see easily while you're in the kitchen. 

Features


Speed heat

Some recent stoves have started to make it so that you can very quickly bring a pot of water to boil. While water is what they typically show, ‘speed heat’ can be applied to anything. It will be one of your burners for those times when you need to make things go that little bit faster. 


Safety

Who hasn’t accidentally burned themselves on a burner because you weren’t looking closely enough? Two safety features that we love for stoves are auto-shutoff and a heat indicator. The auto-shutoff makes it so that you can set a timer for what you’re cooking. After that point, the burner will shut off and you don't have to risk your food burning if you have to step away or forget to turn it off. The heat indicator is just that. It might be at the front right next to the burner knobs, or it might be on the control panel at the back. Either way it will be a light of some sort to show you that the burner is still hot. 


Wi-Fi

There are stoves now that come with wi-fi and app connectivity to make it so that you can keep an eye on your stove from anywhere. 


Controls

When it comes to controlling your stove, as of right now at least, you’ve got two options on most stoves. You can have knobs to turn on an individual burner. Or you can have digital controls that activate just when you touch the panel. These are great if you’re struggling to handle knobs due to arthritis or something similar. 


That’s our deep dive on stoves! Let us know what you think in the comments below or over on our Facebook page. Are you looking to get a new stove? Are you trying to figure out what features you want to change in your current one? We’d love to know. 


On the other hand, if you’ve already got a stove you love and it’s just not working right, give us a call or head to our appointment page. No matter what’s going on Appliance Rescue Service will work with you to figure out what’s happening and get it fixed. 

Christmas Shopping for Your Favorite Chef

When You Just Aren’t Sure What to Get Them

Everyone is hustling and bustling, trying to find gifts that say 'I love you', 'you matter to me' or even 'I really love the food you make, even if we're just coworkers.' We're right with you.  Trying to figure out what the buy or make for people is complicated! So we've put together a list of potential gifts for the special chefs in your life. 

 Starting off with something every chef needs, a good set of knives. If you've ever listened to your chef-y friends talk then you know that with a proper knife there's almost nothing you can't do. On the other hand, if you're stuck with a poor quality knife, you're constantly having to sharpen it before you ever start to work.  This Wakoli 3 piece Damascus steel knife set is a fantastic gift for the favorite chef in your life. It comes with a 9-inch Santoku knife, a 7-inch Santoku and then a 5-inch paring knife.  If you want something that serves as both very pretty and a will be used for decades to come, this is a good bet. 

Price: $120

Next up we've got something that hits both 'cute' and 'useful' marks on your list. A set of Matryoshka dolls that serve as measuring cups. The dolls are made of white pressed plastic, and stack together when not in use. They range from 1 cup at the largest and each doll 'half' steps down by 1/4 cup. Absolutely adorable, easily stored and they can flavor to your kitchen. These might be perfect for a young nice or nephew who is just getting started in the kitchen or someone who loves cute things, but also practicality. 

Price: $13 

Think about the nonstick pans that you love. Now think about all the times when you're in the middle of cooking and you accidentally grab a metal spatula instead of a silicone one. By adding a few more tools to your kitchen and keeping them closer to the stove, you can fix that.  This set comes with 2 spoons, 2 spatulas, 1 jar 'spatula' and a brush for sauces, glazes etc.  It's also available in several different color options, and comes with a steel core so that it'll be more durable than some of the other silicone tools you can buy. 

Price: $20 


If your favorite chef is a lover of different spices, this can be a great gift. A stainless steel spice tower with solid glass jars, to make it easy to look at the different spices, as well as being clearly labeled.  This spice tower spins in place and easily holds of 20 jars of their favorite spices. The company also offers a 5 year spice renewal program. You can purchase the tower and register it with them and for 5 years you get free spices, all you have to do is pay shipping. It's two gifts in one, unlimited spices and a place to store them.  

Price: $50 


Following hard on the heels of our last gift, this one is a bit.. different. It's a label maker. For those of us that love cooking and baking you can end up with all sorts of unlabeled jars. You have friends that give you jars of spices from around the world, you experiment with different combinations, and sometimes labels just fall off. Then you're left staring at a jar going "I know I put some nutmeg in here, and I can taste a little anise, but what the heck is that third one?" Enter the label maker. Now it's easy to label your jars and you're not going to mix up your poultry seasoning with your baking spices. (Yep, we've done it. That's what happens when you don't sniff an unlabeled jar and just toss it into the pot instead.) 

Price: $35 


For the coffee loving chef in your life, you might consider this gift. An easy-to-use grinder that can handle enough beans for 12 cups of coffee at once. The center chamber is removeable to make for easy cleanup and pouring. You can also use it for spices if you prefer to grind your own before use.  And at this asking price, you could even go so far as to buy 3. One for you, one for coffee and one for spices! 


Price: $17

Sometimes you don't want to fight with finding the 'right' spot on your stove for your frying pan. You want to turn it on and get cooking. You also don't want to deal with food sticking to the pan and becoming scorched. Both of these problems are solved by the BELLA Electric Ceramic Skillet. It's able to heat smoothly and consistently in a way that your stove usually doesn't and keep food from sticking to it. You can use it to saute, fry, roast and steam, all without having to argue for space on your stove. Using the skillet also means that you can use it for a main dish while you use your stove to cook sides of your meal. Alternatively, this could be used if you're in a tiny home without much of a kitchen. 

Price: 35


If you're looking to find out what all of the fuss is over air fryers, this might be a good place to start. Not only can you use it for everything from frozen foods to donuts (fresh donuts! At home!) but you can also try it out for a wide variety of different recipes from everyone's favorite food & craft site, Pinterest. While this is a  slightly more expensive model, it's well worth it when you can cook 6qts of food in one go rather than having to do batch after batch. 

Price:  $120

What's worse than having to wait for your kettle to boil so you can wait to brew tea? Having to wait for that perfect cup of tea for whatever the day has thrown at you? Nothing. Nothing is the answer we're looking for.  Fortunately, this electric kettle from Mueller can help. Able to hold 1.8 liters or a little over 7 cups, it's perfect. It boils quickly, auto shuts off, and has 'boil-dry' protection. (Tell us you haven't accidentally turned the stove on without checking if there was water in the kettle at least once. No? We didn't think so. We get it though.) Best of all, there's no frustrating cord to fight with. The kettle sits on a plate that heats the water inside it, and can be removed and carried wherever you need once it's come to a boil. We'll take two. 

Price: $35 


For those of us that are coffee drinkers, whether that's solely coffee or in addition to tea, we've got a lovely French press maker. Made of borosilicate glass just like the electric kettle, the Cafe Du Chateau press also comes with a 4 level filter to ensure that you're only getting coffee in your cup.  Capable of brewing 34 oz of delicious coffee at a time, the French press is something that many coffee lovers swear by.  Plus, if, somehow, there's an issue with your press? Cafe Du Chateau will replace it. 

Price: $25


IF YOU WANNA SHRED MEAT LIKE THE WILD ANIMAL WITHIN, you should look at getting these lovely claw-shaped meat shredders. Great for making pulled pork LIKE A BEAST or just adding a bit of fun and ease to the cooking process, these will surely find a home within any barbecue master's kitchen. We love them because you can shred the meat more easily than trying to do many tiny shreds using a pair of forks. 

Price: $12 

If you want to have a nice, melted cheese to put on your food after it is cooked, rather than melting on during the cooking process, this is an excellent option for you. Offering a small pan that will accommodate 2 standard cheese slices side-by-side, this will allow for you to get your cheese to just the right consistency before putting it on your food.  And if you don't want to just use a slice of cheese? You want to mix your cheeses together? You can go for that too. Just make a small mound of the mixed cheeses and let them melt together. 


Price:  $10  

If you're still looking for Christmas gifts, we suggest booking an appointment for your loved one to have one of our technicians go over all of their appliances. Showing you love them by taking care of their favorite space, is a great way to show that you pay attention, and it will also make it so that any problems that might be there can be caught before they cause major trouble for the favorite chef in your life.  To set up an appointment you can call us at ((214) 599-0055) or go to our website to set up an appointment


Lets Talk Turkey In EVERY Method

Yeah, we know it's overdone, but how often do we get to use such a fowl pun?

Cooking methods

  • Slow Cookers (breast or small roast)

  • Instant Pot (breast)

  • Air Fryer (breast)

  • Convection Oven (whole turkey)

  • Traditional Oven (whole turkey)

  • Deep Fry (whole turkey)


Have you ever wondered what the differences were in how to cook a turkey in your kitchen? We did. So we took all the different ways we could think of and tried them out.

Before The Cooking Begins

Before you start cooking your turkey, we advise taking a few steps. First off, how much turkey do you actually need? Are you doing a whole turkey? A small one? A large one? What about just getting pre-sliced turkey? (For those of you that are skipping the turkey altogether, we aren't really sure we can help with that. At least not in this post.) Unless you're looking at doing a turkey eating contest, estimate roughly 1 lb of turkey per person at your gathering. So if you've got 20 people, get a twenty-pound bird.  If you want to be able to make all sorts of delicious leftovers, estimate at roughly 1.5 pounds of bird per person. 


Thawing a frozen turkey isn't actually that difficult. What matters is that you plan for it leading up to the day you intend to cook the bird. There are three methods you can go about thawing it, depending on the size of your bird. For all of these, we advise making sure the bird is still fully wrapped in order to prevent the spread of germs.  You can thaw it in the fridge for several days prior to Thanksgiving. You can thaw it in the sink, changing out the water every two hours or so. You don't want hot water for this or else the turkey will start to cook. Instead, shoot for lukewarm to slightly cool. Your third option is to use your bathtub as an oversized sink, in the event that you have a very large bird or you're cooking multiple different turkeys. For this one, we strongly advise bleaching and scrubbing the tub both before and after you use it. Again, keep your water lukewarm to slightly cool. The good news is that you won't have to change the water during the thawing process. 


Once you've got a fully thawed bird, it's time to remove the giblets. These are going to be the various organs from the bird. Sometimes they'll be bound together into a small bag, other times you'll need to remove the pieces from either the interior of the turkey or from the neck. You can save or toss these as you prefer. We think they're great for stocks and gravies.  Now pat the turkey dry inside and out with paper towels and set it aside for the time being. 


Now that we've gone through the uniform bits of preparing your turkey, it's time to consider the different ways you might want to cook it. (Admittedly we hope that you'll read the whole article prior to doing the prep, but it is up to you.) 


Slow Cooking That Turkey 

If you're looking at a small bird or a turkey breast, a slow cooker is a  great way to go. You should be able to feed about 8 people with one slow cooker, depending on the size you have. You'll want to mix together the seasonings you intend for the turkey along with water in order to give the turkey plenty to soak up. You can also use different soup mixes if you want to get creative.  One that we've seen suggest is actually French onion soup, or an au jus mix. Your cooking time for this should be about 6-8 hours on low. To check for doneness you're wanting the internal temperature to be 155-160. We know it's supposed to be about 165-170 but, your turkey is going to continue heating after you remove it from the oven. So, look for that temperature, that the turkey has soaked up the juices and the meat is tender. 

A slow cooker is going to result in very juicy, tender meat.


Instant Pot, Instant Turkey? 

Now, the instant pot is obviously not going to fit the entire turkey. For that reason, you're better off using a turkey breast in there rather than trying to figure out if you can fit the whole bird in there. Again, this is going to be a very good for a family gathering  8 or less. Start by putting oil on your turkey. Pat or rub it down, rather than just pouring it on. You can use any oil you find is tastiest, but we suggest either sunflower or olive oils. Now rub on your spice mix of choice. 

With all of that done, pour roughly 1/4 cup of water into the instant pot alongside the turkey breast. Now start the pressure cooker for 25 minutes and use the time for doing something else. When the time is up wait for the full pressure release and allow the turkey breast to rest for 10-15 minutes before you start carving. 

Using an Instant Pot for your turkey is still going to give you a very juicy meal, but it’s not going to be as tender as the slow cooker. 


Air Fryer... for a Turkey? 

We don't quite get why you might want to fry your turkey, but hey, an air fryer might make it slightly healthier? Slightly? Eh, we don't judge. This is still an entirely valid method of making a turkey whether it's just for you or if you're looking to do custom spice blends for different family members. 

These are ideal for 1-2 people at 1-2 pounds of turkey breast. Start by rubbing down your turkey with the spices of choice. Be generous with them and really coat the outside of the turkey.  Put it in for 30-35 minutes at 390*F. Once again you're aiming for an internal temperature of 160*F, but you're not going to have much in the way of continued cooking once you take it out.  Once the air fryer is done, take out the turkey, plate it up and let it sit for 15 minutes before you dig in. 

We’ll point out that this is for using our method. You might have different results if you try a different route or add other elements to the recipe. For this turkey though you’re going to end up with nice, crispy skin with a fairly standard poultry texture to the meat. 


Convection Oven 

A convection oven is much larger than anything we've dealt with up till now. What that means is that you can get creative! You can cook a whole turkey, you can cook several different 'cuts' of turkey or you can do several different varieties of just say turkey breasts. It's up to you,  Fortunately, you can also go back to the 1 lb of bird per person rule, without having to worry that you'll have to do multiple rotations of cooking to feed everyone. 

 Start off by preheating your oven to 350*. Now move your bird over to the roasting pan and grab your favorite spice mix and some oil. Again, you can use whatever type you prefer, we like sunflower because it doesn't add anything to the taste of the bird. Once you've rubbed down the bird with oil, rub in the spice mix you've chosen. Depending on the spices in question you might for a light coating or decide to add a really solid crust to the bird. Once you've got your turkey prepped, it's time to toss it into the oven for 2 - 2.5 hours. You can baste it using the juices or some chicken broth during the process, or you can choose to leave it alone. Either way, you're going to want to use a thermometer to check the temperature of the thigh to figure out when the bird is done. Once the thigh has reached 180* internally, you're good to go. Again we advise letting the bird rest for 15-20 minutes prior to carving it up in order to seal in the flavor. 

At some point you’ve likely had a turkey cooked in a traditional electric or gas oven, this is going to give you a very similar result, although the skin should be slightly crispier. It’s going to still be more tender than a chicken though. 


Traditional Oven….We’ve got nothing for this one. (Leave your suggestions in the comments!)   

Much like the convection oven, you can cook everything up to a whole bird with your traditional oven. You're really only limited by the size of the turkey compared to the internal space of the oven. It's great! Make sure to do a comparison beforehand this way you don't end up with more bird than your oven can handle.  Once again we're sticking with the 1lb of turkey per person, or 1.5 lb if you're wanting to send people home with leftovers. 

This time you'll be preheating your oven to 325*, a lower temperature to allow the turkey to stay nice and juicy. Move the turkey over to the roasting pan and grab your oil and spices. Rub in the oil and then crust your bird to your desired level of spices. We think a nice thick pepper crust is a great way to do a turkey. Once you've done that, grab some tin foil and make a tent for your turkey. You don't need it just yet, but you'll want to ensure that the turkey doesn't end up burning in the last half hour to an hour of cook time. Set that aside for now and pop the turkey into the oven. 


Once again you want to use the thickest part of the thigh to see if the turkey is done. This time you're looking for a range between 165 & 180 when it's done. A good technique to use is to cook the turkey for two hours, check it and if it's not hot enough at that point, to baste it, close it back up and set it for another thirty minutes.  Once the skin has turned a golden brown, that's the point when you put the tin foil over top of the turkey. Make sure that you're not closing the sides, you still want the air to flow through and for the bird to cook. 


When it's done, remove the turkey from the oven and allow it to sit for 10-15 minutes. 

A traditional oven-roasted turkey is going to result in the most ‘traditional’ flavor. It’s going to be juicy if you treat it right, and the skin is going to be softer than the convection oven. 

Deep Frying The Turkey -

 When you want the really  crispy skin 

We're going to start off this section with a warning. Please read all instructions thoroughly before you do this.  It's a wonderful method for cooking turkey we know, but every year hundreds of people end up injured and at least 1,000 fires are started. It's a delicious way to cook the turkey, but we want all of you to be safe as well. 

You're going to want to use a turkey that's between 10 and 20 pounds for this. Make sure that your turkey is completely thawed before you even consider filling the pot.  Once you've guaranteed that, place the turkey into the pot and fill the pot with water.  Fill up until the water is one inch below the top of the turkey. That's the line you're going to want to go to when you fill the pot with oil later. If you fill the pot over the top of the turkey your pot is likely to boil over during the cooking process.   If your pot cannot hold all of this, you do not have the right size pot. Please consider a different method of cooking. 

If you do, remove the turkey and pat both it and the pot dry.  Back to the turkey, grab your spices or marinades, and cover your turkey. Now grab some butcher's twine and tie the legs of the turkey together and attach those to the stand that came with the fry pot.  Once you've got the turkey and the stand situated into the pot, fill the pot with oil up to the line you noted earlier.  We suggest using oil with a high smoke point like canola, corn or soybean.  Grab the thermometer that came with the pot and attach that to the fryer. Bring up the heat slowly to 350* F. 

Once you have your oil at 350, slowly and carefully raise and lower the turkey several times in the oil to seal the juices into it. We suggest 3-4. It's going to be a messy process so gloves and an apron might be useful.  Once you've sealed the turkey, lower it back into the oil and leave it there. You're going to want to cook it for 3 minutes per pound of turkey. So if you've got a 10-pound turkey you're looking at 30 minutes of cooking time. Not bad in comparison to the other methods. 

When you're checking for doneness, again look to the thickest part of the thigh. This time you want an internal temperature of roughly 180* to 190* F. Make sure to slowly and gently lift the turkey out of the oil so you don't get splashed. 

Let the turkey rest for 10-20 minutes before carving. While you're waiting on that, go back to your fryer and turn off the heat.  Now cordon off where you have it for the next three hours at minimum before you try to move the pot or dispose of the oil. After that point, you can carefully check to see if it's cool, and if not, leave it alone for another hour. 


This is the method to use if you really like your crunch. The skin is very ‘crispy crunchy’ without being burnt or charred. The meat isn’t as tender as other methods, but that’s sort of the point? 


Although we've given you the basics on how to do this, we do also advise this article from Butterball for a more in-depth article. (How To Deep Fry A Turkey | Butterball®)


So, what do you think? What's your favorite method of years past for cooking a turkey? Are you going to try something new this year? Let us know in the comments below or over on our Facebook page, we always love to hear from you! 


If you've ended up here because you tried to clean your oven prior to the big meal and found out that your oven devoured itself, it's ok. We can help. Give us a call at ((214) 599-0055) or send us a message through our contact page and we'll be happy to help.


Additional Reading 

Self Cleaning Ovens

How To Prepare Your Kitchen For the Holidays


That is a delicious looking spread, and it’s definitely a traditionally roasted turkey. It’s harder than you might think to find good photos of the other methods of cooking.