How To Prepare Your Kitchen For The Insanity Of The Holidays

Appliance Rescue Dallas McKinney Frisco Plano Coppell  Allen Richardson Addison


It's that time of year again, when we're running around trying to figure out where the roasting pans went to and how is it that Aunt Marge makes her spinach balls. The worst nightmare that any of us can encounter is to have one of our appliances break just days before we're due to have a house full of guests, but we see it every year. You have 20 people coming and in trying to get the house clean, you decided to let the oven or the dishwasher clean itself, and now it's not turning on. Why not save yourself the hassle and check at the beginning of the month to make sure that everything is working as it should? Follow our guide and you can bet that your holiday will go that little bit smoother.


Yes you're going to want to clean all of your appliances the same way you do the rest of your house, but taking a few minutes to look closely at these different areas can save you a headache as we get closer to the end of the month.


Has your refrigerator broken?

Can Your Fridge Breathe?

-Cleaning out your fridge isn't just about getting rid of last week’s pot roast and making room for all of the ingredients. It's also about making sure that your fridge and freezer have enough circulation. Make sure that your fridge has space and that containers aren't shoved into the corners never to see the light of day again.

-While you're at it, take a close look at the seals on the doors for your fridge and freezer. Are they still closing right? Are they dried or rotting?

-When was the last time you changed your air or water filters? With opening and closing your fridge more often in the coming days, these filters are going to get a workout. If they aren't clean you'll end up with ice and water that tastes "off" as well as leaving your fridge struggling to cool down.


All three of these work together to ensure that your fridge can get cool, stay cool, and keep that cold air locked inside and your food from going off well before the expiration date.


Self Clean Button Breaks Ovens

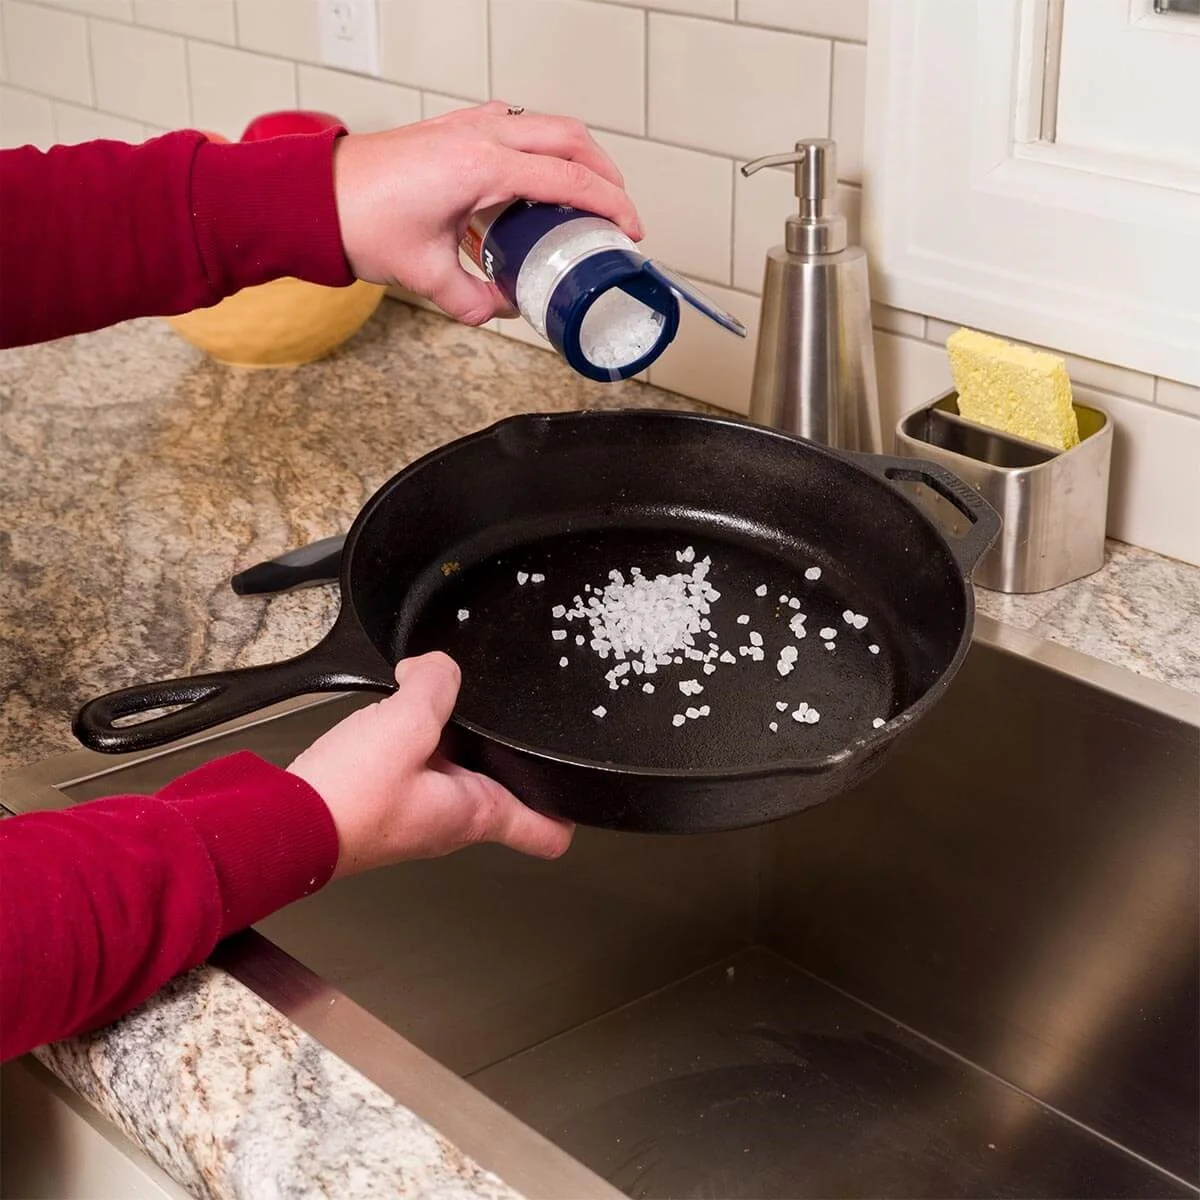
Step Away From The Self-Clean Button!

No, we mean it. The self-clean button, especially on older models, is far more likely to make it so that your oven never turns on again. The function works by turning the heat up far higher than you'd normally cook at to burn anything within to ash. Which is well and good, but it means that it's all too common for those same temperatures to damage your heating elements or electrical wiring as well.

-Instead, consider using this method. It takes elbow grease, but it won't break your oven nor is it going to require harsh chemicals.

  • Start by removing all racks from the oven and sweeping out any debris.

  • From there you can mix together a paste of 1/2 cup of baking soda, and three tablespoons of water.

  • Spread that on the inside of your interior while making sure that you keep it off the heating elements.

  • Let it sit overnight or for a minimum of 12 hours.

  • From there you can wipe it down with a wet washcloth, making sure that you get rid of all of the paste.

  • Then spray vinegar into corners and creases to get rid of any residue. Repeat these steps until your oven is clean as new!


-Is your oven heating properly? If you've had to round up or down from what a recipe said while you were cooking, you might need to consider that it's not. You can get an infrared thermometer to test and find out if things are working as they should. If not, it could be that the heating elements are beginning to go. While this is one that can be 'worked with' at least temporarily, it is an important thing to keep an eye on as it can quickly go from "workable" to "dead."


Burners Destroyed Rusted Igniter Broken Gas Electric Coil Heating Element

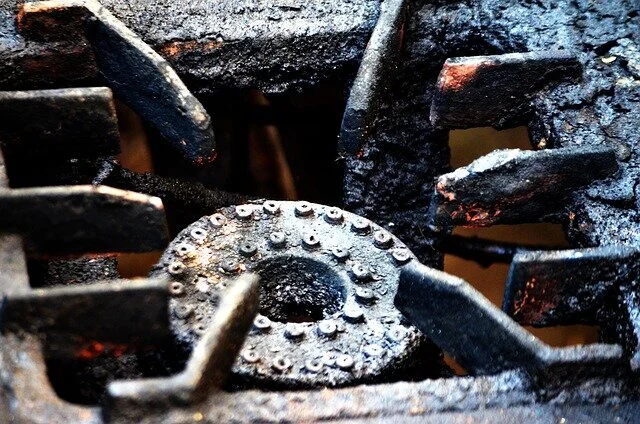
Is Your Stove Hot Enough?

When you're cleaning your stove, take the time to inspect both the burners and the ignition sources.

-If the burners are rusted they aren't going to transmit heat evenly. (We've had it happen that one half of a pot burned while the other half ended up under-cooked.)

-The ignition sources are a quick check, but equally important. Give them a few clicks and see if they're firing properly. If not, it might be time to get them replaced.


Dishwasher broken dirty filter

Is Your Dishwasher Running?

Jokes aside, after you've been cooking and enjoying time with family, you don't want to do dishes. And saying you don’t want your dishwasher to break is a bit like saying you don’t want a bone to break. Now is the time to make sure that everything is as it should be.

-Is it draining properly?
-Are the filters at the bottom of the dishwasher clean of debris?

-Is it leaving a residue either of food or soap when the dishes come out?


Once you've gone through and made sure that everything is running as it should be and still in good repair, it's time to dig in and start cooking!


If you find out that any of your appliances aren’t working properly, now is the best time to find out so that you can call in a professional to take a look. It's better to find out now than the night before you're due to have a house full of guests, or worse when they're on the way! What about you? What do you do to get your house ready for the holidays?

Garbage Disposals : What Can You Throw Down Them?

I feel like there is a misconception on what can and can’t go down a garbage disposal. I currently live in a home that is extremely old. Not saying all the appliances in my home are, but some just may be. I made the mistake of throwing meatloaf down the disposal, had it back up, and nothing would drain after that! My landlord had to come and it was a complete disaster. Long story short, I learned my lesson and am super cautious about what can go down there! But the question is, what can’t go down it? Well, we are here to find out!


1. Bones :

I feel like this one just makes sense, but hey I guess you never know! Bones will never grid up in the disposal and will always continue to spin around and around down there! Not to mention, it would clog the pipes up tremendously!

Bones.jpg
 
Celery.jpg

2. Celery :

You may have thought that this was okay to throw down the disposal. I did too! But apparently, with celery being as fibrous as it is, with all the stringy textures it has, it is impossible for you to throw it down the disposal. They will get tangled around your blades, leaving a huge mess! You don’t want that!


3. Coffee Grounds :

This one really caught me off guard! You would think that it will eventually dissolve and what not, but, it is the complete opposite. The grounds will turn into a sludgy mess, clogging your pipes!

Coffee Grounds.jpg
 
Eggshells.jpg

4. Eggshells:

Growing up, my mom always threw egg shells down the drains. So, as I began living on my own, I totally thought this was normal to do. Apparently, we were both wrong! The eggshells have that membrane lining that will stick to sides of the disposal, resulting in a messed-up shredder! Other people say it is completely fine! I guess that this is one that should just be left for your best judgement! 

 
Fruit Pits.jpg

5. Fruit Pits:

This one goes along the same guidelines as bones. The pits are extremely dense and will never shred. Your blades and disposal will completely break before every starting to grind down. This one just is not going to work.

 
Grease Oil.jpg

6. Grease/Oil :

This was one I have always known about, even as a little girl. But why? It’s a liquid, so why would it clog anything? The oil will simply clog your pipes because of the composition of the oil. No, I am not a scientist of foody that can explain to you the composition, but I do know that oil and water don’t mix. Therefore, I would not try allowing oil to go in the drain, that is supposed to be draining water.


Pasta Rice.jpg

7. Pasta/Rice :

This one is a must-not-do. For sure. As we all know, when cooking pasta or rice (any starchy substance) It expands as it cooks. Therefore, if you put pasta down the drain, it will continue expanding, eventually taking up the whole drain. The same as rice!


Who knew that there were so many things that need to be thrown away, rather than down the drain. All I know is that I never want to take a chance on the integrity of my disposal! However, if you ever run into an issue with your disposal, please give us a call to come check it out! We are always available! 


List Provided By Delish


The Ultimate Guide to your Dishwasher

Honestly, as a consumer myself, I never really think about the quality of a dishwasher. I mean sure, you want it to do the best job possible when cleaning dishes. However, there is so much more that goes into a dishwasher we do not even think about! This guide here will lead you to getting the perfect dishwasher for you and your family!

built in.png

Task 1: The Style

Picking out the perfect dishwasher comes with many decisions. There are three main styles of dishwasher to choose from: countertop, built-in, or drawer. Let's dive a little deeper into what each of these three looks are like. 

  • Countertop: This is one style of washer I do not think I have ever seen before but is in fact a real thing! These dishwashers sit on top of the counters and simply plug into the faucet lines. Pros to this would be how convenient they are if you are someone who moves around a lot. A con to this would be how much space it takes up on the counter itself.

  • Built-In: This is the most common style of dishwasher we know. This would be your standard washer that slides into a spot within your cabinetry, and the drop-down door style to it. However, these do need to be attached to your main plumbing water line. However, that is a super easy set-up!

  • Drawer: This one is very similar to the standard style of built-in dishwashers. They sit within your cabinetry; however, the door style pulls out like drawers. Almost like a garbage compactor. Love the idea of this!

controls.png

Task 2: The Control Panel

This is also something you never think about until actually shopping for a dishwasher. However, it is something I have noticed is important! The control panel is here all of your buttons will be located. Personally, I have a dishwasher with all the buttons on the top and I love that!


  • Fully Integrated: This is the type of I have! All the buttons are located at the top of the dishwasher, hidden for a much sleeker appearance!

  • Semi-integrated: This dishwasher has some of the buttons hidden, and some of them showing. This includes the handle to the dishwasher as well.

  •  Full-Console: This dishwasher has all of its buttons located on the face of the dishwasher. This is the most common layout of dishwashers there are!

Task 3: Special Features

For me, anytime I purchase something I always am looking at what kind of special features it may have. When doing some research, I found out that so many dishwashers have some cool things they can do! This includes things such as

  • Adjustable racks

  • And added 3rd Rack

  • Specialty Cycles (Half Wash, Delicate, etc.)

  • Plate Warmer

And so much more!


The overall message here, is that there is so much research and investigating that goes into purchasing a dishwasher! This guide here has a lot of information but is not limited to the many more features you should look into! And if in case your dishwasher doesn’t seem to be working right, call Appliance Rescue Service in your area today to get a service call set up! We are never too busy to take your calls!

Kitchen Updates

Nothing good lasts forever, and that includes the appliances and equipment that you may have already replaced during recent kitchen updates. While your kitchen will look gorgeous when everything is brand new and state-of-the-art, that shiny new look doesn’t last forever. Sooner or later, you’ll need to invest in replacements or repairs to keep everything up to par.

When contemplating kitchen updates, it’s important to understand that even if you think functionality is still intact, there may be issues lurking under the surface. Here’s what you need to know about maintaining the state of your kitchen.

Kitchen Updates.jpg

When Do You Need a New Dishwasher?

Replace As Needed – Every 10 Years at the Latest

For many households, dishwashers are indispensable, providing a valuable way to reduce post-meal tasks and improve overall cleanliness. However, dishwashers get old, break, and need replacements during kitchen updates, just like any other appliance.

Modern dishwashers are designed to last around 10 years, but if you start seeing these signs of wear and tear issues before that point, it may be time to invest in a repairman or a new dishwasher:

·         Rust on the exterior that can indicate a water leak that isn’t necessarily visible

·         Standing water in your dishwasher, indicating a serious clog

·         A door that doesn’t properly latch or lock

·         Cold dishes following a cycle

·         Cracks or damage to the door or frame

·         Leaking water on the floor under the unit

·         Dishes that are spotty or dirty after a wash cycle

In some cases, a repair or parts replacement can fix these issues, but most of the time, a full replacement is the best option. Replacing a dishwasher will increase energy efficiency and improve the quality of your kitchen cleaning endeavors.

How Long Do Refrigerators Last?

Replace As Needed – Every 10 Years at the Latest

It’s hard to imagine living in a modern home without a refrigerator, which is why prompt repairs or replacements are so important. When refrigerator parts are on the fritz, it can cause plenty of issues, including ruined food, wasted money, and the risk of bacteria development, which can cause food poisoning such as salmonella.

The average lifespan of a refrigerator is about 10 years, but these signs can be indicative of a need for a timely replacement:

·         Excessive condensation; in some cases, this can be remedied by a new door seal

·         A motor that runs too hot

·         Food that spoils faster than normal

·         A freezer that is far too cold and leaves an ice buildup on items or causes freezer burn

·         Excess energy use with no changes in habits

·         A loud motor

·         Uneven cooling, including freezing within the fridge space

It’s not uncommon for attachments such as ice machines or water filters to break after three to five years. If you live somewhere with a hot climate, it’s crucial to stay up to date with these smaller repairs. However, if your refrigerator has broken parts and kitchen updates are a priority, a full replacement may be the best option.

When Is a New Stove Essential?

Replace Every 10 Years at the Latest

Cooking is virtually impossible without a functional stove or oven, but this stable kitchen appliance doesn’t last forever. If you are in need of a new range, these tips can guide your decision between replacing and repairing.

Like most kitchen appliances, a lifespan of 10 years or more isn’t uncommon. However, if you’re seeing signs of trouble and your stove is more than a decade old, replacement is most likely the right choice, especially if:

·         The glass is cracked

·         One or more burners won’t light, or won’t heat up properly

·         The oven heats unevenly, with particular areas heating faster than others

·         Preheating takes longer than usual

·         Burners are uneven

·         There is a strong smell of gas in gas units, indicating a potential leak

Even if a repair is possible, it may not be worth the investment. If the cost of the repair is 50 percent or more of the cost of the unit, it’s time to take on something new.

Timelines for Counter tops and Cabinet Installation

Update Every 10-15 Years

Despite common perception, counters and cabinets aren’t meant to last forever. After excessive use, counters wear down. Eventually, cupboard doors don’t close properly and shelves begin to buckle and bend. Every 10 to 15 years is generally the recommended time frame for a full kitchen remodel. Whether the functionality of your kitchen isn’t meeting your needs, or you simply want an updated look, it may be worth considering a kitchen remodel.

Counter top Replacement

While the functionality of cabinets can actively disturb storage and the protection of your cooking utensils, counter tops rarely interfere with function, no matter how old they are. However, the look and feel can decrease the value of your cooking space, and it’s possible for cracks to hold bacteria before any kitchen updates. If your counter is cracked, stained beyond repair, has any signs of structural problems, or simply looks outdated, it’s time for a counter top replacement.

Cabinet Installation

Unless your cabinets are significantly newer than your counter tops, it’s recommended to replace both at the same time, with cabinet installation taking priority. When cabinets are installed first, you can be sure new counter tops will fit around or on your new cupboards and will not be damaged during the process.

Kitchen.jpg

 Replacing Microwaves and Small Appliances

Replace As Needed – Every 5 Years at the Latest

Unlike large appliances like refrigerators, stoves, ovens, and dishwashers, most smaller appliances won’t make it to a decade of life. As such, you may need to replace things like microwaves on a more accelerated basis.

Microwave

Your microwave should hold up for at least five years, but inexpensive models may only give you a year or two. Signs like smoke, sparks, burning smells, improperly cooked food, suspicious sounds, and trouble with controls often mean it’s time for a replacement.

Microwaves can be repaired, but the cost is often not worth it. When in doubt, a new microwave is generally a better deal, with prices averaging around $100 or less–a steal compared to larger appliances.

Toasters

Toasters and toaster ovens can be important for convenience and easy cooking, particularly for meals that don’t necessitate the time commitment preheating the oven requires. However, like microwaves, these items aren’t meant to last longer than around five years of regular use, either. If you see sparks or smoke, experience uneven cooking, or smell strong metallic scents, it’s time for kitchen updates and potentially a replacement.

Stand Mixers

Stand mixers can make baking fast and simple, but they’re big investments. As such, most people are hesitant to drop cash on a replacement. Little things, like worn gears, may require simple parts repairs that you can do yourself, but bigger problems, like cracked stands, power troubles, or strange smells, usually entail a new unit.

Before jumping the gun, be sure to check the warranty. Some units may come with long-term protection that you can use to minimize or eliminate the cost or a replacement.

How Long Do Spices Last?

Between 1-5 Years

Spices are a staple in any kitchen, but contrary to the habits of standard home cooks, spices don’t last forever. Even though spices are generally dried and intended to be preserved, they do come with an expiration date. Here are a few guidelines for how long spices last:

·         Whole spices should be replaced every four years

·         Ground spices should be replaced every two to three years

·         Herbs should be replaced every one to two years

Spices don’t actually spoil and are unlikely to make you sick, but they do lose flavor and effectiveness, compromising the food you cook.

Common cooking oils, like olive oil or canola oil, should be replaced every one to two years. In theory, white kosher and sea salt will last indefinitely, but table salt should be replaced every five years.

When to Throw Away Non-Stick Pans

Replace Every 5 Years

Pots and pans, particularly non-stick varieties, do need to be a part of your regularly scheduled kitchen updates. Based on the chemicals used to manufacture the non-stick surface, non-stick pots and pans shouldn’t be used for more than five years. If there are any scratches or the surface begins to peel, replacement should be expedited.

A great kitchen has a lot to offer your quality of life and your diet, but maintaining functionality means proper replacements. From broken appliances to outdated counter tops, it’s up to you to keep your kitchen in perfect working order.


10 Crazy Dupes for Household Cleaning Supplies

Have any of you ever tried to clean your house BUT realized that you were on your last leg of that Windex?? No joke, I used to be that broke college student who couldn’t even afford to purchase all the cleaning supplies I needed! I would literally use these dupes to clean my house. Have no fear!  These awesome dupes that cover your butt in case of emergencies


Homemade All Purpose Cleaner

Spray Bottle

½ cup of vinegar

2 tbsp baking soda

Tea Tree Essential Oil

Eucalyptus Essential Oil

Homemade All Purpose Cleaner.jpg
 
Homemade Window Cleaner.jpg

Homemade Window Cleaner

Spray Bottle

½ cup of white vinegar

1 tbsp cornstarch

2 cups of water

Lemon essential oil

Grapefruit essential oil


Clean Rust off a Cast Iron Skillet

1 tbsp of course salt

Lemon juice

 
Natural Toilet Bowl Cleaner.jpg

Natural Toilet Bowl Cleaner

Spray Bottle

⅓ cup liquid Castile soap

2 cups of water

2 tbsp baking soda

Lemon essential oil

Eucalyptus essential oil

Lavender essential oil


Microwave Cleaner

Bowl

Warm Water

Lemon juice

Lemon rinds

Add lemon juice to the warm water, stir. Mix in the lemon rinds. Microwave for 5 minutes. Wipe down microwave after!

Microwave Cleaner.jpg
 
Furniture Refresher.jpg

Furniture Refresher

Baking Soda

Salt Shaker

Sprinkle all over your cloth-covered furniture! Vacuum later!!


Simple Soft Scrub

Baking Soda

Vinegar

Mix together and use on tub or shower!

SImple Soft Scrub.jpg
 
Oil Remover.jpg

Oil Remover

Room temperature Coca Cola

Pour over stain, leave overnight, blot the next day!


Need to clean under your fridge?

Take a hair trap cleaner, slide it under the fridge, and pull out all unwanted objects!

cleaning under refrigeraator.jpg
 
Car Wax.jpg


Make your appliances Smudge Free

Car Wax!

Add a light coat of car wax, allow to dry, and buff clean!